By: Pinakin Patel | Comments | Related: > SQL Server on Linux
Problem
As DBAs we migrate SQL Server databases across servers, from instance to instance and to newer versions. In this tip we look at how to migrate a database from SQL Server on Windows to SQL Server on Linux.
Solution
In this tip we will walk thru how to migrate a SQL Server database on Windows to SQL Server on Linux using Red Hat Enterprise 7.4 EC2 server instance. In part 1, we learned how to build and connect to an EC2 instance in AWS, in part 2, we learned how to install SQL Server on Linux, start/stop SQL server services, connect, and created database, tables and in this tip we will walk thru how to migrate a SQL Server database to Linux.
Hardware and Software Requirements
Before we start the SQL Server database migration to SQL Server on Linux in the cloud we need to build a virtual machine in the cloud and you can create a virtual machine in Azure or AWS. For this SQL Server database migration, I have built a Red Hat Enterprise 7.4 EC2 server instance in AWS, but you can follow the same steps to migrate your SQL Server database from Windows to Linux ether in the cloud or on-premises.
Step 1 - Take Database Backup on SQL Server on Windows
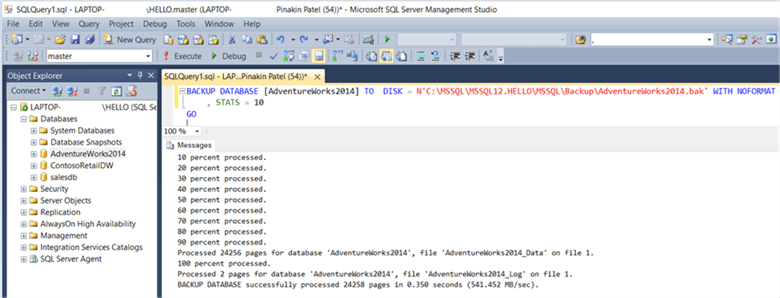
To migrate the database from SQL Server we will take a full database backup.
/* Backup SQL Database on source server */
BACKUP DATABASE [AdventureWorks2014]
TO DISK = N'C:\MSSQL\MSSQL12.HELLO\MSSQL\Backup\AdventureWorks2014.bak'
WITH NOFORMAT, STATS = 10
GO
Step 2 - Install Bash shell on Windows
To restore the database backup on SQL Server on Linux, first you need to copy the database backup file from the Windows server to the Linux server. We will transfer the database backup file using Bash shell (terminal window) running on Windows.
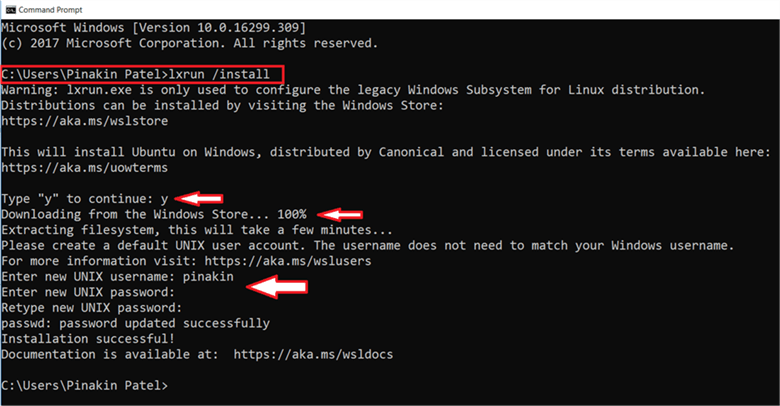
To transfer the database backup file first we need to install Bash shell on Windows. To install Bash shell we will run the below command from CMD command prompt.
/* install Bash shell on windows */
lxrun /install
Hit enter and it will start executing the command, type “y” to continue the installation. It will start downloading from the Windows store once the download is completed it will take a few minutes to install.
After the Bash Shell installation is complete, you need to enter new Linux credentials. Once the username and credentials are entered the installation will appear as "Installation successful!".
Step 3 - Copy Backup files from Windows to Linux
Now we will copy the SQL Server database backup file from the Windows server to the Linux server using the Bash shell. We will follow the below steps to copy the backup files.
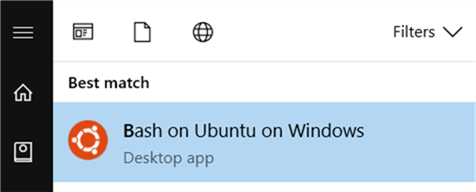
Open the application we just installed which is Bash on Ubuntu on Windows.
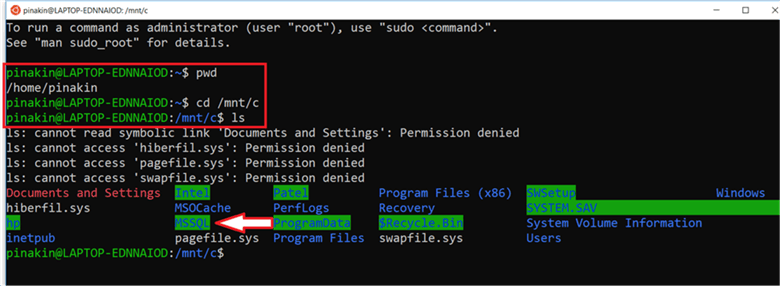
First, we will check the current directory we are in using this command.
/* see current working directory */
pwd
Now we will go to the root C: drive and get a list of contents using the following commands.
cd /mnt/c
ls
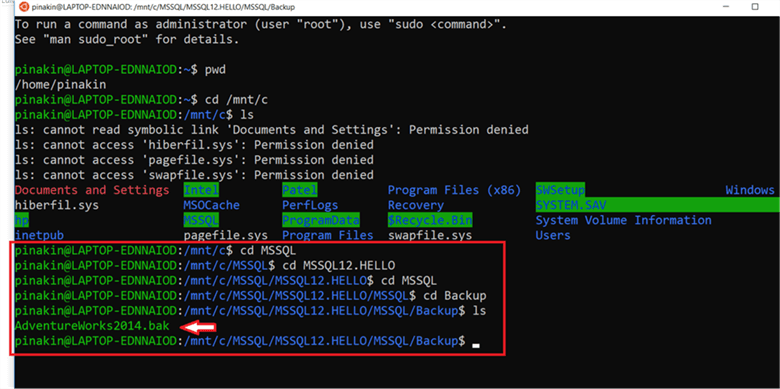
We are now in the C:\ drive directory and we can see the MSSQL SQL installation folder. We need to go to the backup directory.
We can use the following to go to the exact directory.
/* command to directly to backup path directory */
cd /mnt/c/MSSQL/MSSQL12.HELLO/MSSQL/Backup

Note: the default partition for windows (c:\) will be available within the bash as (/mnt/c).
As we are now in the database backup directory and you can see in the below image that AdventureWorks2014.bak file is available.
Now let’s go to the EC2 server instance using a PuTTy terminal session.
First, we will see if a backup directory exists on the Linux server, this is where we will copy the backup. If the directory does not exist we will create a new directory.
/* to verify the backup directory */
sudo ls /var/opt/mssql

/* to create the backup directory under the var/opt/mssql directory */
sudo mkdir –p /var/opt/mssql/backup
We created a backup directory under the var/opt/mssql directory and you can verify using the below command.
/* To verify the backup directory */
sudo ls /var/opt/mssql

Now let’s go back to the Bash shell terminal window and copy the AdventureWorks2014.bak file to the Linux server using a command like the following.
/* this is the syntax to connect and copy the file */
scp -i <.pem> <filename> user@IP:/<location>
We will use the scp command to copy the backup file to the target Red Hat Enterprise Linux 7.4 in EC2 instance server. In this command I am passing my authentication using a Pem file after that I am passing my username and IP address followed by the path where I am copying the backup file.
Below I will show two ways of doing the copy.
Method 1 - Copy backup file to the user home directory
/* we will run this command to copy AdventureWorks2014.bak file to Linux server */
scp -i /mnt/c/MSSQL/MSSQL12.HELLO/MSSQL/Backup/Win2016.pem AdventureWorks2014.bak [email protected]:/home/pinakin/
We executed the command with a Bash shell terminal session and it’s copying the AdventureWorks2014.bak file to the user home directory along with that we can see the percentage complete, transferred size in MB, transfer rate per second and the ETA to copy the file.


After copying to the user home directory, we will move to the /var/opt/mssql/backup/ backup directory using the below command.
/* we will move to /var/opt/mssql/backup/ backup folder directory */
mv /home/pinakin/ AdventureWorks2014.bak /var/opt/mssql/backup/
Method 2 - Copy backup file and move file
We executed the command thru a bash shell terminal session and it’s copying the AdventureWorks2014.bak file to the user home directory after copying to the user home directory it will move to the /var/opt/mssql/backup/ backup folder directory using below command.
Here are two different commands that will do the same thing. The first option uses scp and cp and the second uses scp and mv.
/*to Copy the file directly to home directory and /var/opt/mssql/backup backup folder directory */
scp -i /mnt/c/MSSQL/MSSQL12.HELLO/MSSQL/Backup/Win2016.pem AdventureWorks2014.bak [email protected]:/home/pinakin/ && ssh -i Win2016.pem [email protected] -t "sudo cp AdventureWorks2014.bak /var/opt/mssql/backup && exit && bash"


/* to move the file directly to the /var/opt/mssql/backup backup folder directory */
scp -i /mnt/c/MSSQL/MSSQL12.HELLO/MSSQL/Backup/Win2016.pem AdventureWorks2014.bak [email protected]:/home/pinakin/ && ssh -i Win2016.pem [email protected] -t "sudo mv AdventureWorks2014.bak /var/opt/mssql/backup && exit && bash"


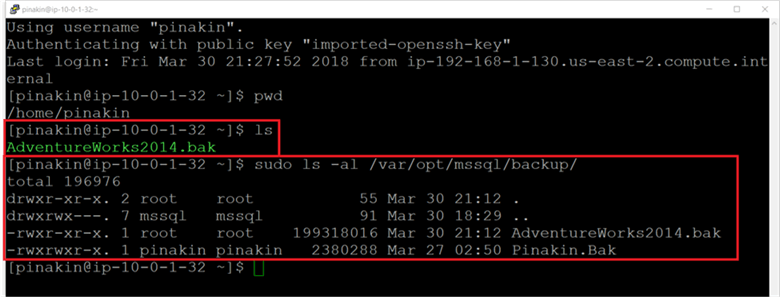
We can see the AdventureWorks2014.bak backup file in the /var/opt/mssql/backup/ backup folder
Step 4 - Restore SQL Server database on Linux
First, we will connect the Red Hat Enterprise Linux 7.4 in EC2 instance server thru a PuTTY terminal session. After connecting to the PuTTY terminal session, we will use SQLCMD to restore the database backup in SQL Server on Linux.
/* restore SQL database on SQL Server on Linux server */
RESTORE DATABASE AdventureWorks2014
FROM DISK='/var/opt/mssql/backup/AdventureWorks2014.bak'
WITH MOVE 'AdventureWorks2014_Data' to '/var/opt/mssql/data/AdventureWorks2014_Data.mdf',
MOVE 'AdventureWorks2014_log' to '/var/opt/mssql/data/AdventureWorks2014_log.ldf'
GO
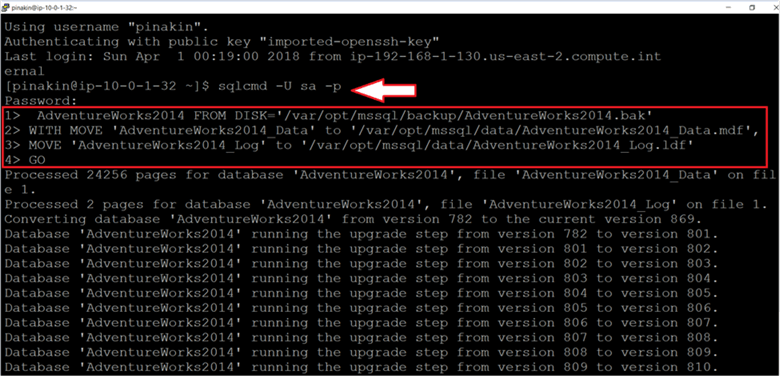

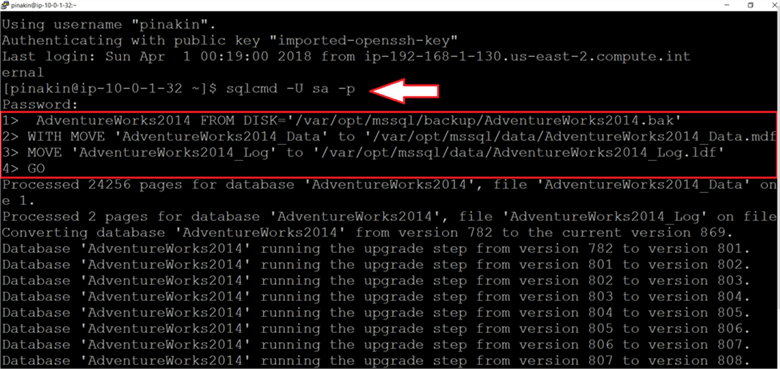
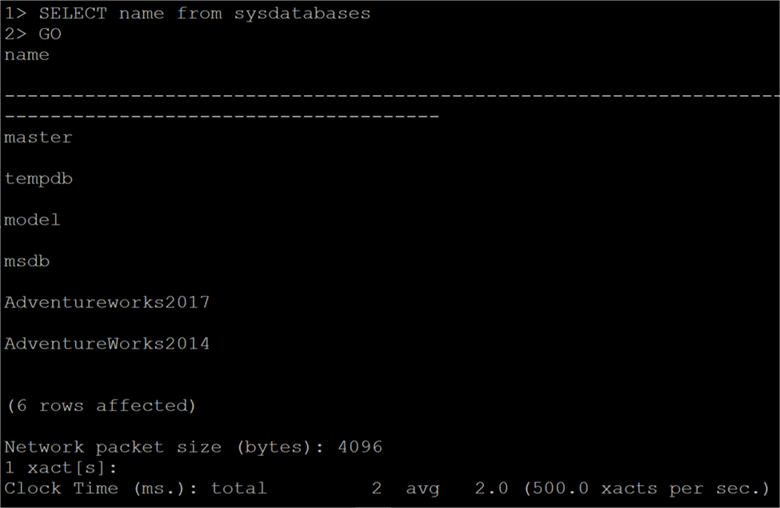
After the restore, we can use SQLCMD to show that the AdventureWorks2014 database is one of the databases on the instance.
Next Steps
In this tip we learned how to migrate a SQL Server database from SQL Server on Windows to SQL Server 2017 on Linux.
Check out these other tips:
- Setting up SQL Server on Red Hat Linux in AWS - Part 1
- Install SQL Server 2017 on Red Hat Linux on AWS - Part 2
About the author
 Pinakin Patel is a SQL Server Admin / AWS Solutions Architect with experience in SQL Server 2000 to 2016.
This author pledges the content of this article is based on professional experience and not AI generated.
View all my tips


