Problem
You are administering servers with SQL Server instances. Suddenly your phone starts to ring and at the other end of the phone is the software architect claiming that his applications cannot connect to the SQL Server instances you are administering. After digging a little bit he tells you that if he uses the IP address of the servers he is able to connect. It’s obvious that the problem has something to do with DNS settings. So, you fix the DNS issue on one of your servers and the software architect can connect to the database servers using the server name, but now you should apply this configuration to all your other servers. In this tip I will show you how it can be done using PowerShell.
Solution
If I have to bet on an issue every IT professional has faced, it will be a DNS related one; probably not only at work but even in your family environment. It is very common that people confuse a DNS failure and report that there is no network/internet connection. I remember one day, a major ISP provider in my country had their DNS servers down for a while and it was on the news. But what the news didn’t tell was that you can setup your network interface to use the IP 8.8.8.8, which is the Google DNS server as the DNS server.
Beyond this example, it is clear that DNS resolution plays a key role not only for the general public, but for enterprises too. Furthermore, in corporate environments managing name resolution can be pretty complicated because of the presence of different domains, firewall restrictions and DMZ’s.
Changing DNS Settings
We know that in order to change the advanced DNS settings we must open the network adapter properties screen, and then select the internet protocol version according to our environment which usually is IPv4 (1) and press the Properties (2) button as you can see on the next screen capture. When the properties window opens you should hit the “Advanced…” (3) button.

Finally, when the Advanced TCP/IP settings window opens you can hit the DNS tab and you will see a window like the one following. I enclosed in a red box the items that are global to all TCP/IP connections, so if you have more than one network adapter then changing those setting in one connection will be enough to impact the whole system.
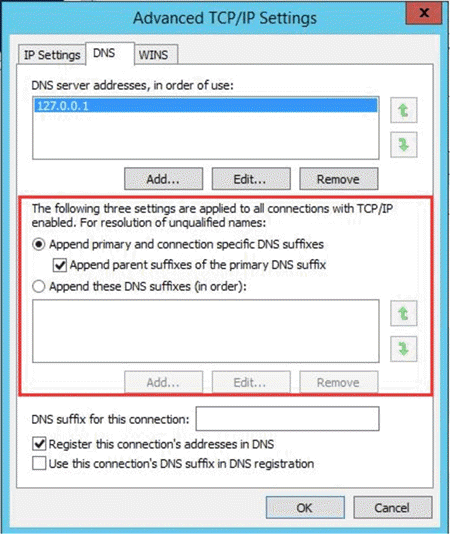
Just for information purposes I added a table below with a brief description of the options in the previous screen.
| Item | Description |
|---|---|
| DNS server addresses, in order of use | It's an ordered list of the name servers your machine will contact for DNS resolution. |
| Append primary and connection specific DNS suffixes | When checked, on name resolution requests that are not FQDN the DNS suffix of the machine will be appended to the host name |
| Append parent suffixes of the primary DNS suffix | This does the same as the above, but using parent suffixes instead. |
| Append these DNS suffixes (in order) | This is a list on which you can add additional suffixes to query for name resolution. |
| DNS suffix for this connection | Retrieves global DNS client settings like the suffix search list. |
| Register this connection's addresses in DNS | When checked the computer will attempt to dynamically create DNS records by registering itself in the zone associated with the connection. This will either be the Active Directory domain the computer is member of; or the DNS suffix listed in the above setting if you have the next setting checked. |
| Use this connection's DNS suffix in DNS registration | Specifies whether DNS dynamic update is used to register the IP addresses and the connection-specific domain name of this connection. The connection-specific DNS name of this connection is the concatenation of the computer name (which is the first label of the full computer name) and the DNS suffix of this connection. The full computer name is specified on the Computer Name tab (available in System in Control Panel). If the “Register this connection's addresses in DNS” check box is selected, this registration is in addition to the DNS registration of the full computer name. The local setting is used only if the associated Group Policy is disabled or unspecified. |
Now that we know how to modify advanced DNS configuration on one server, what if we must do the same on all the servers hosting SQL Server instances? I have a way of thinking that if I have to do the exact same task more than twice, then that task can be automated.
Using PowerShell to Change DNS Settings
PowerShell began its days as a task automation and configuration management framework that included a command-line shell and its own scripting language. It was introduced in 2006 for Windows XP as an attempt from Microsoft to get rid of the old MS-DOS inherited shell CMD.EXE. As time passed, PowerShell has evolved by adding more features.
Nowadays PowerShell is an open source multiplatform tool which is available for Linux, MacOS and of course Windows. In other words, the scripts of this tip can be used on those platforms.
In order to change the global DNS settings, we are going to use the cmdlet functions of DnsClient object which you can list by using the following command on PowerShell:
get-command *-DnsClient*
The execution of the previous line will return results like on the next screen capture.

On the next table I add a brief description of each of those functions.
Source: https://docs.microsoft.com/en-us/powershell/module/dnsclient/?view=winserver2012-ps and https://docs.microsoft.com/en-us/powershell/module/dnsclient/?view=win10-ps
| Function | Description |
|---|---|
| Add-DnsClientNrptRule | Adds a rule to the Name Resolution Policy Table (NRPT). |
| Clear-DnsClientCache | Clears the DNS client cache. Just like executing ipconfig /flushdns. |
| Get-DnsClient | Gets details of the network interfaces configured on a specified computer. |
| Get-DnsClientCache | Retrieves the contents of the DNS client cache. Just like executing ipconfig /displaydns |
| Get-DnsClientGlobalSetting | Retrieves global DNS client settings like the suffix search list. |
| Get-DnsClientNrptGlobal | Gets the NRPT global settings. |
| Get-DnsClientNrptPolicy | Gets the NRPT configured on a computer. |
| Get-DnsClientNrptRule | Retrieves the DNS client NRPT rules. |
| Get-DnsClientServerAddress | Gets DNS server IP addresses from the TCP/IP properties on an interface. |
| Register-DnsClient | Registers all of the IP addresses on the computer onto the configured DNS server. |
| Remove-DnsClientNrptRule | Removes the specified DNS client NRPT rule. |
| Set-DnsClient | Sets the interface-specific DNS client configurations on the computer. |
| Set-DnsClientGlobalSetting | Sets the DNS client global, non-interface specific, settings. |
| Set-DnsClientNrptGlobal | Modifies the global Name Resolution Policy Table (NRPT) settings. |
| Set-DnsClientNrptRule | Modifies a DNS client Name Resolution Policy Table (NRPT) rule for the specified namespace. |
| Set-DnsClientServerAddress | Sets DNS server addresses associated with the TCP/IP properties on an interface. |
Now for example, if we aim to add a new suffix to the search list the following code will do the trick.
$dnsCGSetting = Get-DnsClientGlobalSetting
$dnsCGSetting.SuffixSearchList += "otherdomain"

Set-DnsClientGlobalSetting -SuffixSearchList $dnsCGSetting.SuffixSearchList
Clear-DnsClientCache
The first line saves the resulting array of the Get-DnsClientGlobalSetting cmdlet into object dnsCGSetting. On the next line we are concatenating the new suffix on the string “otherdomain” into the SuffixSearchList property of the dnsCGSetting object resulting from the first line. The following two lines set the suffix search list with the contents of the SuffixSearchList property of dnsCGSetting object and then clean the DNS cache.
The previous script works for one server. I mean, if you need to change this settings on many servers by using the previous script you will need to log on each server to run the script. Fortunately, PowerShell offers us tools to automate what would be a tedious task and make it easier.
If we aim for automation we must look at Invoke-Command cmdlet which allows us to run a given script against another server or list of servers.
The easiest way for executing commands on another server is by using Invoke-Command is to save the PowerShell script you want to execute into a file, in this case let’s create a file with the contents of the previous script and save it as script.ps1. As a side note, when I say easiest way, I mean not just coding difficulty but also code readability.
After creating the script file script.ps1 the next step is to open a PowerShell terminal and run the following command.
Invoke-Command -FilePath c:\scripts\script.ps1 -ComputerName ([System.Data.Sql.SqlDataSourceEnumerator]::Instance.GetDataSources().ServerName | select -uniq)
The previous command loads the script specified in –FilePath parameter and executes it into the computers detailed in –ComputerName parameter.
In this case the computers detailed in –ComputerName parameter is those who hold a SQLServer instance. We can get the detail of servers running SQL Server by executing the PS command [System.Data.Sql.SqlDataSourceEnumerator]::Instance.GetDataSources().ServerName. The “| select –uniq” part of the command is a workaround when you have multiple instances running on a server, because you don’t want to add the same DNS suffix multiple times.
But getting the list of servers that way may not work as well. In order to use [System.Data.Sql.SqlDataSourceEnumerator]::Instance.GetDataSources() you must have enabled the SQL Server Browser on each machine running a SQL Server instance.
Next Steps
- In this tip you will find the fundamentals about listing the SQL Servers in your environment: Find SQL Servers On Your Network with OSQL and SQLCMD.
- Stay tuned to the SQL Server PowerShell Tips category to increase your skills in PowerShell.
- Still having problems connecting to your SQL Server instances? Then maybe you should take a look at the following tip: SQL Server Name Resolution Troubleshooting.

Daniel Farina was born in Buenos Aires, Argentina. Self-educated, since childhood he showed a passion for learning. He studied at Universidad de Buenos Aires. Daniel started working as a programmer at a young age. Over the years he specialized in databases, particularly SQL Server and Oracle. Now with 30 years of age, his work experience includes working with various technologies like VB, C, .NET, web development, Windows and Linux systems. He likes to read about science, psychology, philosophy and many other things. In his spare time, he trains powerlifting aiming to compete.
- MSSQLTips Awards: Author of the Year – 2018 | Champion (100+ tips) – 2018 | Author Contender – 2015-2017, 2019