Problem
I have a number of items on my Azure storage account. Is there any easy way by which we can manage the contents of my Azure storage account without having to use the Azure portal? Is there any kind of tool that can be used for this purpose?
Solution
This tip assumes that you already have resources in your Azure environment and you are familiar with using the Azure storage account. This tip covers a brief introduction on the Azure storage account. If you are new to Azure, you can subscribe to a trial account here which will give you access to Azure services for an year and a credit of $200 USD. In this tip, we will learn about the use of the Azure storage explorer for managing resources on your storage account.
What is an Azure storage account?
In simple terms, an Azure storage account is used for storing objects. There are different kinds of storage options available within Azure which will meet all of your storage requirements. Refer to this tip, which has information on how you can create storage accounts in Azure. In this tip, we will use the Azure blob storage option for demo purposes. Blob storage basically refers to unstructured data like images, audio files, video files, etc.
How can we use the Azure storage account in SQL Server?
There are a number of ways by which you can use the Azure storage account in SQL Server. Refer to one of the tips in this link where you can see how the on-premises database backups can be performed directly on to the Azure storage using database maintenance plans. Another use is for the purpose of migration. You can refer to this tip where you can see an example of migration of a large on-premises database to Azure using the Azure storage container. If you are using standard processes for copying large backup files from on-premises to Azure you may not be able meet the SLAs. But by using Azure storage for this purpose you can save a lot of time on the copy process.
Why should we use the storage explorer?
When you are managing a small number of files within the storage account, it is quite easy to manage. But imagine, if you have to administer a huge number of applications that use the storage account, then it gets quite hard to manage or review information using the Azure portal. In the previous section, where you also read about the multiple uses of Azure storage especially for performing database backups or copying database backup files, it would get quite cumbersome to manage huge number of files. Moreover, the Azure storage explorer is a free tool with easy to use features and is supported across multiple operating systems – Windows, Linux, Mac.
Download the Azure Storage Explorer
You can download the Azure storage explorer from this link.
On the home page, you will see this screen, select on the required “Operating System” and click on the option to “Download Storage Explorer free”.

Go through the prompts to download the required software and accept the license terms and click on the “Install” option.

Azure Storage Explorer launched
Once the installation is complete, open the Azure Storage explorer app. You will see this window where you can connect to your Azure storage.

Click on the option to “Add an account”. You will see this screen with the options, select “Next”. There are multiple ways to connect using the Azure storage explorer. In this demo, we will use the default option by using the Azure account.

Under the Azure environment, you will see these options.

After you click on “Next”, you will see this screen to sign in to your Azure account.

Enter the details of your Azure account and click on “Next”. Once done, you will be able to view details of your subscription on the Azure storage explorer.

Check contents of your storage account in the Azure Storage Explorer
Now, that you can view your subscription details in the Azure storage explorer, you can check out the contents of your storage account by clicking on the option on the left. Here, you can view the details of the storage accounts in your subscription.

In the screenshot, you can see a container named “moh” which I had created earlier. Once you click on it, you can view the contents of the container.

If you see the top menu, you will see several other options for managing the contents in the storage explorer.

In this demo, I just created one sample storage account using a blob container. But in a real production configuration, you will be dealing with multiple storage accounts dealing with various types of storage services like blobs, files, tables, queues.
Try out few options that are available in the Azure storage explorer – Upload option
In this demo, we will try out few options that are available in the storage explorer. First, let us try the “Upload” option. When you click on the “Upload” option, you will see this screen.

Here, you can see the option to either “Upload Folder” or “Upload Files”. Let us try uploading a folder. Once you click on the “Upload Folder” option, select the folder you wish to upload.

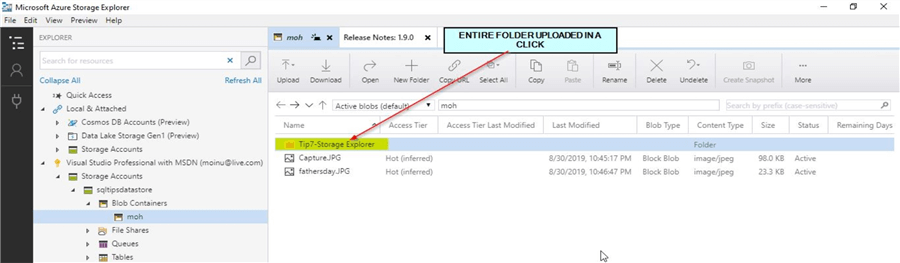
Once you select the folder, you will see this screen next where you can review and click on the “Upload” option.

Once done, you will see that the entire folder is uploaded. All in one click.
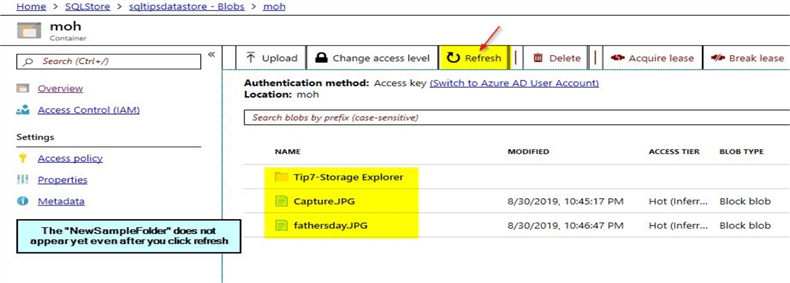
When you check your Azure portal, you will see the new uploaded folder in your storage container. Make sure to click on the “Refresh” option first.

You can make sure that all the files in that folder are uploaded correctly by checking on either the Azure portal or on the Azure storage explorer.

Compare the upload option in the Azure portal
Now that you performed an upload using the Azure storage explorer, try out a similar upload operation using the Azure portal. Go to your storage container in the Azure portal and click on the upload option.

On clicking the information icon near the “Files” option, you can see this pop-up.

Using the portal, you can upload multiple files at once. However, you don’t see any option to upload a complete folder using the Azure portal. This way, you can see a benefit of using the Azure storage explorer for performing file uploads.
Try out the new folder option using the Azure storage explorer
In this section, we will try creating a new folder using the storage explorer. Click on the option “New Folder” as shown.

On the pop-up message, you can see that the folder doesn’t get created as long as it is empty. Give a suitable name and click on OK. Once done, you can view the new folder that was created.

When you go back to the Azure portal, you will notice that this “NewSampleFolder” does not appear in the storage container even after you click on refresh.
As mentioned previously, the folder doesn’t get created as long as it is empty. Once you drag or copy few files into the new folder you will be able to view it. Just upload few files into the folder by using the “Upload” button. Once done, you will be able to view the new folder that you created when you refresh the Azure portal.

Here, you can see the “NewSampleFolder” that is appearing on the storage container.
Try out the Copy URL option using the Azure storage explorer
In this section, let us try out the copy URL option. I just navigated to one of the folders containing images. Click on the option to “Select All” images and then click on the “Copy URL” option.

In just one go, you can copy all of the URLs for the individual images. Once copied, paste the contents on to notepad. You can see all of this done in a few simple steps.
https://sqltipsdatastore.blob.core.windows.net/moh/Tip7-Storage%20Explorer/Agree%20to%20terms.jpg
https://sqltipsdatastore.blob.core.windows.net/moh/Tip7-Storage%20Explorer/Azure%20Environments.jpg
https://sqltipsdatastore.blob.core.windows.net/moh/Tip7-Storage%20Explorer/Azure%20Storage%20explorer.jpg
https://sqltipsdatastore.blob.core.windows.net/moh/Tip7-Storage%20Explorer/Capture.JPG
https://sqltipsdatastore.blob.core.windows.net/moh/Tip7-Storage%20Explorer/Click%20on%20Upload.jpg
https://sqltipsdatastore.blob.core.windows.net/moh/Tip7-Storage%20Explorer/Connect%20to%20Azure%20Storage.jpg
https://sqltipsdatastore.blob.core.windows.net/moh/Tip7-Storage%20Explorer/Container%20contents.jpg
https://sqltipsdatastore.blob.core.windows.net/moh/Tip7-Storage%20Explorer/Contents%20on%20Storage%20Explorer.jpg
https://sqltipsdatastore.blob.core.windows.net/moh/Tip7-Storage%20Explorer/Download%20Storage%20Explorer.jpg
https://sqltipsdatastore.blob.core.windows.net/moh/Tip7-Storage%20Explorer/fathersday.JPG
https://sqltipsdatastore.blob.core.windows.net/moh/Tip7-Storage%20Explorer/Sign%20in%20to%20Azure.jpg
https://sqltipsdatastore.blob.core.windows.net/moh/Tip7-Storage%20Explorer/Storage%20Explorer%20options.jpg
https://sqltipsdatastore.blob.core.windows.net/moh/Tip7-Storage%20Explorer/StorageExplorerLinks.txt
https://sqltipsdatastore.blob.core.windows.net/moh/Tip7-Storage%20Explorer/Subsription%20details.jpg
https://sqltipsdatastore.blob.core.windows.net/moh/Tip7-Storage%20Explorer/Tip%237-Azure_Storage_Explorer.docx
https://sqltipsdatastore.blob.core.windows.net/moh/Tip7-Storage%20Explorer/Upload%20Folder.jpg
https://sqltipsdatastore.blob.core.windows.net/moh/Tip7-Storage%20Explorer/Upload.jpg
https://sqltipsdatastore.blob.core.windows.net/moh/Tip7-Storage%20Explorer/~%24p%237-Azure_Storage_Explorer.docx
When you copy one of the URLs above and try it on the browser, you will see it works. I had set the public access level for my container to anonymous read access; hence the image can be viewed. Output is below.

Compare the Copy URL option on the Azure portal
Just go to your storage container on the Azure portal to get the URLs for the files in the storage folder. In the screenshot, you will see that there is no such option where you can copy the URLs for all the files in a specific storage folder.

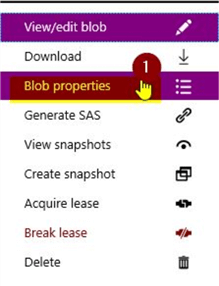
On the Azure portal, you would need to click on the individual file that you need the URL for. For example, if you want the URL for the fathersday.JPG just click on the ellipsis option on the right-hand side. Once done, on the pop-up option click on the “Blob Properties” option.
You will see this screen in the blob properties for the image.

Here, you can click on the option to copy the URL as shown.
https://sqltipsdatastore.blob.core.windows.net/moh/Tip7-Storage Explorer/fathersday.JPG
So, from the Azure portal you can see there is no easy way to perform this operation for a huge number of files. Using Azure storage explorer, you could perform the operation to Copy URLs for all the files in a folder in just two clicks.
Next Steps
- In this tip, you learned about the use of Azure storage
- In this tip, you learned about the use of a free tool known as the Azure storage explorer
- You saw how easy it is to use the Azure storage explorer
- You also saw a comparison of performing similar operations using the Azure portal
- From the demo, you saw how time-consuming Azure portal would become if you have to manage huge number of objects
- Try downloading the Azure storage explorer and explore the options available as shown in this tip
- Refer other articles available on MSSQLTips related to Azure

Mohammed has been a SQL Server DBA since 2005 and has had the opportunity to work on different versions of SQL Server starting from SQL Server 2000 with exposure to Sybase as well. He is based in Wellington, New Zealand and works at Datacom Systems Ltd, as a SQL Database Administrator. He can be reached at: moinu@live.com.
- MSSQLTips Awards: Author of the Year Contender – 2016, 2018-2021 | Achiever (75+ tips) – 2021


