Problem
You have resources in Azure (including, but not limited to, Azure SQL), and you have a task at hand to eradicate usage of public endpoints. Security requirements are to start communicating with resources, such as database servers through encrypted VPN channels.
Solution
For this purpose, Azure point-to-site (P2S) VPN can be used. In this guide, we will learn how to configure Azure VPN, so you can connect to a virtual network from your laptop or PC over a secured channel and communicate with its resources, without using public endpoints.
Steps Overview
Since this is step-by-step guide on how to configure Azure P2S VPN, we will do it from scratch, creating all necessary resources in the process.
- Deploy virtual network
- Configure virtual network
- Deploy virtual network gateway (VPN gateway)
- Configure Point-to-Site Azure VPN in VPN Gateway Settings
- Configure VPN Authentication (Certificates or Microsoft Entra)
- Azure VPN Client Configuration
Deploy Virtual Network
First step will be to deploy a virtual network. It is a base element, where many resources can be deployed to. In Azure, virtual network is free of charge.
Go to “Virtual networks” > press “Create” > specify subscription, resource group, virtual network name and region.
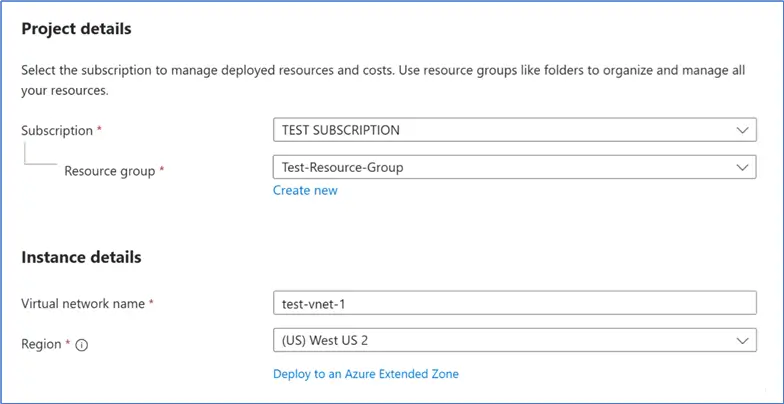
On the Security tab, do not check any additional services – we do not need them for this exercise. Note that most of them are paid services.
On IP Addresses, specify address space, for example 10.188.0.0/16. The point is not to use overlapping address spaces, so we should better avoid common address spaces such as 10.0.0.0/16, or 10.1.0.0/16.
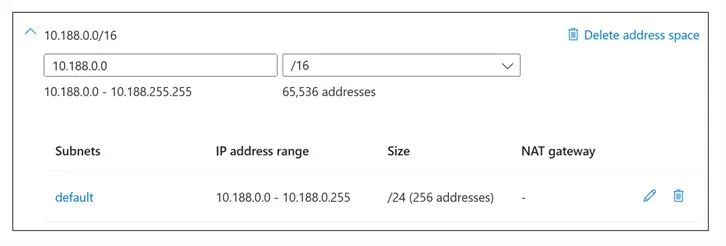
Then, review and create the virtual network.
Configure Virtual Network
Next, we will need to create a subnet called “GatewaySubnet”. It is a dedicated subnet for hosting a VPN gateway resource.
Go to the created virtual network > Settings > Subnets > Press “Add a Subnet”.
“Subnet purpose” should be “Virtual Network Gateway”. Selecting it will automatically name subnet as “GatewaySubnet”. The address space and size for new subnet can be 10.188.1.0/24.
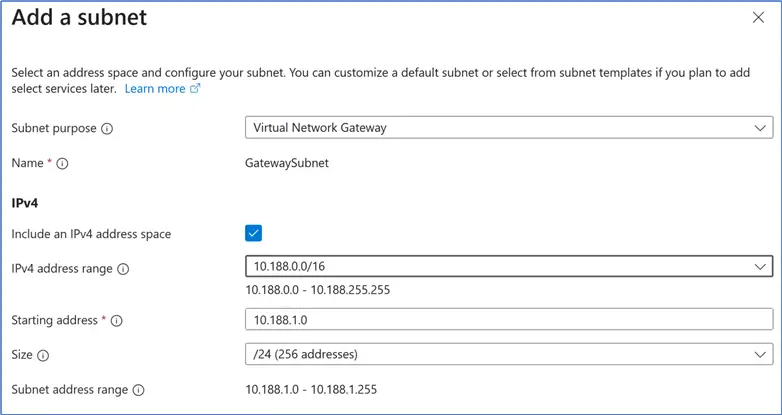
Subnet list will look like this:

Without this step, creation of virtual network gateway next will fail.
Deploy Virtual Network Gateway
Go to Virtual network gateways -> VPN Gateways -> press “Create” -> pick the same subscription, resource group and region as our previously created virtual network has.
- Gateway type: VPN
- SKU: VpnGw1 or VpnGw1AZ (Generation 1) should be enough for the purpose of this guide. It covers many needs with 650 Mbps network bandwidth and big enough number of connections. If you need more, check out Gateway SKUs and VPN Gateway Pricing. Note that higher service tiers can be pricey.
- Virtual network: select the one that we created previously (or the one that you need to have VPN access to).
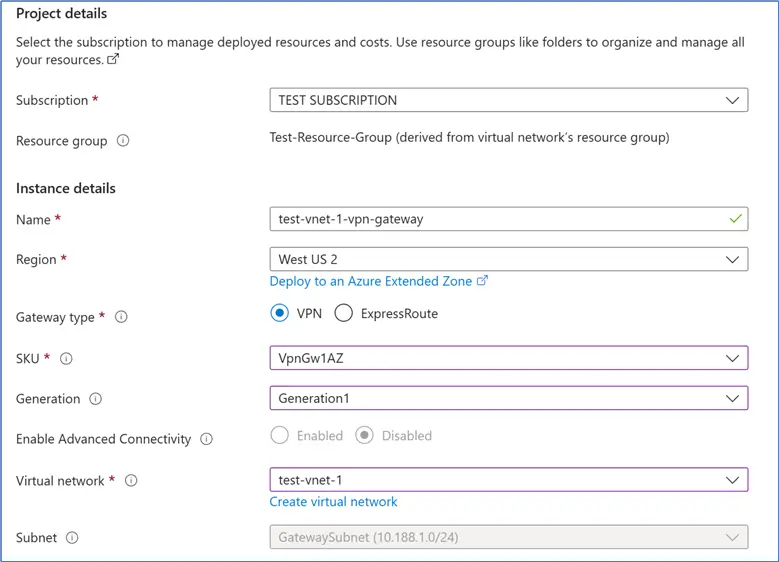
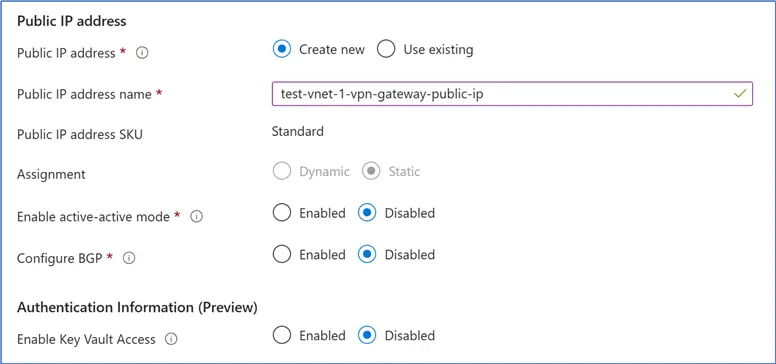
- Public IP: create new (or use existing).
- Active-active mode and Configure BGP – we don’t need this for our exercise.
Configure Point-to-Site Azure VPN in VPN Gateway Settings
Now we’ve got the point of Point-to-Site VPN configuration.
Go to virtual network gateway > Settings > Point-to-site configuration > press Configure now.
There are two most common ways of configuring Azure VPN connectivity. First is using certificates for authentication, second is using Microsoft Entra (formerly known as Azure Active Directory). You can have both ways configured at the same time, or just one of them.
In our guide, we will use following configuration options:
- Address pool: 172.16.201.0/24
- Tunnel type: OpenVPN (SSL)
- Authentication type: Azure certificate and/or Azure Active Directory (Microsoft Entra)

Azure VPN Configuration using Certificate Authentication
First way is to have Azure VPN authentication using certificates.
Note: When you have a tenant linked to your subscription, and users in your tenant, you could skip this and go to “Azure VPN Configuration using Microsoft Entra Authentication” (simply because it is easier to configure). Configure certificate authentication if you have specific reasons to do so. For example:
- Some organizations do not use Azure AD (Microsoft Entra), or cannot integrate their identity provider with Azure AD, or avoid cloud identity dependencies
- Or have highly restricted networks with tightly controlled outbound access
- Or desire to have full control over the trust chain (own root CA, certificate issuance, expiration, strict PKI and compliance, and so on)
- Other reasons (regulated industries, automated systems, external contractors, legacy environments, long-running VPN workloads, IKEv2 support, etc.)
It all starts with creating a root certificate. For this, most popular tools that can generate certificates, include OpenSSL, PowerShell, Microsoft Active Directory Certificate Services (AD CS), EasyRSA, and others.
We can either create a new self-signed certificate or use existing certificate. Certificates issued by a trusted certificate authority should work, too. In this guide, we will create a self-signed certificate using PowerShell.
PowerShell Scripts
Make sure your PowerShell is updated to the latest version. Launch it with administrative privileges and run:
/* MSSQLTIPS.com (PowerShell) */
$params = @{
    Type = 'Custom'
    Subject = 'CN=P2SRootCert'
    KeySpec = 'Signature'
    KeyExportPolicy = 'Exportable'
    KeyUsage = 'CertSign'
    KeyUsageProperty = 'Sign'
    KeyLength = 2048
    HashAlgorithm = 'sha256'
    NotAfter = (Get-Date).AddMonths(24)
    CertStoreLocation = 'Cert:\CurrentUser\My'
}
$cert = New-SelfSignedCertificate @params
It will create a certificate named “P2SRootCert” in the “Personal” folder of Current User’s certificate store. Don’t close the PowerShell window, we will also need to generate client certificate out of root certificate. Use PowerShell again to create “P2SChildCert” in the same folder:
/* MSSQLTIPS.com (PowerShell) */
$params = @{
       Type = 'Custom'
       Subject = 'CN=P2SChildCert'
       DnsName = 'P2SChildCert'
       KeySpec = 'Signature'
       KeyExportPolicy = 'Exportable'
       KeyLength = 2048
       HashAlgorithm = 'sha256'
       NotAfter = (Get-Date).AddMonths(18)
       CertStoreLocation = 'Cert:\CurrentUser\My'
       Signer = $cert
       TextExtension = @(
        '2.5.29.37={text}1.3.6.1.5.5.7.3.2')
   }
   New-SelfSignedCertificate @params
Complete Certificate Setup
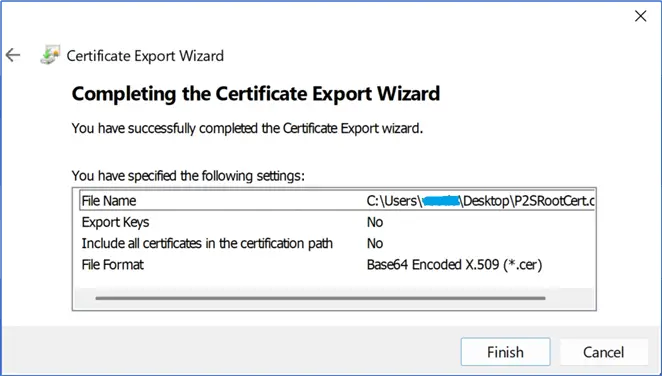
Next, launch the certmgr.msc, go to Personal folder, right click the “P2SRootCert” and export this Root certificate as:
- Base-64 encoded X.509 (.CER) file
- Without private key
Then, you can open this P2SRootCert.cer file in the text editor, such as Notepad++ and copy contents (just the certificate’s string, WITHOUT “BEGIN” line or “END” line). Make sure no additional symbols are included.
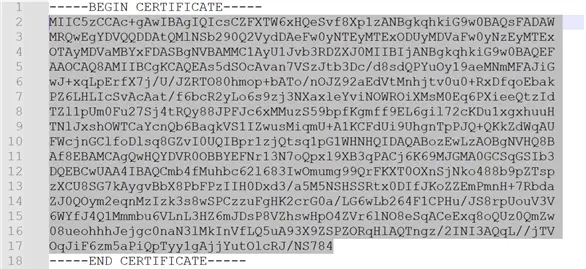
Go to Azure VPN Gateway that we created, Settings > Point-to-site configuration. Under root certificates, add the name, and paste the contents of certificate (string that we have just copied from P2SRootCert.cer file) into the “Public Certificate Data” field. Press Save.

After configuration is saved, press “Download the VPN Client”. It will download ZIP archive which contains the azurevpnconfig.xml. Save it to the same folder as “P2SRootCert.cer”. It will need to be imported into Azure VPN client.

If you want to share the certificate with other people, so they can connect to Azure VPN via certs, you can export client cert (P2SChildCert) as:
- PFX file
- With private key included

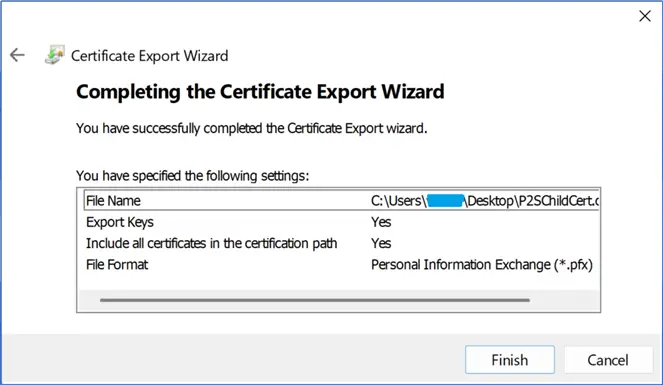
Protect it by password and let people install it to their Personal stores. Much more detailed instruction on root and child certificates can be found here and here.
Azure VPN Configuration using Microsoft Entra Authentication
Easier way is to configure authentication using Microsoft Entra (Azure Active Directory).
When your subscription is created, Azure automatically creates Azure AD (Entra ID) tenant for you. Your account is added as a user with Global Administrator of that tenant, and you can create other users. Your user, and those users can connect to Azure VPN using the “Microsoft Entra” authentication type.
In the Microsoft Entra, you can find Tenant ID of your tenant. It is a value like “4f6f4b78-dca1-4fd9-b34a-e10082769432” (example). Copy it, as we will need it further.

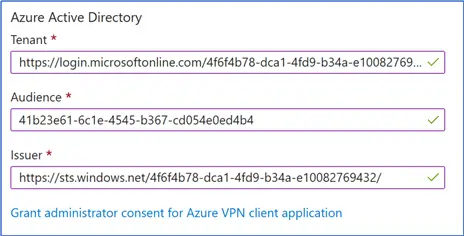
Go to VPN Gateway that we created, Settings > Point-to-site configuration. Under Azure Active Directory (Microsoft Entra), fill out three fields. Example:
- Tenant: https://login.microsoftonline.com/4f6f4b78-dca1-4fd9-b34a-e10082769432/ (replace the Tenant ID)
- Audience: 41b23e61-6c1e-4545-b367-cd054e0ed4b4 (no need to change anything)
- Issuer: https://sts.windows.net/4f6f4b78-dca1-4fd9-b34a-e10082769432/ (replace the Tenant ID)
Press “Grant administrator consent for Azure VPN client application” and then press Save. After it is saved, press “Download VPN client”.
Azure VPN Client Configuration
Final step is to download, install and configure Azure VPN Client application. It is available for Windows and MacOS.
After it is installed, we need to import the configuration file. The ZIP archive that we downloaded (“Download VPN client”) in previous steps, contains “azurevpnconfig.xml” file (there can be two, if you configured both certificates and Microsoft Entra auth types). This is the one that needs to be imported.
During the import, initial configuration depends on whether authentication is done via certificates, or Microsoft Entra.
Certificates:
- Authentication Type: Certificate
- Certificate information: P2SChildCert
Microsoft Entra:
- Authentication Type: Microsoft Entra ID
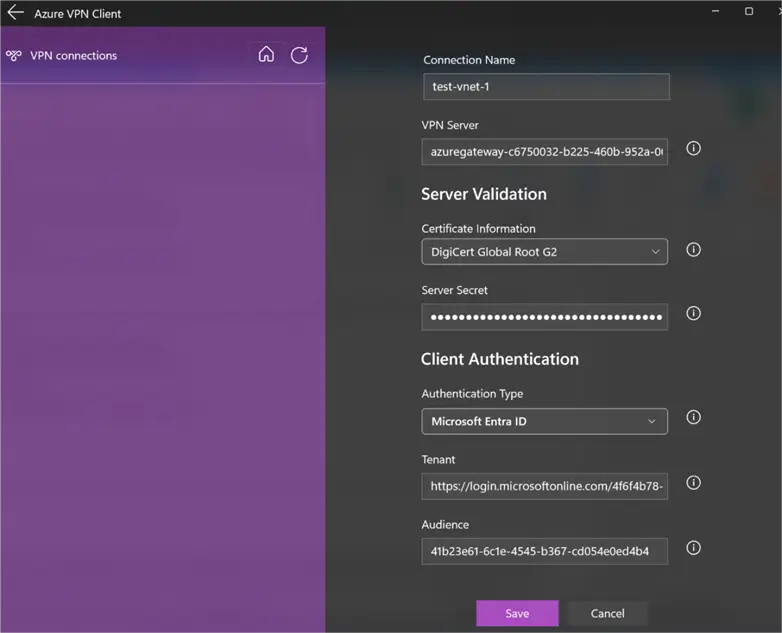
Press Connect, and it should connect to your virtual network.
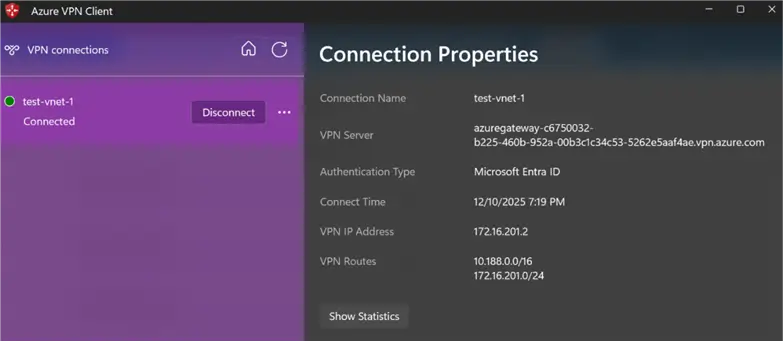
You should be able to see resources in the virtual network and connect to them. Beware that additional configuration may be required for those resources, depending on the resource type.
Conclusion
In this article, we covered all steps required to configure point-to-site connections to Azure virtual networks via Azure VPN client. We created necessary resources such as virtual network and VPN gateway, configured them and learned two ways to configure VPN authentication: certificates and Microsoft Entra.
Next Steps

Aleksey Vitsko is SQL Server DBA with several years of experience including production database administration, database development, performance tuning, security, high availability and disaster recovery, migrations, and more – both on-premises and in Azure SQL. He has earned these certifications: Microsoft Certified Solutions Associate (MCSA, 2020) and Microsoft Certified: Azure Database Administrator Associate (MCADAA, 2025). He can be reached at voodoosh2@gmail.com for any questions or help.

Wonderful article! I didn’t even know this type of VPN security was available in Azure. This should replace some IP whitelisting type security we currently use.