Problem
How can I create a linked server between a local SQL Server instance and an Azure SQL Database?
Solution
In this article, I am going to explain the process of creating a linked server between a SQL Server instance on a local computer and Azure SQL Database.
I created a database named “AzureDatabase” on an Azure server named “companyemployee.database.windows.net“. See the following screenshot.

On my laptop, I installed a default instance of SQL Server 2016. I created a database named “DemoDatabase” on the local instance. Now let’s create a linked server between these two instances.
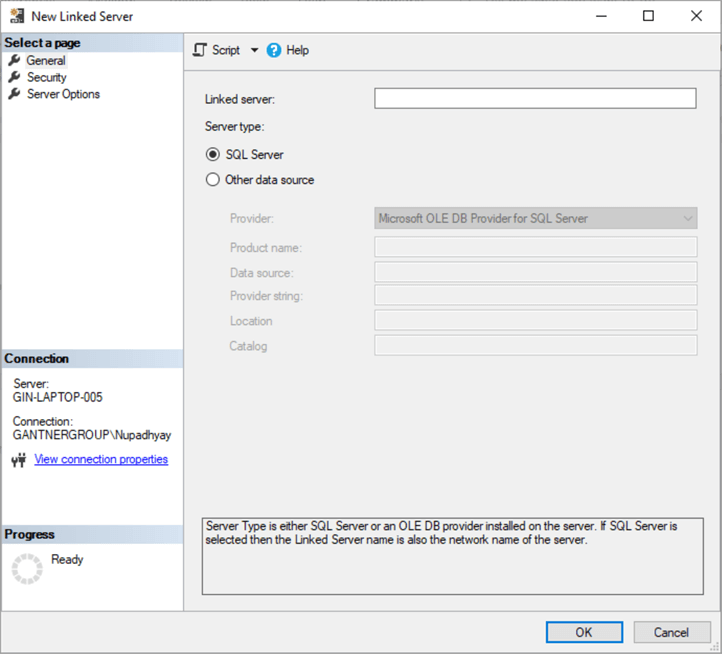
To do that, open SQL Server Management Studio and connect to the local instance. In object explorer, expand Server Objects > Linked Servers and right click and select “New Linked Server.“

The dialog box “New Linked Server” opens. See the following image:
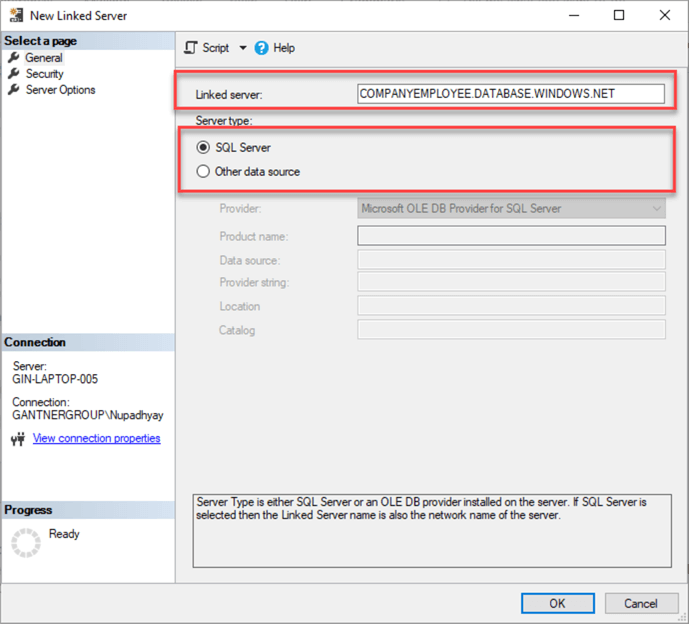
When we choose “SQL Server” as the server type, the Linked Server name must be the network name of the server we are connecting to which will be “COMPANYEMPLOYEE.DATABASE.WINDOWS.NET“. See the following image:
Now click on Security. On this page, we can configure the security options. These options are used to determine the security context which is going to be used to connect to the linked server. See the following image. As you can see in the below image, there are many options that can be used to configure the security context.
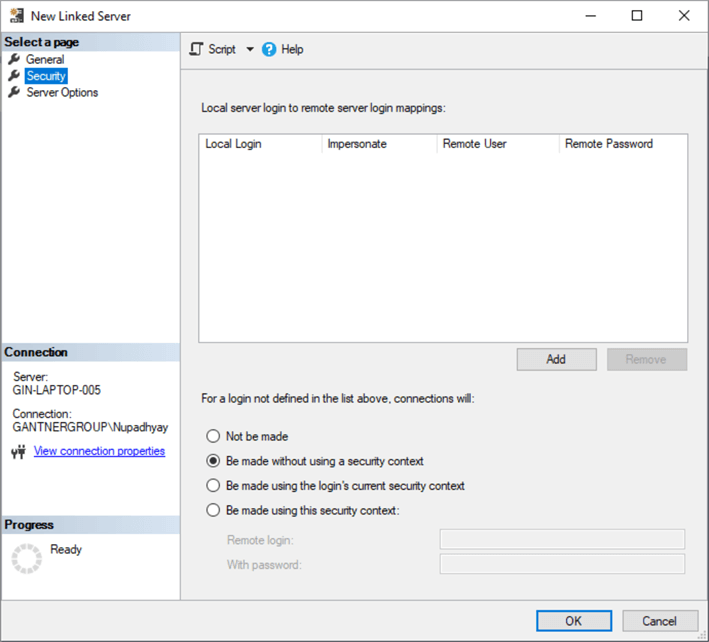
Option 1: Local server login to remote server login mappings
This option is used when you want to allow a specific login to use the linked server. Local Logins can use SQL Server authentication or Windows authentication to connect to the remote SQL Server.
Option 2: Not to be made
This option is used when you do not want to use the security context for logins which are not defined in the list.
Option 3: Be made without using the security context
This option is used when you want to use the security context for logins which are not defined in the list.
Option 4: Be made using the login’s current security context
This option is used when you want to use the security context of the login that is connected to the server. If the login is connected using Windows authentication, then it will use the Windows credentials to connect to the remote server, and if it is connected using a SQL Server login then it will use SQL Server authentication to connect to the remote server. If we are using the SQL Server authentication, then the same SQL login and password must exist on the remote server.
Option 5: Be made using this security context
This option is used when we want to connect to the remote server using a specific SQL user name and password. We must provide the user name and password in remote login and with password text boxes.
We will connect to the remote server using a remote user name and password. On Azure database, I created a SQL user named nisargupadhyay, which we are going to use. Hence provide the appropriate user name and password and click on OK. See the following image:

Querying the Linked Server Database
Once the linked server is created, let’s try to query the database. To do that, execute the following code using the four part naming (server.database.schema.object):
select * from [COMPANYEMPLOYEE.DATABASE.WINDOWS.NET].AzrueDatabase.dbo.Employees
The above query throws the following error.
Reference to database and/or server
name in 'AzrueDatabase.sys.sp_tables_info_90_rowset_64' is not supported
in this version of SQL Server.
The above error occurs because the Azure master database does not allow you to connect to it directly therefore, we must direct the linked server to connect to user database, AzureDatabase.
To do that, we will make following changes.
- Provide the desired name of Linked Server name in the “Linked Server” textbox.
- Instead of using the SQL Server network name, we must choose Microsoft OLEDB Provider for SQL Server from the Provider drop-down box.
- In the Data source textbox, enter the network name of Azure SQL Server instance. Enter “COMPANYEMPLOYEE.DATABASE.WINDOWS.NET” in the Data Source text box.
- In the catalog text box, enter the Azure database name which you want to access, which will be “AzureDatabase”.
See the following image:

Once the linked server is configured, click OK to close the dialog box.
Now let us try to run the query again to verify that the linked server is configured properly.
select * from [COMPANYEMPLOYEE.DATABASE.WINDOWS.NET].AzrueDatabase.dbo.Employees
The query has executed successfully with the following output:

Now let’s try to execute a stored procedure to return a list of employees within the Sales department. I created a stored procedure named “getSalesEmployees” in the AzureDatabase. Following is the code of the stored procedure:
CREATE PROCEDURE getSalesEmployees
as
begin
select * from [AZURE LINKED SERVER].[AzureDatabase].[dbo].[Employees] Where DeptName='Sales'
end
Execute the stored procedure from the local machine using the following code:
exec [AZURE LINKED SERVER].[AzureDatabase].[dbo].[getSalesEmployees]
We get the following error:
Msg 7411, Level 16, State 1, Line 1
Server 'AZURE LINKED SERVER' is not configured for RPC.
To fix this error we must enable RPC and RPC Out for the linked server. These parameters enable the execution of remote stored procedures via a linked server. To do that, execute the following code on the local server to update the linked server settings or use the screenshot below to do via the GUI.
USE [master]
GO
EXEC master.dbo.sp_serveroption @server=N'AZURE LINKED SERVER', @optname=N'rpc', @optvalue=N'true'
GO
EXEC master.dbo.sp_serveroption @server=N'AZURE LINKED SERVER', @optname=N'rpc out', @optvalue=N'true'
GO
Alternatively, you can change it from Linked Server Properties. To do that, right-click on AZURE LINKED SERVER and choose Properties, select Server Optionsandset “RPC” and “RPC Out” as true. See the following image:

Once RPC and RPC Out are enabled, execute the stored procedure.
Exec getSalesEmployees
The following is the output.

Summary
In this article, I demonstrated the process of creating a linked server between a local SQL Server and an Azure SQL Server.
Next Steps
- You can read the following resources about SQL Server Linked Servers and Azure SQL Database.

Nisarg Upadhyay is a SQL Server Database Administrator and Microsoft certified professional who has more than 5 years of experience with SQL Server and 2 years with Oracle 10g including: database design, performance tuning, backup and recovery, HA and DR setup, database migrations and upgrades. He has completed the Bachelors in Information Technology from Ganpat University. When Nisarg is away from computers, he loves travelling, reading books and watching Sci-Fi movies.
- MSSQLTips Awards: Rookie of the Year Contender – 2018


Excelente, muchas gracias