By: Joe Gavin | Comments (6) | Related: 1 | 2 | > SQL Server Agent
Problem
In past tips, Using SFTP with SQL Server Integration Services and SFTP in SQL Server Integration Services SSIS Package with Bitvise, we looked at how to use SFTP to transfer files via SQL Server Integrations Services (SSIS).
We also looked at how to do SFTP using WinSCP, a free SFTP and FTP client for Microsoft Windows, with SQL Agent in this tip Automate SFTP File Transfer with SQL Server Agent and WinSCP.
In this article, we look at how to add more functionality to our WinSCP scripts and make troubleshooting issues a bit easier.
Solution
WinSCP has some more options we can explore to assist with troubleshooting. In this tip we will look at a few examples.
Versions used:
- Windows 10
- WinSCP 5.17.2 / Build 10278
Let's start by reviewing how to have the WinSCP GUI generate templates for us.
Connecting to SFTP Server with WinSCP
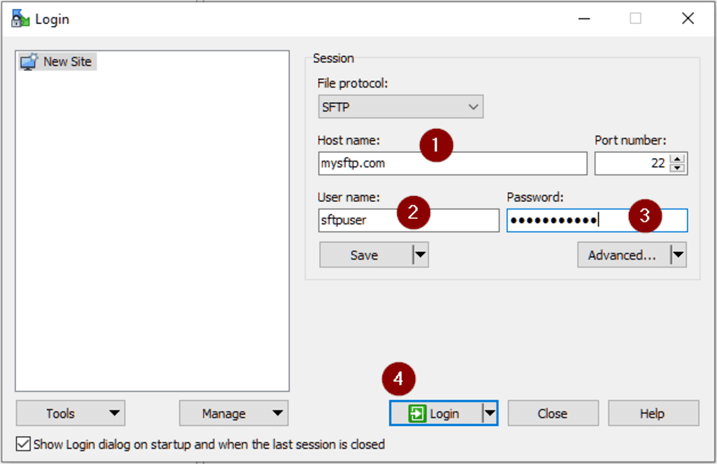
Here is my connection info:
- Host name: mysftp.com
- User name: sftpuser
- Password: supersecret
To launch WinSCP, run "C:\Program Files (x86)\WinSCP\WinSCP.exe" (presuming WinSCP is installed under "C:\Program Files (x86)\WinSCP\”) on the machine you'll be running transfer from. If you're testing from another machine, you'll just need to copy and paste the new RSA key.
Enter
- Host name
- User name
- Password
- Login
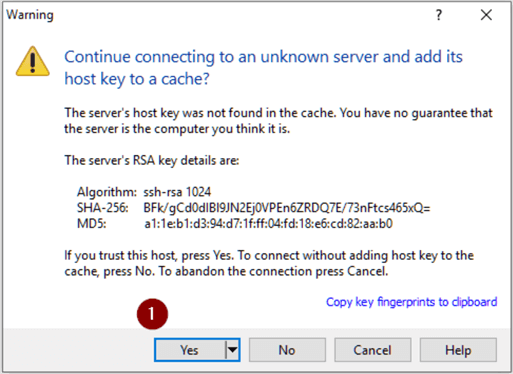
- If prompted, select Yes to add host key to the cache.
Generate Template
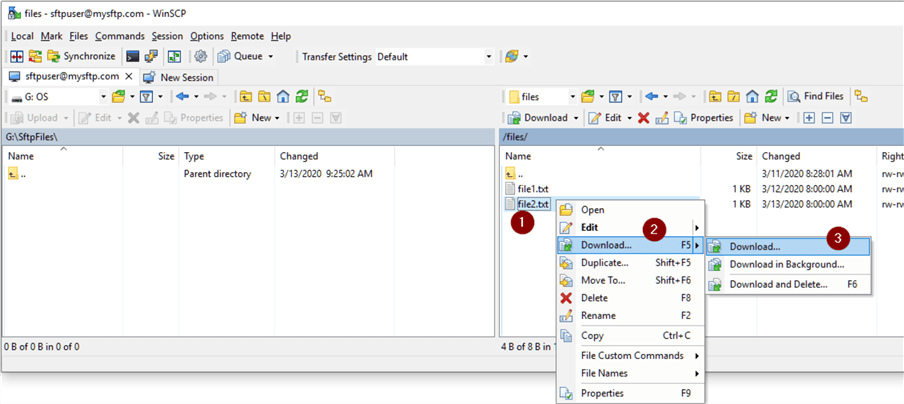
Let's generate a template to download a file. Open the WinSCP GUI and navigate to the local directory we want to download to.
- Right click on file(s) to download
- Download…
- Download…
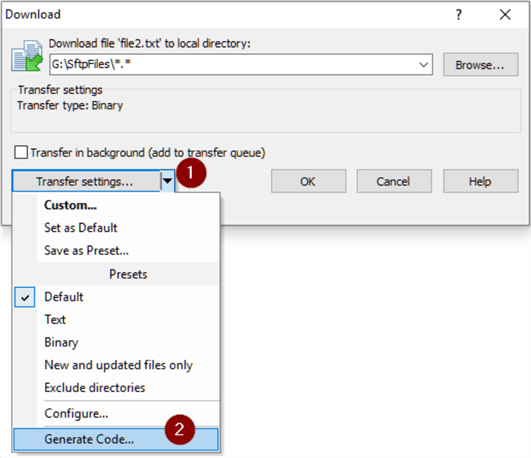
- Transfer Settings… down arrow
- Generate Code…
- Copy to Clipboard
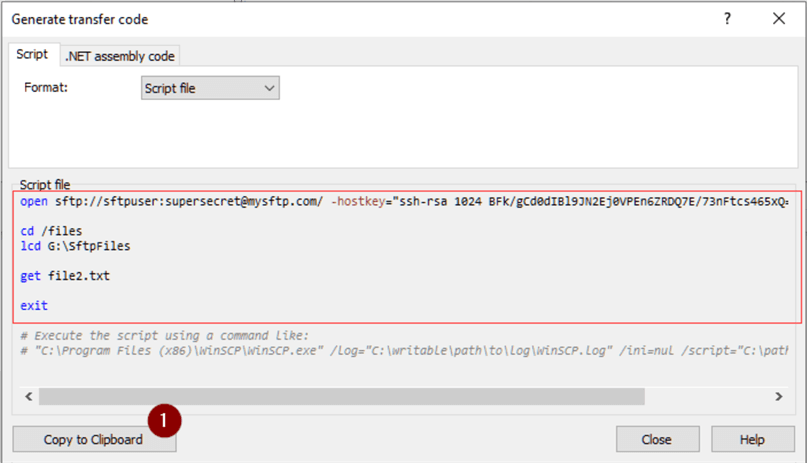
Paste it into a text editor.
open sftp://sftpuser:[email protected]/ -hostkey="ssh-rsa 1024 BFk/gCd0dIBl9JN2Ej0VPEn6ZRDQ7E/73nFtcs465xQ="

cd /files
lcd G:\SftpFiles

get file2.txt

exit

# Execute the script using a command like:
# "C:\Program Files (x86)\WinSCP\WinSCP.exe" /log="C:\writable\path\to\log\WinSCP.log" /ini=nul /script="C:\path\to\script\script.txt"
I've saved it as G:\SftpScripts\ WinscpDemo.sftp.

Next, copy the Windows command line section of the generated script into another text file.
- Remove # commented lines
- Add @echo off
- Log to working drive
- Cd to working directory
- Change WinSCP.exe to WinSCP.com (WinSCP.com is opens the console version of the app. I suspect this is a bug.)
- Edit the /script to the .sftp file we just created.
- Edit the name of log file. I've chosen G:\SftpScripts\SftpDemo.log.
- Save the file. Ours is G:\SftpScripts\SftpDemo.bat.
@echo off
G:
cd \SftpScripts

"C:\Program Files (x86)\WinSCP\WinSCP.com" /log="G:\SftpScripts\WinscpDemo.log" /ini=nul /script="G:\SftpScripts\WinscpDemo.sftp"

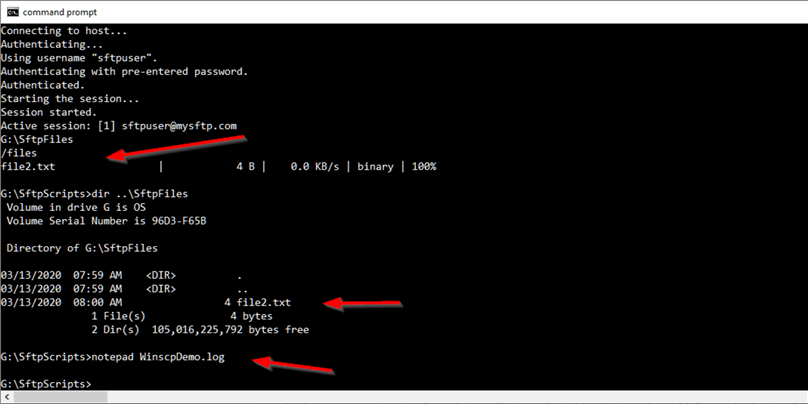
Run WinscpDemo.bat.
We see the file transferred, the file in the directory and open WinscpDemo.log.
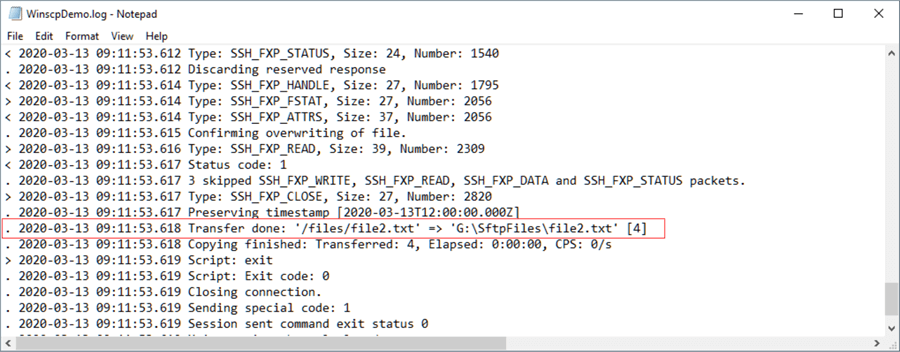
Here we see file2.txt was transferred.
Automatically Download Latest File(s)
What if we have a requirement to only download a new file?
The files named file1.txt, file2.txt… are randomly dropped in the /files directory on SFTP server mysftp.com. We don't control the number in the file name or when they're dropped and always need to download the newest file. We'll check daily so a new file is defined as being less than 1 day old.
There are 2 files in the /files directory:
- files1.txt – last modified over 24 hours ago
- file2.txt – last modified less than 24 hours ago
Edit WinsftpDemo.sftp with the following:
- Set local directory
- CD to where files are located G
- Add -filemask switch with parameters to the command line tell the 'get' command to only transfer files named starting with 'file' and any other characters with an extension of '.txt' that are older than 1 day
We'll add a couple of lines to set the local directory and change to the directory we want to download from, make the edits, add some comments and delete the commented-out command line. Change the 'get file2.txt' to 'get -filemask="*>1D" file*.txt' which says filter out files that are greater than 1 day old and are named file*.txt, * being a wildcard for any character, and pass the name(s) to get to download.
open sftp://sftpuser:[email protected]/ -hostkey="ssh-rsa 1024 BFk/gCd0dIBl9JN2Ej0VPEn6ZRDQ7E/73nFtcs465xQ="

# change local directory
lcd G:\SftpFiles
# change remote directory to /files
cd /files
# get files named starting with 'file' and any other characters with an extension of '.txt' that are older than 1 day
lcd G:\SftpFiles

get -filemask="*>1D" file*.txt

# exit sftp client
exit
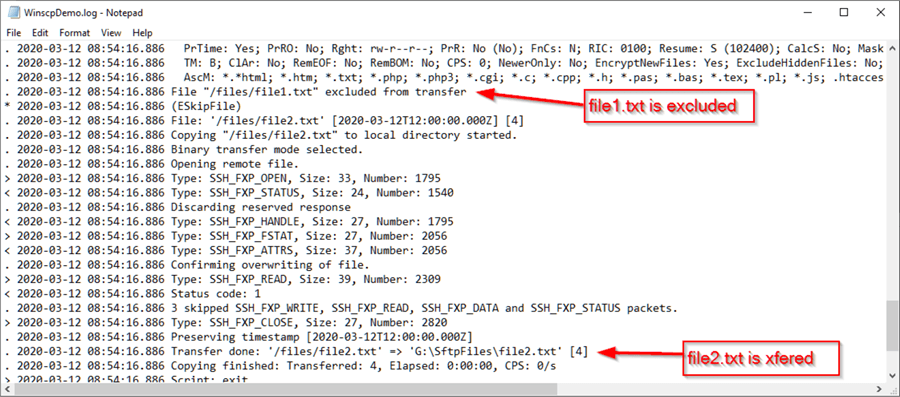
Run WinscpDemo.bat and we see where file2.txt was transferred to where we told it to go on the local drive. Open WinscpDemo.log.
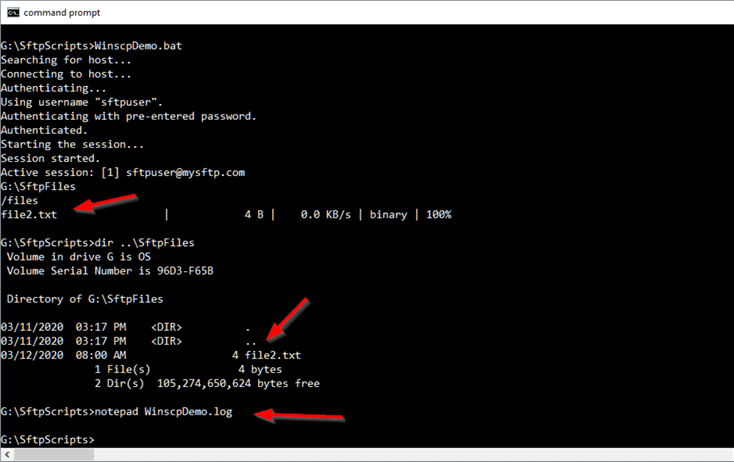
We see here where file1.txt was excluded because it's less than 1 day old and file2.txt was transferred.
Change Logging Level Verbosity, File Size and Retention
We'll go further and change the verbosity level of the log file. Currently, we're at the default of 0, but we can reduce or increase it by adding the /loglevel= switch to the WinSCP.com command line in the .bat file. The options are -1 (Reduced), 0 (Normal), 1 (Debug 1) and 2 (Debug 2).
@echo off
G:
cd \SftpScripts

"C:\Program Files (x86)\WinSCP\WinSCP.com" /log="G:\SftpScripts\WinscpDemo.log" /ini=nul /script="G:\SftpScripts\WinscpDemo.sftp" /loglevel=-1
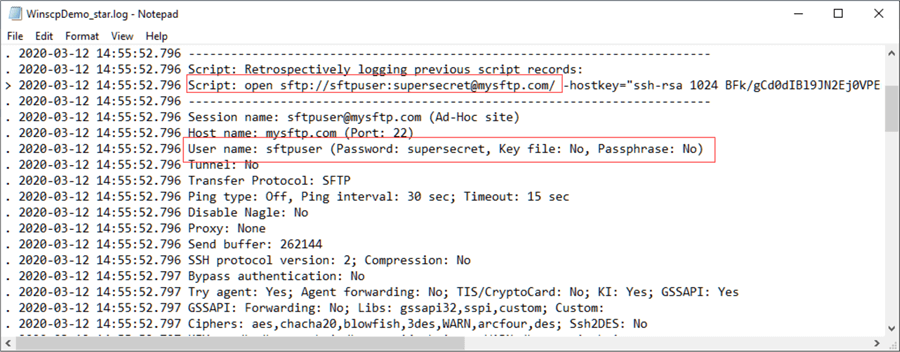
Another parameter that can be added to /loglevel switch, regardless of which logging level is chosen is to append a * to enable password logging.
@echo off
G:
cd \SftpScripts

"C:\Program Files (x86)\WinSCP\WinSCP.com" /log="G:\SftpScripts\WinscpDemo.log" /ini=nul /script="G:\SftpScripts\WinscpDemo.sftp" /loglevel=-1*
As shown here the password is now displayed in the log file.
Whether we increased the logging verbosity or not, we probably don't want the log file to grow out of control.
Add the WinSCP.com /logsize to the command line. We can use this to limit the size of the log file and roll it over up to 5 files. The file size is specified in bytes and you can optionally use K (kilobyte, M (megabyte) or G (gigabyte) after the file size to keep the command line a little cleaner.
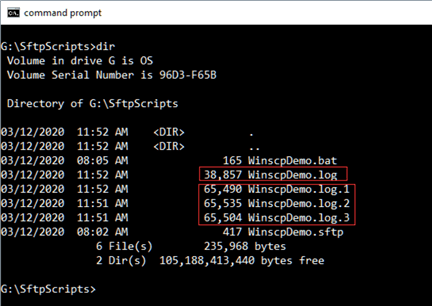
Let's increase the verbosity to 2, keep 3 archived log files and limit the log size to 64 kilobytes.
@echo off
G:
cd \SftpScripts

"C:\Program Files (x86)\WinSCP\WinSCP.com" /log="G:\SftpScripts\WinscpDemo.log" /ini=nul /script="G:\SftpScripts\WinscpDemo.sftp" /loglevel=2 /logsize=3*64K
And here's our log file with 3 archived copies after running the script multiple times.
Next Steps
We've touched on some basic and commonly used functionality with WinSCP. Following are some links that show you how to schedule a SFTP job and dig deeper into using WinSCP:
SFTP with SSIS and SQL Server Agent again:
- Using SFTP with SQL Server Integration Services
- SFTP in SQL Server Integration Services SSIS Package with Bitvise
- Automate SFTP File Transfer with SQL Server Agent and WinSCP
WinScp
About the author
 Joe Gavin is from the Greater Boston area. He started working with SQL Server and Sybase in 1998 in the financial services industry and has been a SQL Server Database Administrator for a dairy cooperative since 2011. He graduated from Northeastern University in Boston with a Bachelor of Science in Engineering Technology (BSET) degree in Computer Technology. Joe has spoken at the Boston and Providence SQL Saturday events.
 This author pledges the content of this article is based on professional experience and not AI generated.
View all my tips


