Problem
In almost any business environment, there is a need at some point for committing data back into the database, based on an Excel/CSV file. We usually will be provided with an Excel/CSV file and be required to apply CRUD (Create, Read, Update, and Delete) operations, and we need to do it quickly and efficiently. Now, there are many ways to upload Excel/CSV files, but most of these techniques focus on loading the data into a table. And when we are working in an OLTP environment where our tables are normalized, and data needs to be uploaded to multiple tables, then it becomes more challenging. Lots of people use a temporary table and then perform the required CRUD operation on the database with the temporary table, and when the task is completed, the table is dropped. However, this technique is cumbersome.
In this tip, I will describe how you can easily perform CRUD operations by turning each record in the spreadsheet into an individual data operation. This technique is extremely versatile and works for any Excel version and with any database requirement. I promise you once you learn it, you will stick with it because it is so easy and intuitive to use. I hope you will see how it puts you in control of the operations performed and how it makes it very easy if you need to repeat the process in the future.
Solution
In our example, I will use the AdventureWorks2017 database.
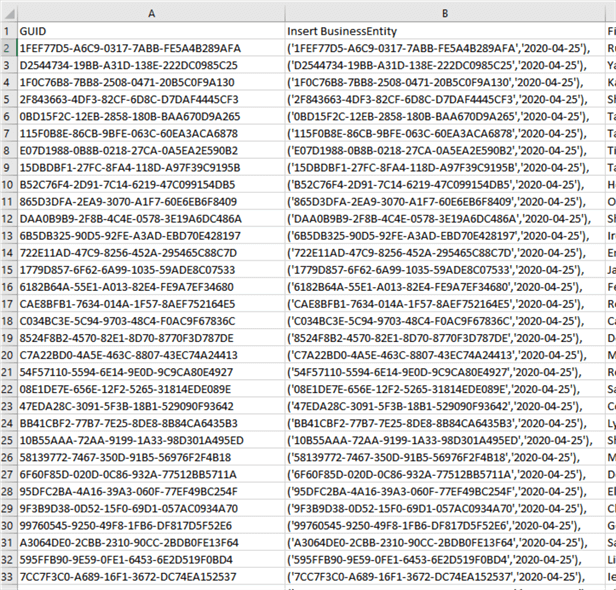
For this demonstration, I have prepared a list of new people on a spreadsheet with the data provided (name, person type, email, and phone). We will need to upload the data into the following tables:
- BusinessEntity
- Person
- PersonPhone
- EmailAddress
To create a Person in the AdventureWorks2017 database requires creating a Business entity first in the [BusinessEntity] table, and each entity requires a GUID value. In order to create the GUID value, I used an Excel formula. Once the GUIS value created, I have copied all the cells and pasted them as values, so the value will not change when modifying the spreadsheet. The Excel formula is provided in the "Additional Resources" section.
The first thing we need to do is to create a new Business Entity. To do so, we will need to create an INSERT statement. We can get the table INSERT statement by right-clicking the required table and selecting "Script Table as" > "INSERT To" > "New Query Editor Window". A new window will open with the required statement, what we need to do is to put the INSERT statement in one line by removing all the new line characters, up to the "Values" keyword.


Next, we will copy the INSERT statement to the cell next to the GUID value, but we will put it within quotes; this will allow us to modify the string.
="INSERT INTO [Person].[BusinessEntity] ([rowguid],[ModifiedDate]) VALUES"

What we need to do next is to add the following things to the inline script:
- The values of the GUID and Modified date
- Print out of the newly create BusinessEntityID, this value we will need to add it into our Excel sheet to process the other records
To complete step 1, we need to put between parentheses the GUID and Date, and both values should be passed as a string, which means we need to put the values in quotes; otherwise, the insert operation will fail. If you need to pass a number, then quotes won’t be required. For example, in our case, we need to be able to generate the following value (‘1FEF77D5-A6C9-0317-7ABB-FE5A4B289AFA’,‘2020-04-25’).
To generate the required syntax in Excel, we have the option of using the "CONCATENATE" function, or not. This comes as a matter of preference, and either way is correct. I will demonstrate both options.
Using CONCATENATE
The advantage of using CONCATENATE is a more structured way, and if you are using it often, it might be easier for you to understand the syntax involved. The down-side of using it, it’s causing the formula to be more verbose.
In our case, the cell syntax will be as follows:
=CONCATENATE("INSERT INTO [Person].[BusinessEntity] ([rowguid],[ModifiedDate]) VALUES ('",A2,"','",TEXT(TODAY(),"yyyy-MM-dd"),"');")

Copy and pasting the result to any text editor allows us to view the result easily.
INSERT INTO [Person].[BusinessEntity] ([rowguid],[ModifiedDate]) VALUES ('1FEF77D5-A6C9-0317-7ABB-FE5A4B289AFA','2020-04-25');
Once created, we should test the operation.

Using Excel Text Syntax
The other option is to concatenate values using the " & " character. In my opinion, this way is easier because it’s easier to read and the syntax is simpler.
For example, if we want to add the value from A3
- And the value is a number; then we will use this: A3
- If the field type is a string, we will add this: ‘"&A3&"’ - Notice the extra quote " ‘ " wrapped in the double quotes
- If we want to upload the date value, we need to make sure it is correctly formatted. What I usually use is the TEXT function, like so: TEXT(TODAY(),"yyyy-MM-dd")
Note, the TODAY() function can be replaced with reference to another column
If our syntax is correct, the cell will highlight in blue; if the color is black, it means we have some error in the syntax.
The Excel cell syntax is as follows:
="INSERT INTO [Person].[BusinessEntity] ([rowguid],[ModifiedDate]) VALUES ('"&A3&"','"&TEXT(TODAY(),"yyyy-MM-dd")&"');"
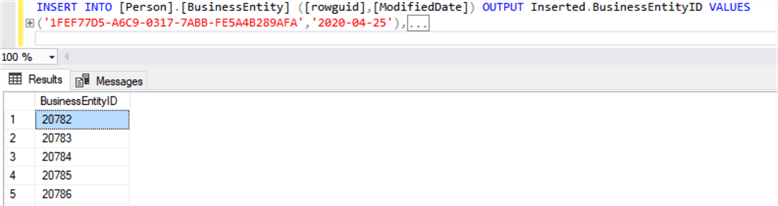
To complete step 2, we will need to add "OUTPUT Inserted.BusinessEntityID" to the insert statement; this statement will return the Results tab the BusinessEntityID values.
INSERT INTO [Person].[BusinessEntity] ([rowguid],[ModifiedDate]) OUTPUT Inserted.BusinessEntityID VALUES
In our scenario, we need to get one table with all business entity id values after processing all the rows; hence, it would be easier if we remove the INSERT statement from the cell, and keep only the values.
Therefore, we will keep the following code and populate it across all rows.
="('"&A3&"','"&TEXT(TODAY(),"yyyy-MM-dd")&"'),"
Notice, how I changed ";" at the end to "," , the reason is we now have one INSERT call.
Creating Business Entities
In this step, we will upload the data by using the INSERT statement created in the previous step, and we Copy-Paste the values to insert from column B into SQL Server, do not forget to replace the comma from the last line with ";", and execute the script.
Once the Business Entity ID is generated, we can easily copy-paste the values back into our spreadsheet so that we can process the next inserts statements.

In other scenarios, where we want to control the process, like update and delete operations, I would recommend including the full statement within the cell, unlike what we did for importing the Business Entity; this will make it easier for you to execute each cell separately.
Inserting Data
Our next step is to repeat the same technique for importing the other data from the spreadsheet into [Person].
First, create an insert statement for Person. You can use the automated scripting option, demonstrated above.
Remove the none required columns from the script created, and keep only what is needed for the import.
INSERT INTO [Person].[Person]
([BusinessEntityID],[PersonType],[FirstName],[LastName],[rowguid],[ModifiedDate])
VALUES
Create the required syntax in Excel.
="INSERT INTO [Person].[Person] ([BusinessEntityID],[PersonType],[FirstName],[LastName],[rowguid],[ModifiedDate])
VALUES ("&F2&",'"&E2&"','"&C2&"','"&D2&"','"&A2&"','"&TEXT(TODAY(),"yyyy-MM-dd")&"');"
If you copy the value from Excel, it should look something like this:
INSERT INTO [Person].[Person] ([BusinessEntityID],[PersonType],[FirstName],[LastName],[rowguid],[ModifiedDate])
VALUES(20782,'GC','Ruthanne','Flatley','1FEF77D5-A6C9-0317-7ABB-FE5A4B289AFA','2020-04-25');
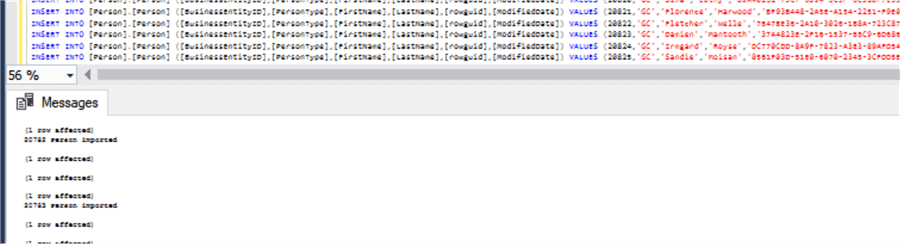
Now, let’s add a "Print" option for report the execution completed PRINT(CONCAT("&F2&",’ Person imported’));
The cell syntax should look as follows:
="INSERT INTO [Person].[Person] ([BusinessEntityID],[PersonType],[FirstName],[LastName],[rowguid],[ModifiedDate])
VALUES ("&F2&",'"&E2&"','"&C2&"','"&D2&"','"&A2&"','"&TEXT(TODAY(),"yyyy-MM-dd")&"');PRINT(CONCAT("&F2&",' Person imported'));"
And if we copy-paste the value to SQL-Server and execute, we will get the following

Now, let us create the INSERT script for [PersonPhone] and add the INSERT statement into a new cell so it is easier to write the code
="INSERT INTO [Person].[PersonPhone] ([BusinessEntityID],[PhoneNumber],[PhoneNumberTypeID],[ModifiedDate])
VALUES ("&F2&",'"&H2&"',2,'"&TEXT(TODAY(),"yyyy-MM-dd")&"');"
Copy-paste it into SQL should produce the following:
VALUES (20782,'(466) 254-8460′,1,’2020-04-26′);
Next, let us add the data INSERT statement into [Person].[EmailAddress]. Below is the Excel formula.
="INSERT INTO [Person].[EmailAddress] ([BusinessEntityID],[EmailAddress],[rowguid],[ModifiedDate])
VALUES ("&F2&",'"&G2&"','"&A2&"','"&TEXT(TODAY(),"yyyy-MM-dd")&"');"
Example with actual data.
INSERT INTO [Person].[EmailAddress] ([BusinessEntityID],[EmailAddress],[rowguid],[ModifiedDate])
VALUES (20782,'scarlet@msn.com','1FEF77D5-A6C9-0317-7ABB-FE5A4B289AFA','2020-04-26');
By now we should be ready to import all the data, all we need to do is to copy-paste the INSERT statements from Excel into SQL Server and execute the process.

We can now upload them all at once and get the status for each line executed.
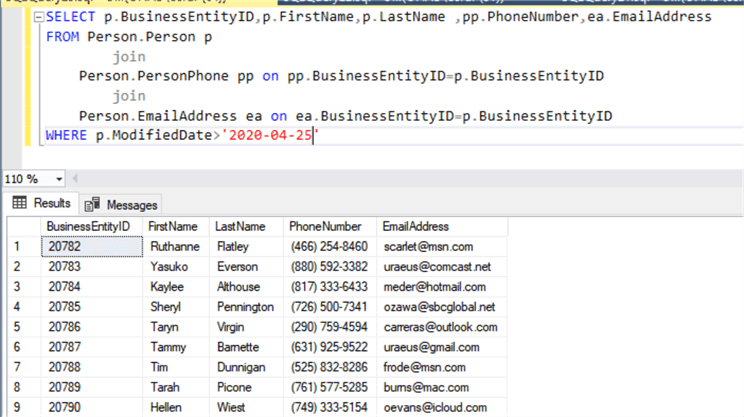
Lastly, we will run the following query to check that everything was imported correctly.
SELECT p.BusinessEntityID,p.FirstName,p.LastName ,pp.PhoneNumber,ea.EmailAddress
FROM Person.Person p
Join Person.PersonPhone pp on pp.BusinessEntityID=p.BusinessEntityID
Join Person.EmailAddress ea on ea.BusinessEntityID=p.BusinessEntityID
WHERE p.ModifiedDate > '2020-04-25'
Deleting Data
Lastly, we need will clean up the import, we need to delete the records in the correct order due to the existing relationships:
- Delete Email and Phones
- Delete Person
- Delete Business Entity
Therefore, we will create a delete person statement in one Excel Cell, where the first operation deletes the phone and email, and the last operation deletes the Person entity.
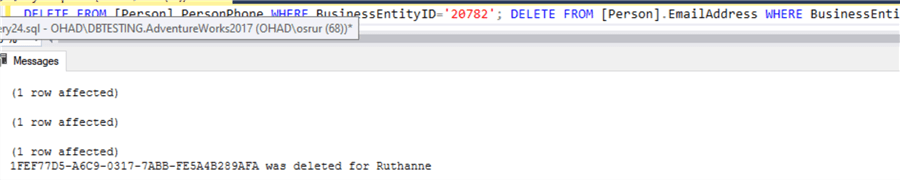
="DELETE FROM [Person].PersonPhone WHERE BusinessEntityID='"&F2&"'; DELETE FROM [Person].EmailAddress WHERE BusinessEntityID='"&F2&"';DELETE FROM [Person].[Person] WHERE rowguid='"&A2&"'; PRINT(CONCAT('"&A2&"',' was deleted for "&C2&"'));"
Next, we will create the delete statement for the Business entity in the next cell.
="DELETE FROM [Person].[BusinessEntity] WHERE rowguid='"&A2&"'; PRINT(CONCAT('"&A2&"',' was deleted for "&C2&"'));"
The delete statement should look like the following.
DELETE FROM [Person].[BusinessEntity]
WHERE rowguid='1FEF77D5-A6C9-0317-7ABB-FE5A4B289AFA';
PRINT(CONCAT('1FEF77D5-A6C9-0317-7ABB-FE5A4B289AFA',' was deleted for Ruthanne'));
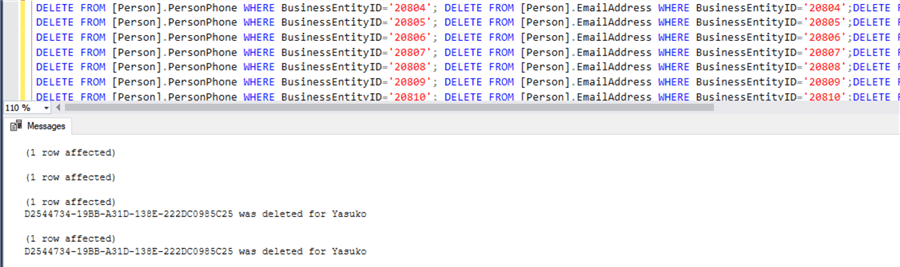
Now, we can populate the formula across all rows, and copy-paste it into SQL Server.

After copy-pasting it all into SQL, we can execute the process, and this will delete all the data we have imported.
A few more useful uses cases
You can add Excel formulas between the "&&". For examples, you can use the following to change True/False value to Boolean:
"&if(A2=True,1,0)&"
You can include very handy formulas like vLookup, IF statement, Concat, etc.
=PRINT(CONCAT('"&A2&"',' was deleted for "&concat(C2," ",D2)&"'));"Here is what the output looks like from the above formula.
PRINT(CONCAT('1FEF77D5-A6C9-0317-7ABB-FE5A4B289AFA',' was deleted for Ruthanne Flatley'));You can use it for executing a stored procedure multiple times with different parameters.
="exec spEmployeeDetails '"&A2&"';"
Here is what the output looks like from the above formula.
exec spEmployeeDetails '1FEF77D5-A6C9-0317-7ABB-FE5A4B289AFA';
Summary
As you can understand by now, this method is extremely versatile and can resolve many use cases for importing/ updating or deleting data from the server by using spreadsheets. The power of dynamically creating the execution text based on values in the spreadsheets makes it a breeze to handle these daily tasks. Once the sheet is created with all required formulas, it makes it very easy to repeat the process, all is required is to copy-paste the new dataset into the spreadsheet.
Resources
Creating GUID in Excel – https://stackoverflow.com/questions/14990236/how-to-create-a-guid-in-excel
Copy-Paste this to your cell:
=CONCATENATE(DEC2HEX(RANDBETWEEN(0,4294967295),8),"-",DEC2HEX(RANDBETWEEN(0,42949),4),"-",DEC2HEX(RANDBETWEEN(0,42949),4),"-",DEC2HEX(RANDBETWEEN(0,42949),4),"-",DEC2HEX(RANDBETWEEN(0,4294967295),8),DEC2HEX(RANDBETWEEN(0,42949),4))
I used the website https://www.randomlists.com/ to generate the required data for the provided file
Next Steps
- Practice this method by changing the values for one of the columns and then try to update the values in the database
- Download Now – Sample Excel Spreadsheet

Ohad Srur is the Managing Director of Data-Best based in Sydney, Australia, which is a consulting company that focuses on assisting to K-12 independent schools to improve their use of their technology systems. Ohad loves to develop database solutions, and wrangle with code and data to automate processes as much as possible. Ohad is a Microsoft Solution Expert (MCSE) Data Platform since 2016 and has been working with the SQL Server stack since 2011. Other than SQL Server stack, he likes to work with PowerShell and Python.