Problem
We have deployed SQL Server on Linux for our new database application. We want to provide a disaster recovery solution that would allow us to automatically restore backups to a secondary instance. How do I configure SQL Server on Linux to achieve this goal?
Solution
Regularly restoring database backups on another instance is the only way to check validity of backups. In my consulting work, I have encountered several incidents involving restoring databases from backups only to find out that the backups were also corrupted. It doesn’t matter if you can perform page-level restores as described in this tip when your backups are corrupted. However, as the size of the databases grow, so do the size of the backups. This not only impacts storage requirements but also recovery time objective. Your disaster recovery solution should meet your recovery objectives. One way to achieve this goal is to use SQL Server Log Shipping.
SQL Server Log Shipping allows you to automatically send transaction log backups of databases from a SQL Server instance to one or more secondary instances. The transaction log backups are applied to each of the secondary databases individually. This helps you achieve multiple goals: (1) regularly restore database backups on another instance, (2) provide a disaster recovery solution for your databases, and (3) meet your recovery time objectives for disaster recovery. Because transaction log backups are smaller than full database backups, it also helps reduce storage space requirements.
Configuring SQL Server Log Shipping when running on a Windows operating system is described in the tip Step By Step SQL Server Log Shipping. While the process on the SQL Server side is the same regardless of the operating system, the steps to prepare the directories for storing transaction log backups are not. This requires an understanding of the Linux operating system, sharing directories on the network, and filesystem permissions.
This tip will focus on configuring Log Shipping between SQL Server on Linux instances. Below are the details of the implementation. The servers can access the Internet to download the necessary components. Keep in mind that CentOS Linux is not officially supported to run SQL Server on Linux and is only used for demonstration purposes since CentOS Linux is a community-supported distribution based on Red Hat Enterprise Linux (RHEL), the officially supported distribution. For deployment in production, use RHEL. However, the steps outlined below will work for RHEL.

Here’s a high-level overview of the steps for configuring Log Shipping on SQL Server on Linux:
- Configure the primary server
- Configure the secondary server
- Setup Log Shipping on the primary server
- Setup Log Shipping on the secondary server
The process that makes SQL Server Log Shipping work consists of these three (3) steps:
- Backup the transaction log within a specified interval, say every 15 minutes
- Copy the log backup from the primary server to the secondary server
- Restore the copied log backup while leaving the database in either no-recovery or read-only, standby mode
So, whether you are configuring SQL Server Log Shipping between the same or different operating systems, like from Windows to Linux, these will be the same 3 steps. For the secondary server to have access to the transaction log backups on the primary server, they have to be stored on a network file share. For this tip, we will be using Samba and the Common Internet File System (CIFS). CIFS is an implementation of the Server Message Block (SMB) protocol. It is used to share filesystems, printers, or serial ports over a network and is most commonly used with Windows operating systems. You can think of CIFS as a specific implementation of SMB that Microsoft created. Samba is the standard Windows interoperability suite of programs for Linux and Unix and is based on the SMB protocol. Because of the differences between Unix and Windows, especially among the advocates of both operating systems, a facilitator is necessary to make sure hostility is kept to a minimum. That’s what Samba does. Configuration of Samba and CIFS is key to making Log Shipping for SQL Server on Linux work.
Configure the primary server
We’ll start with configuring Samba on the primary server. Run the command below to install Samba on the Linux server.
sudo yum -y install samba

After installing Samba, create a directory to store the transaction log backups. You can create the directory anywhere. Run the command below to create the directory named TLogsLS in the /var/opt/mssql directory. Since the mssql user owns this directory, you need root privileges to create a new directory inside it.
sudo mkdir /var/opt/mssql/TLogsLS
And because the directory is created with root privileges, the root user (and group) owns it.

For the SQL Server database engine to store transaction log backups in this directory, you need to assign ownership of the directory to the mssql user and grant it read/write/execute permissions. Run the command below to assign ownership of the directory to the mssql user.
sudo chown mssql:mssql /var/opt/mssql/TLogsLS
Run the command below to grant the mssql user the read/write/execute permissions to the directory. The Octal (or numeric) value of the permissions is 0700.
sudo chmod 0700 /var/opt/mssql/TLogsLS
The drwx means that this is a directory and that the mssql user has read/write/execute permissions.

Next, you need to edit the /etc/samba/smb.conf file and add the newly created directory as a network share. The smb.conf file contains the runtime configuration for Samba. This is used to describe the details of a share. The format of a section that describes a share is shown below:
[sharename]
parameter = value
The common parameters that you can include for describing the details of a share are shown below:
- [sharename] – the name you give to a shared directory
- path – the path of the directory that you will share
- comment – the description of the shared resource
- guest ok – this specifies if guest access is allowed. A value of yes allows guest access, no password will be required to access the share. A synonym for this parameter is public
- force user – this specifies a username that will be assigned as the default user for all users connecting to this service
- writeable – this specifies if users accessing the share can have write permissions. A value of yes means read/write and a value of no means read-only. A reverse synonym for this parameter is read only
- browsable – this specifies whether the share is visible in View network computers and devices in Windows
A complete list of the different parameters and their corresponding values can be found on the smb.conf documentation. Backup the smb.conf file before you make any modifications to it. It’s easier to revert from backup than to remember the changes you’ve made. Run the command below to create a copy of the smb.conf file.
sudo cp /etc/samba/smb.conf /etc/samba/smb.conf.backup
Use a text editor to modify the smb.conf file and add the following at the end of the file. Note that you need root privileges to modify the file.
[TLogsLS]
path = /var/opt/mssql/TLogsLS
browsable = yes
public = yes
writable = no
force user = mssql

Run the command below to validate the configuration settings in the smb.conf file.
sudo testparm

Run the command below to restart the Samba services for the configuration to take effect.
sudo systemctl restart smb.service
sudo systemctl restart nmb.service
You also need configure the Linux firewall to allow Samba traffic. Run the command below to configure FirewallD on RHEL/CentOS to allow Samba traffic.
sudo firewall-cmd --permanent --zone=public --add-service=samba
sudo firewall-cmd --reload
Finally, you need to create a user account that will access Samba. For SQL Server Log Shipping, this will be the mssql user. Note that this user account runs the SQL Server daemon/service on both the primary and secondary server. The secondary server will connect to the primary server to copy the transaction log backups.
sudo smbpasswd -a mssql
This simply adds the existing mssql user on the primary server to the Samba internal database. If you run this command before the mssql user has been created on the server, you will get an error. You will be prompted to enter a password that you will later use to connect to the shared directory. Take note of the password. You will use this to configure the secondary server.

Configure SELinux on the primary server
Depending on the configuration of your Linux server, you may also have to make configuration changes to SELinux. SELinux is a Linux kernel security module that provides a mechanism for supporting access control security policies. While some would suggest disabling SELinux, it’s not a security best practice. Talk to your security team about the corporate policies regarding SELinux configuration.
You need to check the status of SELinux. Run the command below to display the status of SELinux.
sudo getenforce

A value of Enforcing means SELinux is enabled and policy rules are enforced. You need to add policy rules that would allow Samba. In order to proceed with the configuration you may need to install the semanage utility, the tool you will use to configure SELinux. Attempting to run semanage without installing will get an error message like the one below.

Run the command below to find which package the semanage utility belongs to.
sudo yum provides semanage

In this example the policycoreutils-python-2.5-34.el7.x86_64 package contains the semanage utility. Run the command below to install this package.
sudo yum install policycoreutils-python-2.5-34.el7.x86_64

After the package is installed, you can now use semanage to configure SELinux. Run the command below to configure SELinux to share any standard directory as read-only.
sudo setsebool -P samba_export_all_ro=1
Because the shared directory will only be accessed through Samba, it should be labeled samba_share_t, which gives Samba read and write access. Run the command below to change all the files in the /var/opt/mssql/TLogsLS directory to type samba_share_t. The -a parameter adds a new record while the -t parameter defines a type (samba_share_t).
sudo semanage fcontext -at samba_share_t "/var/opt/mssql/TLogsLS(/.*)?"
This change will be made persistent and will survive the execution of the restorecon command below. Run the command below to restore the default SELinux contexts to the directory and the files inside the /var/opt/mssql/TLogsLS. You want the mssql user to perform the tasks on behalf of the SQL Server database engine with the original security context. In this case, read and write transaction log backups.
sudo restorecon /var/opt/mssql/TLogsLS
After configuring SELinux, you can proceed to work on the secondary server.
Configuring the secondary server
In Log Shipping, the secondary server acts as a client to the primary server by connecting to the shared directory and copying the transaction log backups. In order to do so, it needs to have a CIFS client to allow mounting of SMB shares on a Linux system. Run the command below to install the CIFS client on the secondary server.
sudo yum install -y cifs-utils

After installing the CIFS client, create a directory to store the transaction log backups copied from the primary server. You can create the directory anywhere. Run the command below to create the directory named TLogsLS in the /var/opt/mssql directory. Since the mssql user owns this directory, you need root privileges to create a new directory inside it.
sudo mkdir /var/opt/mssql/TLogsLS
And because the directory is created with root privileges, the root user (and group) owns it.

For the mssql user to store copied transaction log backups from the primary server into this directory, you need to assign ownership of the directory to the user account and grant read/execute permissions. Run the command below to assign ownership of the directory to the mssql user.
sudo chown mssql:mssql /var/opt/mssql/TLogsLS
Run the command below to grant the mssql user the read/execute permissions to the directory. The Octal (or numeric) value of the permissions is 0550.
sudo chmod 0550 /var/opt/mssql/TLogsLS
The dr-x means that this is a directory and that the mssql user has read/execute permissions.

Next, run the command below to create a hidden file that will contain the credentials you provided for the Samba user on the primary server. The dot (.) in the beginning of the filename specifies that this is a hidden file.
sudo touch /var/opt/mssql/.smbcreds_mssql
Edit the file to contain the following:
username=mssql
password=mYSecUr3PAssw0rd
This is the credential you defined on the primary server for the Samba account using the smbpasswd command. This file will be read to load the credentials needed to connect to the Samba shared directory on the primary server. Make sure the mssql user owns the file. Run the command below to assign ownership of the file to the mssql user.
sudo chown mssql:mssql /var/opt/mssql/.smbcreds_mssql
To protect the file from unauthorized access, run the command below to restrict access to the file by only allowing the file owner (mssql) read-only permissions. The Octal (or numeric) value of the permissions is 0400.
sudo chmod 0400 /var/opt/mssql/.smbcreds_mssql
After the directory has been created and permissions assigned to the mssql user, you will use it to mount the Samba share on the primary server. Think of this as mapping a network folder as a directory in Windows. In this example, the /var/opt/mssql/TLogsLS directory on the secondary server will be mapped to the Samba shared directory //centossql02/TLogsLS on the primary server. Run the command below to mount the //centossql02/TLogsLS directory to the /var/opt/mssql/TLogsLS directory.
sudo mount //centossql02/TLogsLS /var/opt/mssql/TLogsLS -o username=mssql

Note that by using the mount command with the username option as specified in the -o argument, you need to provide the password for the mssql user. This becomes challenging when the server reboots as it will not automatically mount the Samba shared directory. You want to make this process – mounting the Samba shared directory and providing the mssql user credentials – automated so it survives server reboots. To do this, you need to configure the /etc/fstab file. The /etc/fstab file is used to define the Linux filesystem table. It contains all available disks, disk partitions, and their options – including mounted Samba shared directories. Each line in the /etc/fstab file describes a filesystem, containing six fields separated by one or more spaces or a tab. Add the line below to the /etc/fstab file to mount the //centossql02/TLogsLSSamba shared directory to the /var/opt/mssql/TLogsLS directory. You need root privileges to modify the file.
//centossql02/TLogsLS /var/opt/mssql/TLogsLS cifs credentials=/var/opt/mssql/.smbcreds_mssql,ro,uid=mssql,gid=mssql 0 0
The first field in this entry refers to the block device or, in this case, a Samba shared directory. The second field refers to the mountpoint. The third field – cifs – refers to the filesystem type. The fourth field provides a list of options used when mounting the filesystem. The following options are used in this example:
- credentials – this defines the file containing the credentials to use to log on to the Samba shared directory
- ro – means read-only. For read-write, use rw
- uid – means the user that will own all files or directories on the mounted filesystem
- gid – means the group that will own all files or directories on the mounted filesystem
The fifth field describes whether the filesystem should be dumped, or what SQL Server DBAs commonly refer to as backup. A value of 0 means the filesystem will not be backed up. The sixth field describes whether this filesystem will be checked on server boot. A value of 0 means this filesystem will not be checked. With the Samba shared directory defined as a mountpoint in the /etc/fstab file, run the command below to mount all the filesystem defined.
sudo mount -a
A simple way to check if this works is by creating a file on the primary server and checking if it is visible on the secondary server. The image below shows creating files on the primary server and displaying the contents of the directory on the secondary server using ssh.

Setup Log Shipping on the primary server
Setting up Log Shipping on the primary server is the same as how it is done with SQL Server on Windows, using the sp_add_log_shipping_primary_database stored procedure. In the sample code below, note that the @backup_share parameter value is the same as the @backup_directory parameter value. The transaction log backups will be stored on the primary server’s local directory /var/opt/mssql/TLogsLS. Also, be sure that the @secondary_server of the sp_add_log_shipping_primary_secondary stored procedure can be resolved via its hostname.
DECLARE @LS_BackupJobId  AS uniqueidentifier
DECLARE @LS_PrimaryId    AS uniqueidentifier
DECLARE @SP_Add_RetCode  AS int
EXEC @SP_Add_RetCode = master.dbo.sp_add_log_shipping_primary_database
         @database = N'Northwind'
        ,@backup_directory= N'/var/opt/mssql/TLogsLS/'
        ,@backup_share = N'/var/opt/mssql/TLogsLS/'
        ,@backup_job_name = N'LSBackup_Northwind'
        ,@backup_retention_period = 4320
        ,@backup_compression = 2
        ,@backup_threshold = 60
        ,@threshold_alert_enabled = 1
        ,@history_retention_period = 5760
        ,@backup_job_id = @LS_BackupJobId OUTPUT
        ,@primary_id = @LS_PrimaryId OUTPUT
        ,@overwrite = 1

IF (@@ERROR = 0 AND @SP_Add_RetCode = 0)
BEGIN

DECLARE @LS_BackUpScheduleUID  AS uniqueidentifier
DECLARE @LS_BackUpScheduleID   AS int

EXEC msdb.dbo.sp_add_schedule
        @schedule_name =N'LSBackupSchedule'
        ,@enabled = 1
        ,@freq_type = 4
        ,@freq_interval = 1
        ,@freq_subday_type = 4
        ,@freq_subday_interval = 15
        ,@freq_recurrence_factor = 0
        ,@active_start_date = 20170418
        ,@active_end_date = 99991231
        ,@active_start_time = 0
        ,@active_end_time = 235900
        ,@schedule_uid = @LS_BackUpScheduleUID OUTPUT
        ,@schedule_id = @LS_BackUpScheduleID OUTPUT

EXEC msdb.dbo.sp_attach_schedule
        @job_id = @LS_BackupJobId
        ,@schedule_id = @LS_BackUpScheduleID

EXEC msdb.dbo.sp_update_job
        @job_id = @LS_BackupJobId
        ,@enabled = 1
END

EXEC master.dbo.sp_add_log_shipping_alert_job

EXEC master.dbo.sp_add_log_shipping_primary_secondary
        @primary_database = N'Northwind'
        ,@secondary_server = N'centossql03'
        ,@secondary_database = N'Northwind'
        ,@overwrite = 1
Be sure to initialize the database prior to running the SQL Server Agent jobs. Backup the database on the primary server and restore it on the secondary server using the WITH NORECOVERY option.
Setup Log Shipping on the secondary server
Similarly, setting up Log Shipping on the secondary server is the same as how it is done with SQL Server on Windows, using the sp_add_log_shipping_secondary_primary stored procedure. In the sample code below, note that the @backup_source_directory parameter value is the same as the @backup_destination_directory parameter value. Recall that the /var/opt/mssql/TLogsLS directory on the primary server is mounted as a Samba shared directory in the /var/opt/mssql/TLogsLS directory on the secondary server. From the point-of-view of the secondary server, the Samba shared directory now appears as a local directory. In the same way, be sure that the @primary_server parameter can be resolved via its hostname.
DECLARE @LS_Secondary__CopyJobId     AS uniqueidentifier
DECLARE @LS_Secondary__RestoreJobId  AS uniqueidentifier
DECLARE @LS_Secondary__SecondaryId   AS uniqueidentifier
DECLARE @LS_Add_RetCode              AS int

EXEC @LS_Add_RetCode = master.dbo.sp_add_log_shipping_secondary_primary
        @primary_server = N'centossql02'
        ,@primary_database = N'Northwind'
        ,@backup_source_directory= N'/var/opt/mssql/TLogsLS/'
        ,@backup_destination_directory = N'/var/opt/mssql/TLogsLS/'
        ,@copy_job_name = N'LSCopy_Northwind'
        ,@restore_job_name = N'LSRestore_Northwind'
        ,@file_retention_period = 4320
        ,@overwrite = 1
        ,@copy_job_id = @LS_Secondary__CopyJobId OUTPUT
        ,@restore_job_id = @LS_Secondary__RestoreJobId OUTPUT
        ,@secondary_id = @LS_Secondary__SecondaryId OUTPUT

IF (@@ERROR = 0 AND @LS_Add_RetCode = 0)
BEGIN

DECLARE @LS_SecondaryCopyJobScheduleUID AS uniqueidentifier
DECLARE @LS_SecondaryCopyJobScheduleID  AS int

EXEC msdb.dbo.sp_add_schedule
        @schedule_name =N'DefaultCopyJobSchedule'
        ,@enabled = 1
        ,@freq_type = 4
        ,@freq_interval = 1
        ,@freq_subday_type = 4
        ,@freq_subday_interval = 15
        ,@freq_recurrence_factor = 0
        ,@active_start_date = 20170418
        ,@active_end_date = 99991231
        ,@active_start_time = 0
        ,@active_end_time = 235900
        ,@schedule_uid = @LS_SecondaryCopyJobScheduleUID OUTPUT
        ,@schedule_id = @LS_SecondaryCopyJobScheduleID OUTPUT

EXEC msdb.dbo.sp_attach_schedule
        @job_id = @LS_Secondary__CopyJobId
        ,@schedule_id = @LS_SecondaryCopyJobScheduleID

DECLARE @LS_SecondaryRestoreJobScheduleUID  AS uniqueidentifier
DECLARE @LS_SecondaryRestoreJobScheduleID   AS int

EXEC msdb.dbo.sp_add_schedule
        @schedule_name =N'DefaultRestoreJobSchedule'
        ,@enabled = 1
        ,@freq_type = 4
        ,@freq_interval = 1
        ,@freq_subday_type = 4
        ,@freq_subday_interval = 15
        ,@freq_recurrence_factor = 0
        ,@active_start_date = 20170418
        ,@active_end_date = 99991231
        ,@active_start_time = 0
        ,@active_end_time = 235900
        ,@schedule_uid = @LS_SecondaryRestoreJobScheduleUID OUTPUT
        ,@schedule_id = @LS_SecondaryRestoreJobScheduleID OUTPUT

EXEC msdb.dbo.sp_attach_schedule
        @job_id = @LS_Secondary__RestoreJobId
        ,@schedule_id = @LS_SecondaryRestoreJobScheduleID

END
DECLARE @LS_Add_RetCode2 AS int
IF (@@ERROR = 0 AND @LS_Add_RetCode = 0)
BEGIN

EXEC @LS_Add_RetCode2 = master.dbo.sp_add_log_shipping_secondary_database
        @secondary_database = N'Northwind'
        ,@primary_server = N'centossql02'
        ,@primary_database = N'Northwind'
        ,@restore_delay = 0
        ,@restore_mode = 0
        ,@disconnect_users = 0
        ,@restore_threshold = 45
        ,@threshold_alert_enabled = 1
        ,@history_retention_period = 5760
        ,@overwrite = 1

END

IF (@@error = 0 AND @LS_Add_RetCode = 0)
BEGIN

EXEC msdb.dbo.sp_update_job
        @job_id = @LS_Secondary__CopyJobId
        ,@enabled = 1

EXEC msdb.dbo.sp_update_job
        @job_id = @LS_Secondary__RestoreJobId
        ,@enabled = 1

END
You can view the status of the Log Shipping using the Transaction Log Shipping Status report in SQL Server Management Studio. Keep in mind that since there is no copying of transaction log backup files being done between the primary and the secondary servers, the Last Copied File field will be empty.
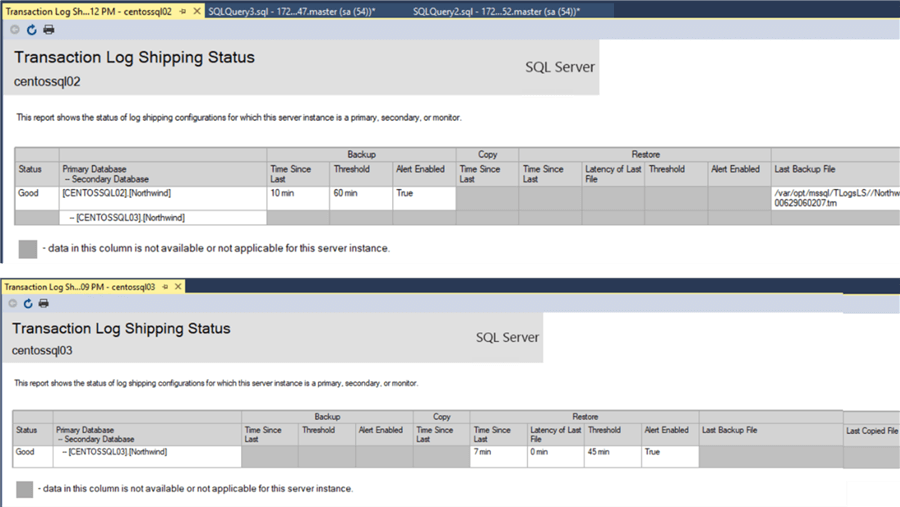
You will also see this in the Log Shipping Copy job history.

Next Steps
- Review the previous tip Step By Step SQL Server Log Shipping to have an understanding of the processes involved
- Test your disaster recovery strategy by failing over the databases from your primary server to your secondary server

Edwin M. Sarmiento is the Managing Director of 15C, a consulting and training company that specializes on designing, implementing and supporting SQL Server infrastructures. He is a Microsoft SQL Server MVP and Microsoft Certified Master from Ottawa, Canada specializing in high availability, disaster recovery and system infrastructures running on the Microsoft server technology stack ranging from Active Directory to SharePoint and anything in between. He is very passionate about technology but has interests in music, professional and organizational development, and leadership and management matters when not working with databases. Edwin lives up to his primary mission statement: “To help people and organizations grow and develop their full potential.”
- MSSQLTips Awards: Champion Award (100+ tips) – 2017 | Author of the Year Contender – 2020, 2017