Problem
As a developer who using SQL in any capacity, it is likely that at some point you will need to insert new data into a table. Whether it is part of a transactional application, ETL process, or populating a configuration table, there are many scenarios where you might find yourself needing to add new data to a table. The INSERT INTO SQL statement allows you to insert one or more rows into an existing table, either from another existing table, or by specifying the VALUES you want to insert. This article will explore how the statement works and provide a number of examples.
Solution
To execute the code in this article, it assumes you have SQL Server Management Studio installed and a SQL Server you can connect to and work in.
If needed, download a free version of SQL Server or SQL Server Management Studio.
Create Test Table
In order to test out the code in the below article, please create this sample table with the following SQL statement including data types, NULL value and Primary Key constraints that we will be using in your environment to insert data into:
CREATE TABLE [HumanResources].[DepartmentTest] (
    [DepartmentID] [smallint] NOT NULL
   ,[Name] varchar(255) NOT NULL
   ,[GroupName] varchar(255) NULL
   ,[ModifiedDate] [datetime] NOT NULL
   ,CONSTRAINT [PK_Department_DepartmentIDTest] PRIMARY KEY CLUSTERED ([DepartmentID] ASC)
   )
For clarification, HumanResources is the schema name and DepartmentTest is the name of the table.
NOTE – The table does not have an identity column to auto_increment a unique value for each new record, nor do any of the columns have a default value.
INSERT INTO SQL Syntax
The Insert Into syntax is broken down into two main parts:
- Which table and columns you are inserting into
- What values you are inserting into that table
Here is the most basic syntax of this command, where we are inserting one row of defined data into a table using INSERT INTO VALUES. Note that the order of the comma separated data in the values command will line up with the corresponding column you want to insert that data into.
INSERT INTO ...
   (
   ,
   ,
   ,
   ,
   )
VALUES
   (
    "value_for_column_a"
   ,"value_for_column_b"
   ,"value_for_column_c"
   ,"value_for_column_d"
   )
Next, let’s apply this and insert an example record into our table:
INSERT INTO [HumanResources].[DepartmentTest] (
    [DepartmentID]
   ,[Name]
   ,[GroupName]
   ,[ModifiedDate]
   )
VALUES (
    1
   ,'MSSQL_Dept1'
   ,'MSSQL_Group1'
   , GETDATE()
   )
As you can see, the result of executing this query is a single row of data that we can see when selecting (all) * from the table. The GETDATE() function is used to capture the date values.
SELECT *
FROM [HumanResources].[DepartmentTest] 
Quick Tip to Generate INSERT INTO Statements
To quickly generate an insert statement in SQL Server Management Studio for a table that already exists, right click the table, navigate to Script Table as > INSERT To > New Query Editor Window. This will generate the base code for the INSERT INTO SQL statement.

INSERT INTO Syntax – Specifying List of Columns
Before getting into other examples, it is important to note that you can choose to specify the exact list of columns you want to insert data into, or you can specify no columns, which means you are choosing to insert data into all columns.
Here is an example where we do not specify any column names, and the INSERT statement expects a value for every column for a new row.
INSERT INTO [HumanResources].[DepartmentTest]
VALUES (
    2
   ,'MSSQL_Dept2'
   ,'MSSQL_Group2'
   ,GETDATE()
   )
SELECT statement result is DepartmentID 2:
SELECT *
FROM [HumanResources].[DepartmentTest]
Here is an example where we specify only a subset of the columns, leaving out the GroupName.
INSERT INTO [HumanResources].[DepartmentTest] (
    [DepartmentID]
   ,[Name]
   ,[ModifiedDate]
   )
VALUES (
    3
   ,'MSSQL_Dept3'
   ,GETDATE()
   )
SELECT Statement result is DepartmentID 3:
SELECT *
FROM [HumanResources].[DepartmentTest]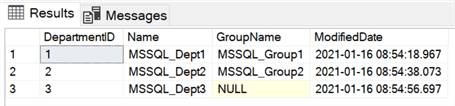
Possible Errors
If the amount of data you have specified does not match the number of columns in the table, you will get the following error:

Likely, you have missed a column in your VALUES data by missing the column entirely or forgetting to type a comma. Here you can see we specified 3 columns in the column list, but only provided two values of data.
Similarly, you will get an error if you try to insert data to a column of the wrong type. For example, trying to insert a string to an integer column will result in an error.
When considering this syntax, it is critical to note that if a column in your table is not NULLABLE, you must insert data into it. A column that is NOT NULLABLE requires to always have data in it.
This query will fail because we are missing the Name column, which is NOT NULLABLE in the following statement.
INSERT INTO [HumanResources].[DepartmentTest] (
    [DepartmentID]
   ,[GroupName]
   ,[ModifiedDate]
   )
VALUES (
    4
   ,'MSSQL_Group'
   ,GETDATE()
   )
You can check whether columns are nullable by looking at the table definition:

Generally, it is a best practice to specify the column names in your insert statement, so that even if the underlying table changes in the future your code will not break.
INSERT INTO Syntax – Multiple Rows Using VALUES
Just as you can insert a single row of VALUES, you can insert multiple rows simply by comma separating the rows themselves.
Here is how that looks:
INSERT INTO [HumanResources].[DepartmentTest] (
    [DepartmentID]
   ,[Name]
   ,[GroupName]
   ,[ModifiedDate]
   )
VALUES (
    5
   ,'MSSQL_Dept5'
   ,'MSSQL_Group5'
   ,GETDATE()
   )
   ,(
    6
   ,'MSSQL_Dept6'
   ,'MSSQL_Group7'
   ,GETDATE()
   )
   ,(
    7
   ,'MSSQL_Dept8'
   ,'MSSQL_Group8'
   ,GETDATE()
   )
Result is DepartmentID 5, 6 and 7:
SELECT *
FROM [HumanResources].[DepartmentTest]
SQL INSERT INTO Syntax – Row with Variables
There might be a scenario where you don’t want to hardcode the values in your insert statement, as you need the data being inserted to be more dynamic. In these cases, you can use variables. This way, you only have to change the variable values, not the insert statement itself.
Here is an example where we are inserting a row of data using declared variables:
DECLARE @DeptID INT = 8
DECLARE @DeptName VARCHAR(50) = 'Variable Dept'
DECLARE @GroupName VARCHAR(50) = 'Variable Group'

INSERT INTO [HumanResources].[DepartmentTest] (
    [DepartmentID]
   ,[Name]
   ,[GroupName]
   ,[ModifiedDate]
   )
VALUES (
    @DeptID
   ,@DeptName
   ,@GroupName
   ,GETDATE()
   )
Result is DepartmentID 8:
SELECT *
FROM [HumanResources].[DepartmentTest]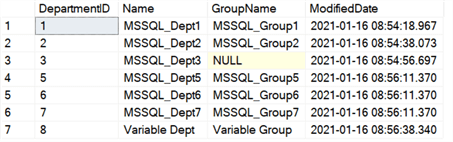
SQL INSERT INTO Syntax – Row with Stored Procedures
To build on the last example, if your insert statement is a dynamic and programmatic part of your application or it will need to be called repeatedly and passed parameters by some other ‘job’, you will want to wrap it in a stored procedure.
If you have not used a stored procedure before, this tip can help you get started:
The stored procedure can have any number of parameters and those parameters will act as the dynamic values of the data you will be inserting into the table. That way, this procedure can be called any time dynamic data needs to be inserted into the table.
In this example, the stored procedure can insert one row of data per call.
Here is the stored procedure definition: SQL Server Stored Procedure Tutorial
CREATE PROCEDURE sp_InsertToDepartment (
    @DeptId INT
   ,@DeptName VARCHAR(50)
   ,@GroupName VARCHAR(50)
   )
AS
BEGIN
   INSERT INTO [HumanResources].[DepartmentTest] (
       [DepartmentID]
      ,[Name]
      ,[GroupName]
      ,[ModifiedDate]
      )
   VALUES (
       @DeptID
      ,@DeptName
      ,@GroupName
      ,GETDATE()
      )
END
Here is an example calling the stored procedure:
EXECUTE sp_InsertToDepartment 9, 'Sproc Dept', 'Sproc Group'Finally, the resulting data in the table, DepartmentID 9.
SELECT *
FROM [HumanResources].[DepartmentTest]
INSERT INTO Syntax – Rows with SELECT Statement
Even more often than using VALUES, you might find that you need to insert data into one table FROM another table. Using INSERT INTO SELECT, you can craft any query you want (using filters, aggregates, etc.) to select from one table and insert the data into another table. In this case, as before, your target table needs to exist for this to work.
Let’s create a replica table to work with:
CREATE TABLE [HumanResources].[DepartmentTest_Replica] (
    [DepartmentID] [smallint] NOT NULL
   ,[Name] varchar(255) NOT NULL
   ,[GroupName] varchar(255) NULL
   ,[ModifiedDate] [datetime] NOT NULL
   )
Here is an example where we do a simple INSERT INTO SELECT, where we select all the data from the table we have been working with and insert it into the new table.
INSERT INTO [HumanResources].[DepartmentTest_Replica] (
    [DepartmentID]
   ,[Name]
   ,[GroupName]
   ,[ModifiedDate]
   )
SELECT
    [DepartmentID]
   ,[Name]
   ,[GroupName]
   ,[ModifiedDate]
FROM [HumanResources].[DepartmentTest]
You can see the number of rows are here:
SELECT *
FROM [HumanResources].[DepartmentTest_Replica]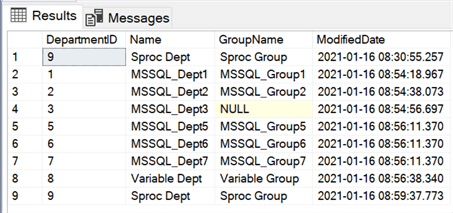
Next, let’s truncate the replica table and apply the same insert except with a filter:
TRUNCATE TABLE [HumanResources].[DepartmentTest_Replica]Here is an example where we add a filter to only insert a subset of the data from our main table:
INSERT INTO [HumanResources].[DepartmentTest_Replica] (
    [DepartmentID]
   ,[Name]
   ,[GroupName]
   ,[ModifiedDate]
   )
SELECT
    [DepartmentID]
   ,[Name]
   ,[GroupName]
   ,[ModifiedDate]
FROM [HumanResources].[DepartmentTest]
WHERE [Name] = 'Sproc Dept'
Now you can see that we only have a single record in our replica table:
SELECT *
FROM [HumanResources].[DepartmentTest_Replica]
INSERT INTO Syntax – Insert Rows with a UNION
The same way you might need to insert data into one table from another, you might have two different source tables that have similar data in them which you want to insert into a third.
In this scenario, you can use a UNION statement to insert data from both source tables into the target table in a single query.
Here is an example in action:
CREATE TABLE [HumanResources].[DepartmentTest_Union] (
    [DepartmentID] [smallint] NOT NULL
   ,[Name] varchar(255) NOT NULL
   ,[GroupName] varchar(255) NULL
   ,[ModifiedDate] [datetime] NOT NULL
   )

INSERT INTO [HumanResources].[DepartmentTest_Union] (
    [DepartmentID]
   ,[Name]
   ,[GroupName]
   ,[ModifiedDate]
   )
SELECT
    [DepartmentID]
   ,[Name]
   ,[GroupName]
   ,[ModifiedDate]
FROM [HumanResources].[DepartmentTest_Replica]

UNION ALL

SELECT
    [DepartmentID]
   ,[Name]
   ,[GroupName]
   ,[ModifiedDate]
FROM [HumanResources].[DepartmentTest]
Notice that there are two rows for the ‘Sproc Dept’ – one from the replica table, and one from the original test table. This shows we were able to grab the data from both tables to insert into the third.
SELECT *
FROM [HumanResources].[DepartmentTest_Union]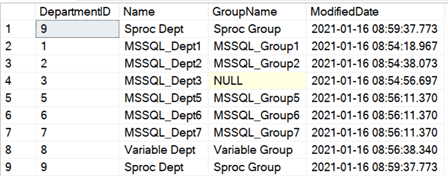
To read more about UNION statements, follow this link: UNION vs. UNION ALL in SQL Server.
INSERT INTO Syntax – Insert Rows with an IDENTITY Column
Finally, a common scenario you might come across is trying to insert data into a table that has an IDENTITY column. Any IDENTITY column is a column that automatically increments from a set starting point at a set increment. The most common example is IDENTITY(1,1), meaning the column will start at ‘1’, and increment up one for each new record added to the table.
You cannot insert data directly into the IDENTITY column. Rather, you should ignore the column in your insert statement for the list of columns, and it will automatically increment.
Here is an example:
CREATE TABLE [HumanResources].[DepartmentTest_Identity] (
[DepartmentID] [smallint] IDENTITY(1, 1) NOT NULL
,[Name] varchar(255) NOT NULL
,[GroupName] varchar(255) NULL
,[ModifiedDate] [datetime] NOT NULL
,CONSTRAINT [PK_Department_DepartmentIDTestIdentity] PRIMARY KEY CLUSTERED ([DepartmentID] ASC)
)
INSERT INTO [HumanResources].[DepartmentTest_Identity] (
[Name]
,[GroupName]
,[ModifiedDate]
)
VALUES (
'MSSQL_Dept'
,'MSSQL_Group'
,GETDATE()
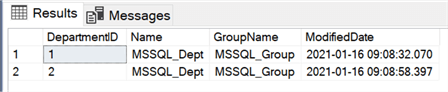
)Let’s look at the results:
SELECT *
FROM [HumanResources].[DepartmentTest_Identity]
Now, if you were to run that insert code again, we can see there is another row, and the DepartmentID automatically incremented to ‘2’.
The only exception is to use IDENTITY INSERT, which you can read more about in this tip: SQL Server Identity Insert to Keep Tables Synchronized.
Next Steps
- Try some more complex versions of INSERT INTO SELECT – for example, an aggregate query using GROUP BY.
- Read some other articles on getting data into tables:

Ryan Kennedy is a Solutions Architect for Databricks, specializing in helping clients build modern data platforms in the cloud that drive business results. He has worked with clients across industries, most extensively healthcare and insurance, to architect and build data solutions spanning the data fabric – from ingestion processes, data lakes, and data warehouses, to advanced analytics, visualizations, and BI. Ryan is Microsoft certified in Big Data and Data Science technologies, and is always looking to further his technical expertise. When not working on an exciting data project, you can find Ryan spending time with his wife or training for a triathlon.
- MSSQLTips Awards: Rookie of the Year – 2020