Problem
We have all needed to schedule recurring activities for our databases for things like backups, maintenance routines (index reorgs or rebuilds), business-specific calculations, etc. Unfortunately, there are big differences between how SQL Server, Oracle, and PostgreSQL address this need. PostgreSQL doesn’t come with a scheduler agent, but we will cover how you can still schedule tasks.
Solution
This tip covers the different ways to schedule jobs in SQL Server, Oracle and PostgreSQL. We will also see how to install pgAgent to have a scheduler for PostgreSQL inside pgAdmin, similar to SQL Server, and Oracle.
As in the previous articles, we will use the github free downloadable database sample, Chinook, since it is available in multiple RDBMS formats. It is a simulation of a digital media store with some sample data. Download the version you need; you will have all the scripts for the data structure and the inserts for data.
SQL Server Task Scheduling
In SQL Server, we can easily create and schedule a recurring or a one-use job using SQL Server Agent, which can schedule various jobs, including executing stored procedures, Integration Services Packages, T-SQL scripts, PowerShell, etc.
Let’s schedule a task that calculates commissions to be paid to sales representatives based on the invoices of their customers from the previous month. This will be run on the first day of the month and inserts the data into a new table called Commissions created with the following script.
Here is the script to create the table.
create table Commissions (
  SupportRepId int not null,
  Commission_period varchar(7) not null,
  Total_Commission numeric(10,2)
  CONSTRAINT [PK_Commissions] PRIMARY KEY CLUSTERED (SupportRepId, Commission_period)
);
Here is the query that will calculate a 10% commission based on the total invoiced and writes to this table.
insert into Commissions (SupportRepId, Commission_period, Total_Commission)
select
   SupportRepId,
   cast(month(invoicedate) as varchar)+'-'+cast(year(invoicedate) as varchar) as Commission_period,
   sum(total*0.1) as Total_Commission
from Invoice
inner join Customer on Invoice.CustomerId = Customer.CustomerId
where InvoiceDate >= cast(dateadd(m,-1,getdate()) as date)
  and InvoiceDate < getdate()
group by
   SupportRepId,
   cast(month(invoicedate) as varchar)+'-'+cast(year(invoicedate) as varchar);
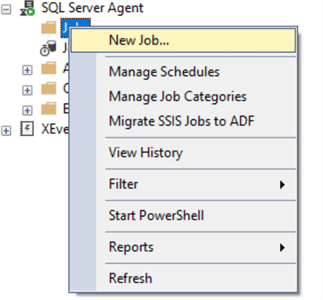
Now, we can schedule this simple script to run on the first day of every month at 00:01 to have all the previous monthly invoices. We can do this easily using the SSMS GUI by expanding SQL Server Agent, right-clicking on Jobs and selecting New Job.
First, we need to name this scheduled job. It is also important to set the Owner to “sa”. Do not leave it as a user login since that can be deleted or disabled and you’ll end up in trouble with the owner of the database objects!
Please note that the job is in “Enabled” by default.

Let’s move to the next page, Steps, and click New which opens the following window. Here, we give the step a name and choose the type of job, in this case, T-SQL script. We can then copy the above query to insert data into the table. Click OK.

The screenshot below shows the next page, Schedules. Click on New to create a run schedule for the job.

We need to name the schedule, then choose the frequency (date/time) and the duration of this job. In this instance, select a monthly frequency of the first day of every month, a time of day (it could also be added a time-frequency), and a duration. In our case, we didn’t put an end date on this job.

The next page is Notifications. I usually do not bother with the Alerts as I prefer to use notifications when the job fails. That can be easily done here. To send emails, we need to set up Database Mail and a SQL Server Agent Operator, but this is not the scope of this tip.

Once all these steps are complete, click OK to create a new scheduled job in SQL Server Agent, which is shown below.

Note: A new scheduled job can also be created using T-SQL scripts.
We can monitor the execution of the job in SQL Server by double-clicking “Job Activity Monitor” to get the following screen.

To manually start a job from this window, right-click on the job name and choose Start Job at Step.

As we can see from the screenshot above, we have all the details of the last execution, including the date of its next run. All this information can also be retrieved with a simple query of the msdb.dbo.sysjobhistory, msdb.dbo.sysjobs and msdb.dbo.sysjobschedules tables.
SELECT
   name,
   history.step_name,
   run_date,
   run_time,
   run_status,
   message,
   next_run_date,
   next_run_time
FROM       msdb.dbo.sysjobhistory AS history
INNER JOIN msdb.dbo.sysjobs job ON history.job_id = job.job_id
INNER JOIN msdb.dbo.sysjobschedules sched ON history.job_id=sched.job_id
In the output, we see the first 2 rows show failures, this is because I had not yet created the Commissions table when I ran the job. Another thing to notice is the date and time, which are not in date or time format, but a number data type.

Oracle Task Scheduling
The DBMS_SCHEDULER package is used in Oracle to schedule jobs and can be done with either the Oracle SQL Developer GUI or a SQL script. Let’s take a look at it in SQL Developer.
First let’s prepare the environment in Oracle by creating the same Commissions table using the following script.
create table chinook.Commissions
(  SupportRepId numeric(10) not null,
   Commission_period varchar(7) not null,
   Total_Commission numeric(10,2),
   CONSTRAINT PK_Commissions PRIMARY KEY (SupportRepId, Commission_period));
With the table created, we can now start the job creation by expanding the Scheduler tree. As you can see, there are several options and features available.

Let’s begin with the first option, right-clicking on Jobs, then New Job.

First, we need to specify the job name, then the type of job (a PL/SQL block in this instance), and a description and job class.

Here is the script which is slightly different in PL/SQL.
begin
insert into chinook.Commissions (SupportRepId,Commission_period,Total_Commission)
select SupportRepId, extract(month from invoicedate)||' - '||extract(year from invoicedate) as Commission_period, sum(total*0.1) as Total_Commission
from chinook.Invoice
inner join chinook.Customer on Invoice.CustomerId=Customer.CustomerId
where InvoiceDate>=trunc(sysdate)-1 and InvoiceDate<trunc(sysdate)
group by SupportRepId,extract(month from invoicedate)||' - '||extract(year from invoicedate);
end;

Now we can specify the execution schedule by modifying the When to Execute Job section by changing the default Immediate to Repeating, as shown below.

To specify the repeat interval, click on the pencil icon to show the following screen.

Like SQL Server, we can specify an email to be sent in case of a job failure in the Notification tab, as seen below.

The screenshot below shows that all the scripts used to create the same job not using the GUI can be found in the SQL tab.

We have created the same job in Oracle as in SQL Server. The other job is something I created previously.

You can run a job from the GUI manually by clicking on the Actions icon from the job window and selecting Run Job.

And then click Apply to run.

There is also a SQL tab with a script to run the job.

To monitor the job as we did in SQL Server, it is possible to do that via the GUI by clicking on the job name and choosing the run log tab.

We have all the details of every time the job ran. This can also be done with a SQL script like the one below.
SELECT
   jobs.job_name,
   jobs.repeat_interval,
   jobs.next_run_date,
   jobs.last_start_date,
   jobs.enabled,
   log_date,
   status
FROM dba_scheduler_jobs JOBS
INNER JOIN DBA_SCHEDULER_JOB_RUN_DETAILS HISTORY ON JOBS.JOB_NAME=HISTORY.JOB_NAME
WHERE JOBS.owner='CHINOOK'
ORDER BY log_date desc;
With this query, we can retrieve all the job executions of all the jobs in the CHINOOK schema, including status, last execution, and next execution. This output shows data for both of the jobs I have in Oracle.

PostgreSQL Task Scheduling
As I mentioned at the beginning, PostgreSQL does not come with a scheduler agent. There are a few ways to schedule a job: 1) rely on Linux Crontab, or 2) use third-party open-source schedulers specific for PostgreSQL.
In this tip, we will install and set up the pgAgent which is an extension of pgAdmin, this is maintained as open-source software by the community.
Let’s start by preparing the Postgres environment. Since I’m using Debian in my VM, we first need to install pgAgent via the package manager using a Linux shell.
sudo apt update

And then run this code.
sudo apt install pgagent

Now, we can connect to the Postgres database using pgAdmin and execute the following script.
CREATE EXTENSION pgagent;
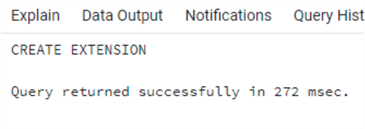
Note that after the connection on pgAdmin, a new application has been added to the tree.

Pay attention when installing pgAgent because if it’s on a Bitnami Virtual Machine, like in my case, you’ll need to manually copy the extension from /usr/share/postgresql/11/extension to /opt/bitnami/postgresql/share/extension. Otherwise, you will get the following error.
When running the above CREATE EXTENSION script. As the last step of this installation, we need to start the pgAgent daemon in Linux.
You may need to provide the password for user postgres. If this is the case, you can write it in this command preceding it with parameter PGPASSWORD=’password’, or better yet, you can provide it in the .pgpass file by inserting a row with the following format.
127.0.0.1:5432:*:postgres:password
Like before, we can now create the Commissions table that will hold the data using the following script.
create table Commissions
(  SupportRepId numeric(10) not null,
   Commission_period varchar(7) not null,
   Total_Commission numeric(10,2),
   CONSTRAINT PK_Commissions PRIMARY KEY (SupportRepId, Commission_period));
Here is the insert script.
insert into commissions (SupportRepId,Commission_period,Total_Commission)
select "SupportRepId", extract(month from "InvoiceDate")||' - '||extract(year from "InvoiceDate") as Commission_period, sum("Total"*0.1) as Total_Commission
from "Invoice"
inner join "Customer" on "Invoice"."CustomerId"="Customer"."CustomerId"
where "InvoiceDate">=current_date-1 and "InvoiceDate"<current_date
group by "SupportRepId", extract(month from "InvoiceDate")||' - '||extract(year from "InvoiceDate");
Now, we are ready to create the job by right-clicking on pgAgent Jobs and choosing Create.

In the first window, we need to provide a name for the job.

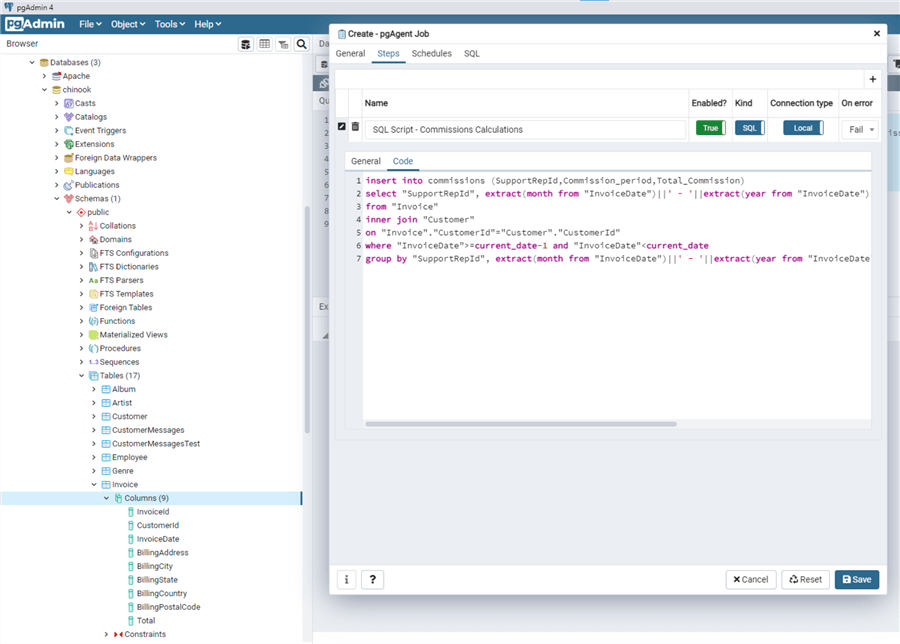
We can then choose the Steps tab and add a new step by clicking on the + in the top right corner.

Typically, we give a name to the step and then click on the pencil to edit it. In this case, we left the default enabled, SQL kind, and local connection, and then made sure to specify the database to use.

We move to the Code subtab within Steps to specify the SQL script.
Now we can move to the Schedule tab, where we need to add a schedule by choosing + and giving it a name. Then we need to edit it with the pencil icon.

We specify a start date and then move to the repeat tab, where we specify the schedule.
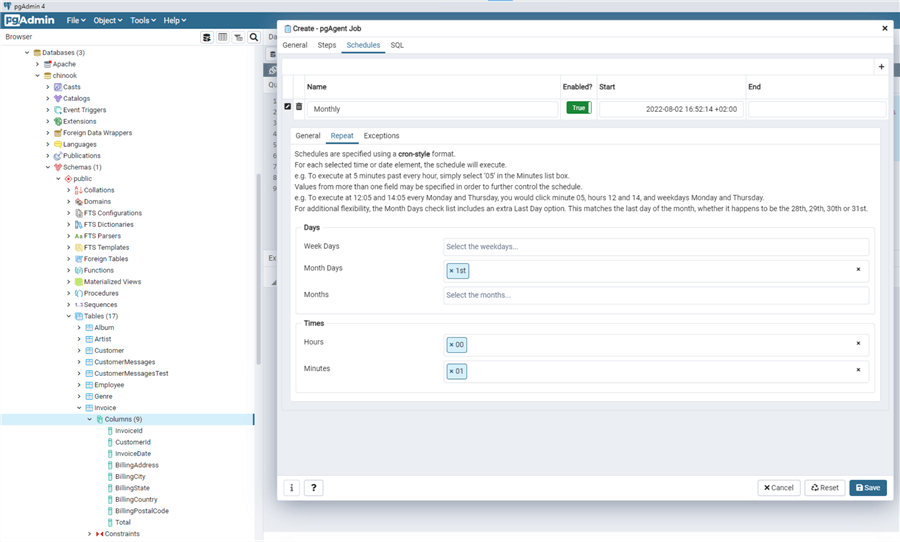
As specified in the window, this is done with a cron style of scheduling. Since we do not need to add exceptions, we can now click on save, and the job is ready.

Similarly, the job can be manually run without waiting for the schedule to take effect by right-clicking on the job name and selecting Run now.

We can then monitor the execution from pgAdmin by selecting the job and clicking on the Properties tab.

We can see all the usual information. The last result status is shown using “s” for success and “f” for failed. If we want to go deeper, we switch to the Statistics tab. We can see that we’ve executed it twice (one failed because the correct database wasn’t specified).

This can also be done with a script checking the tables in the pgAgent extension in the postgres database.
select
   jobname,
   jobnextrun,
   joblastrun,
   jslstatus,
   jslstart,
   jsloutput
from       pgagent.pga_job jobs
inner join pgagent.pga_joblog history on jobs.jobid=history.jlgjobid
inner join pgagent.pga_jobsteplog historys on history.jlgid=historys.jsljlgid;

Conclusion
In this tip, we reviewed the basics of job scheduling and monitoring jobs in SQL Server, Oracle, and PostgreSQL. We have also seen how to set up pgAgent to have a job scheduler in PostgreSQL, as well as some scripts to monitor the executions of the jobs.
Next Steps
- Here are links to the official documentation for scheduling jobs:
- Check out some additional helpful tips:

Andrea Gnemmi is a Database and Data Warehouse professional with almost 20 years of experience, having started his career in Database Administration with SQL Server 2000.
His expertise ranges from SQL Server to Oracle and Postgres for database administration and from SAP BO to SSIS, SSRS and Power BI regarding BI and ETL.
He has worked both in SQL Server and Oracle mostly in multinational environments with very high transaction volumes and large datasets. Performance tuning, indexing techniques and in general Database administration are his hot topics. Ensuring a 24/7 uptime of the various databases in shop is his main responsibility, as well as the best possible performances of all queries run on the databases. He has started working with PostgreSQL two years ago loving many of the features of this RDBMS.
- MSSQLTips Awards: Trendsetter (25+ tips) – 2024 | Rookie of the Year – 2021
Hello Gene,
Personally I never used SQLScheduler.exe, I do not think that there is a particular performance advantage in using it, but since I never used it I cannot be sure!
Anyway you can always have resource governor taking care of any load, based on the username that you use for running queries or procedures from the scheduler for example.
I have recently taken over control of the SQL Server for our company. My predecessor was using SQLScheduler.exe instead of the SSMS Job Scheduler, even though our SQL Server is now 2019. I have noticed a lot of performance issues with big jobs and was wondering if anyone can tell me, if there is any benefit of keeping any of the processes running through the SQLScheduler.exe service or not? Are these jobs controlled by the Resource Governor at all, or are they at the mercy of whatever resources happen to be available?