Problem
I have a 2-node failover cluster instance running on Windows Server 2019 Standard edition. I have a requirement to add a new SAN disk to the SQL Server failover cluster instance (FCI), and then I need to move a user database to that newly added shared disk. Can you show the steps required to add a new disk to the FCI and move the user database?
Solution
In my client’s SQL Server environment, one of the databases grows very rapidly because of the high number of transactions. This user database is not very critical, but other critical user databases on the same instance share the same disk. Therefore, management decided to keep the critical databases on the same disk and move the non-critical, high-volume database to another disk so the rapidly growing size of the non-critical database does not affect other databases.
In the current SQL environment, there is a WSFC (Windows Server Failover Cluster) with 2 nodes using Windows Server 2019 Standard edition OS with a SQL Server 2017 failover cluster instance configured.
Major Steps
The following significant steps will be performed throughout this tip:
- Add one new shared disk on the nodes and make it online
- Add the disk to the Windows cluster using the failover cluster manager
- Assign the newly added disk to the FCI role in the Windows cluster
- Add the disk into the dependencies of the SQL Server service resource
- Make the database offline
- Move the data file (MDF) and the log file (LDF) to the new disk
- Modify the database to use the new path
- Make the database Online
Let’s discuss these steps one by one in more detail.
Step 1: Make the New Disk Online to Node
Once we get the shared disk from the storage team, we need to make the disk online and visible to all the nodes. First, open disk management from one of the nodes (better to do it from the Active node). Initialize the disk, make the disk online, and then create a simple volume for the newly added disk. For all these three steps (Initialize, Online, and Create Volume), right-click on the new disk (Disk 5 for this example) each time.

Step 2: Add the New-Shared Disk to WSFC
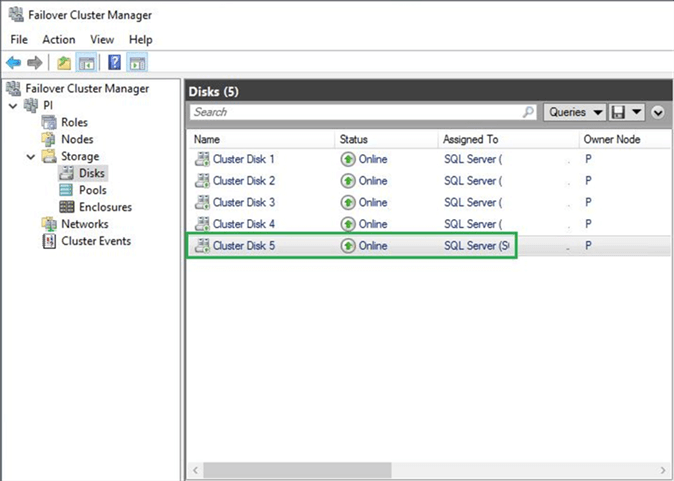
Once the disk is online and available to the nodes, we can add it to the Windows Server Failover Cluster (WSFC). Open the failover cluster manager and click on the Disks under Storage. Right-click on the Disks and select Add disk.

A new window will appear with a list of available disks. Select the new disk (Disk 5) and click OK.

Click on Disks to see that the new disk has been successfully added to the cluster, as shown in the screenshot below.
Step 3: Assign the Disk to the FCI Role
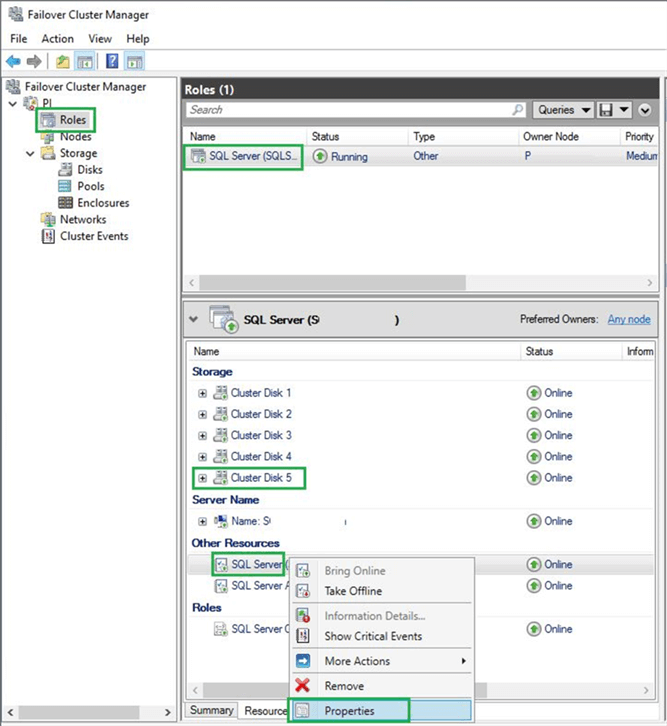
Once the disk is added, we can assign it to a particular role in the cluster. In the left pane, click on Roles to see the available roles. Right-click on the SQL Server FCI role and select Add Storage.

A new window will appear to show Cluster Disk 5, which is added to cluster disks in the previous step. Select the checkbox near Cluster Disk 5 and click OK.

Step 4: Add the Disk to the Dependencies for the SQL Service Resource
After the disk is assigned to the FCI role, it will be visible under the resource section for that particular role.
The next step is to add the new disk (Disk 5) to the dependencies for the SQL Server Service resource, as shown in the screenshot below. Right-click on the SQL Server service resource and select Properties.
A new window will appear. Click on the Dependencies tab, click the Insert button to enter the new disk (Cluster Disk 5), select the ‘AND‘ parameter, and then click OK.
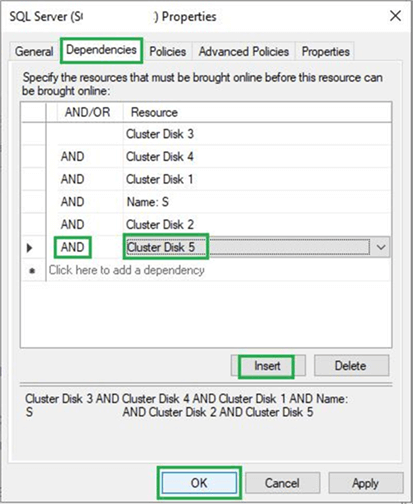
We have completed the following steps regarding the new disk (Disk 5). We have added the new disk to the cluster, then assigned it to the SQL Server FCI role, and at the last step, we have included it to the dependencies for SQL Server service resource. Now the SQL Service engine resource is also dependent on cluster disk 5.
Now that the new disk is added to the cluster and ready to use, we can move the user database to the newly added disk. For this step, I have used a test database named TESTDB1.
Step 5: Make the Database Offline
The first step in moving the database to a separate disk is to make the database offline. The data file and log file for the TESTDB1 database are currently on the G and H drives, respectively, as shown in the screenshot below.
It is always advisable to take a full backup of the SQL database before doing any activity. After the full backup is complete, make the database OFFLINE. Right-click on the TESTDB1 database, select Tasks, and click on Take Offline.
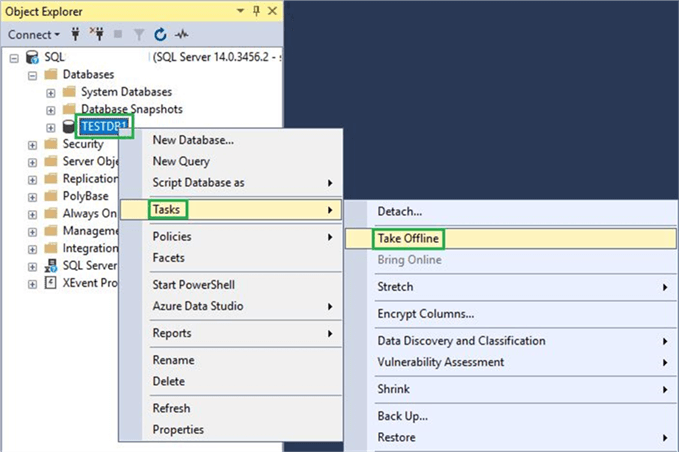
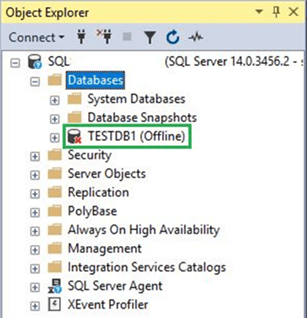
A new window will appear. Click OK to take the database offline. Once the database is offline, it will appear with a red cross, and its status will be Offline, as shown in the screenshot below.
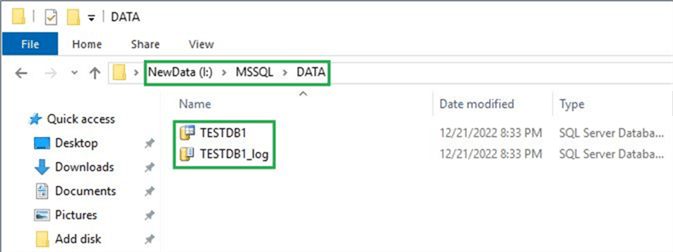
Step 6: Move the Database Files to the New Disk
In this step, you need to move the database data file and log file to the new location. It is recommended to keep the data file and log file on a separate disk. For this example, we moved both the data file (MDF) and the log file (LDF) to the same disk (I drive), as shown below.
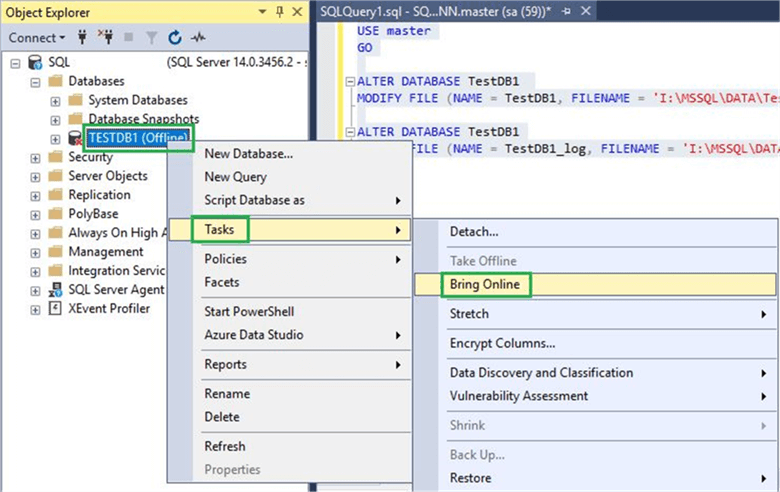
Step 7: Modify the Database to Use the New Path
Next, run the below SQL query to modify the database’s new data file and new log file location:
USE master
GO

ALTER DATABASE TestDB1
MODIFY FILE (NAME = TestDB1, FILENAME = 'I:\MSSQL\Data\TestDB1.mdf')

ALTER DATABASE TestDB1
MODIFY FILE (NAME = TestDB1_log, FILENAME = 'I:\MSSQL\Data\TestDB1_log.ldf')
In the above code, NAME refers to the logical name of the database, and FILENAME refers to the new location of the data file and log file. The following message will appear when the above query is executed successfully:

Now we are all set to start database TESTDB1.
Step 8: Make the Database Online
Right-click on the TESTDB1 database, select Tasks, and click on Bring Online. If the service account used for the SQL Server Engine already has permission on the new database path (I:\MSSQL\Data\), then the database status will change to online.
Otherwise, it will throw an error (below):
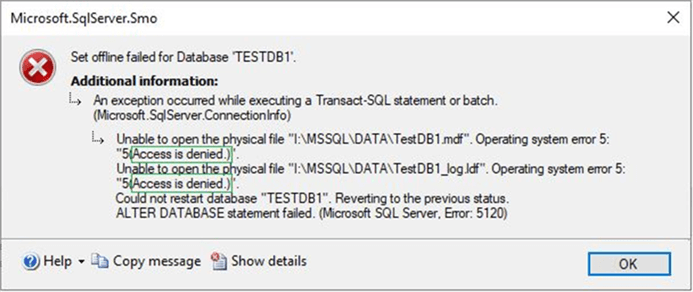
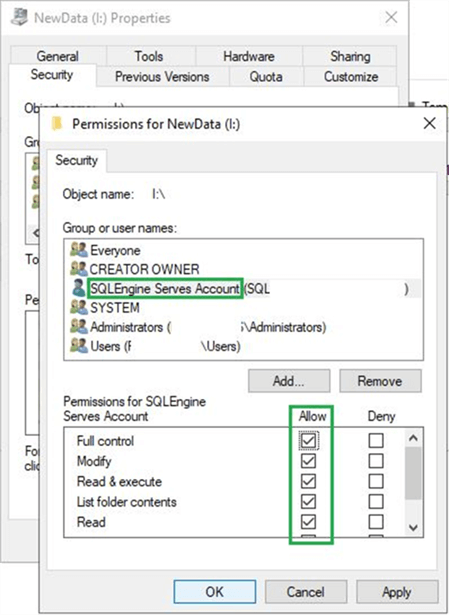
To fix this error, give permission to the service account used for SQL Server Engine. Right-click on the new drive (I) and select Properties. Then select the Security tab, and click the Edit button. A new window will appear.
Click the Add button, search for the SQL Engine Service account, and add it. Once added, click on it and select the check boxes under the Allow tag to grant permission to the SQL Engine Service account, as shown in the below screenshot. Click OK.
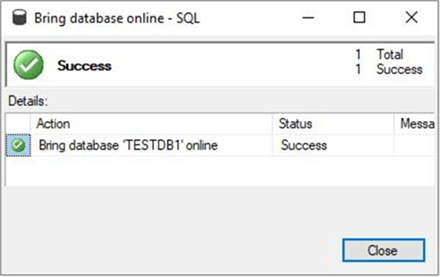
After the correct permission is granted to the SQL Engine Service account, repeat the steps mentioned in Step 8 to make the database Online. Database TESTDB1 will be online when the success message below appears.
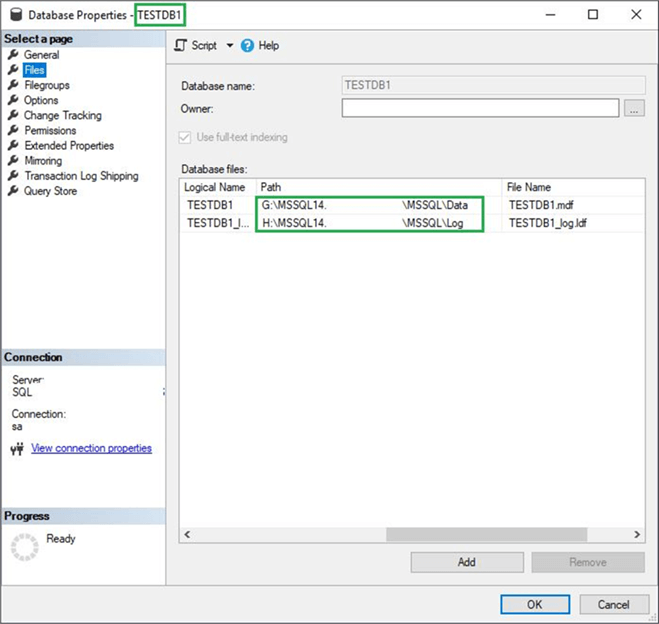
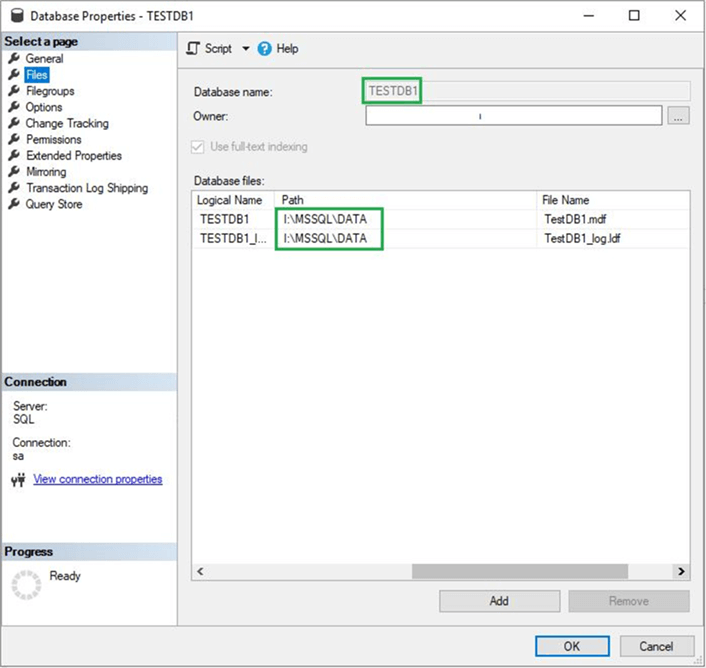
Now, the database TESTDB1 is up and running using the new path for the data file and log file. To confirm, right-click on the TESTDB1 database, select Properties, and click on Files to see the new path in use, as shown below.
Conclusion
This tip first discussed the steps necessary to add a new shared disk to the SQL Server failover cluster Instance (FCI). We covered all the steps required, from adding the shared disk to the windows cluster, assigning it to a particular SQL Server failover cluster role, and then adding the new disk to the dependencies of that SQL FCI role/resource. We also covered the steps required to move a database to a newly added shared disk. These steps were tested on SQL Server 2017 but should work the same for other versions of SQL Server.
Next Steps
- The steps mentioned in this tip can also be applied to other SQL Server versions.
- The next tip will be about the steps to bring the Windows cluster and its roles online and perform an AG failover to DR after the disaster on the primary site (real-world scenario).

Muhammad Kamran is a Senior SQL DBA with more than 11 years of experience in SQL Server database administration and consultation. He is a Microsoft Certified System Engineer (Data Management & Analytics). He has a Master’s degree in Advance Computer System Development. Currently, he provides services for government clients in Saudi Arabia. Although he covers SQL services in many different areas, his key interest is SQL high availability, disaster recovery, troubleshooting, upgrades and performance tuning. Check out his blog.