Problem
I want to improve the design of my reports in Power BI and SSRS. Is there a good tool to work with my designs for the reports? Also, I want to save the images in SQL Server.
Solution
Yes, it is possible. This time we will teach how to work with Microsoft Designer. This is an excellent tool that can convert text to images using AI, and then you can edit the images.
This tutorial will show you how to create and edit an image using Microsoft Designer. Additionally, we will look into storing the images in SQL Server using the following methods:
- Insert images into a table using T-SQL.
- Insert images into a table using a sqlclient connection in PowerShell.
- Insert images using PowerShell and a SQL script.
- How to compress images to a zip file using PowerShell.
- How to compress images using 7z and PowerShell.
- How to load multiple images from a folder to SQL Server using PowerShell.
Requirements
- SQL Server 2022 installed or any other SQL version.
- SQL Server Management Studio (SSMS) installed.
- An account in Microsoft Designer.
Getting Started in Microsoft Designer
Go to Microsoft Designer and type a description of your desired design and press Generate.

There are some bears with glasses.

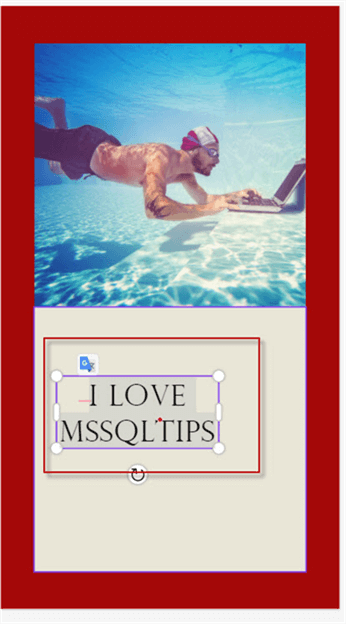
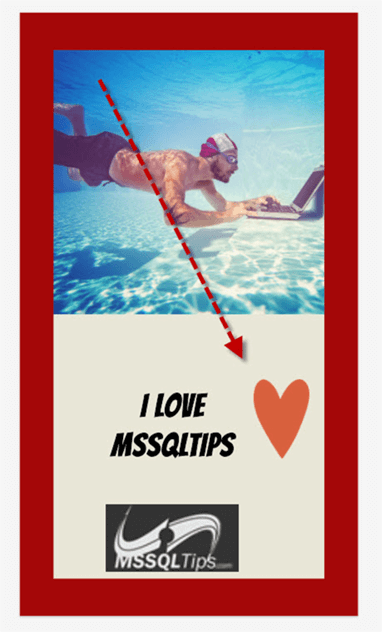
Let’s try something else. Type “A man with a laptop in a swimming pool.” Press Generate.

Select the design of your preference and select Customize Design.

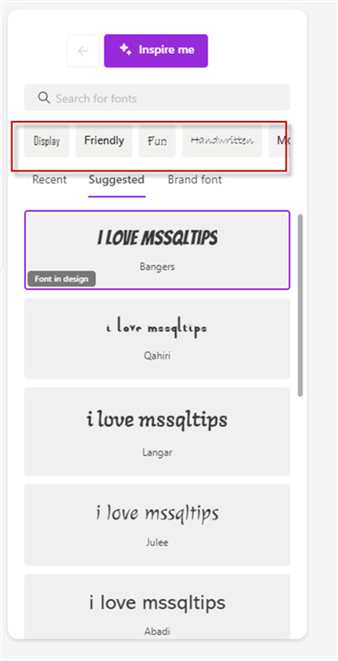
Select the text and choose a style like Friendly, Fun, Handwritten, etc.
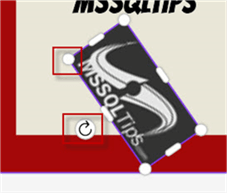
It is possible to copy and paste images from other places and add them to our design. In this example, we are copying and pasting the MSSQLTips logo.

You can resize and rotate your images.
There are also options to remove the background, crop images, add effects, set an image as background, change the positions between images, or change the opacity.
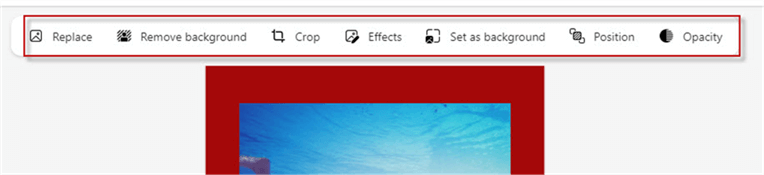
There are special effects to remove the background or blur it.

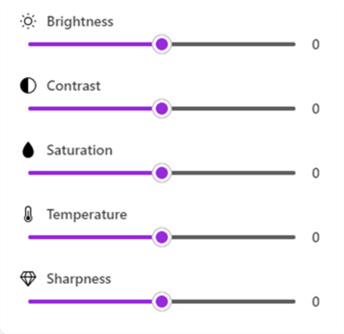
You can also adjust the brightness, contrast, saturation, temperature, and/or sharpness.
There is also an option to add Visuals to your design.

You can drag and drop your Visual in your design.
Finally, there is an option to download with the ability to choose the download type. A favorite type is PNG (Portable Network Graphics).

You can use AI to generate captions or hashtags to publish the image.

OK, we have a nice design. How can we store this .png file in SQL Server?
The rest of the article will show different ways to store images. We will work with Microsoft Designer images, but the procedure is the same for any image.
Insert Images into a Table Using T-SQL
The easiest way to insert an image into SQL Server is using T-SQL. In the following example, we will insert an image into the images table.
First, we will create a table named Images with the identity column, and the images will be a varbinary(max).
CREATE TABLE Images (
    id INT IDENTITY(1,1) PRIMARY KEY,
    images VARBINARY(MAX)
);
Secondly, we will insert an image into the Images table:
INSERT INTO Images (images)
SELECT BulkColumn
FROM OPENROWSET(BULK N'C:\data\mssqltips.png', SINGLE_BLOB) AS x;
In this example, the image is in the C:\data\ path.
Insert Images into a Table Using a sqlclient Connection in PowerShell
Inserting images with T-SQL is a straightforward process. However, if we want an automated process, we could use PowerShell.
PowerShell is a great tool to automate some DBA tasks. This next example will show how to insert images using PowerShell with a sqlclient connection:
# Set the SQL Server Name
$SqlserverName = "localhost"
#Set the SQL Server database name
$databaseName = "Adventureworks2019"
#set the table name
$tableName = "Images"
#Set the path where the image is stored
$imagePath = "C:\data\mssqltips.png"

# Create a connection string
$connectionString = "Server=$SqlserverName;Database=$databaseName;Integrated Security=True"

# Load the image file as a byte array
$imageBytes = [System.IO.File]::ReadAllBytes($imagePath)

# Create a connection to SQL Server
$connection = New-Object System.Data.SqlClient.SqlConnection($connectionString)
$connection.Open()

# Create a variable with the insert command to insert images
$sql = "INSERT INTO $tableName (images) VALUES (@images)"
#Create the command
$command = $connection.CreateCommand()
$command.CommandText = $sql

# Add parameter with the image
$command.Parameters.AddWithValue("@images", $imageBytes)

# Execute the SQL query
$command.ExecuteNonQuery()

# Close the connection
$connection.Close()
It looks like a lot of code, but we are creating some variables with the connection properties. We insert the image in Adventureworks2019, where the images table is stored. We need to specify the connection properties (SQL Server name, database name, authentication mode).
This option works, but it is too much code. Is there an easier way?
Insert Images Using PowerShell and a SQL Script
Yes, there is a more straightforward way. To avoid writing the connection properties, we will install the SqlServer module for PowerShell.
To install it, run the following in PowerShell:
Install-Module -Name SqlServer
Once installed, right-click the database in SSMS and select the option Start PowerShell.

In SSMS, save this T-SQL code in a file named insertimages.sql.
INSERT INTO Images (images)
SELECT BulkColumn
FROM OPENROWSET(BULK N'C:\data\mssqltips.png', SINGLE_BLOB) AS x;
In PowerShell, run these commands:
#The path of the SQL script
$SqlScriptPath = "C:\data\insertimages.sql"
#Invoke the script in PowerShell
Invoke-SqlCmd -InputFile $SqlScriptPath
PowerShell will invoke the script stored in C:\data. We do not need to specify connection properties because we started the SQL PowerShell in the database where the Images table is stored.
How to Compress Images to a Zip File Using PowerShell
Sometimes, we must compress the images to a zip file and store them in SQL Server. The procedure to load a zip file to SQL Server is almost the same as an image. However, to compress the image into a zip file, you can use the following PowerShell commands:
$ImagePath = "C:\data\mssqltips.png"
$zipPath = "C:\data\mssqltips.zip"

Compress-Archive -Path $ImagePath -DestinationPath $zipPath
You need to specify the image path and the destination path for the zip file and then use the compress-archive cmdlet.
How to Compress Images Using 7-Zip and PowerShell
7-Zip is free software that can compress files with a higher ratio than a simple zip. This tip assumes that you have already downloaded and installed 7-Zip.
We need to specify where 7-Zip is installed. We then can select the path of the PNG file and the destination of the .7z file.
Finally, we use the Start-Process cmdlet to invoke the process and send the arguments to compress.
# Set the path where 7-Zip is installed.
$7zPath = "C:\Program Files\7-Zip\7z.exe"

# Set the path of the image
$ImagePath = "C:\data\mssqltips.png"

# Set the destination path of the zipped image
$destination7zPath = "C:\data\compressedimage.7z"

# Compress the image
Start-Process -FilePath $7zPath -ArgumentList "a", "-t7z", "-mx=9", "$destination7zPath", "$ImagePath" -Wait
How to Load Multiple Images from a Folder to SQL Server using PowerShell
What if I have several images in a folder, and I want to load all the PNG images to SQL Server? How can I do that?
The following code illustrates how:
#Create a variable with the images
$folderPath = "C:\images"


# Loop through the files in the folder using the get-childitem and insert them into the table.
# In this example we are using a filter to upload only jpg files.
Get-ChildItem -Path $folderPath -Filter "*.png" | ForEach-Object {
    $imagePath = $_.FullName
    # Invoke SQL command to insert image
    Invoke-SqlCmd -Query "INSERT INTO Images (images) SELECT BulkColumn FROM OPENROWSET(BULK N'$imagePath', SINGLE_BLOB) AS x;"
}
First, we specify the folder. Secondly, we use the get-childitem cmdlet to get all the image names and send the names and paths to the invoke-sqlcmd cmdlet to INSERT the images.
Conclusion
In this tutorial, we demonstrated how to create a design in Microsoft Designer, store images in SQL Server, compress images to zip and 7z, and finally, upload multiple images from a folder into a SQL Server table.
Next Steps
To learn more about PowerShell, refer to the following links:
- Generating SQL Scripts using Windows PowerShell
- Using PowerShell for SQL Server Database Backups
- Deploy Database Objects to Multiple SQL Server Instances Using PowerShell

Daniel Calbimonte is a Microsoft Most Valuable Professional, Microsoft Certified Trainer and Microsoft Certified IT Professional for SQL Server. He is an accomplished SSIS author, teacher at IT Academies and has over 10 years of experience as a QE and developer for SQL Server related software. He has worked for the government, oil companies, web sites, magazines and universities around the world. Daniel also regularly speaks at SQL Servers conferences and blogs.
- MSSQLTips Awards: Author of the Year Contender – 2015-2018, 2022, 2023 | Champion (100+ tips) – 2018