Problem
You have tons of text data stored in your company’s SQL database. You already have access to Azure OpenAI. How do you enable a large language model (LLM) to answer questions based on your data stored in Azure SQL Database? How do you package this in a custom application, such as a chatbot, for user-friendly interaction?
Solution
The retrieval augmented generation (RAG) pattern is a powerful technique designed to ground LLMs in your knowledge resources. This grounding enables the model to answer questions about your data. This tip will focus on developing an example solution using Azure OpenAI, existing vectorized data from SQL Server, and Azure Bot Framework under Python. While getting into the intricacies of RAG itself is beyond the scope of this tip, check out this tutorial as a primer.
Prerequisites
In your Azure tenant, you need to have access to:
- Azure OpenAI.
- An Azure AI Search index populated with vectorized data from an SQL data source. Please refer to the previous article on MSSQLTips.com, where I explained in detail how to set up a vectorized SQL data index.
- Access to a Python environment.
Solution Namespace
Let’s begin by creating a project folder and opening it in VS Code. Then, navigate to the official Microsoft repo containing bot framework samples. As an example, we will go with the template for 03.Welcome bot. Either clone the whole repo or copy the files needed from the samples/python/03.welcome-user directory. Below is what the project namespace should look like after you copy or clone the files:

Create a Virtual Environment
Open the already created requirements.txt file and add the following two lines:
python-dotenv
python-dotenv
openai
So, now it looks like this:

Next, create the virtual environment. Hit Ctrl+Shift+P, select Python: Create environment, select venv, then your global Python interpreter. Check the requirements file for installing the required packages:

Wait until your environment is created and selected.
Configuration
Next, create a subfolder named cfg. Inside it, create a file called .env. Populate the file with the following lines:
SCM_DO_BUILD_DURING_DEPLOYMENT=true
AZURE_OPENAI_ENDPOINT=
OPENAI_API_KEY=
DEPLOYMENT_ID=
API_V=
SEARCH_ENDPOINT=
SEARCH_KEY=
SEARCH_INDEX_NAME=
MicrosoftAppId=
MicrosoftAppPassword=
The values for these variables are available in your Azure Open AI and AI Search services. Here is what my env file looks like:

The values for MicrosoftAppId and MicrosoftAppPassword can be left blank for now unless you have an existing app registration and want to deploy this bot.
Next, move the existing config.py into the same folder. Modify the file like this:
01: import os
02: from dotenv import load_dotenv
03:
04: load_dotenv()
05:
06: class DefaultConfig:
07:     """ Bot Configuration """
08:
09:     PORT = 3978
10:     APP_ID = os.environ.get("MicrosoftAppId", "")
11:     APP_PASSWORD = os.environ.get("MicrosoftAppPassword", "")
12:
13: class OpenAIServiceConfig:
14:     """ Open AI Service Configuration """
15:
16:     API_KEY = os.environ.get('OPENAI_API_KEY')
17:     SEARCH_KEY = os.environ.get('SEARCH_KEY')
18:     SEARCH_ENDPOINT = os.environ.get('SEARCH_ENDPOINT')
19:     SEARCH_INDEX_NAME = os.environ.get('SEARCH_INDEX_NAME')
20:     AZURE_OPENAI_ENDPOINT = os.environ.get('AZURE_OPENAI_ENDPOINT')
21:     DEPLOYMENT_ID = os.environ.get('DEPLOYMENT_ID')
22:     API_V = os.environ.get('API_V')
This is the result:

App File Update
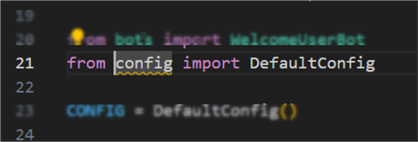
Next, we need to modify the main application file, app.py, because we moved the config file. Open app.py and change line 21:
Previous version

Updated version
This modification ensures the import of the config class reflects its new location in the namespace.
Bot Framework Emulator
Finally, make sure to have the Bot Framework Emulator installed so you can test the bot. You can find the most recent release here.
Azure Bot Framework OpenAI Integration
Now, we need to 1) add the AI functionality to the bot and 2) adapt the core app file.
Azure Open AI (AOAI) Integration
In the solution namespace, create a folder named azr and add to it the file azropenaisvc.py. This file will contain the class for interacting with AOAI:
01: import json
02: from openai import AsyncAzureOpenAI
03: from cfg.config import OpenAIServiceConfig
04:
05: CONFIG = OpenAIServiceConfig()
06:
07: class OpenAIServiceResponder():
08:
09:     @staticmethod
10:     async def get_completion(usr_msg: list[dict[str:str]]) -> tuple[str, list[tuple[int,str,str]]]:
11:
12:         rag_client = AsyncAzureOpenAI(
13:             azure_endpoint=CONFIG.AZURE_OPENAI_ENDPOINT,
14:             api_key=CONFIG.API_KEY,
15:             api_version=CONFIG.API_V
16:         )
17:
18:         completion = await rag_client.chat.completions.create(
19:             model=CONFIG.DEPLOYMENT_ID,
20:             messages=usr_msg,
21:             extra_body={
22:                 'data_sources': [
23:                     {
24:                         'type': 'AzureCognitiveSearch',
25:                         'parameters': {
26:                             'endpoint': CONFIG.SEARCH_ENDPOINT,
27:                             'authentication': {
28:                                 'type': 'api_key',
29:                                 'key':CONFIG.SEARCH_KEY
30:                             },
31:                             'embedding_dependency':{
32:                                 'type':'deployment_name',
33:                                 'deployment_name': 'embeddings'
34:                             },
35:                             'index_name': CONFIG.SEARCH_INDEX_NAME,
36:                             'semantic_configuration': 'my-semantic-config', # name of the semantic config
37:                             'query_type': 'vector_simple_hybrid', # "simple" in case of non-vectorized extraction
38:                             'fields_mapping': {}, # If you are using your own index, you will be prompted in the Azure OpenAI Studio to define which fields you want to map for answering questions
39:                             'role_information': 'You are a knowledgeable QnA bot.',
40:                             'filter': None, # https://learn.microsoft.com/en-us/azure/search/search-filters
41:                             'strictness': 2, # Determines the system's aggressiveness in filtering search documents based on their similarity scores.
42:                             'top_n_documents': 2, # how many documents to show
43:                             'in_scope': True, # limit responses from the model to the grounding data content
44:                         }
45:                     }
46:                 ]
47:             },
48:             temperature= 0.3,
49:             top_p= 1,
50:             max_tokens= 400,
51:             stop= None
52:         )
53:         answer = json.loads(completion.model_dump_json(indent=2))['choices'][0]['message']['content']
54:         document_refs = json.loads(completion.model_dump_json(indent=2))['choices'][0]['message']['context']['citations']
55:         doc_data = [(nr+1, citation['title'], citation['content'])
56:                           for nr, citation
57:                           in enumerate(document_refs)]
58:         return (answer, doc_data)
Let’s break it down:
- 05: Make
CONFIGvariable (instance of the config class) to reference the config values we configured earlier. - 12 – 16: Instantiate a RAG client using the
AsyncAzureOpenAIclass using parameters provided by the config. - 18 – 54: Get a completion, which is the model response. Several important configurations enable this function:
- 20: The input user message, which will be a list of dictionaries (we will see it later).
- 21: In the extra body, we specify how the completion will work. In this case, it is a RAG, so we need to configure the data sources.
- 24 – 30: Configure the search service authentication.
- 31 – 34: Configure the embeddings dependency.
- 35 – 45: The specific configurations for the vectorized source data. Most notably:
- 35: Index name.
- 36: The semantic configuration if it exists (also refer to the previous article on SQL data vectorization).
- 37: The query type. Ideally, you want to use the hybrid combination of vector and semantic. Here, we use the simple hybrid type because of the lower service tier of the search service.
- 38: Empty, as we use the default mapping.
- 39: Role information for the service.
- 40: The filter configuration can be used to filter out documents based on RBAC or other rules. More information is available here.
- 41: Determines the system’s aggressiveness in filtering search documents based on their similarity scores.
- 42: How many documents to show as references when answering.
- 43: Limit responses from the model to the grounding data content.
- 48: A low temperature for more deterministic responses.
- 45: Max four hundred tokens per response.
- 53: Assign the answer to a variable. Internally, the answer is a generator object that is populated word-by-word as the model generates the answer. The
AsynAzureOpenAIclass provided a handy methodmodel_dump_jsonto easily access the answer as ajsonobject. - 54: Using the internal json data structure, we can access the references to the grounding data that the model will generate.
- 55 – 57: For the references, I want to output a list of tuples, where I have the index, the title, and the source URL.
This is the result:


Update the Bot App
Make a Private Method. Next, open the file welcome_user_bot.py. At line 20, import the module we created for interacting with AOAI:
from azr.azropenaisvc import OpenAIServiceResponder

At line 115, insert a new line and a new private method. This is the definition:
115:     async def __get_gpt_response(self, q: list[dict[str:str]]) -> HeroCard:
116:
117:         gpt = OpenAIServiceResponder()
118:         response = await gpt.get_completion(q)
119:
120:         card = HeroCard(
121:             title='Answer: ',
122:             text=response[0],
123:             buttons=None
124:         )
125:
126:         bullet_points = "\n".join([f"{index}. {title}: {content}" for index, title, content in response[1]])
127:
128:         card.text += "\n\n" + bullet_points
129:         return card
Here, we instantiate an object of type OpenAIServiceResponder – our custom class that takes care of connecting to AOAI.
- 118: We get the response using the user query as parameter.
- 120 – 124: Using the built-in
HeroCardcard type, we assign the first element of the response tuple to the text of the card. - 126: Remember those references to grounding data we extracted from the json response? Here, we make them in a nice bullet-point list.
- 128: Add the bullet points to the answer.
Update the User Text Input Flow. Next, delete lines 108 through 113:

Substitute with:
108:             query = [{"role": "user",
109:                     "content": text}]
110:             card = await self.__get_gpt_response(q=query)
111:             await turn_context.send_activity(MessageFactory.attachment(
112:                                                     CardFactory.hero_card(card))
113:                                                     )
This code formats the user prompt and passes it to the custom private method. Using the send_activity method, we serve the result in the bot app.
Update the Rest of the Bot App. The template we used contains code with some example messages. We do not really need them. Let’s adapt that code a bit. In the __init__ method, adapt line 33 with a welcome message and delete everything from line 35 up to 49:

Note: The line number will no longer correspond to the original count.
Next, in the on_members_added_activity method, delete lines 57 up to 64:

Next, in the on_message_activity method, adapt line 70 with an introductory message you want to see and delete lines 73 up to 77:

Finally, save the changes to the file.
Running the Bot App
Open a terminal in VS code. Navigate to the .venv/Scripts folder and activate your environment:

Type cd ../.. to navigate back to the root folder of the project.

Then, type python app.py to start the bot app:

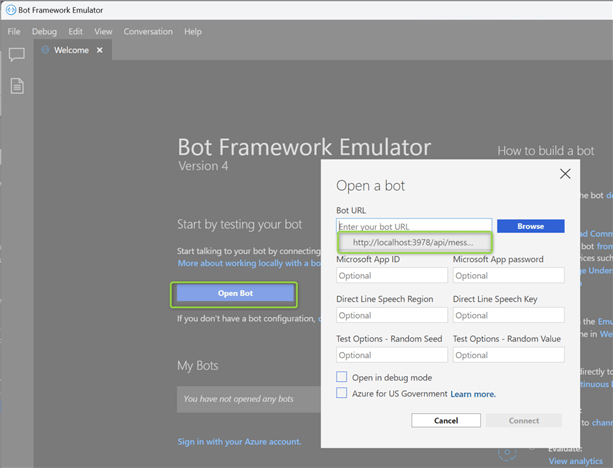
Open the Bot Framework Emulator application, click Open Bot, and input the Bot URL http://localhost:3978/api/messages
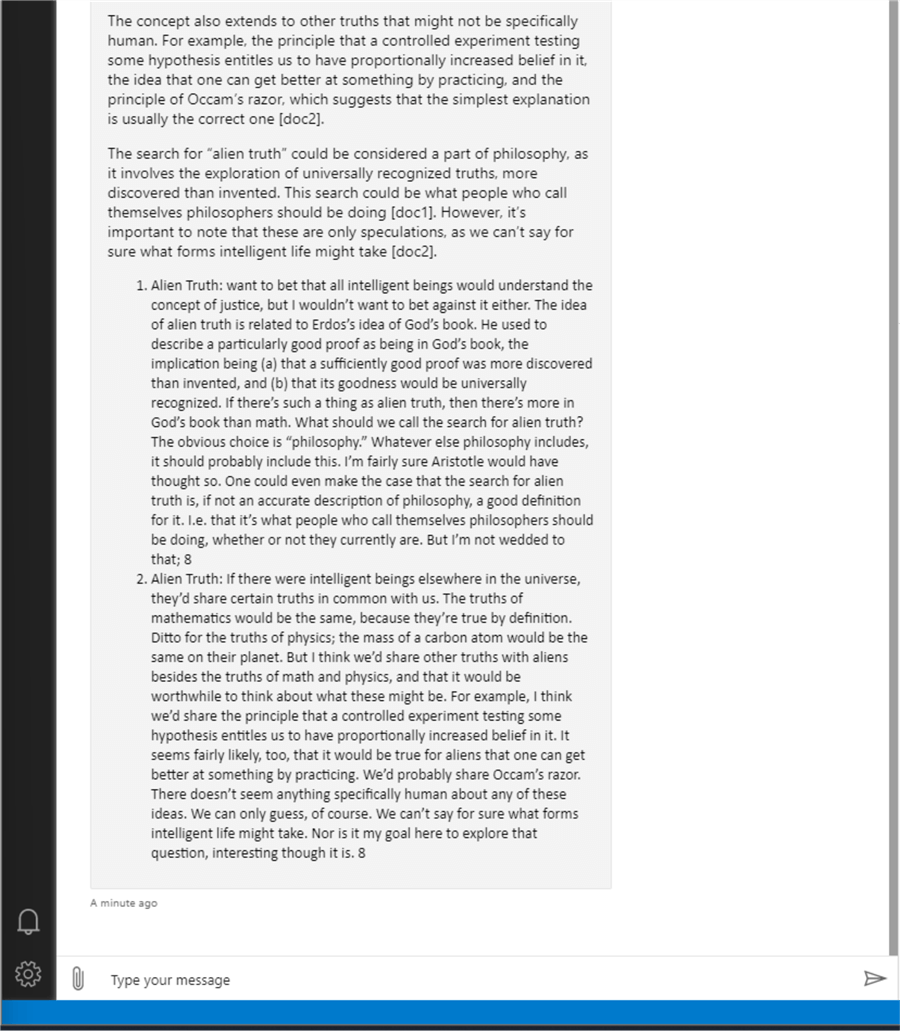
At this point, you should be able to interact with your data using the GPT model configured earlier in the config file. In my case, I am using GPT 4.0:

If you recall, the Alien Truth is one of Paul Graham’s essays that we vectorized and indexed in AI Search here. The answer develops further, including two references to index data chunks:
Conclusion
Using the Azure Bot Framework SDK for Python, Azure Open AI, and AI Search, we have built a chatbot solution to answer questions about your SQL Server data. This is a basic solution demonstrating the core principle. Further improvements may include automatic recurring indexing of new data, deploying the chatbot to different channels (web, MS Teams, etc.), adding authentication to the bot, and monitoring the solution telemetry.
Next Steps
- Bot Framework SDK for Python
- Azure AI Search Data Source
- AOAI Service Overview
- Large Language Models with Azure AI Search and Python for OpenAI RAG
- OpenAI API Introduction
- LangChain Prompt Template with OpenAI LLMs

Hristo Hristov is a seasoned data professional with 10+ years of experience spanning the intersection of data engineering and smart manufacturing solutions. Since 2017, he has specialized in implementing advanced analytics solutions for bridging the IT/OT gap.
A technical writer with over 80 published articles on data and AI technologies, Python development, and cloud solutions. Passionate about transforming complex data into business value through innovative applications of Azure Data Platform, Python, IoT solutions, databases, and other cloud technologies.
Currently applying Industry 4.0 best practices, focusing on IoT connectivity, and implementing data and AI systems in manufacturing. Hristo holds a degree in Data Science and several Microsoft certifications covering SQL Server, Power BI, and related technologies.
- MSSQLTips Awards
- Achiever Award (75+ tips) – 2026
- Rookie of the Year – 2021
- Author Contender – 2022/2023/2024/2025