Problem
Training an object detection machine learning algorithm is frequently a resource-intensive process. Once trained, you can use your model to run inference, i.e., get a prediction on new data from the domain you have trained on. The inference process may not be as resource-intensive as the training; however, it does require specific hardware to run efficiently. Due to their fast parallel processing, many machine learning solutions in the computer vision domain have been trained on high-end compute unified device architecture (CUDA)-based devices. What if you wanted to run a lightweight object detection model on your home or business PC regardless of the hardware you have?
Solution
With the DirectML plugin for TensforFlow, we can run training and inference on existing DirectX 12-enabled hardware, including built-in GPU units like Intel, AMD, and NVIDIA devices. To perform the experiment outlined in this article, you will need:
- Windows 10 or 11, 64-bit
- Python x86-64 3.7, 3.8, 3.9, or 3.10.
Note that version 3.10 is the maximum supported version due to the use of specific package versions. - One of the following supported GPUs:
- AMD Radeon R5/R7/R9 2xx series or newer and 20.20.01.05 driver or newer
- Intel HD Graphics 5xx or newer and 28.20.100.8322 driver or newer
- NVIDIA GeForce GTX 9xx series GPU or newer and 460.20 driver or newer
Environment Setup
Install the Latest GPU Driver
Ensure that you have the latest GPU driver installed for your hardware. Go to the Windows Update section of the Settings app. Select Check for updates in the Windows Update section. Pick up an install from your hardware vendor using the links above if needed.
Install Python 3.9
DirectML requires the tensorflow-cpu package version 2.10. Since this is an older version, you will need an older version of the Python interpreter that supports it. Let’s try with Python 3.9.
Go to Python downloads, look up version 3.9.10, download the 64-bit installer, and install it. You may want to uncheck “add to path” and “install IDLE,” especially if you already have a newer Python version added to PATH. We need this installation just for the basis of our venv; there is no need for optional features.


Create a Project Folder
Create a folder where you would like to place the files for this experiment. Then, open the folder in VS Code, for example, by using the command prompt and the code . command:

Create a Virtual Environment
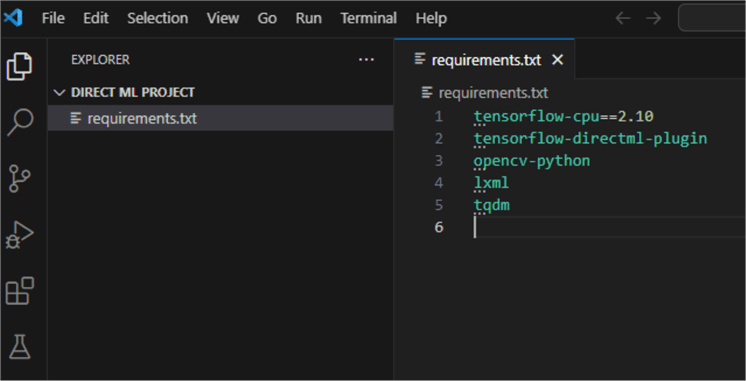
With the folder open in VS code, create a requirements.txt file in it. Add the following lines to it:
tensorflow-cpu==2.10
tensorflow-directml-plugin
opencv-python
lxml
tqdm
Next, hit CTRL+SHIFT+P. Choose Python: Create Environment…, then Venv.

In the next step, do not use the current (latest) Python interpreter you have. Instead, choose + Enter interpreter path.

Then browse to find the Python 3.9. we installed previously:

Finally, check the checkbox for the requirements.txt file so that the packages are installed. Click OK.

VS Code will begin creating your venv according to the instructions specified. Open the terminal and run a quick check:

Install git
To successfully complete this experiment, I recommend having Git installed. Go to https://gitforwindows.org/ and click Download. Install using the default settings and restart VS Code. Now, the Git commands will be available from the VS Code terminal.
Download Sample Models
At this point, we are getting to the core of our experiment. We need an object detection model to run on our machine using DirectML for TensforFlow 2.
Clone the DirectML Repo
From the VS Code terminal in your project folder, run git clone https://github.com/microsoft/DirectML.git. This will clone the Microsoft repo containing various machine learning projects for DirectML to your machine.

Set Up Model
To use the object detection model, navigate to its folder. Type cd DirectML\TensorFlow\TF2\yolov3-tf2 in the VS Code terminal. If your PC has one GPU, skip to the next step. If your PC has two GPUs, you will need to set the one to use explicitly:
- In the file browser, find the file
convert.py - On line 18, add
tf.config.experimental.set_visible_devices(physical_devices[0], 'GPU'). This command will explicitly instruct TensorFlow to use the first device in the device list:

The machine I am working on has two GPUs. The first one is the integrated Intel Iris device. The second one is a dedicated Nvidia device.

Other PCs may have only one GPU.
Next, run the setup script. It will download all data and pre-trained weights for the model.
By default, the script downloads the yolov3 weights. To download the yolov3-tiny weights, uncomment line 31. YOLO (you only look once) is a fast and accurate object detection neural network that has already been trained. Therefore, we can use the pre-trained weights. This saves us tons of time and compute effort.

The script itself downloads a small 1.9 GB training set and splits it into training and validation subsets using the TF record format. Depending on your internet connection, this process may take some time.
Run Inference
We are ready to use the object detection model using the streaming input from the webcam. Again, skip to the next step if your PC has one GPU. If your PC has two GPUs, you will need to explicitly set the one to use:
- In the file browser, find the file
detect_video.py - On line 29, add
tf.config.experimental.set_visible_devices(physical_devices[0], 'GPU').

Run python detect_video.py –video 0. If you have an external web camera, you may have to change the zero to one so that the detect_video script switches on the external camera.
Result
Your web camera should start working. The object detection model should start inferring and recognizing objects from the streaming input in real-time.

In the project documentation for TensorFlow 2, you can see other ways to use the pre-trained model and instructions to train your own. For example, you can also use the existing setup for image or video object detection.
Next Steps

Hristo Hristov is a seasoned data professional with 10+ years of experience spanning the intersection of data engineering and smart manufacturing solutions. Since 2017, he has specialized in implementing advanced analytics solutions for bridging the IT/OT gap.
A technical writer with over 80 published articles on data and AI technologies, Python development, and cloud solutions. Passionate about transforming complex data into business value through innovative applications of Azure Data Platform, Python, IoT solutions, databases, and other cloud technologies.
Currently applying Industry 4.0 best practices, focusing on IoT connectivity, and implementing data and AI systems in manufacturing. Hristo holds a degree in Data Science and several Microsoft certifications covering SQL Server, Power BI, and related technologies.
- MSSQLTips Awards
- Achiever Award (75+ tips) – 2026
- Rookie of the Year – 2021
- Author Contender – 2022/2023/2024/2025