By: Tim Ford | Comments (19) | Related: 1 | 2 | 3 | > Database Mail
Problem
One of the most welcome SQL Server 2005 enhancements over its predecessors is Database Mail. Database Mail is built on the Simple Mail Transfer Protocol (SMTP) as compared to SQL Server 2000 Mail which used a buggy and temperamental MAPI client causing significant frustration. Just like with everything else, every enhancement comes with its own learning curve. If you're new to Database Mail in SQL 2005 it is quite easy to get lost somewhere between the Surface Area Configuration Tool (where Database Mail is enabled) and SQL Server Management Studio (where the settings for Database Mail configured). I'll show you the basics of getting Database Mail configured for basic use in Management Studio and then show you a much quicker method via T-SQL. You'll be able to get Database Mail running in under a minute once this script is customized for your environment. At the end of this tip we will review a few of the most common stored procedures associated with Database Mail and compare them to their SQL Mail stored procedure equivalents.
Solution
Before SQL 2005 even had an official name and we were all referring to the product as Yukon, we've been told by Microsoft that the release would be "Secure by Default". What does that mean exactly? Well, what it means is that the base installation's configuration settings are as restrictive as possible. You must explicitly enable features and services that provide additional functionality for SQL Server 2005, yet may expose it to unwanted intrusion. The tool Microsoft has provided for this task is the SQL Server Surface Area Configuration. This tip will focus on one of the features that is enabled via this tool: Database Mail.
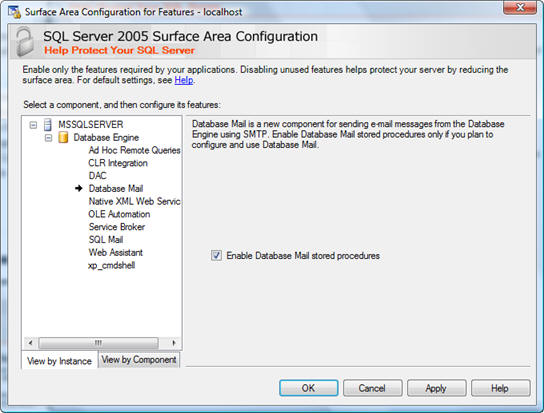
SQL Server 2005 Surface Area Configuration - Database Mail
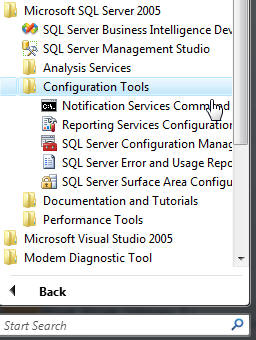
Step 1 - The enabling of this feature is simple enough; launch SQL Server Surface Area Configuration from your Start Menu:
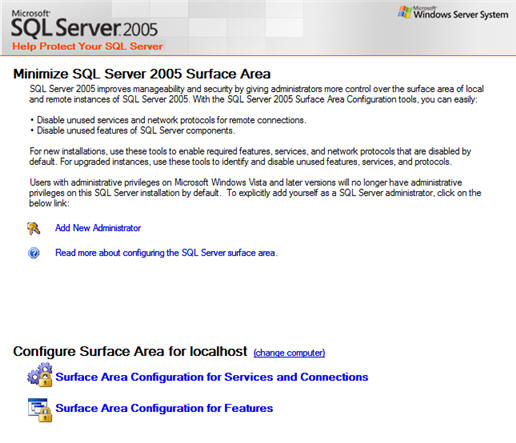
Step 2 - Select Surface Area Configuration for Features:
Step 3 - Expand Database Engine, select Database Mail, and check the Enable Database Mail Stored Procedures checkbox.
SQL Server 2005 Management Studio - Database Mail Configuration
At this point you've simply enabled the 25 system stored procedures that are used to perform email operations in SQL 2005 under the auspices of Database Mail. It is now necessary to configure Database Mail for your environment. For that we must move onto more familiar territory: SQL Server management Studio (SSMS).
Database Mail configuration in SQL Server 2005 Management Studio Step 1 - After launching SSMS, you'll need to connect to the server for which you wish to configure Database Mail. Expand the Management folder, then right-click Database Mail and select Configure Database Mail.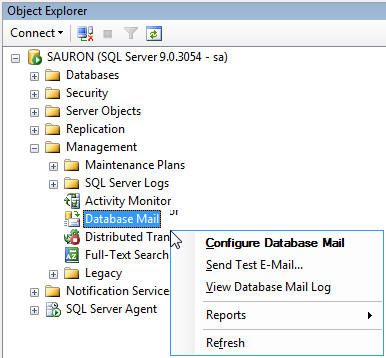
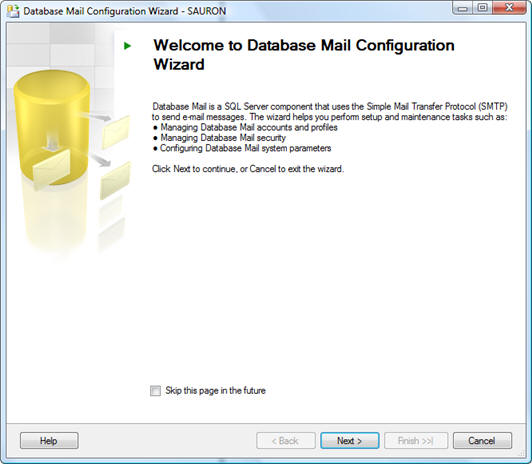
Step 2 - Doing so will launch the Configure Database Mail Wizard. It may look a little confusing at first, but once we step through it the script at the end of this tip will make more sense.
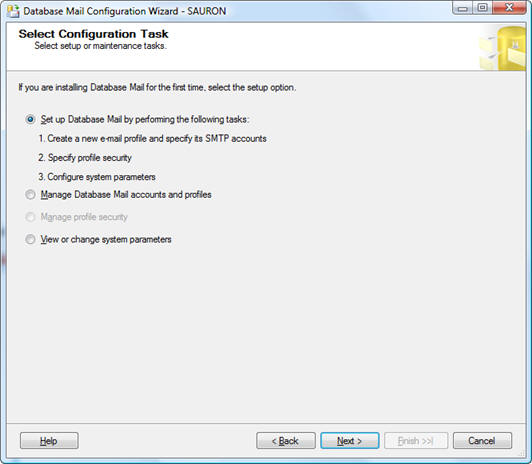
Step 3 - Since we're setting up Database Mail for the first time, select the Setup option as recommended.
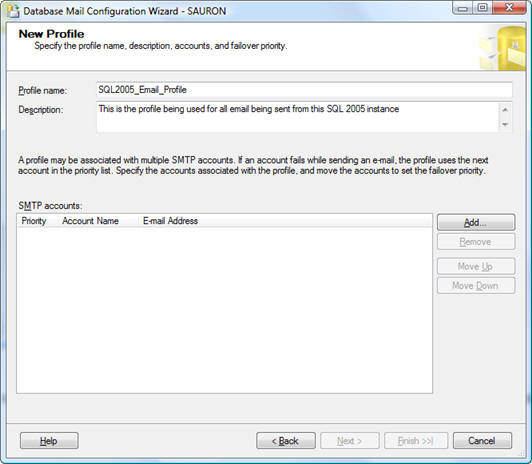
Step 4 - The first step is to set up an email profile to be used with mail being sent from your SQL Server 2005 instance on this screen you will be required to create a profile name, description, and then assign an SMTP account to the profile.
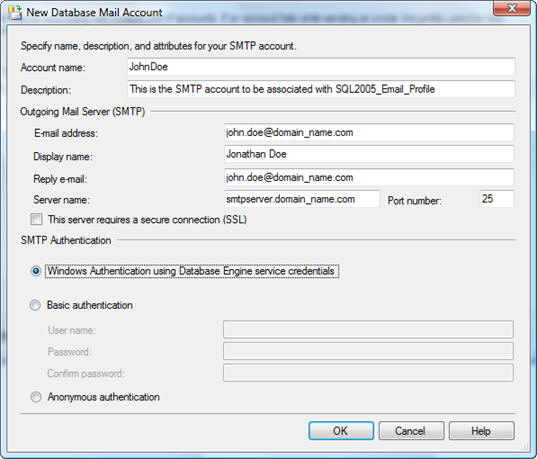
Step 5 - Click the Add button to assign an SMTP account to the profile you're creating. You may need to work with your Server Technicians and/or Security Teams to collect some of the information you'll need. It's best to have this ahead of time so as not to hold up the process of configuring Database Mail. You will need the account name, description, email address (both incoming and outgoing), display name, and SMTP server name for this account. Be sure to confirm the port number with your Server Technicians as well. Typically, the default of port 25 will work. Select how you want to authenticate to the SMTP server and then click OK to proceed.
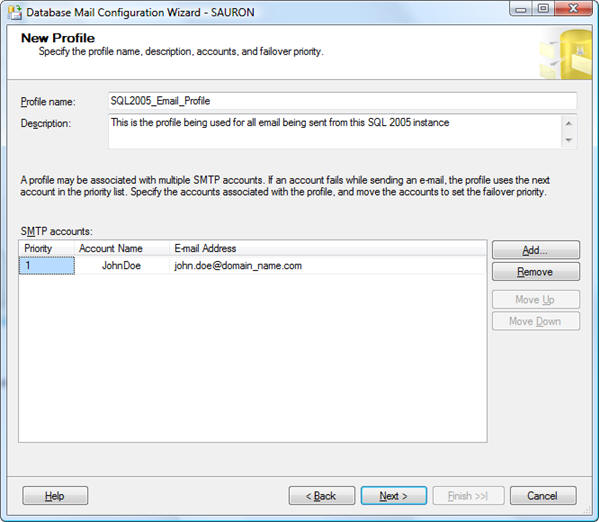
Step 6 - You will notice that the account information is now listed. You can set up multiple accounts for the Database Mail profile to allow for failover if you so choose. Click Next to continue onto setting up security for the Database Mail profile. I've already taken the liberty of setting this up as a Public Profile. This means that all users of the SQL instance will have access to this Database Mail profile. You have the option of creating Private Profiles that are only accessible to certain users of the instance. In our environment we have a default Database Mail profile that is used across all SQL instances. Your environment may differ. A Future tip will outline creation and use of Private Database Mail Profiles.
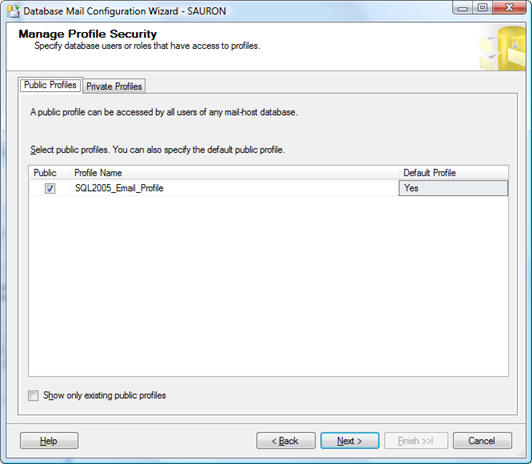
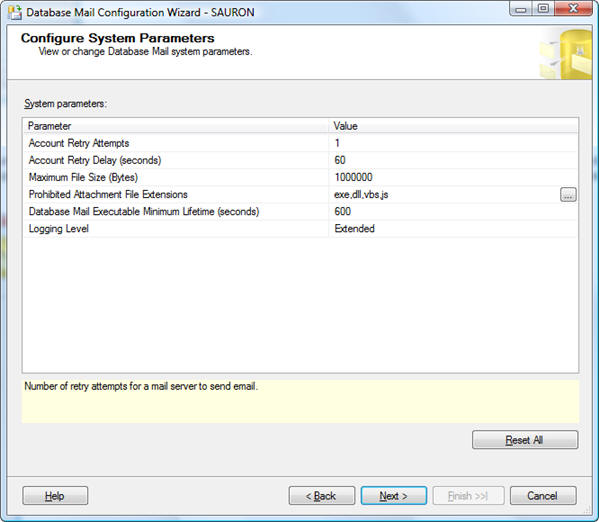
Step 7 - Once your form looks similar to this click Next to proceed to setting up your Database Mail system parameters, that form will look something like the one below. I make no suggestions here. You need to configure these settings to best-suit your environment. In our environment I tend to allow for up to 5 retry attempts, but other than that I leave the defaults unchanged.
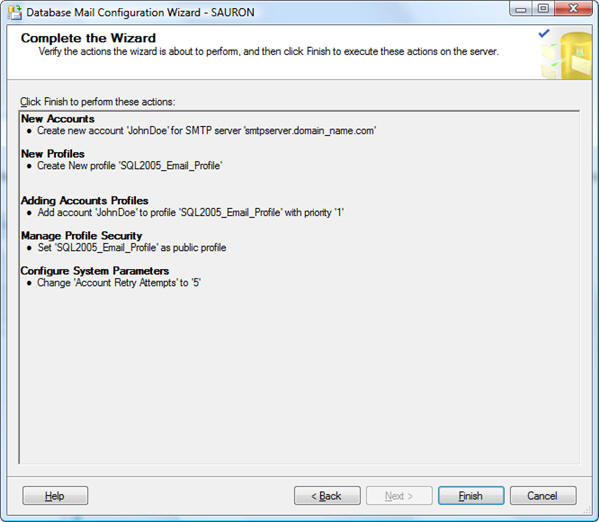
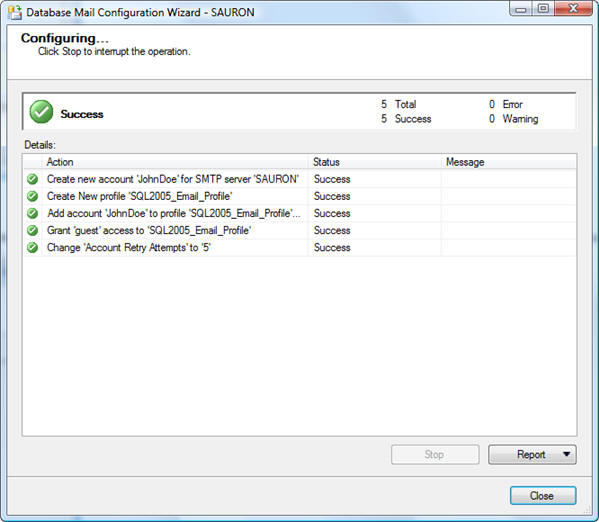
Step 8 - It is finally time to finish up with the wizard. Click Next for a summary of all the configuration settings you've made. Once you've reviewed them you can proceed with running the underlying stored procedures that create .
Database Mail T-SQL Commands
Congratulations, at this point you're now able to utilize Database Mail in the same manner as you utilized SQL Mail in previous versions of Microsoft SQL Server. However, you may have noticed that stepping through the wizard was a little time-consuming. I would rather script-out repetitive tasks rather than step through a wizard. If you're like me, you support more than a single instance of Microsoft SQL Server with more instances coming online all the time. That is why I maintain a SQL Server Solution that contains a listing of approximately a dozen scripts that I can run immediately after I install SQL Server 2005 and run through the Surface Area Configuration tool. The last script I run executes four Database Mail stored procedures (enabled during our visit to the Surface Area Configuration tool) that cumulatively create the default profile I use across all my SQL Server instances, then sets up the associated account, security, parameters for that profile.
SQL Server 2005 Database Mail Configuration Script
-- Create a Database Mail profile
EXECUTE msdb.dbo.sysmail_add_profile_sp
@profile_name = 'SQL2005_Email_ProfileName',
@description = 'Notification service for SQL Server' ;

-- Create a Database Mail account
EXECUTE msdb.dbo.sysmail_add_account_sp
@account_name = 'SQL Server Notification Service',
@description = 'SQL Server Notification Service',
@email_address = 'john.doe@domain_name.com',
@replyto_address = 'john.doe@domain_name.com',
@display_name = 'SQL Server Notification Service',
@mailserver_name = 'smtpserver.domain_name.com' ;

-- Add the account to the profile
EXECUTE msdb.dbo.sysmail_add_profileaccount_sp
@profile_name = 'SQL2005_Email_ProfileName',
@account_name = 'SQL Server Notification Service',
@sequence_number =1 ;

-- Grant access to the profile to the DBMailUsers role
EXECUTE msdb.dbo.sysmail_add_principalprofile_sp
@profile_name = 'SQL2005_Email_ProfileName',
@principal_id = 0,
@is_default = 1 ;

SELECT * FROM msdb.dbo.sysmail_profile
SELECT * FROM msdb.dbo.sysmail_account
This is a simple process, much more simple than the wizard. First, you pass the profile name and description into the dbo.sysmail_add_profile_sp system stored procedure to create the profile. The next stored procedure, dbo.sysmail_add_account_sp creates the account that you'll assign to the profile. The third system stored procedure you'll execute is dbo.sysmail_add_profileaccount_sp; assigning the account to the profile. Finally, execute dbo.sysmail_add_principalprofile_sp to set the account priority and to assign the prodile to the DBMailUsers role on the SQL Server instance. The SELECT statements that close out the statement block will confirm your settings executed successfully. Twenty-eight lines of code and 2 seconds versus stepping through nine screens in the Configure Database Mail wizard. You be the judge.
Additional Important Database Mail Stored Procedures
The first thing you'll notice when comparing SQL Mail versus Database Mail stored procedures is the sheer increase in available stored procedures that are now associated with the de-facto messaging component for SQL Server 2005. These stored procedures give you unprecedented control over mail accounts, logs, tables, queues, and of course the composition and sending of query results to recipients. Previously, when using SQL Mail, you had access to only a single stored procedure (sp_processmail, which in-turn called three different extended stored procedures and was declared a security risk by Microsoft Books Online) and a half-dozen extended stored procedures that had limited control over the SQL Mail inbox in addition to composing and sending query results to recipients. By far, the most-important query for Database Mail is sp_send_dbmail. This stored procedure affords you the ability to create a mail document, embed or attach query results, attach additional files, include message text, set a myriad of mail document properties and then send the mail message. The SQL Mail counterpart to sp_send_dbmail is xp_sendmail. All functionality from xp_sendmail exists in sp_send_dbmail, with some important differences as they relate to parameter data types. The parameters for both mail message and query text are limited in SQL Mail to 8000 bytes each; sp_send_dbmail is able to bypass that limitation by making use of the nvarchar(max) data type that was first released in SQL Server 2005. Additionally, Boolean parameters have been replaced by bit data types. I've presented the syntax for each stored procedure and also summarized their differences below:
SQL Mail (Microsoft SQL 2000 and earlier)
xp_sendmail { [ @recipients= ] 'recipients [ ;...n ]' }
[ ,[ @message= ] 'message' ]
[ ,[ @query= ] 'query' ]
[ ,[ @attachments= ] 'attachments [ ;...n ]' ]
[ ,[ @copy_recipients= ] 'copy_recipients [ ;...n ]'
[ ,[ @blind_copy_recipients= ] 'blind_copy_recipients [ ;...n ]'
[ ,[ @subject= ] 'subject' ]
[ ,[ @type= ] 'type' ]
[ ,[ @attach_results= ] 'attach_value' ]
[ ,[ @no_output= ] 'output_value' ]
[ ,[ @no_header= ] 'header_value' ]
[ ,[ @width= ] width ]
[ ,[ @separator= ] 'separator' ]
[ ,[ @echo_error= ] 'echo_value' ]
[ ,[ @set_user= ] 'user' ]
[ ,[ @dbuse= ] 'database' ]
Database Mail (Microsoft SQL 2005)
sp_send_dbmail [ [ @profile_name = ] 'profile_name' ]
[ , [ @recipients = ] 'recipients [ ; ...n ]' ]
[ , [ @copy_recipients = ] 'copy_recipient [ ; ...n ]' ]
[ , [ @blind_copy_recipients = ] 'blind_copy_recipient [ ; ...n ]' ]
[ , [ @subject = ] 'subject' ]
[ , [ @body = ] 'body' ]
[ , [ @body_format = ] 'body_format' ]
[ , [ @importance = ] 'importance' ]
[ , [ @sensitivity = ] 'sensitivity' ]
[ , [ @file_attachments = ] 'attachment [ ; ...n ]' ]
[ , [ @query = ] 'query' ]
[ , [ @execute_query_database = ] 'execute_query_database' ]
[ , [ @attach_query_result_as_file = ] attach_query_result_as_file ]
[ , [ @query_attachment_filename = ] query_attachment_filename ]
[ , [ @query_result_header = ] query_result_header ]
[ , [ @query_result_width = ] query_result_width ]
[ , [ @query_result_separator = ] 'query_result_separator' ]
[ , [ @exclude_query_output = ] exclude_query_output ]
[ , [ @append_query_error = ] append_query_error ]
[ , [ @query_no_truncate = ] query_no_truncate ]
[ , [ @query_result_no_padding = ] query_result_no_padding ]
[ , [ @mailitem_id = ] mailitem_id ] [ OUTPUT ]
Parameter Comparisons
Below outlines the parameter comparisons between xp_sendmail and sp_send_mail with some additional commentary:
| SQL Mail (xp_sendmail) Parameter | Database Mail (sp_send_dbmail) Parameter | Notes |
|---|---|---|
| @set_user | @profile_name | SQL Mail: context query is run under. DB Mail: DB mail profile to use |
| @recipients | @recipients | Semi-colon separated list of recipients |
| @copy_recipients | @copy_recipients | Semi-colon separated list of recipients |
| @blind_copy_recipients | @blind_copy_recipients | Semi-colon separated list of recipients |
| @subject | @subject | Subject of email |
| @message | @body | Email message, 8000 byte max in SQL Mail, varchar(max) in DB Mail |
| @body_format | Either 'Text' or 'HTML' | |
| @importance | Either 'Low', 'Normal', or 'High' | |
| @sensitivity | Either 'Normal', 'Personal', 'High', or 'Confidential' | |
| @attachments | @file_attachments | Semicolon-separated list of file names for attachments as absolute file paths |
| @query | @query | Text of query to execute. 8000 byte max in SQL Mail, varchar(max) in DB Mail |
| @dbuse | @execute_query_database | Database to run query against |
| @attach_results | @attach_query_result_as_file | Attach query results as file? Boolean in SQL Mail, Bit in DB Mail |
| @query_attachment_filename | Filename for the query results | |
| @no_header | @query_result_header | Include column headers in the query results? Boolean in SQL Mail, Bit in DB Mail |
| @width | @query_result_width | Line width, in characters for query results |
| @separator | @query_result_separator | Character to use for column delimiter |
| @echo_error | @exclude_query_output | Print query output messages? Boolean in SQL Mail, Bit in DB Mail |
| @append_query_error | 0 or 1 to signify whether to send the email even if the query returns an error | |
| @query_no_truncate | 0 or 1 to signify whether to truncate the query column results at 256 characters per column | |
| @query_result_no_padding | 0 or 1 to signify whether to pad query results; default pads the results. | |
| @mailitem_id | Returns the mailitem_id of the message | |
| @no_output | TRUE or FALSE to determine whether the client session that called the sproc receives the output when the mail is sent. | |
| @type | Signifies the type of MAPI mail message |
Next Steps
- Tweak T-SQL code provided to fit your environment.
- Examine the other Database Mail stored procedures and use them to add increased functionality and detail to this code.
- Add email notification functionality to your SQL Agent jobs without concern that MAPI will fail you and you'll miss important notifications.
- Stay tuned for more Database Mail tips.
About the author
 Tim Ford is a Senior Database Administrator with MindBody.
This author pledges the content of this article is based on professional experience and not AI generated.
View all my tips


