Problem
In a previous tip on Disaster Recovery Procedures in SQL Server 2005 Part 1, we have seen how we can come up with a disaster recovery procedure in SQL Server 2005. There are other ways to increase availability of your highly critical database in SQL Server 2005. What are those other options?
Solution
To continue the series on disaster recovery scenarios in SQL Server 2005, let us look at another means to increase the availability of your highly critical databases. Isolating critical objects gives you the advantage of increasing your database availability. You should create a separate filegroup for your critical database objects. In fact, you should be creating your database objects in a different filegroup other than the default primary filegroup. Most of the time, we think of filegroups as a means to improve performance or manage database files. However, we tend to forget the fact that filegroups can be used as a means to improve database availability and should be considered as part of our disaster recovery plan.
1) Keep user-defined objects away from the PRIMARY filegroup
There are a few things we need to note about filegroups to consider them as part of our disaster recovery plan. First, the primary data file of a database is always created as part of the primary filegroup and it cannot be removed from this group. Second, the primary filegroup contains all the pages for the system tables/objects in the database and cannot be removed from this group. It is important to note that if the primary filegroup is inaccessible, the database itself becomes unavailable. Hence, you should consider storing your primary filegroup on a disk subsystem that provides fault tolerance – a RAID 1 disk subsystem would suffice since you would rarely write data on system objects. As a best practice, you should create your database objects on a separate filegroup that is not the primary filegroup. Plus, since all new objects created in the database are created in the default filegroup, which by default is set to the primary filegroup, you can opt to change the default filegroup to point to a different filegroup or simply change your scripts to create the objects on another filegroup and not the default filegroup.
Now, if you already have an existing database, plan well on how you would move your user-defined objects out of the primary filegroup as you need to deal with moving the data and the indexes along with the tables as well. An example on how to do that is provided on a table level on the next item.
2) Move your highly critical objects on a separate filegroup on a different disk subsystem
Let’s say the Order Details table of the Northwind database is a highly critical object. We can create a separate filegroup just for this object and store it on a data file that we can define on another disk subsystem – a RAID 5 disk subsystem would be recommended for both I/O performance and redundancy but if you do have enough budget for your disks, a RAID 10 subsystem would be ideal. I’ll first create a new filegroup named OrderDetailsFG on my Northwind database
USE Northwind
GO
ALTER DATABASE [Northwind]
ADD FILEGROUP OrderDetailsFG
GO
Next, I’ll add a database file in my Northwind database and add that file to the filegroup I have just created. My operating system partition sits on my D:\ drive as well as my database files so I’ll store this new database file on my F:\ drive. Do take note that you should place this data file on a fault tolerant disk subsystem
ALTER DATABASE [Northwind]
ADD FILE
(  NAME = N'NorthwindSalesData'
   , FILENAME = N'F:\DBFiles\NorthwindSalesData.ndf'
   , SIZE = 500
   , MAXSIZE = UNLIMITED
   , FILEGROWTH = 50)
TO FILEGROUP OrderDetailsFG
GO
To move the Order Details table from the primary filegroup to the OrderDetailsFG filegroup, we need to drop and recreate the existing clustered index on the new filegroup. This will eventually move the table to the new filegroup.
IF  EXISTS (SELECT * FROM sys.indexes
            WHERE OBJECT_ID = OBJECT_ID(N'[dbo].[Order Details]')
            AND name = N'PK_Order_Details')
ALTER TABLE [dbo].[Order Details] DROP CONSTRAINT [PK_Order_Details]
GO
ALTER TABLE [dbo].[Order Details]
ADD  CONSTRAINT [PK_Order_Details] PRIMARY KEY CLUSTERED
(
   [OrderID] ASC,
   [ProductID] ASC
)WITH (ONLINE = OFF) ON [OrderDetailsFG]
GO
You have the option to do this as an online index operation by specifying the ONLINE parameter to ON instead of OFF, giving you the benefit of doing this operation without bringing the database offline. In the example above, I used the offline option because removing an existing primary key might affect transactions running against this table.
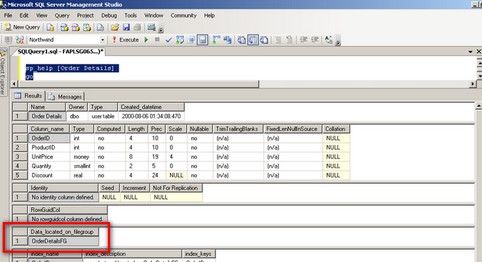
Verify that the Order Details table has been moved to the OrderDetailsFG filegroup
sp_help [Order Details]
GO
It is up to you to move all the other indexes in a separate filegroup for performance and maintainability but that of course will depend on your requirements and your budget.
3) Update your disaster recovery plan to include this change
Now that you’ve managed to move your highly critical table to a separate filegroup, you need to update your disaster recovery plan to include this change. You must perform a FULL database backup after performing the steps above to make sure that you have a consistent state anytime a disaster occurs.
USE master
GO
BACKUP DATABASE Northwind
   TO DISK = N'C:\DBBackup\NorthwindBackup.bak'
   WITH NAME = N'Full Database Backup', DESCRIPTION = 'Starting point for recovery',
    INIT, STATS = 10
GO
If you currently have FULL database backups, you need to include the process to recover using filegroups. This gives you an opportunity to do piecemeal restores in case your critical object encounters a disaster.
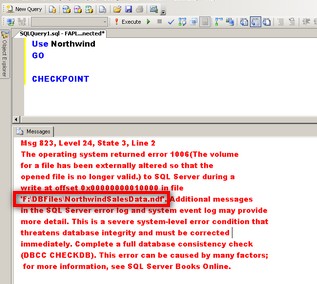
To simulate a disaster, let’s say the disk subsystem containing the OrderDetailsFG filegroup is damaged. What I did was to manually run the CHECKPOINT command so that SQL Server will write all the dirty pages in the buffer cache to disk, including the damaged one. This is just to demonstrate that the disk subsystem containing the Order Details table is unavailable. Note the path of the NorthwindSalesData.ndf file in the error message
What we will do is to bring the file containing the Order Details table offline. This partial availability feature in SQL Server 2005 gives us the advantage of performing file or filegroup restores without taking the entire database offline.
ALTER DATABASE Northwind
   MODIFY FILE (NAME = N'NorthwindSalesData' , OFFLINE)
GO
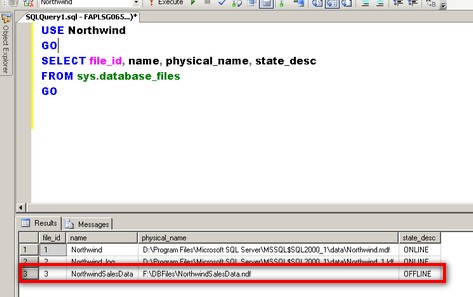
Running the script below will show us the status of the NorthwindSalesData file.
USE Northwind
GO
SELECT FILE_ID, name, physical_name, state_desc
FROM sys.database_files
GO
Next, we will restore the damaged filegroup from our backup by moving it to a different disk subsystem. Note that in the real world, it might take some time for the disk to be replaced, hence, restoring it temporarily to an existing disk subsystem. You should document this procedure as you need to move it back to the original drive when the disks get replaced. To restore the damaged filegroup,
USE master
--Restore the damaged filegroup moving it to a different disk subsystem
RESTORE DATABASE Northwind FILEGROUP='OrderDetailsFG'
FROM DISK=N'C:\DBBackup\NorthwindBackup.bak'
WITH MOVE N'NorthwindSalesData' TO N'C:\DBFiles\NorthwindSalesData.ndf', STATS=10
As in Part 1 of this series, we need to backup the tail of the log so we can recover the transactions until the time the database filegroup (in this case, the disk subsystem containing the filegroup) was damaged.
BACKUP LOG Northwind
   TO DISK = N'C:\DBBackup\NorthwindBackupLog.trn'
   WITH INIT, NO_TRUNCATE,
   STATS = 10
GO
Finally, we restore the tail of the log which we backed up as part of the recovery process to get the database filegroup back online and in a consistent state as before the disaster,
RESTORE LOG Northwind
   FROM DISK = N'C:\DBBackup\NorthwindBackupLog.trn'
   WITH RECOVERY,
   STATS = 10
GO
Next Steps
- Check out these other Disaster Recovery tips

Edwin M. Sarmiento is the Managing Director of 15C, a consulting and training company that specializes on designing, implementing and supporting SQL Server infrastructures. He is a Microsoft SQL Server MVP and Microsoft Certified Master from Ottawa, Canada specializing in high availability, disaster recovery and system infrastructures running on the Microsoft server technology stack ranging from Active Directory to SharePoint and anything in between. He is very passionate about technology but has interests in music, professional and organizational development, and leadership and management matters when not working with databases. Edwin lives up to his primary mission statement: “To help people and organizations grow and develop their full potential.”
- MSSQLTips Awards: Champion Award (100+ tips) – 2017 | Author of the Year Contender – 2020, 2017