By: Edwin Sarmiento | Comments (7) | Related: 1 | 2 | 3 | 4 | > Disaster Recovery
Problem
In a previous tip on Disaster Recovery Procedures in SQL Server 2005 Part 1, we have seen how we can come up with a disaster recovery procedure in SQL Server 2005. There are other ways to increase availability of your highly critical database in SQL Server 2005. What are those other options?
Solution
To continue the series on disaster recovery scenarios in SQL Server 2005, let us look at another means to increase the availability of your highly critical databases. We will extend the concept of filegroups as highlighted in a previous tip on Disaster Recovery Procedures in SQL Server 2005 Part 2 (Isolating Critical Objects) wherein we can use filegroups to isolate and store a critical object. While keeping a critical object in a single filegroup, it still is a single point of failure as demonstrated in the tip. What we can do is store a critical object in multiple filegroups for high availability. Let's take the same database object as what we have been using throughout this series - the Order Details table of the Northwind database. We will introduce the use of table partitioning with multiple filegroups for high availability. I used the default configuration of the Northwind database - single filegroup and single data file - as a starting point for this tip.
Partitioned tables were introduced in SQL Server 2005 to give you a more granular control over your data by allowing you to store the table partitions in different disk subsystems. This not only gives you additional benefits on performance and data management but on high availability and disaster recovery as well. When implementing table partitioning, you need to take into account how to best partition the table and plan for administration overhead. An article on strategies for partitioning relational data warehouse in SQL Server is available on Microsoft TechNet. We will not be dealing with the basics of table partitioning in this article so it is recommended to have a basic understanding on how it works.
1) Create files and filegroups that will contain the table partitions
The first thing we need to do is prepare the database by creating files and filegroups which we will use to store the table partitions. For this demonstration, we will create four files stored in four filegroups spanned across four disk subsystems. The number of files and filegroups you create for your databases are bound by your available disk resources.
USE Northwind
GO

--Add the first filegroup
ALTER DATABASE Northwind
ADD FILEGROUP NorthwindOrderDetailsDataPartition1
GO

--Add a database file to the first filegroup
ALTER DATABASE Northwind
ADD FILE
(  NAME = N'NorthwindOrderDetailsDataPartition1'
   , FILENAME = N'C:\DBFiles\NorthwindOrderDetailsDataPartition1.ndf'
   , SIZE = 10
   , MAXSIZE = 120
   , FILEGROWTH = 10)
TO FILEGROUP NorthwindOrderDetailsDataPartition1
GO

--Add the second filegroup
ALTER DATABASE Northwind
ADD FILEGROUP NorthwindOrderDetailsDataPartition2
GO

--Add a database file to the second filegroup
ALTER DATABASE Northwind
ADD FILE
(  NAME = N'NorthwindOrderDetailsDataPartition2'
   , FILENAME = N'D:\DBFiles\NorthwindOrderDetailsDataPartition2.ndf'
   , SIZE = 10
   , MAXSIZE = 120
   , FILEGROWTH = 10)
TO FILEGROUP NorthwindOrderDetailsDataPartition2
GO

--Add the third filegroup
ALTER DATABASE Northwind
ADD FILEGROUP NorthwindOrderDetailsDataPartition3
GO

--Add a database file to the third filegroup
ALTER DATABASE Northwind
ADD FILE
(  NAME = N'NorthwindOrderDetailsDataPartition3'
   , FILENAME = N'F:\DBFiles\NorthwindOrderDetailsDataPartition3.ndf'
   , SIZE = 10
   , MAXSIZE = 120
   , FILEGROWTH = 10)
TO FILEGROUP NorthwindOrderDetailsDataPartition3
GO

--Add the fourth filegroup
ALTER DATABASE Northwind
ADD FILEGROUP NorthwindOrderDetailsDataPartition4
GO

--Add a database file to the fourth filegroup
ALTER DATABASE [Northwind]
ADD FILE
(  NAME = N'NorthwindOrderDetailsDataPartition4'
   , FILENAME = N'G:\DBFiles\NorthwindOrderDetailsDataPartition4.ndf'
   , SIZE = 10
   , MAXSIZE = 120
   , FILEGROWTH = 10)
TO FILEGROUP NorthwindOrderDetailsDataPartition4
GO
By now, we already have five data files and five filegroups defined in the Northwind database - the four recently created and the PRIMARY filegroup

2) Create the partition function
A partition function specifies how the table or index is partitioned. This is the part where your initial considerations and design translate into physical implementation. To create a partition function, you specify the number of partitions, the partitioning column, and the range of partition column values for each partition. We will take the OrderID column of the Order Details table as our partition column for demonstration purposes. In a real environment, you would normally take a column with a datetime data type and partition according to date ranges.
CREATE PARTITION FUNCTION OrderDetails4Partitions_PFN(INT)
AS
RANGE RIGHT FOR VALUES (10000,10500,10750)
GO
The CREATE PARTITION FUNCTION statement I used creates four partitions - first partition contains records with OrderID less than 10000, the second partition contains records with OrderID greater than or equal to10000 but less than 10500, the third partition contains records with OrderID greater than or equal to10500 but less than 10750, and the fourth partition contains records with OrderID greater than 10750. We will look at how the records are placed in the partition later after we managed to move the data to their corresponding partitions. The RANGE RIGHT clause simply means that the value is the lower bound for the partition.
3) Create the partition scheme
A partition scheme maps the partitions created by a partition function to a set of filegroups that you define. We need to make sure that there are enough filegroups to hold the partitions, as what we have in the example provided.
CREATE PARTITION SCHEME [OrderDetails4Partitions_PS]
AS
PARTITION [OrderDetails4Partitions_PFN] TO
       (NorthwindOrderDetailsDataPartition1, NorthwindOrderDetailsDataPartition2,
       NorthwindOrderDetailsDataPartition3, NorthwindOrderDetailsDataPartition4 )
GO
The OrderDetails4Partitions_PS partition scheme maps to the OrderDetails4Partitions_PFN partition function. This means that once data is inserted in the Order Details table, the records will be stored in the appropriate filegroups - hence, in the appropriate disk subsystems - based on the partition function we have defined earlier. Since by default, the data in the Order Details table is still stored in the PRIMARY filegroup, we need to move the data to their corresponding filegroups by dropping and recreating the existing clustered index. But instead of using a filegroup as a parameter where to place the indexes, we will use the partition scheme we created earlier and the partitioning column we selected.
IF  EXISTS (SELECT * FROM sys.indexes
            WHERE OBJECT_ID = OBJECT_ID(N'[dbo].[Order Details]')
            AND name = N'PK_Order_Details')
ALTER TABLE [dbo].[Order Details] DROP CONSTRAINT [PK_Order_Details]
GO

ALTER TABLE [dbo].[Order Details]
ADD  CONSTRAINT [PK_Order_Details] PRIMARY KEY CLUSTERED
(
   [OrderID] ASC,
   [ProductID] ASC
)WITH (ONLINE = OFF) ON [OrderDetails4Partitions_PS] (OrderID)
--we pass the partition scheme name and the partitioning column
GO
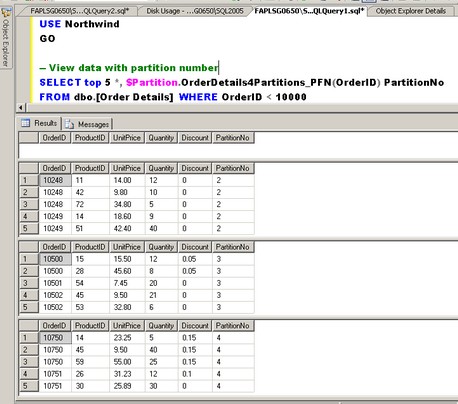
Verify that the data in the Order Details table has been moved to the corresponding filegroup as defined by the partition function.
USE Northwind
GO

-- View data with partition number
SELECT TOP 5 *, $Partition.OrderDetails4Partitions_PFN(OrderID) PartitionNo
FROM dbo.[Order Details] WHERE OrderID < 10000

SELECT TOP 5 *, $Partition.OrderDetails4Partitions_PFN(OrderID) PartitionNo
FROM dbo.[Order Details] WHERE OrderID >= 10000 AND OrderID < 10500

SELECT TOP 5 *, $Partition.OrderDetails4Partitions_PFN(OrderID) PartitionNo
FROM dbo.[Order Details] WHERE OrderID >= 10500 AND OrderID < 10750

SELECT TOP 5 *, $Partition.OrderDetails4Partitions_PFN(OrderID) PartitionNo
FROM dbo.[Order Details] WHERE OrderID >= 10750


4) Update your disaster recovery plan to include this change
Now that you've managed to move your highly critical table to a multiple filegroup filegroups, you need to update your disaster recovery plan to include this change. You must perform a FULL database backup after performing the steps above to make sure that you have a consistent state anytime a disaster occurs.
USE master
GO
BACKUP DATABASE Northwind
   TO DISK = N'C:\DBBackup\NorthwindBackup.bak'
   WITH NAME = N'Full Database Backup', DESCRIPTION = 'Starting point for recovery',
    INIT, STATS = 10
GO
If you currently have FULL database backups, you need to include the process to recover using filegroups. This gives you an opportunity to do piecemeal restores in case your critical object encounters a disaster as we have done in the previous tip.
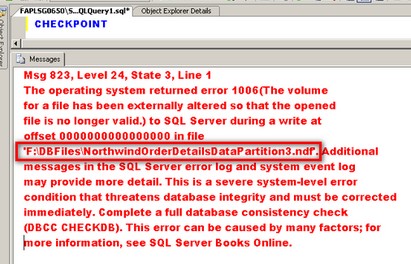
To simulate a disaster, let's say the disk subsystem containing the NorthwindOrderDetailsDataPartition3 filegroup - Disk F:\ - is damaged. This filegroup contains records with OrderID values between 10500 and 10750. What I did was to manually run the CHECKPOINT command so that SQL Server will write all the dirty pages in the buffer cache to disk, including the damaged one. This is just to demonstrate that the disk subsystem containing the NorthwindOrderDetailsDataPartition3 filegroup is unavailable. Note the path of the NorthwindOrderDetailsDataPartition3.ndf file in the error message

What's fascinating is that even though the disk containing the NorthwindOrderDetailsDataPartition3 filegroup has already failed, the SELECT query will still work as this is being retrieved from memory. At any rate, should the memory gets refreshed, you will still be able to query the Order Details table as long as the query does not retrieve the records from the damaged filegroup. You can try this out by running a DBCC DROPCLEANBUFFERS command to remove all clean buffers from the buffer pool without shutting down or restarting the server.
What we will do is to bring the file in the NorthwindOrderDetailsDataPartition3 filegroup offline as we did in the previous tip.
ALTER DATABASE Northwind
   MODIFY FILE (NAME = N'NorthwindSalesData' , OFFLINE)
GO
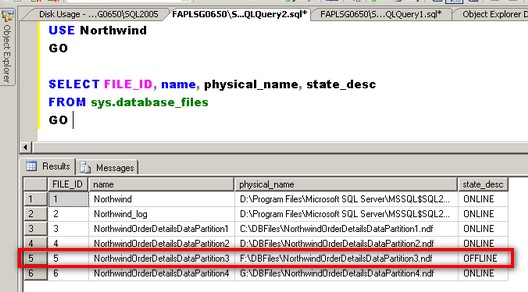
Running the script below will show us the status of theNorthwindOrderDetailsDataPartition3 file.
USE Northwind
GO

SELECT FILE_ID, name, physical_name, state_desc
FROM sys.database_files
GO 
Next, we will restore the damaged file from our backup by moving it to a different disk subsystem. Users and applications will still be able to access the Order Details table except for the damaged file. You can even run some test queries for OrderID values below 10500 while running the restore process just to validate that the table is still indeed partially available. To restore the damaged filegroup,
USE master

--Restore the damaged file moving it to a different disk subsystem
RESTORE DATABASE Northwind FILE='NorthwindOrderDetailsDataPartition3'
FROM DISK=N'C:\DBBackup\NorthwindBackup.bak'
WITH MOVE N'NorthwindOrderDetailsDataPartition3'
         TO N'C:\DBFiles\NorthwindOrderDetailsDataPartition3.ndf',
          STATS=10
As always, we need to backup the tail of the log.
BACKUP LOG Northwind
   TO DISK = N'C:\DBBackup\NorthwindBackupLog.trn'
   WITH INIT, NO_TRUNCATE,
   STATS = 10
GO
Finally, we restore the tail of the log which we backed up as part of the recovery process to get the database filegroup back online and in a consistent state as before the disaster,
RESTORE LOG Northwind
   FROM DISK = N'C:\DBBackup\NorthwindBackupLog.trn'
   WITH RECOVERY,
   STATS = 10
GO
Next Steps
Filegroups and table partitioning have always been associated with data management and performance. This tip has demonstrated how the combination of these features has allowed for partial database availability in SQL Server 2005. This enables us to provide higher availability to our mission critical databases in case of disasters.
- Simulate this particular process by going thru the steps outlined above
- Learn more about Partitioned Tables and Indexes from this MSDN article
- You can download the Northwind database used in the sample here.
About the author
 Edwin M Sarmiento is a Microsoft SQL Server MVP and Microsoft Certified Master from Ottawa, Canada specializing in high availability, disaster recovery and system infrastructures.
This author pledges the content of this article is based on professional experience and not AI generated.
View all my tips


