By: Edwin Sarmiento | Comments (4) | Related: > Microsoft Excel Integration
Problem
I've been hearing about PowerPivot for Microsoft Excel and how it can be used as a self-service business intelligence analytics tool. Can you tell me more about it?
Solution
PowerPivot is a free Microsoft Excel 2010 add-in that extends the data analysis capabilities in Excel. Created by the SQL Server Analysis Services team in collaboration with the Excel team, this add-in enables business analysts and end-users who are already familiar with the Excel environment to gain business insights by transforming massive amount of data from virtually any data source which can then be shared to team members for collaboration. PowerPivot is made up of two components - the add-in for Excel and the SharePoint server component. This tip will only focus on the Excel add-in.
Installing the PowerPivot for Excel Add-In
In order to install and use the PowerPivot add-in, we need to install a few prerequisites. First, you would need the .NET Framework 3.5 with Service Pack 1 installed on your workstation. If you are using Windows 7 as your operating system, this is already installed for you. Second, you need to install Microsoft Office 2010. This means that if you are still running older versions of Microsoft Office, this add-in would be a very good reason to upgrade. It is recommended to use the 64-bit version of Office 2010 in order to take advantage of the capabilities for handling large amount of memory. This would also mean that your operating system has to be 64-bit. I've learned this the hard way when I first loaded around 500MB-sized data in the 32-bit version of PowerPivot. My Excel workbook froze and crashed that prompted me to build a 64-bit workstation even from a virtual machine. With the 64-bit version, the performance was a lot better. Bear in mind that the amount of memory you would need for your workstation depends on the amount of data that you need to load on your Excel workbook via PowerPivot. More memory is always better.
After installing the prerequisites, you need to install the PowerPivot add-in. This Microsoft Download page provides you with the bits to download the add-in. Select the appropriate version for your needs and proceed with the installation. When you start Microsoft Excel 2010 for the first time after installing the PowerPivot add-in, you will be prompted by the Microsoft Office Customization Installer for permissions for Excel to load the add-in. Click Install to proceed.

The add-in will create a new tab on the Microsoft Excel ribbon named PowerPivot. Click on the PowerPivot tab to access the features. You can create PowerPivot workbooks by clicking on the PowerPivot Window button.
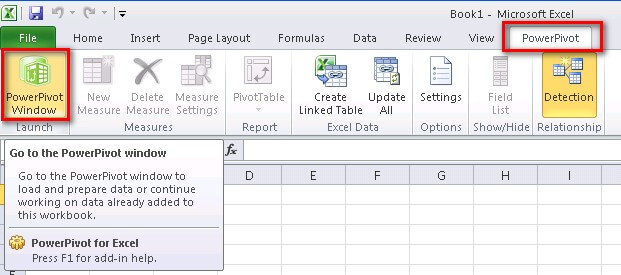

The PowerPivot workbook opens as a process within the Excel workbook process. You can think of it as the PowerPivot engine running inside the same process space as Excel.
An Overview of Importing Data from a SQL Server database
To really appreciate the wonders of PowerPivot, we need to import data from different data sources into the PowerPivot workbook to perform analysis. To start with, we will import data from a SQL Server database. I will be using the Contoso datawarehouse sample provided by Microsoft. The sample database is available from this Microsoft Download Center page. From within the PowerPivot workbook, click the From Database button and select From SQL Server.

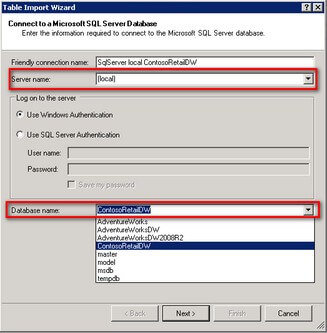
This opens up the Table Import Wizard which will guide you thru creating a connection to a SQL Server instance. On the Connect to a Microsoft SQL Server Database page, enter or select the SQL Server instance name as well as the database name from which you will import the data. Use the appropriate authentication method whether Windows-integrated or SQL Server. Click Next.
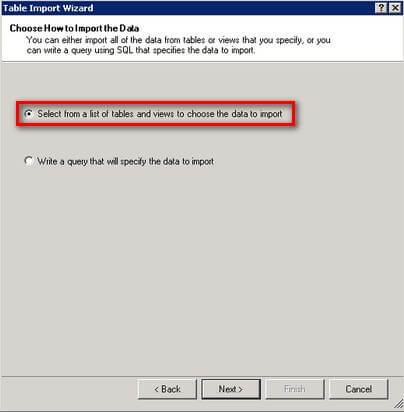
In the Choose How to Import The Data page, you can either select from the list of tables or views available from the database you selected or write your own custom SQL statement to retrieve the rows to import. For this example, I will just use the Select from a list of tables and views to choose the data to import option and click Next.
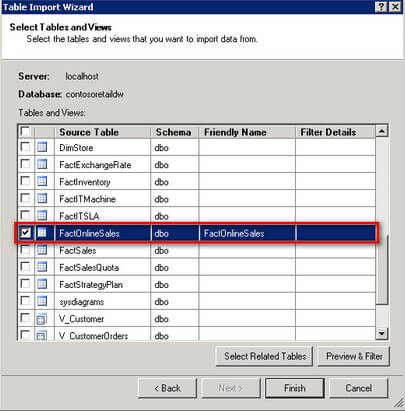
In the Select Tables and Views page, select the tables from which you would want to import data. In this example, I will choose the FactOnlineSales table to demonstrate importing a large amount of records from within the PowerPivot workbook. Note that the FactOnlineSales table from the sample Contoso database contains more than 12.6 million rows so make sure that you have more than enough memory in your workstation if you intend to import all of the rows on this table. You could rename the tables you selected to come up with a more intuitive name on the worksheet and even filter the columns to only include those which you want to import. For this example, I will simply use the default values and import all of the rows and all of the columns. Click Finish to start the data import process.
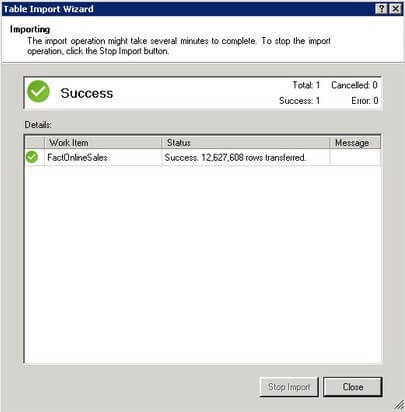
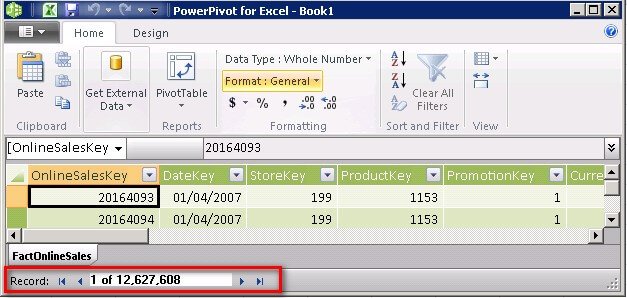
The Importing page will display the progress of the import process. When all the data has been imported successfully, click Close to close the Table Import Wizard. Notice that PowerPivot has imported 12.6 million rows from the FactOnlineSales table.
Note that the PowerPivot add-in gives you the capability to load millions of records - more than the maximum number that Excel 2010 can handle. You can now perform filtering and sorting of the data just like how you would do in Excel.
In future tips, you will see how you can import data from multiple data sources other than SQL Server as well as perform analysis on the data imported using calculations and graphs.
Next Steps
- Download and install the PowerPivot add-in for Microsoft Excel 2010 .
- Start importing data from a SQL Server database.
About the author
 Edwin M Sarmiento is a Microsoft SQL Server MVP and Microsoft Certified Master from Ottawa, Canada specializing in high availability, disaster recovery and system infrastructures.
This author pledges the content of this article is based on professional experience and not AI generated.
View all my tips


