By: Arshad Ali | Comments (7) | Related: > Master Data Services
Problem
SQL Server 2008 R2 introduced Master Data Services (MDS) as Master Data Management (MDM) platform for managing enterprise master data centrally in a consistent, clean and up-to-date manner. There were three ways to manage master data in MDS. First is the Master Data Manager which is a web based user interface. Second is loading data through a staging process. Third is using the MDS WCF services to programmatically manage the master data. These are fine, but there are many users who want to manage data in MS-Excel in bulk rather than managing each record one at a time in the Master Data Manager UI. The SQL Server team heard this requirement and introduced a brand new Excel add-in for MDS server in SQL Server 2012 to manage master data. With this new option, now the questions are, how to get started with this new add-in, how to manage data in bulk with this add-in and how publish it to MDS server? Check out this tip to learn more.
Solution
Before I can start demonstrating the Microsoft Excel add-in for MDS, let me explain a couple of key terms, which will be helpful for people who are new to Master Data Services:Master Data
Master data is the reference or non-transactional data which categorizes transactional data. For example in a typical business organization, Sales Amount is a transactional data and if we analyze the Sale Amount by Customer, Product, Geography etc., then these Customer, Product, Geography etc. become master data.
Master Data Management
Organizations face issues for managing master data. One issue is when the master data is being managed by each line of business application in the organization separately. There is no central, single, authoritative source for the master data. For example, consider two applications that maintain customer data separately. First is an Order Management application (to take the order from customers) and second is a Sales Management application (to sell/deliver products to customers against the received orders). Now if there is a change in address, the customer requests the address change in the Order Management application, but not in the Sales Management application so this application still has the old address. Now when customer calls the Order Management team to place an order, they will confirm the customer address with the customer and it is correct. The problem is when the Sales Management team delivers the products, they will be delivered to the wrong address because the old address has not been updated in Sales Management application.
To address these needs, Master Data Management is a set of tools, processes and policies to centrally manage master data for the organization as a single authoritative source. This lays-out processes for creating, organizing, modifying and viewing master data across different line of business applications in a consistent, clean and up-to-date manner.
Master Data Services
Master Data Services (MDS) was first introduced in SQL Server 2008 R2 and further enhanced in SQL Server 2012. Master Data Services is an extensible Master Data Management (MDM) platform which is built on top of SQL Server database engine and Windows Communication Foundation (WCF) services. As expected from a Master Data Management platform, it allows you to centrally create, organize, manage a single authoritative source of enterprise master data along with additional capabilities like transaction logging for all the changes made to the master data, business rules for data validation, integration with Data Quality Services for data matching, workflow, etc.
Getting started with MS-Excel add-in for Master Data Services
The Microsoft Excel add-in for Master Data Services is a client tool to manage master data stored in the Master Data Services Server database. Not only this, you can even create a new entity and modify an existing entity's attribute properties. This excel add-in is used to create and load master data in bulk quickly and hence it helps in speeding the deployment process and as this add-in exists in Microsoft Excel you can also leverage existing Excel functionality for data management. You can modify existing master data or create new master data in a worksheet, run business rules to check if the data adheres to business rules defined (this ensures you are not compromising the data's integrity and accuracy) and then can publish the correct data to the MDS Server database. During publishing you can also annotate your changes with your remarks or comments about the changes. This add-in also allows you to integrate MDS with DQS (Data Quality Services) to cleanse and match the data in a worksheet before actually publishing it to the MDS repository.
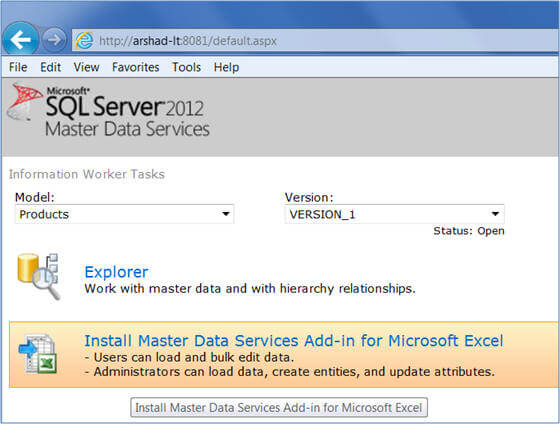
The Microsoft Excel add-in for Master Data Services is a separate installation which can be either installed from Master Data Manager (by default a link will appear on the Master Data Manager UI, but it can be hidden/shown by changing the property in Master Data Configuration Manager) as shown below or can be installed after downloading it from the Microsoft Download Center. Please note, the Microsoft Excel add-in can be installed on any machine (not necessarily be on MDS Server) and then can be connected to any MDS Server on which user has appropriate permissions.
Using the Microsoft Excel add-in for Master Data Services
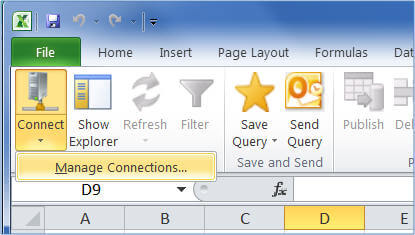
Once installed you can go to Excel and open the Master Data tab. You will notice a ribbon appearing with different commands and icons to work with Master Data Services as shown below:

Click the Connect icon available on the left side of the ribbon and you will see Manage Connections menu option. Since this is the first time we are launching this add-in there are no connections available. Connections will start appearing as favorites when you keep on adding new connections to it. For now click on the Manage Connections menu to add a new connection information:
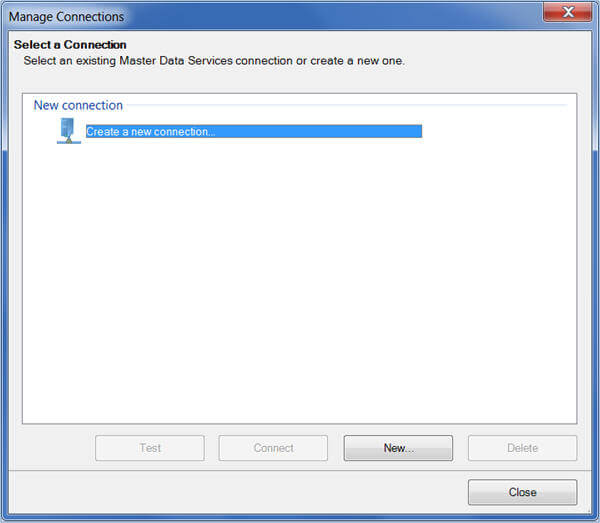
In the Manage Connections dialog box select Create a new Connection and click on the New button to create a new connection to the MDS Server:
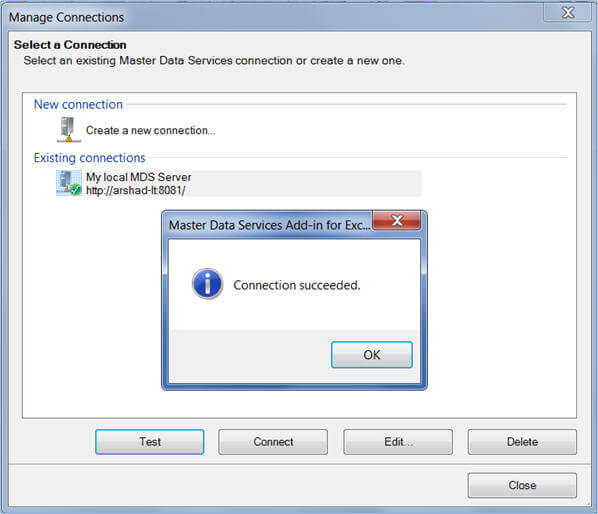
If you already have connections created, you would see the Existing connections options as well and then you could choose any of them to connect. You can click on Test button to verify the existing connection information to connect to the MDS Server:
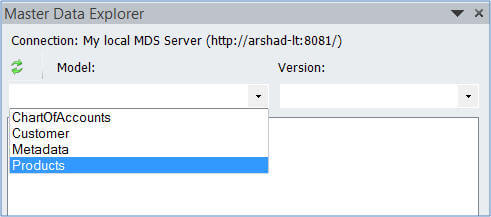
Once connected to the MDS Server, you will notice a Master Data Explorer appearing on the right side of the sheet by default, but you can drag it to left side if you want. This Master Data explorer will show all the Models deployed on the MDS Server based on your access. You can select any of the models in the left side combo-box and all the related versions will start appearing on the right side of the combo-box:
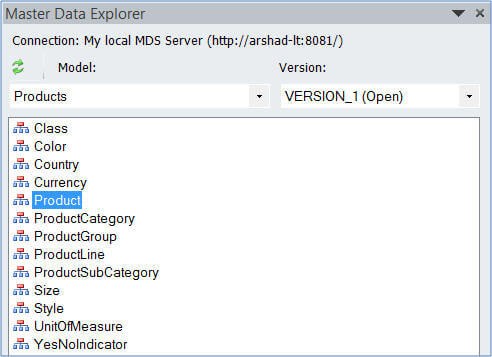
Once you have selected a model and its version, you will see all the entities you have permission to. You can now double click on any of these entities to open the data of the that entity in Excel. By double clicking on the entity, this will cause add-in to retrieve data for that entity from the MDS Server.
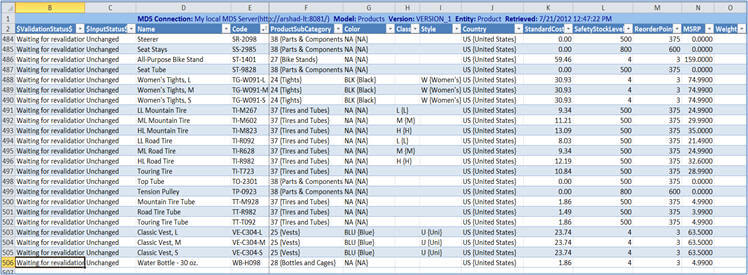
For example, when I double clicked on the Product entity, I can see members of this entity getting pulled from the MDS Server. They are displayed in the worksheet as shown below. The first two columns (ValidationStatus and InputStatus) columns are status columns and can be hidden and shown by clicking on the Show Status icon in the add-in ribbon:
So far so good, but now you must have few concerns. What if the entity contains millions of members/rows and some of these members are only need to be loaded in Excel for management? What if the entity contains hundreds of attributes/columns, but only a few of them are required in Excel for editing? Well, if these are your concern, then you can click on the Filter icon on the add-in ribbon. This functionality can be used to filter data even before you actually load the data for the first time or filter data which you have already loaded. By default this includes all the leaf attribute types, all the attributes and all the members of the selected entity. Total rows of the selected entity are 504 and columns are 27 as highlighted as below:
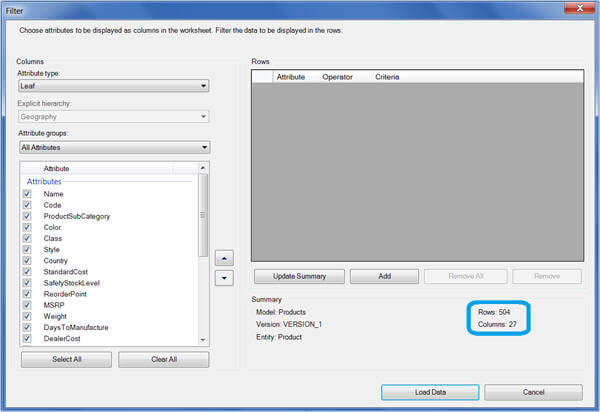
Now let's see this filtering in action, let's select only a couple of columns instead of the default and then specify a condition to bring all the rows/members which has Country = US (United States). Now you should notice the number of rows have been reduced to 422 (only rows which satisfy the specified condition) from 504. You can click on the Update Summary button to refresh the statistics as shown here:
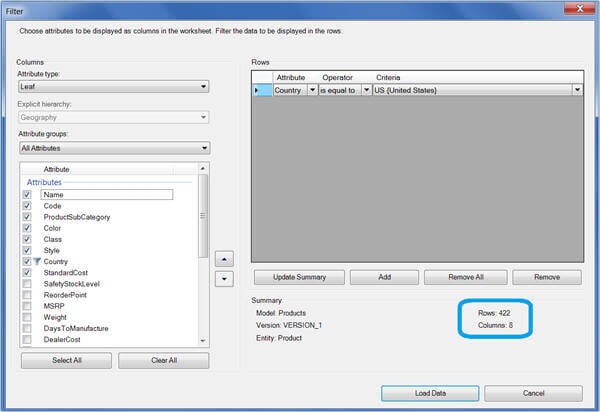
Once you are done specifying the filtering conditions, you can click on the Load Data button to load the data from the MDS Server into the an Excel worksheet which actually meets your specified conditions. This is what is shown below after specifying the above conditions. As you can notice, it has only the columns which I selected and only those rows/members which have Country = US (United States):

The query that you created can be utilized many more times by saving it as shown below. Go to the add-in ribbon and click on the Save Query icon as shown below. You can click on the Manage Queries option to manage or use all the saved queries.

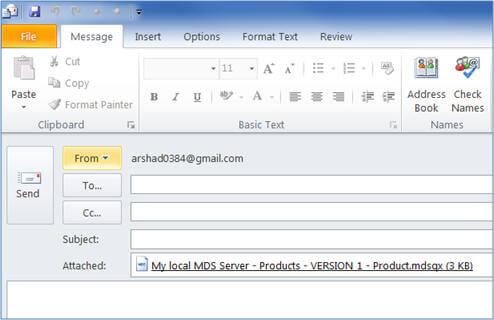
Not only can you save the MDS query for reuse for yourself, but you can also share the query with others by sending them the query files as attachments in email. The email recipient can open the query file and will be able to use the query files, but will be able to see only the data on which that individual has permissions. For example, if you have one query file to show data for United States, United Kingdom and Australia and you share this file to a person who is only allowed to view data for Australia, he will be able to see data for Australia only. He/she would not be able to see data for the United States and United Kingdom as he/she does not have access on this data.
So far I talked about Master Data Management and Master Data Services and then I demonstrated, how to get started with Microsoft Excel add-in to manage master data stored in Master Data Services Server database in a familiar Excel interface. In my next tip, I am going to talk more about editing, creating, combining master data, creating or modifying an entity and how it can be used in conjunction with Data Quality Services for data matching, so please stay tuned.
Next Steps
- Review Data Quality Services tip.
- Review Master Data Services tips.
- Review Introduction to Master Data Services in SQL Server 2008 tip.
About the author
 Arshad Ali is a SQL and BI Developer focusing on Data Warehousing projects for Microsoft.
This author pledges the content of this article is based on professional experience and not AI generated.
View all my tips


