Problem
I am new to SSIS and need to know how to read a comma-separated value (CSV) file into an SQL Server Integration Services (SSIS) 2012 package? What are the steps that you need to follow? Check out this tip to learn more.
Solution
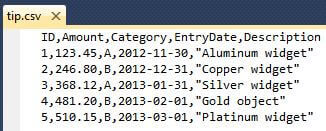
For this solution, we will use the CSV file shown below. The file is named tip.csv and it has five columns and a header row.
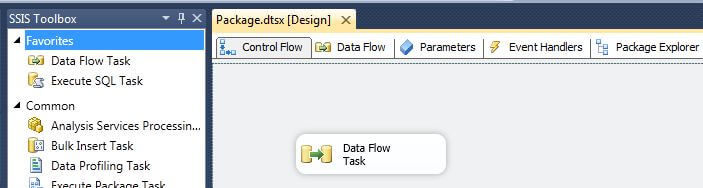
The first step is to drag a Data Flow Task onto the package palette as shown below.
Double click on the Data Flow Task or click on the Data Flow tab.
Next, drag a Flat File Source from the SSIS Toolbox onto the Data Flow palette as shown below.

If you see a white X in the red circle, hover over the object to show the help message. The message below states that we need to set up a connection to the flat file.

At this point there are two ways to initiate the setup of the flat file connection. The first way is to right click in the Connection Manager window and select “New Flat File Connection…” as shown below.

The second way is to double click on the Flat File Source to bring up the Flat File Source Editor and then click on “New…”.

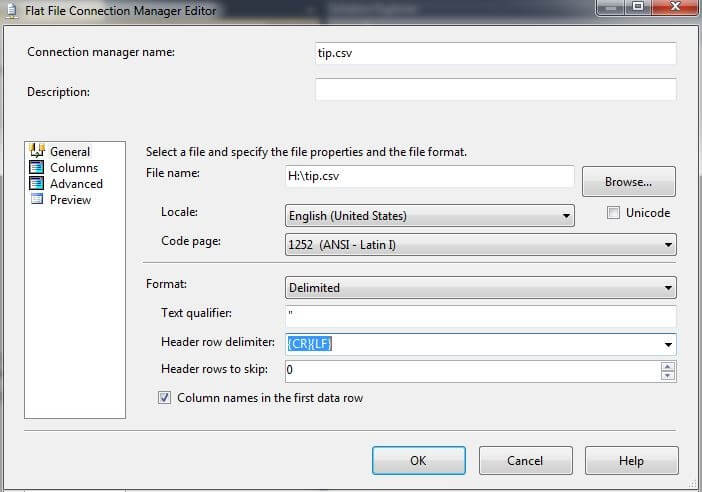
Either of the above ways will initiate the Flat File Connection Manager Editor.

Complete the Flat File Connection Manager Editor:
Now, we click on “Columns” tab to review the Columns page. We leave the “Row delimiter” set to the default of {CR}{LF} (carriage return/line feed). We leave the “Column delimiter” set to the default of Comma {,}. The preview section on this page allows us to see that SSIS is reading the file properly according to the format. This preview page will also allow us to make changes as necessary to accommodate the file’s format.

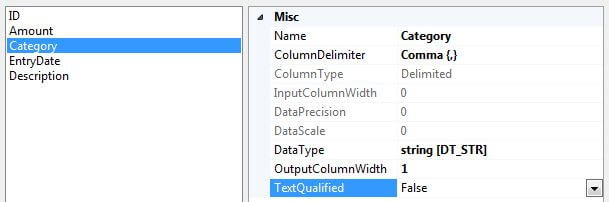
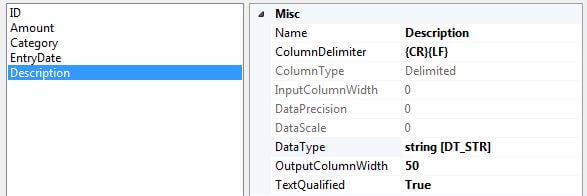
Next, we click on “Advanced” tab to review the Advanced page. By default, SSIS sets the “DataType” for each column to string [DT_STR], “OutputColumnWidth” to 50, and “TextQualified” to True. Setting each column to the proper data type as it is read in from its source eliminates the need to convert the data type downstream.

We change the data type of the ID column to a four-byte signed integer [DT_I4] and “TextQualified” to False.

We change the data type of the Amount column to currency [DT_CY] and “TextQualified” to False.

We change the length of the Category column to 1 and “TextQualified” to False.
We change the data type of the EntryDate column to database date [DT_DBDATE] and “TextQualified” to False.

We leave the attributes of the Description column unchanged because we want the DataType to be string [DT_STR], the OutputColumnWidth to be 50, and TextQualified to be True.
Click on the “Preview” tab to review another preview page. This preview page differs from the one shown previously because the user has the capability to skip a specified number of rows to look into their file the way the SSIS Flat File Source views it.
Click on OK when you are done.

On the “Connection Manager” page of the Flat File Source Editor, make sure the newly created Flat File connection is selected.

On the “Columns” page of the Flat File Source Editor, the columns to be output from the Flat File Source are displayed.

On the “Error Output” page of the Flat File Source Editor, we will leave the default values to have SSIS fail the Flat File Source component on truncation or an error. Click the OK button when you are finished.

When setup correctly, the SSIS window Data Flow window should appear as shown below.

Next Steps
- After creating the Flat File Source, try connecting it to a Flat File or OLE DB Destination. Please refer to the following tips for further assistance with SSIS Flat File handling:

Dr. Dallas Snider is an Assistant Professor in the Computer Science Department at the University of West Florida. He received his Ph.D. in Integrated Computing and M.S. in Instrumental Sciences from the University of Arkansas at Little Rock. He received a B.A. in Physics from Hendrix College. Before joining UWF, he worked as a data warehouse developer for Northrop Grumman Information Systems and prior to that as a database application developer for Acxiom and Euronet. Dr. Snider’s teaching and research interests include data mining, data warehousing, information visualization, and software development.