By: Nisarg Upadhyay | Comments (2) | Related: More > Integration Services Excel
Problem
I need to export different sets of data from SQL Server to different worksheets within the same Excel file. How can that be done using SQL Server Integration Services (SSIS)?
Solution
In this tip, I am going to demonstrate how can we export data from multiple SQL Server sources into multiple worksheets of an Excel file by using an SSIS package.
For this demo, I am going to use the ‘AdventureWorks2014’ database. I have created an Excel file which has two worksheets named Employees and Job Candidates. The SSIS package will retrieve data from [HumanResources].[vEmployee] and [HumanResources].[vJobCandidate] views and export them into the Employees and Job Candidates worksheets.
In this demo, I am going to perform the below tasks.
- Create a SSIS package and connection managers.
- Create a data flow task to pull data from SQL views and write to an Excel file.
- Test the SSIS Package.
Create SSIS Package and Connection Managers
For this demo, I am using SQL Server Data Tools 2015.
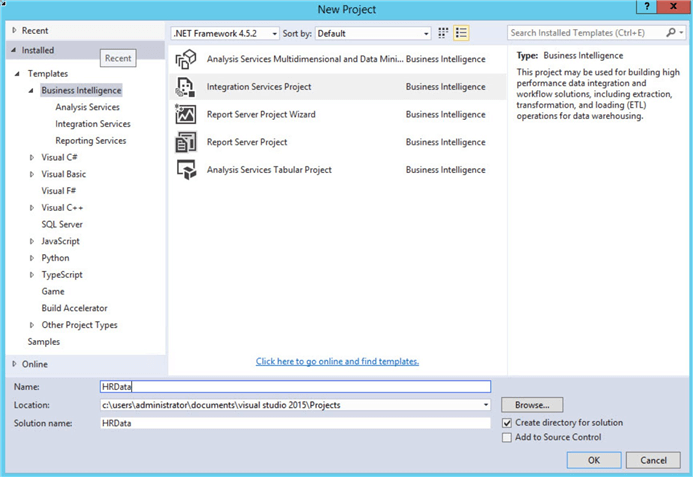
First, I will create a new Integration Services project. The project name is “HRData”.
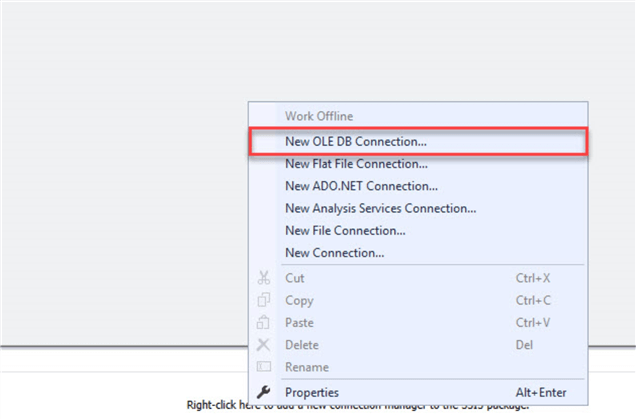
After creating the new project, I am going to create a SQL connection manager and an Excel connection manager. To do this, right click the connection managers window and then click New OLEDB Connection as shown below.
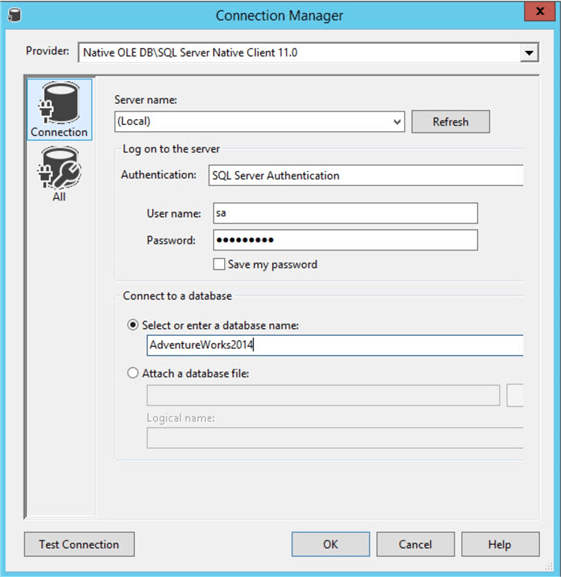
After clicking on it, the Connection Manager dialog box will appear.
In the Server Name, select the name of the SQL Server instance that hosts the database which contains the data. Then configure the appropriate authentication type. Finally, in the Connect to a database drop down, select the database which you want to use. In this demo, I am connecting to a SQL instance which is installed on my local machine, so the Server Name is “(Local)” (you can use a hostname or an IP address). I am using Windows authentication as my authentication type and connecting to the “WideWorldImporters” database as shown below.
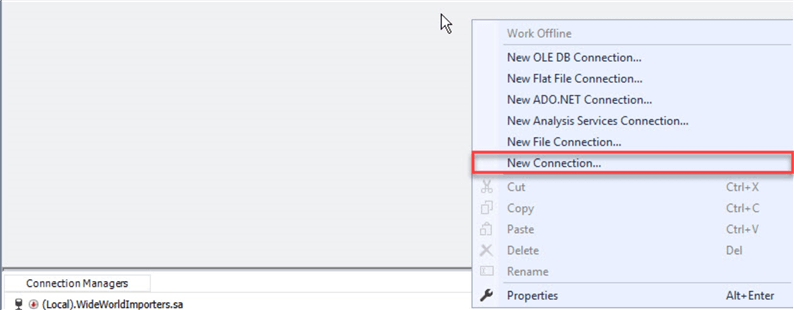
As a destination, I am going to use an Excel file, so I will create an Excel connection manager. For that, right click on the connection manager and select New Connection as shown in the below image.
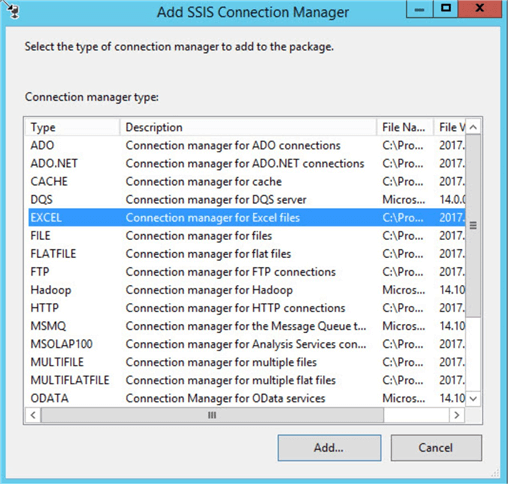
A dialog box with all connection managers will open as shown in the below image. Select the Excel connection manager and click Add.
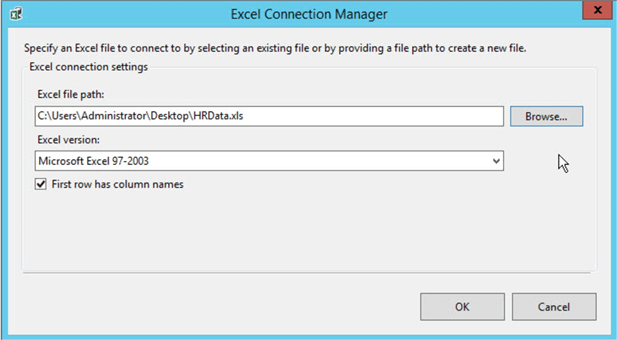
After adding the Excel connection manager, a dialog box will open. In that I will provide the path of the Excel file that I have already created named “HRData.xls” which is on my desktop.
Configure Data Flow Task
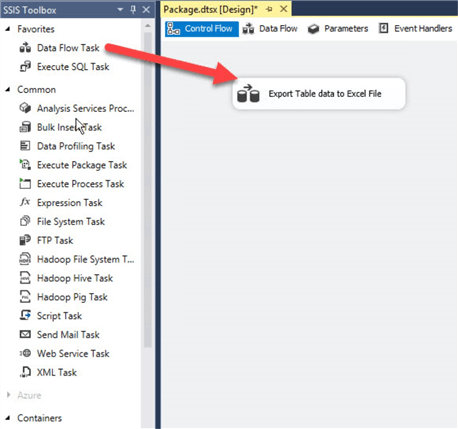
I created the connection managers, now I will setup the data flow tasks with two OLE DB sources to retrieve data from [HumanResources].[vEmployee] and [HumanResources].[vJobCandidate] along with that I will create two Excel destinations to write data to Employees and Job Candidates worksheets. To do that, I will add a Data Flow task in the Control Flow. Drag the data flow task from the Favorites tab and drop it onto the control flow window. Rename it to Export Table data to Excel File, as shown in the below image.
Configure OLE DB Connections
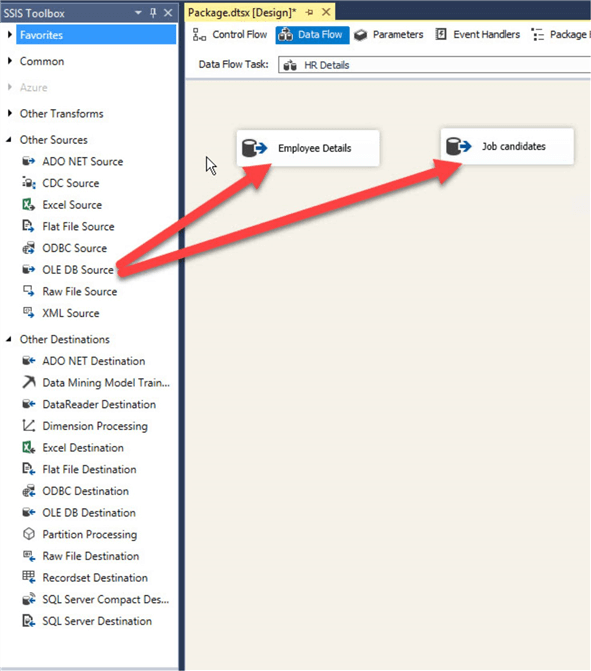
In the data flow task, drag and drop two OLE DB Sources to the data flow window. Rename the first OLE DB Source to Employee Details and the second OLE DB Source to Job candidates. The data flow window will look like the below image:
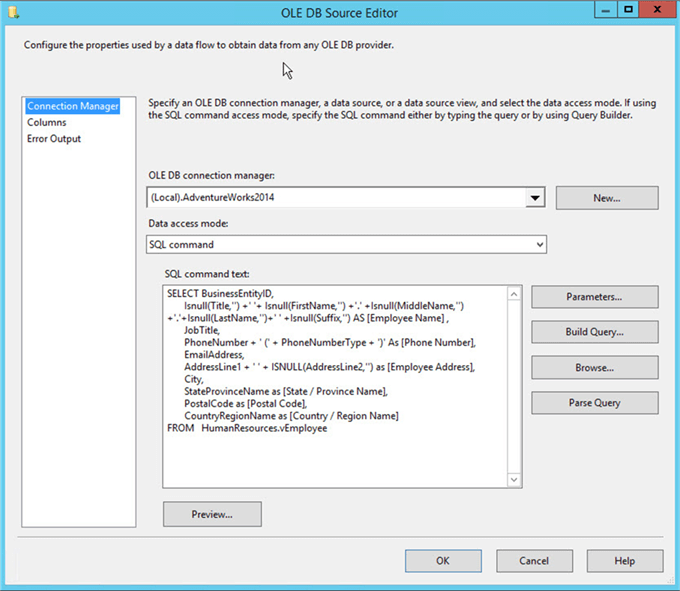
Now, double click on the Employee Details data flow task. A dialog box ‘OLE DB Source editor’ will open. As we have already created an OLE DB connection manager, I will select the connection which was created before from the drop down. After that we will configure the data access method. In this demo, I am going to retrieve the data using the following SQL Query. I will select SQL Command as the data access mode. In the command text, I will write the below query to retrieve data from the view.
SELECT BusinessEntityID, Isnull(Title,'') +' '+ Isnull(FirstName,'') +'.' +Isnull(MiddleName,'') +'.'+Isnull(LastName,'')+' ' +Isnull(Suffix,'') AS [Employee Name] ,
       JobTitle,
       PhoneNumber + ' (' + PhoneNumberType + ')' As [Phone Number],
       EmailAddress,
       AddressLine1 + ' ' + ISNULL(AddressLine2,'') as [Employee Address],
       City,
       StateProvinceName as [State / Province Name],
       PostalCode as [Postal Code],
       CountryRegionName as [Country / Region Name]
FROM   HumanResources.vEmployee
Paste the above query in the SQL command text. The OLE DB Source Editor will look like the below image:
Similarly, we will create another OLE DB Source using this query for the other data:
SELECT JobCandidateID, Isnull( [Name.Prefix],'') +' '+ Isnull([Name.First],'') +'.' +Isnull([Name.Middle],'') +'.'+Isnull([Name.Last],'')+' ' +Isnull([Name.Suffix],'') AS [Candidate Name] ,
       [Addr.Type] as [Address Type],
       [Addr.Loc.CountryRegion] as [Country / Region],
       [Addr.Loc.State] as [State],
       [Addr.Loc.City] as [City],
       [Addr.PostalCode] as [Postal Code]
FROM   HumanResources.vJobCandidate
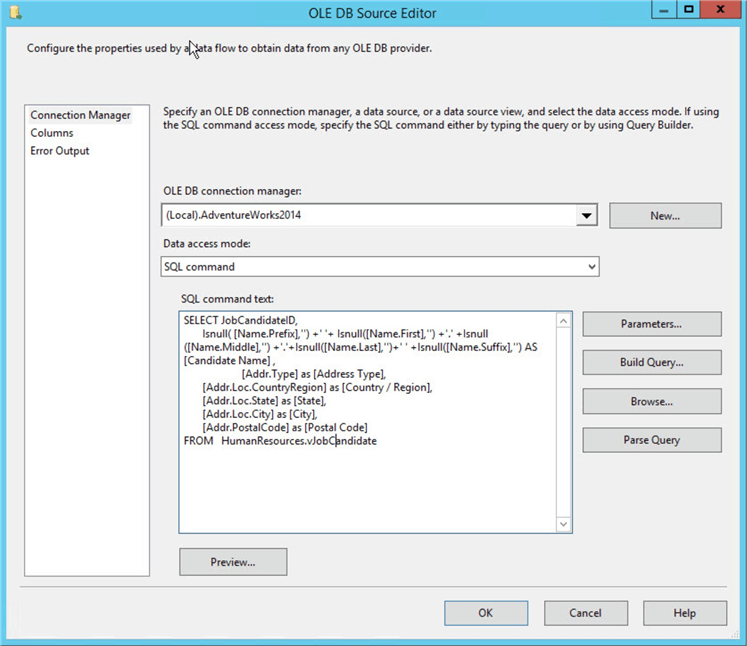
The second OLE DB Source Editor will look like the below image:
Thus, I have created and configured both OLE DB sources, now let’s configure the Excel destinations.
Configure Excel Destinations
Now, I will add two Excel destinations for writing data to the different Excel worksheets. In the beginning, I have already created an Excel connection that I am going to use. Now I will drag and drop the Excel destination into the control flow as shown below.
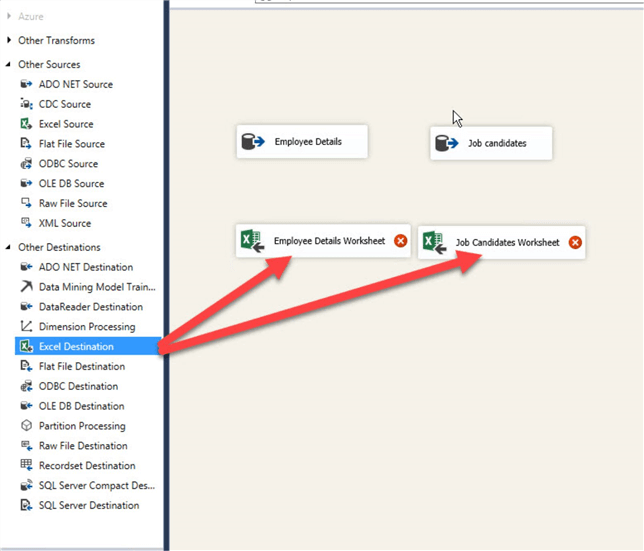
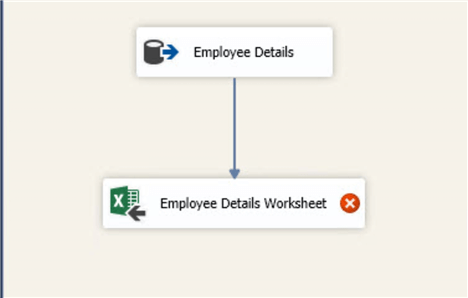
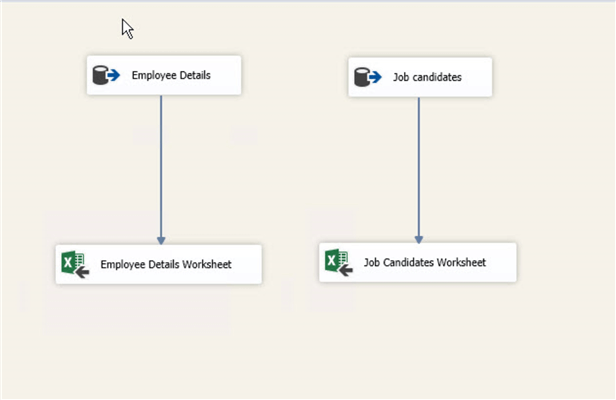
Before configuring, I will rename both Excel destinations to Employee Details Worksheet and Job Candidates Worksheet. Now I am going to configure the data path. To do that drag the blue data path arrow from the OLEDB Source (Employee Details) to the Excel Destination (Employee Details Worksheet) as shown in the below image.
Now double click on the Excel destination (Employee Details Worksheet), a dialog box will open as shown below:
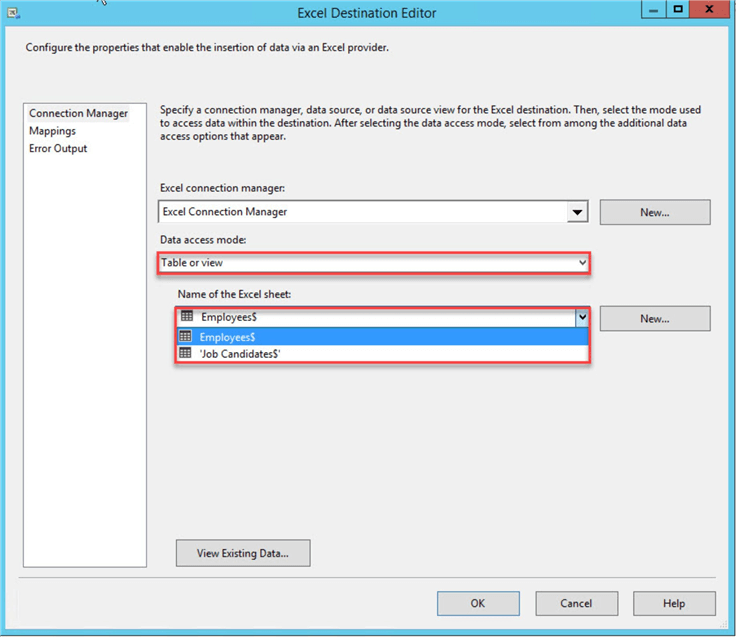
We have already configured the Excel connection manager, so the default Excel Connection Manager will be selected in the Excel Connection Manager drop down. The data access mode will be table or view. As I mentioned in the beginning of tip, the Excel file has two worksheets named Employees and Job Candidates. In the first worksheet, I want to write data from [HumanResources].[vEmployee], so in the Name of the Excel sheet I will select Employees$. Now, I will map the table columns with Excel worksheet columns. To do that click on Mappings on the left pane of the Excel Destination Editor dialog as shown in the below image.
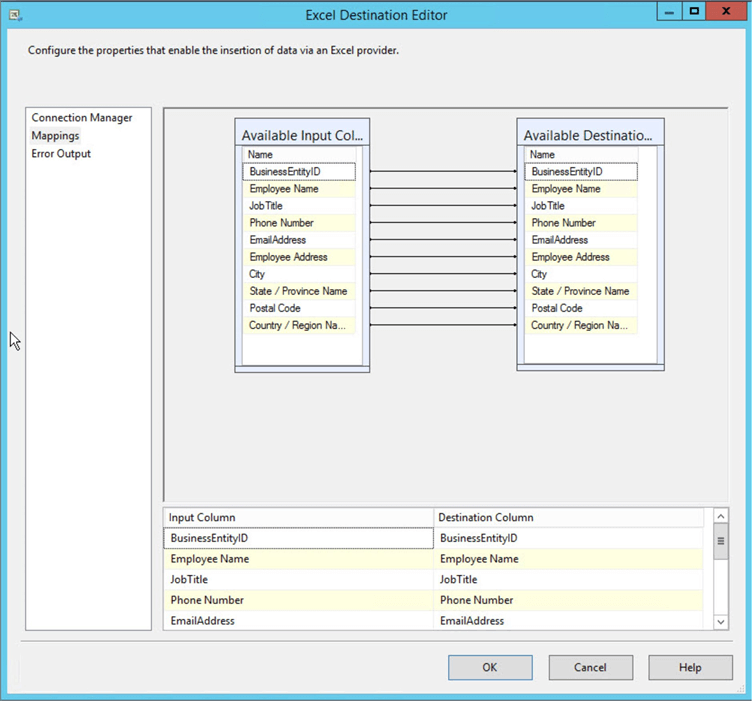
In the above image, the Input Column is the column name of the SQL Server view as well as the destination column for the Excel worksheet. In this demo, the column names in SQL Server and Excel are the same, so the Excel destination editor will automatically map the input and output columns.
I will repeat the data flow configuration process to write data for the [HumanResources].[vJobCandidate] view to the ‘Job Candidates’ worksheet. I want to write the job candidates to the Excel worksheet JobCandidates$. Again, the column names for SQL Server and Excel are the same, so the destination editor will automatically map the input and output columns.
Once I finish the Excel destination, the final SSIS package will look like the below image:
SSIS Package Testing
Now let’s run the package and see how it works. To do that click on Start button on the menu bar. If the package completes successfully then it should look like the below image.
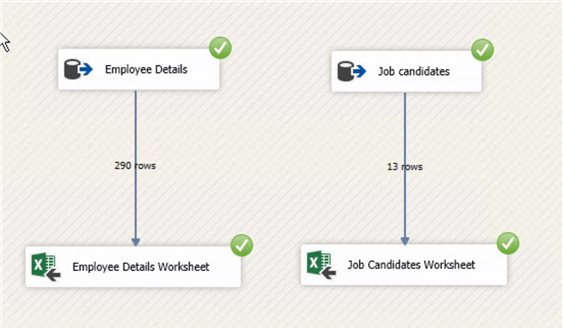
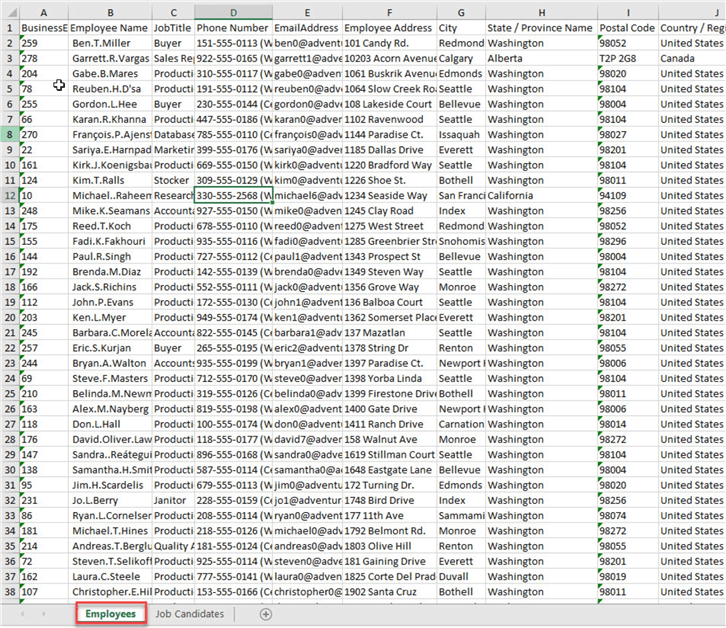
The above image indicates the package inserted 290 records into the Employees Worksheet and 13 records into the Job Candidates Worksheet. Data in the Employees worksheet is shown below:
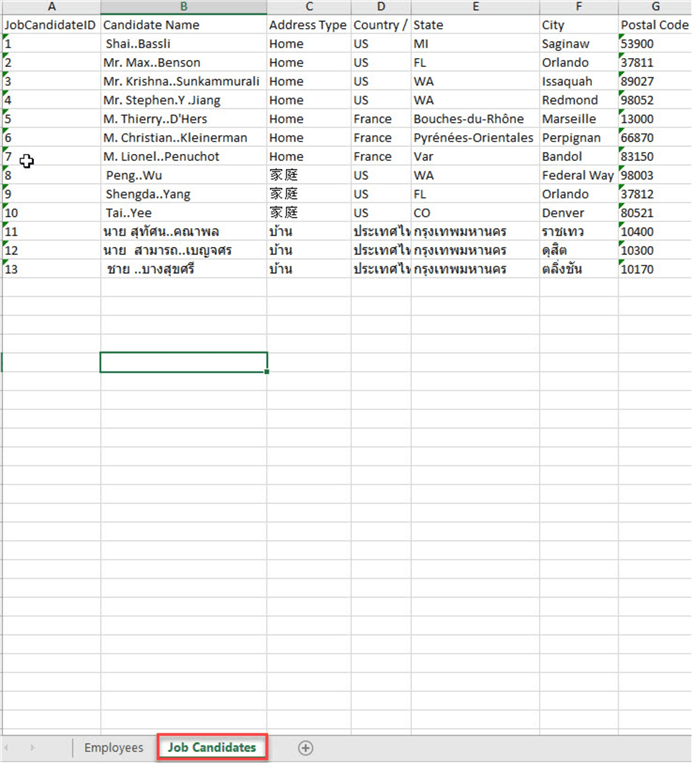
The output for the Job Candidates is shown below.
Our problem has been solved with this approach.
Next Steps
- Try this solution out for yourself and see if you can make things more dynamic for your projects.
- Check out these related tips:
About the author
 Nisarg Upadhyay is a SQL Server Database Administrator and Microsoft certified professional with more than 5 years of experience.
This author pledges the content of this article is based on professional experience and not AI generated.
View all my tips


