Problem
If you run a "portal" site for an organization, you need to ensure that the information on the home page is meaningful and relevant for your users, so they keep coming back. But this becomes difficult when you have a large and diverse user base. For example, the Sales department will find information about new lines in promotional goods riveting, but it will have no interest for engineering. Conversely, engineering will be excited by news about a breakthrough in material bonding, but it will be gobbledegook to the accounting department.
One option would be to include all the information on the page that anyone would be interested in. This will produce a large and "busy" page, which users will find unattractive and hard to use.
Another option is to have separate pages for each department or group, but this significantly increases administration, and requires co-ordination to ensure that important corporate information is repeated on each page. It also isolates users within their silos rather than fostering the spirit of a single organization.
Solution
Enter SharePoint's "Audience" and targeting features. These let you tag web parts and information for display to particular types of users. Effectively, you can re-configure the page so people see the information and links that are relevant and important to them.
In this tip, we will talk about how and where you define an Audience, and how you can use it to show web parts on a page, items of information and navigation links. This is known as "targeting" information to users.
These features are available in both SharePoint Server 2007 and 2010, but note that they are not in WSS or SharePoint Foundation. Therefore, the discussion and examples below all relate to sites with publishing features enabled.
We will also review some of the important limitations of this feature.
Defining audiences
First, you need some way of dividing up your users so that you can identify who will see the information or links and who won't. You can do this with groups or global audiences.
Groups as audiences
With SharePoint 2007 and above, you can use SharePoint or Active Directory groups or Active Directory distribution lists as a way of identifying the users you want to see the information. You can list multiple groups, so that all users who are a member of one or more of the groups will see it. You can also make Active Directory groups members of a SharePoint group, and use that as an Audience.
Note that you can use distribution lists for audiences, even though they cannot be used in SharePoint for security purposes. This can be useful because these are generally less centrally administered than security groups, and there may be lists that suit your needs for audiences.
There are two main advantages to using groups as audiences:
- You will often have groups or distribution lists already defined for other purposes that you can re-use as audiences
- You can control membership of SharePoint groups directly in SharePoint, so you can manage who will see the content
However, there are significant limitations to using groups as audiences:
- If the groups or lists do not already exist, it will be difficult or even impossible to maintain groups with large numbers of users manually
- You cannot target users who are not a member of a group, so to display one set of content to some users and another set of content to all other users, you would need to manage two groups. Again, this may not be feasible in practice.
Global audiences
Global audiences are the original "audiences" introduced with SharePoint Portal Server 2003. These are defined and managed by farm administrators in the Shared Services Provider. Global audiences are defined by rules based around user profile properties.
This is very flexible and powerful. For example, there will typically be a profile property called "Office" with the name of the office that the user works in. This information will originate from an HR system, so it is generally accurate and well maintained. Some process will exist to push the information into Active Directory so that users can see it in (for example) the Outlook address book.
Profile synchronization in SharePoint will also read that information from the active directory and update the user's profile in SharePoint. Using that property, it's easy to define an audience for all users who work in a particular office.
Similarly, you can easily define an audience for all users based in a particular country or with a particular job grade (like 'Manager'), as long as that information is in user profile properties. You can also base global audiences on membership of Active Directory groups or distribution lists, as well as reporting lines in AD.
You can define an audience using up to 10 rules. These rules can be of an "AND" type ( where a user must satisfy all the conditions to be in the audience) or an "OR" type (where a user can satisfy any of the conditions to be in the audience).
In SharePoint 2007, in Central Administration, use the link on the left to go to the Shared Services Administration screen for the SSP. Once there, select the Audiences link.
For SharePoint 2010, in Central Administration go to Application Management. Then select Manage Service Ppplications. Select the "User Profile Service Application" link , then select "Manage Audiences".
To create an Audience, select "Create Audience" (2007) or "New Audience" (2010). Enter a name and description. You can optionally select the name of a user as the owner of the Audience – this seems to be purely for reference. At this point, you also select whether the Audience rules are to be of the type "AND" or "OR".

You are then taken to a screen to enter the first Audience rule. To define an Audience based on the Office property, you would select the 'Property' option, select 'Office' from the drop-down list of properties, select the = operator and enter the text of the Office name as it would appear in people's profiles.

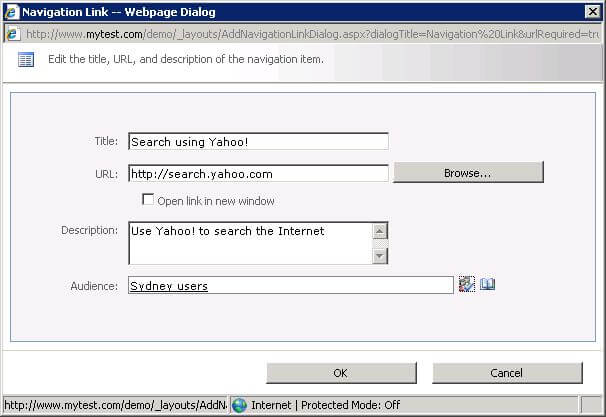
Unlike using groups, you can easily create "mirror image" audiences. For example, you would define an Audience for 'Sydney users' using the rule "Office=Sydney". Then, to define an audience for 'Non-Sydney users', you would use the rule "Office<>Sydney".
For a user to become a member of an audience, there will often need to be a chain of events. For example, say a user is posted to the Sydney office. First, someone has to update the office information for that user in the HR system. Some batch process will then need to run to update the user's information in Active Directory. A scheduled job in SharePoint then reads AD and updates the office property in the user's profile. Another scheduled job in SharePoint must re-compile the 'Sydney users' global audience to identify that the user is now a member of it.
The advantages of using global audiences are:
- It is easy to define audiences that include large numbers of users, simply by defining rules based on profile properties
- Once defined, the audiences are self-maintaining, automatically including new users who meet the criteria and excluding users who don't
- You can easily create "mirror image" audiences
- Once defined, they can be used by all sites linked to the shared services provider
- They are centrally defined, so a site administrator must ask a farm administrator to create or update them
- There can be delays in users being included in an audience due to the chain of events that are required to update an audience
- You can only create global audiences based on profile properties or AD groups that exist and are well maintained
Targeting
As stated earlier, targeting is the process of making information visible to some users but not others. In SharePoint, you will most often configure targeting on web parts and navigation links. It is also possible to target individual list items, but as we see later, there are limitations with this in practice.
It's important to note that targeting is not a security feature. If the user is not in the right audience or group, targeting will stop the information being shown on that page. However, this will not prevent the user from using other means to access the information, for example by viewing a different page.
Targeting web parts
You can set targeting on pretty much any web part. This will hide the web part if the user is not in the specified Target Audience. From the web part menu, select Edit Web Part (SharePoint 2010) or Modify Shared Web Part (SharePoint 2007).

Expand the 'Advanced' section and you will find Target Audiences at the bottom. Here, you can type the names of groups or audiences, then use the Check Names icon to verify them; or you can use the address book icon to look them up. Strangely, in 2010 the entry field has no border so it is effectively invisible, but you can still click there and type in it. You can enter the name of a global audience, SharePoint group, AD group or distribution list. You can enter multiple names separated by semi-colons.

Usually, it is easier to lookup names with the address book button. Here you have the option of searching on global audiences, AD groups and lists, or SharePoint groups.

Once you save the web part properties and publish the page, the web part will not be visible to users who are not a member of the target audience. If you are not in the target audience, even as the site administrator you will not see it either, unless you edit the page.
A common requirement is to show one set of information to a specific set of users (for example, people within the group that owns the site) and different information to other users (for example, everyone else in the organization). To achieve this, you would need to add two web parts to the page, and select an appropriate audience for each.
As discussed earlier there is no way to target people who are not in a particular audience or group. This means you need to define audiences or groups that cover both cases. This is not hard to do with audiences, because you can define another audience (a "mirror image" audience) with the rules reversed, but difficult to achieve with groups, unless you already have groups defined with the required membership.
In theory, you could have lots of web parts on a page with different combinations of audiences to achieve a very dynamic web page that adjusts its content to the user. In practice this is difficult to build and maintain. Apart from the extra work to create more web parts, there is no straightforward way to test how the page will appear to users in different audiences.
Targeting navigation links
You can also set targeting on navigation links. Again, these will be hidden from users who are not in the specified audience(s) or group(s).
In 2007, select Site Actions > Site Settings > Modify Navigation. In 2010, select Site Actions > Site Settings, then under Look and Feel select Navigation.
There is a section on the page called Navigation Editing and Sorting which shows the headings and links defined for the Global Navigation (the tabs under the banner at the top of the page) and the Current Navigation (the links on the left).
You have options to automatically include links to pages and/or subsites in the navigation. If you do, these links will automatically be security trimmed (that is, only shown to users with access rights to the pages or subsites), but you cannot set target audiences on them. Links or headings that you add manually will not be security trimmed, but you can set target audiences on them.
If you click the option to Add Link…, a dialog will be displayed for information about the link, including an option for target audiences. You can enter or select target audiences in the same way as for a web part.
Again, these links will be hidden from users who are not a member of the target audience, even site administrators. Note also that, as discussed previously, this is not a security feature, and will not stop a user accessing the target page of the link if he/she finds out about it some other way.
Targeting list or library items
The final targeting option is to define a target audience for individual list or library items. For example, you might have a list where you post information about recent or upcoming social events. Some of these might be relevant to all users, but some may only relate to users in a specific office.
First, you need to enable targeting in the list. Go into the list settings and select the link Audience targeting settings. Select the option to enable audience targeting.

Now, when you create or edit an item in the list, you will see an extra field where you can select target audiences, just as you did for web parts and navigation links. You can add this field to a list view so you can see how items are targeted.

The only web part that makes use of these target audiences is the Content Query Web Part. So go to a page in the site and add a content query web part to it. In the properties of the web part, configure it to read from the list where you enabled audience targeting. In the Content Query Web Part, you will also need to enable the option to Apply audience filtering. Optionally, you can select whether to include items that have no targeting as well.

Note that these options are separate from the normal option to set a target audience on the content query web part itself, which would be redundant in this case.
This web part will now only show entries from the list that are targeted to the user. In this case, I am not a member of either audience, so I only see the entry that has no targeting.

As you can see, the Content Query Web Part shows the title of the item, with a link to display the full text. If this is what you want, great! However, while it is easier in 2010 to configure how the CQWP displays information, it is still somewhat difficult and inflexible. So you may have challenges achieving the results you want with this approach.
Some Issues
Some time ago, I worked with a client who wanted to use this feature on their site. Apart from the lack of flexibility in formatting the information display, we found two other significant issues.
The first was that they wanted a number of users to be able to contribute items to be shown on the site. They believed their users would find it hard to select the correct audiences for their items out of all the groups available in the directory (global audiences, AD groups and lists and SharePoint groups). We managed to work out a solution where we added some custom columns in the list in which users could easily select relevant audiences for the item. We then built a workflow to run after the item was saved. The workflow would set the appropriate audiences and groups in the target audiences field, based on the selections users had made in the custom columns.
The key to making this work was to uncover the internal format for the information SharePoint stores in the target audiences column. We found that it stores global audiences first as GUIDs, comma separated, followed by a double semi-colon separator, followed by AD groups and distribution lists as LDAP container name paths ("ADSPath"), carriage return separated, followed by another double semi-colon, followed by SharePoint group names, comma separated! With some string building in the workflow, we were able to enter the relevant audiences into the field so that SharePoint would recognize them.
The other issue was that they wanted to show just the latest three items relevant to the user. The CQWP has an option to limit the number of items returned. Unfortunately though, it limits the number of items returned before applying an audience filter! This means that if (say) none of the first three items returned is relevant to the user's audience, nothing will be displayed. It won't keep looking for more items until it finds three with the right audience.
This last limitation was a deal breaker for them, and we were unable to find a practical workaround. Unfortunately, you cannot apply audience filtering in any other web part. You cannot even use the swiss-army-knife SharePoint Designer DataForm (or DataView) Web Part, because targeted content is not exposed as a web service or standard query option.
So, what sounds like the most promising of options for using audience targeting, setting target audiences on individual items, has some major practical limitations:
- You need a reasonably skilled content author managing the items to target them appropriately, unless you build some sort of workaround like the workflow discussed earlier;
- You are limited to using the content query web part to display the information filtered by the user's audience, which restricts flexibility in formatting the display; and
- There is no good way to control the number of items returned in a content query web part when target audiences are applied.
Next Steps
- Identify where you identify distinct audiences among your users, and improve your site by showing them more relevant information
- Work out how to define those audiences using AD groups or distribution lists, or global audiences based on profile properties, or SharePoint groups
- Design your landing page with web parts that show information relevant to specific audiences, and configure target audiences on those web parts so they only display for the right users
- See Using a Custom List for Portal Splash Page for a way to configure the information to be shown on a portal page without using SharePoint audiences
- See Configuring Tabbed Navigation in MOSS 2007 for more about configuring SharePoint navigation

Knox is a Senior Technical Architect with an international professional services firm, where he has designed Intranet, Internet and Extranet systems based on SharePoint Portal Server 2001 and 2003, Content Management Server 2002, and Microsoft Office SharePoint Server 2007. He has an MBA as well as degrees in marketing and law.