Problem
I need to retrieve a list of all the files and their corresponding size from a folder and all of its subfolder. Is there an easy way to do this that doesn’t involve writing lots of code?
Solution
Fortunately there is. Power Query – a free add-in for Microsoft Excel – can handle a variety of different sources. One of those possible sources is the file system. With Power Query, you can easily extract metadata from files in your directories.
You can download Power Query here. For an introduction to Power Query, please refer to the following tips:
Power Query is also part of the Power BI ecosystem and is integrated in Power BI Desktop. For more information, please read Getting Started with Power BI Designer.
Reading the file system with Power Query
In the Power Query ribbon, go to the section Get External Data, click on From File and then navigate to From Folder.

In the following dialog, enter the name of the directory you want to scan with Power Query. All of its subdirectories will be included as well.
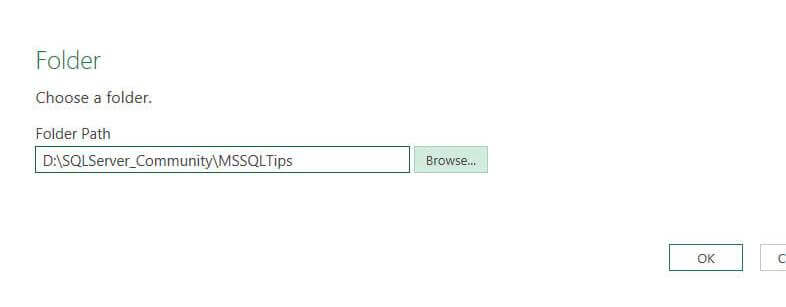
In this tip, I’ll use a folder called MSSQLTips which contains all the screenshots, tips and other files I have created for MSSQLTips.com over the past years.
The editor will open and the following columns are returned:
- Content – The binary content of the file. In most cases you will probably drop this column.
- Name – The file name.
- Extension – The file extension.
- Three very interesting date columns:
- Date accessed
- Date modified
- Date created
- Attributes – A link to the file attributes.
- Folder Path – The full file path
The date metadata columns can be very interesting for auditing purposes.

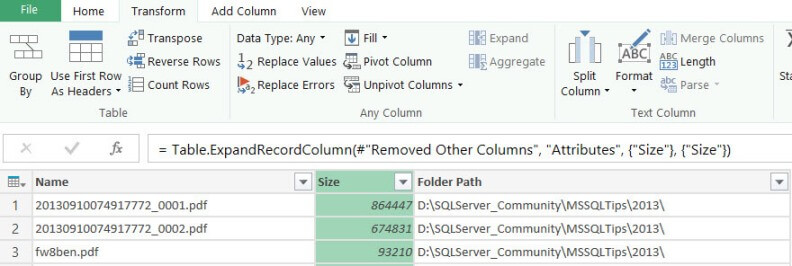
Since we are interested in file sizes only, you can drop all columns except Name, Attributes and Folder Path. You can do this easily by selecting those 3 columns, right-clicking and choosing Remove Other Columns.

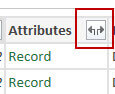
Now we have to retrieve the file size from the Attributes record. You can do this by clicking on the double arrow icon in the header of the Attributes column.
This will give you a list of all the columns you can retrieve for a specific file. We only need the Size column, so all the others can be deselected. As you can see, there is a lot of other useful information in there.
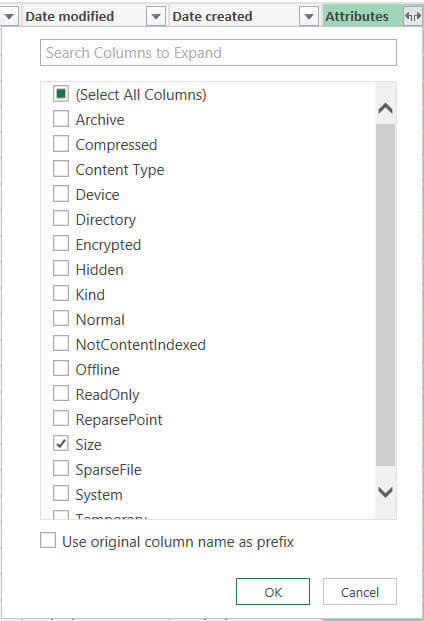
When you retrieve a column from a record, it is by default prefixed with the original column name. This would result for example in Attributes.Size. You can remove this prefix by deselecting the checkbox at the bottom of the dialog.
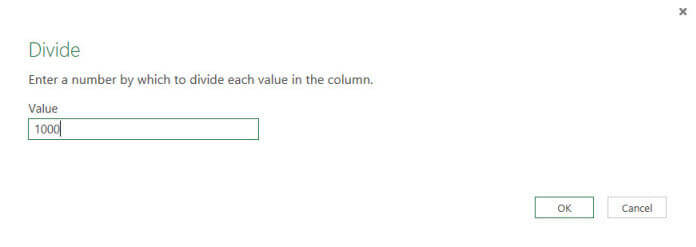
The retrieved size is in bytes, which will lead to quite big numbers for most files. Let’s divide the number by 1000 to convert it to kilobytes. This can be done by selecting the Divide transformation from the Standard transformations in the Number Column section in the Transformation ribbon.
In the following pop-up, simply enter the number 1000.
We now have basically everything we need:

Splitting up the Folder Path
However, if we want to do a bit of analysis on the file sizes per folder, it might be useful to split up the folder path into different columns, where each column represents a specific level of subfolder. This will make it easier to aggregate to a specific level.
The folder path can easily be split by the Power Query user interface by using the backslash as a delimiter. However, when you take a look at the folder path in the example, you can see that each path ends with a backslash. This would result in an unnecessary empty column at the end, but also empty strings (instead of NULLs) in intermediate levels. To solve this issue, we need to remove that final backslash. Since there is no standard transformation available in the Power Query interface to remove the last character, we need to resort to a little bit of M programming (also called the Power Query formula language).
First we need to add a new calculated column. This can be done in the Add Column ribbon.

The formula itself is quite simple: we need the take a substring starting from the left for a length equal to the total length minus one character. In M this becomes:
Text.Start([Folder Path],Text.Length([Folder Path]) - 1)
Where
- Text.Start is like the LEFT function (as in Excel or T-SQL)
- Text.Length is similar to the LEN function (as in Excel or T-SQL)

Be aware that the M language is case sensitive. Since we now have the folder path we need, the old column can be removed.

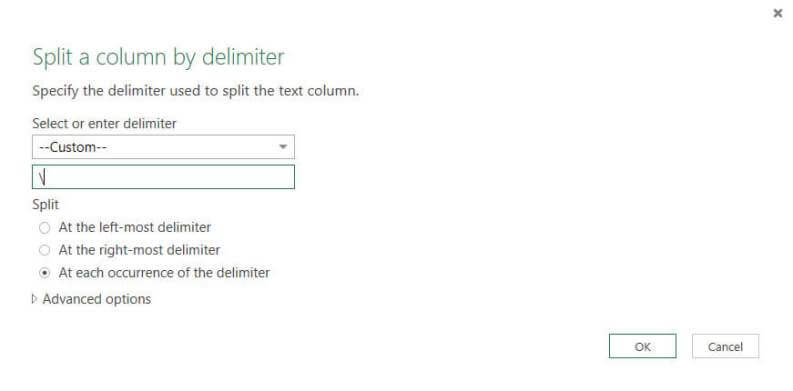
Now we can split the folder path into its different subfolders. Right-click the column header, navigate to Split Column and choose By Delimiter…
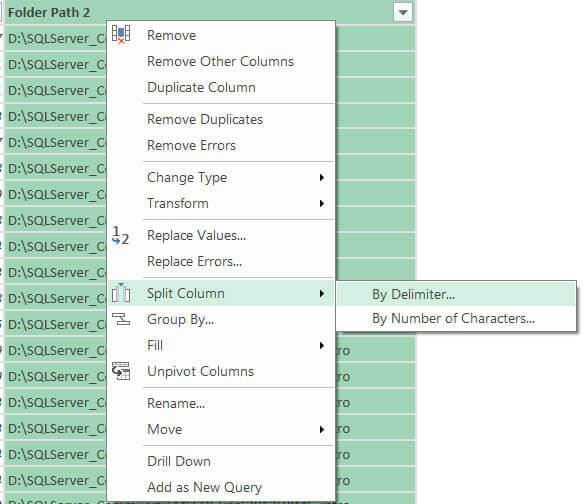
In the dialog, choose a custom delimiter and enter the backslash in the textbox. Leave the other options as-is.
This will result in a whole bunch of columns being generated, where each column corresponds with one level in the folder hierarchy. In my example there was a total of 9 columns. You can probably remove the first few columns, since they contain information that is of no interest, such as the drive letter and parent folders above the folder of interest.
The final step is to give all of the resulting columns appropriate names and then the result can be imported into Excel or into the Excel data model (Power Pivot).

Using Power BI Desktop, you can create for example a treemap showing the size per tip by year:

Conclusion
Using Power Query, it’s very easy to extract metadata information from the file system without writing a single line of code. OK, one single line of code…
Next Steps
- Try it out yourself! Download Power Query and analyze your hard drive!
- More tips about Power Query:
- For more info about Power BI, check out Getting Started with Power BI Designer and PowerBI.com.

Koen Verbeeck is a seasoned business intelligence consultant with over a decade of experience with the Microsoft Data Platform. He holds several certifications, including Azure Data Engineer. He’s a prolific writer, with over 375 articles on technologies such as Microsoft Fabric, SSIS, ADF, SSAS, SSRS, MDS, Power BI, Snowflake and Azure services. He has spoken at various events such as PASS, SQLBits, dataMinds Connect and many others. He frequently delivers educational webinars on MSSQLTips.com. For his efforts, Koen has been awarded the Microsoft MVP data platform award for many years.
- MSSQLTips Awards:
- Leadership Award (200+ Tips) – 2021
- Author of the Year – 2014/2020/2022
- Author Contender – 2024/2025