Problem
There are several steps to setup a Windows cluster for SQL Server and in this tip we will focus on the SQL Server 2014 cluster installation prerequisites and Windows cluster validation to validate the Windows cluster health prior to installing SQL Server.
Solution
Windows Server Failover Clustering provides infrastructure features that support the high-availability and disaster recovery scenarios of hosted server applications such as Microsoft SQL Server. If a cluster node or service fails, the services that were hosted on that node can be automatically or manually transferred to another available node in a process known as failover.
Here, I have a two node cluster based on Windows Server 2012 R2 operating systems where we will be installing SQL Server 2014. So let’s start with the first step to check whether the Windows cluster is properly configured and in a healthy state to run the installation for the clustered SQL Server instance.
Configuration of Windows OS clustering is not covered in this tip. I am expecting you will get your Windows cluster ready to be used from your infrastructure team. As a SQL Server DBA first we need to validate that the Windows cluster is working correctly before moving ahead with the actual SQL Server installation.
Prerequisites
Before running the SQL Server 2014 setup, we should run a few checks as prerequisites to make sure we have a successful installation, these include:
- Make sure the Windows OS cluster is working fine and is in a healthy state. Validate your Windows cluster to avoid a SQL Server failure during the installation. The cluster validation process is covered later in this tip.
- Make sure to keep local drive letters the same on all nodes. If a Windows cluster has a local disk drive and the same drive letter is also used on one or more cluster nodes as a shared drive, you cannot install SQL Server on that drive.
- Windows PowerShell 2.0 is a prerequisite for installing the SQL Server 2014 database engine components and SQL Server Management Studio. Install it on all nodes if it is not already installed.
- Install .NET Framework 3.5 SP1 on all the nodes of the cluster.
- Do not install SQL Server on a compressed or encrypted disk. If you attempt to install SQL Server to a compressed drive or an encrypted drive, the SQL Server setup fails.
- To create a failover cluster, you must be a Windows local administrator with permissions to log on as a service and to act as part of the operating system on all nodes of the failover cluster instance.
- The network name and IP address of your SQL Server should not be used for any other purpose, such as file sharing. If you want to create a file share resource, use a different unique network name and IP address for the resource.
- Make sure that your operating system is installed properly and is designed to support failover clustering.
Validate Windows Cluster Configuration
Step 1: Launch “Failover Cluster Manager” from location “Control Panel\System and Security\Administrative Tools”. You can see all shared disks are online and the current owner of all shared disks are SQL-Node1 in the below screenshot.

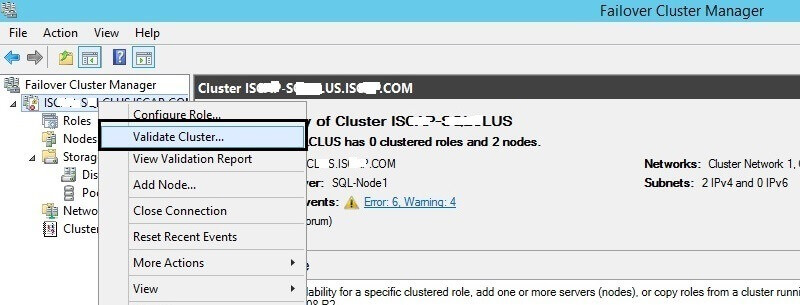
Step 2: Now we will validate the cluster health before installing SQL Server. Right click on the cluster node in the left pane and click on “Validate Cluster…” as shown in the below screenshot.
A welcome window will appear, then proceed with the validation check. Click on the ‘Next’ button of this page to start the process.
Step 3: Once you click on the ‘Next’ button of the welcome page, it will go to the “Testing Options” page. There are two options you will see: first is to “Run all tests” which is recommended by Microsoft and second is to “Run only test I select”. We will run all tests.

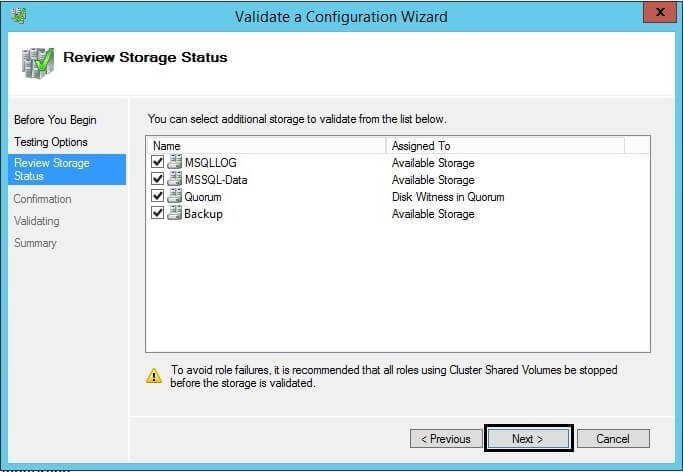
Step 4: The next window is to check the storage status. Click the checkbox for each shared disk which will be used for your SQL Server cluster installation. I have selected all shared disks as shown below.
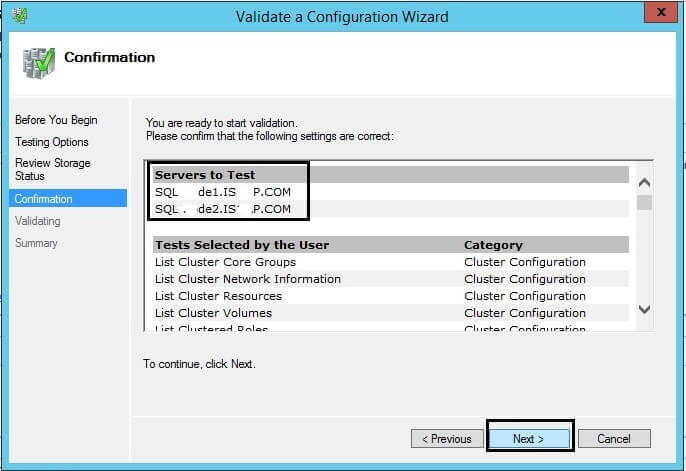
Step 5: Next is the confirmation page where you can see all tests that the validation is going to perform. Click the ‘Next’ button to start the cluster validation.
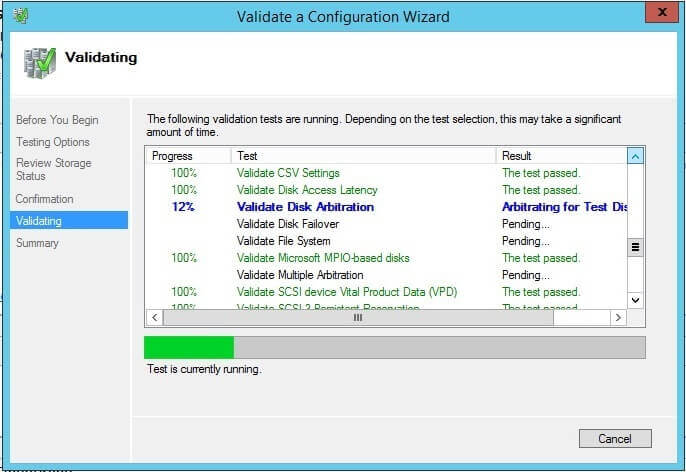
Step 6: Once you click on the ‘Next’ button, the validation checks will be started as shown below.
Step 7: Once the cluster validation completes, a summary window will appear with the cluster validation results stating whether the cluster is healthy or has any issues. As we can see in the summary window below, testing is complete with a few warnings, but it does say the configuration appears to be suitable for clustering. We can ignore these warnings as these can be fixed at later stage, but if the cluster validation throws any errors it is recommended to first fix those errors before installing SQL Server.

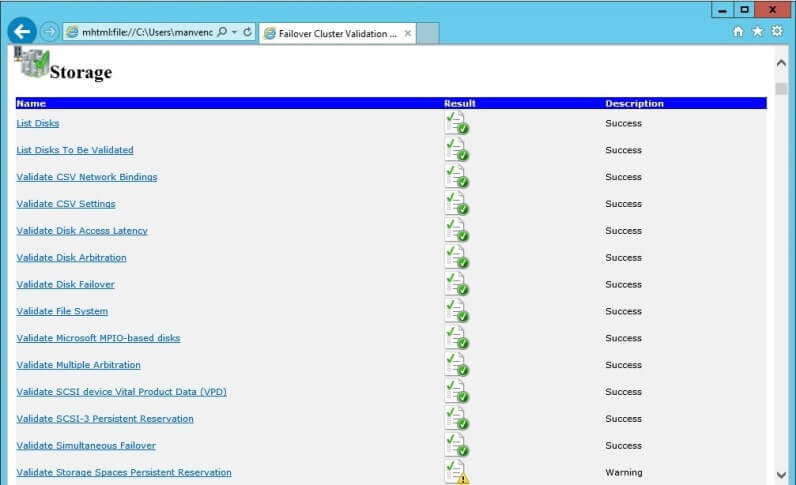
Step 8: If you want to see the detailed cluster validation report, click on the “View Report…” button shown on the bottom right of the above screenshot. The report will look like the below screenshot. We can see the status of the validation results. We can get an in depth view of the warnings and errors if we click on the respective tab. In the screenshot below, I have clicked on the storage link to see the warnings.
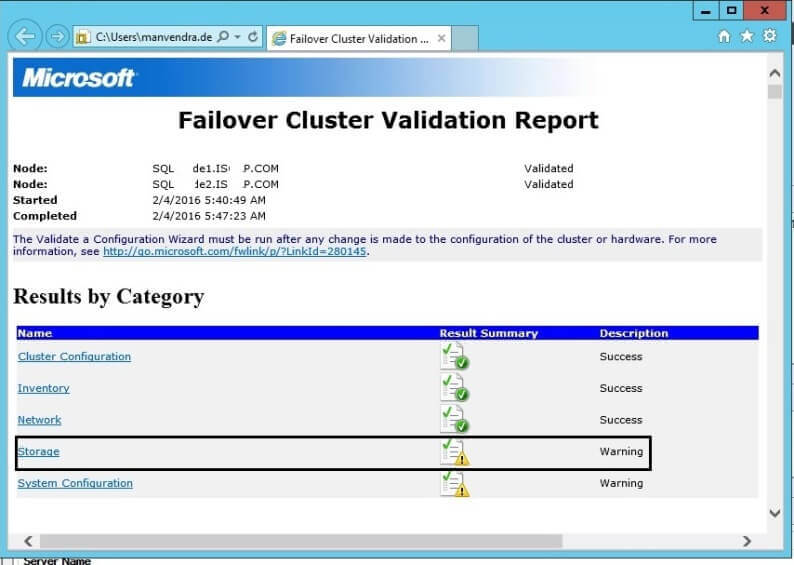
Step 9: Most of the storage tests are successful except the one showing a warning. As I said earlier, we can ignore warnings for now, but if it was an error or a failure then we need to fix those issues before moving forward.
Now, we can say our two node windows cluster is healthy to install SQL Server. The next step is to check and verify all the pre-checks given in the prerequisites section.
Next Steps
- It is very important to check the cluster validation and all prerequisites to have a smooth SQL Server cluster installation.
- For our next tip, we will start the SQL Server 2014 installation since we completed the testing and made sure the Windows cluster is working correctly.
- Explore more knowledge on SQL Server Database Administration and Clustering tips.

Manvendra is a passionate database lover currently working as a Technical Architect at one of the top MNCs. He has extensive experience on all versions of SQL Server since 2000 and has built Big Data skills. He has lead projects on the following database features: Database Mirroring, Always ON, Replication, Log Shipping, Geo-Clustering and Performance Tuning and delivered many SQL Server projects on consolidation, upgrades, heterogeneous replication, HA / DR solutions, automation and major performance tuning projects. You can also follow Manvendra on his blog, Twitter, LinkedIn and Facebook.
- MSSQLTips Awards: Champion (100+ tips) – 2018 | Author Contender – 2015-2018, 2021-2022