Problem
In a previous tip on Step-by-step Installation of SQL Server 2016 on a Windows Server 2016 Failover Cluster – Part 1, I have seen how to install a SQL Server 2016 on a Windows Server 2016 failover cluster (WSFC). We are migrating to a SQL Server 2019 failover cluster running on Windows Server 2019. How do I go about installing and configuring a SQL Server 2019 failover cluster on Windows Server 2019?
Solution
To continue this series on Step-by-step Installation of SQL Server 2019 on a Windows Server 2019 Failover Cluster, we will look at configuring the Windows Server 2019 failover cluster according to Microsoft best practices in preparation for installing SQL Server 2019. In Part 1, you have learned of the new Windows Server 2019 failover clustering features that apply to SQL Server. You've also installed the Failover Clustering feature on all the servers that you want to include in the WSFC, ran the Failover Cluster Validation Wizard, created the WSFC, and configured a witness. This tip will walk you through configuration of the WSFC according to Microsoft best practices.
Renaming Shared Storage Resources
As a best practice, you should rename your shared storage resources prior to installing SQL Server 2019. This makes it easy to identify what the disks are used for – data, log, backups, etc. – during the installation and later when troubleshooting availability issues. And while you may have renamed the disks using the Disk Management console, you still have to rename them from the point-of-view of the WSFC. The default names of the shared storage will be Cluster Disk n where n is the number assigned to the disks.

To rename the shared storage resources:
- Within the Failover Cluster Manager console, under the Storage navigation option, select Disks. This will display all the shared storage resources added to the WSFC.

- Right-click one of the shared disks and select Properties. This will open the Properties page for that specific disk.
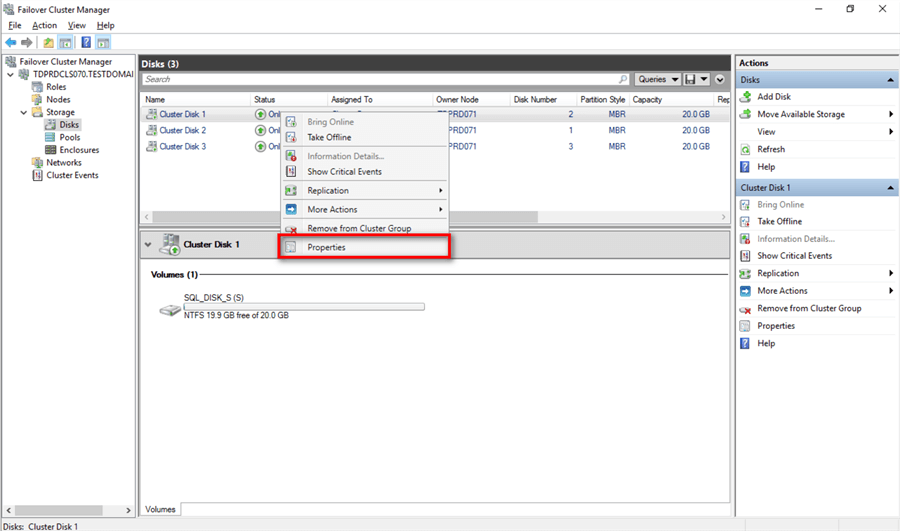
- In the Properties page, on the General tab, type the appropriate name for the shared disk in the Name textbox. Click OK.

Do this on all the shared storage resources available on your WSFC.

Alternatively, you can use the PowerShell script below to identify the clustered disks and their corresponding disk properties. The DiskGuid property of the cluster disk is used to identify the Path property of the physical disk. The Path property of the physical disk is used to identify the DiskPath and DriveLetter properties of the logical partition. The DriveLetter property of the logical partition is used to identify the FileSystemLabel property of the disk volume.
Foreach ($a in (Get-ClusterResource | Where {$_.ResourceType -eq "Physical Disk"} | Get-ClusterParameter -Name DiskGuid))
{
$ClusterDiskGuid=$a.Value.ToString()
$Disk=Get-Disk | where {$_.Path -like "*$ClusterDiskGuid"} | Select DiskNumber, Path
$Partition=Get-Partition | where {$_.DiskPath -like $Disk.Path} | Select DriveLetter, DiskPath
$Volume=Get-Volume | where {$_.DriveLetter -eq $Partition.DriveLetter} | Select FileSystemLabel

"Cluster Disk Name: " + $a.ClusterObject + " , Disk Number: " + $Disk.DiskNumber + " , Drive Letter: " + $Partition.DriveLetter  + " , Volume Label: " + $Volume.FileSystemLabel
}

Once you’ve mapped the cluster disks with the corresponding physical disks, you can rename them accordingly using the PowerShell command below, replacing the appropriate values.
(Get-ClusterResource -Name "Cluster Disk 1").Name = "SQL_DISK_R"
Renaming Cluster Network Resources
Similarly, you should rename your cluster network resources prior to installing SQL Server 2019. And while you may have renamed the network adapters using the Network Connections management console, you still have to rename them from the point-of-view of the WSFC. The default names of the cluster network resources will be Cluster Network n where n is the number assigned to the cluster network adapter. In the setup shown, three network adapters are configured – one for production network, one for private/heartbeat communication, and one for iSCSI network. By default, all available network adapters will be used for inter-node communication, or what is commonly known as private communication/heartbeat. Configuring another network adapter provides resiliency and redundancy for inter-node communication.

To rename the cluster network resources:
- Within the Failover Cluster Manager console, select the Networks navigation option. This will display all the cluster network resources added to the WSFC.

- Right-click one of the cluster network adapters and select Properties. This will open the Properties page for that specific cluster network resource.

- In the Properties page, type the appropriate name for the cluster network resource in the Name textbox. Click OK.

NOTE: The WSFC will automatically detect whether client applications can connect thru the specific cluster network resource. This is determined based on whether a network adapter has a default gateway and can be identified via network discovery. Thus, it is important to get your network administrators involved in properly assigning the IP address, the subnet mask and the default gateway values of all the network adapters used on the WSFC nodes prior to creating the WSFC. An example of this is the network adapter configured for inter-node communication.

Other network adapters also need to be configured properly. The network adapter used for iSCSI in the example cluster has the Do not allow cluster network communication on this network optionselected.

Do this on all the cluster network resources available on your WSFC.

Again, all available network adapters will be used for inter-node communication, including the network adapter you configure for production network traffic. How the WSFC prioritizes which network adapter is used for private/heartbeat communication traffic is determined by using the cluster network adapter’s Metric property value. You can identify the cluster network adapter’s Metric property value by running the PowerShell command below.
Get-ClusterNetwork | Sort Metric

The cluster network adapter with the lowest Metric property value will be used for private/heartbeat communication (and cluster shared volume, if it is configured). In the example provided, the Private cluster network adapter will be used for private/heartbeat communication. And since LAN cluster network adapter has value of ClusterAndClient for the Role property, the WSFC will use it in case the Private cluster network adapter becomes unavailable. This is described in more detail in the Configuring Network Prioritization on a Failover Cluster blog post from Microsoft.
Alternatively, you can use the PowerShell script below to identify the clustered network resources and rename them accordingly.
#Display all cluster network resources
Get-ClusterNetworkInterface

#Rename cluster network resources accordingly based in the result of Get-ClusterNetworkInterface
(Get-ClusterNetwork –Name "Cluster Network 1").Name = "LAN"
(Get-ClusterNetwork –Name "Cluster Network 2").Name = "Private"
(Get-ClusterNetwork –Name "Cluster Network 3").Name = "iSCSI"

In this tip, you have learned the following items:
- Renamed the shared storage resources
- Renamed the cluster network resources and
- Viewed network prioritization for cluster network adapters.
In the next tip in this series, you will go thru the process of installing SQL Server 2019 on top of the WSFC.
Next Steps
- Read other articles in this series
- Review the previous tips on Step-by-step Installation of SQL Server 2016 on a Windows Server 2016 Failover Cluster Part 1, Part 2, Part 3 and Part 4 to see the difference in the setup experience between a SQL Server 2016 Failover Clustered Instance on a Windows Server 2016 and a SQL Server 2019 Failover Clustered Instance on a Windows Server 2019.
- Read more on the following topics:

Edwin M. Sarmiento is the Managing Director of 15C, a consulting and training company that specializes on designing, implementing and supporting SQL Server infrastructures. He is a Microsoft SQL Server MVP and Microsoft Certified Master from Ottawa, Canada specializing in high availability, disaster recovery and system infrastructures running on the Microsoft server technology stack ranging from Active Directory to SharePoint and anything in between. He is very passionate about technology but has interests in music, professional and organizational development, and leadership and management matters when not working with databases. Edwin lives up to his primary mission statement: “To help people and organizations grow and develop their full potential.”
- MSSQLTips Awards: Champion Award (100+ tips) – 2017 | Author of the Year Contender – 2020, 2017

Hi Lou,
At the top there are numbers Related: 1 | 2 | 3 | 4 where you can move through each.
Also, you could use the links in the Related Articles section.
Love the level of detail. Thank you for your hard work! One issue though, how do I get to “Step-by-step Installation of SQL Server 2019 on a Windows Server 2019 Failover Cluster – Part 2” The navigation links make it a little hard to move through your documentation.