Problem
Most requests sent to the DBA are for Database Administration issues. Sometimes, however, something out of the ordinary comes along – in my case, a request for the design of some user input forms to be connected to SQL Server. Assuming that the solution is to be built without code, what options are available?
Solution
This article introduces Microsoft InfoPath, an application that is part of Microsoft Office Professional Plus 2013, or available alongside Office 365 (ProPlus subscription only). It is used to design and share forms between user groups and integrates fully with SharePoint and SQL Server together with being able to produce standalone forms with zero code exposed to the user and no knowledge of SQL required. This article will also guide you through creating an interactive form connected to SQL Server, a template that could be used to produce more sophisticated solutions.
Introduction to Microsoft InfoPath
In the course of my work for clients, I often get called upon to diagnose SQL Server issues; a poorly-performing query, unusual error message, an alert from the monitoring tools or some other database administration problem. Occasionally, I get asked to implement a feature – for example, setting up monitoring, replication or log shipping, or reviewing the backup strategy and making some changes. There’s the day-to-day DBA work, reviewing and approving (or rejecting) requests from development teams, pushing changes into production and so on. In my role as a contractor, I have a huge variety of requests that are normally fairly predictable and most fall within my field of expertise.
Recently, however, I had a request to provide a data input mechanism for SQL Server for the use of non-technical users. This stopped me in my tracks; this isn’t a DBA activity, nor something that a regular BI developer would do. I mean, SQL Server is for applications, right? It’s a middleware layer, not something your everyday John Q. User would need to know about, let alone interact with?
Now you may be thinking what I’m thinking – Microsoft Excel. It’s a straightforward, no-nonsense approach using a common framework to SQL Server (.NET) with built-in support for native SQL Server connections to local or remote servers. Once I gathered a little more information, I realized this wasn’t to be the solution – this system both needed to be centralized (via SharePoint), easy-to-use via a web browser with an uncluttered interface, ScreenTips (help on mouse-over), options to add client-side validation, server-side validation in the future, ensure supportability (so no obscure VBA code) – oh, and with great aesthetics too. Excel ticks maybe half of these boxes.
O…kay. So now I’m beginning to panic – when I do play with software development outside the context of the BI stack, it’s normally in Python, TKinter, R, Matlab and other assorted tooling to work on projects completely unrelated to databases (I don’t dream in SQL!). I’ve never seriously used .NET in anger beyond VBScript and PowerShell, and I’m certainly not up to the task of producing a solid and robust application within a web interface, not on my own or in the short timescale I was given.
So, what to do? Clearly I needed some other form-creating tool … SharePoint has some basics, but nothing that met all the criteria above. Here’s a great opportunity then to introduce Microsoft InfoPath. In this tip, I’m using Microsoft InfoPath 2013 with SQL Server 2008 Standard Edition.
Some preparation – in this demonstration, I will be reading and writing data to and from the same table, dbo.Person, and also reading data from table dbo.lookup_animals in database ‘msst_test’. You can find an object creation script here if you would like to follow along.
Preparation
Run this on your SQL Server installation (not production!) to follow along with the tip. Make sure you have permission to do this from your DBA first.
CREATE DATABASE msst_test
GO
USE msst_test
GO
CREATE TABLE dbo.Person (
PersonID INT IDENTITY(1,1) PRIMARY KEY,
FirstName VARCHAR(100),
Surname VARCHAR(100),
DateOfBirth DATE,
CurrentAge AS DATEDIFF(YEAR, DateOfBirth, GETDATE()),
AnimalPreference1 INT,
AnimalPreference2 INT,
AnimalPreference3 INT,
LastUpdated DATETIME DEFAULT GETDATE() )
GO
CREATE TABLE dbo.lookup_Animals (
AnimalID INT PRIMARY KEY,
AnimalName VARCHAR(100) )
GO
INSERT INTO dbo.lookup_Animals
SELECT 1, 'Elephant' UNION ALL
SELECT 2, 'Bear' UNION ALL
SELECT 3, 'Cat' UNION ALL
SELECT 4, 'Dog' UNION ALL
SELECT 5, 'Rabbit'
GO
Introducing InfoPath
Wikipedia sums up InfoPath far better than I can: “Microsoft InfoPath is a software application for designing, distributing, filling and submitting electronic forms containing structured data“.
So let’s dive in and take a look at how to create a basic form, and connect this form up to a SQL Server database.

When we open InfoPath Designer 2013, we are presented with a choice of forms to use. Select New -> Advanced Form Templates -> Database to open a new database-compatible form. You’ll immediately recognize the form layout as similar to PowerPoint – the title area is clearly displayed, and there’s an area to add tables below.
What’s new is the ‘Fields’ section to the right of the screen. Here is where references to the fields we are using are stored, and underneath you’ll see ‘Manage Data Connections…’ – this is where Data Connections (the BI equivalent of Connection Managers) are stored.
Configuring the Main Database Connection
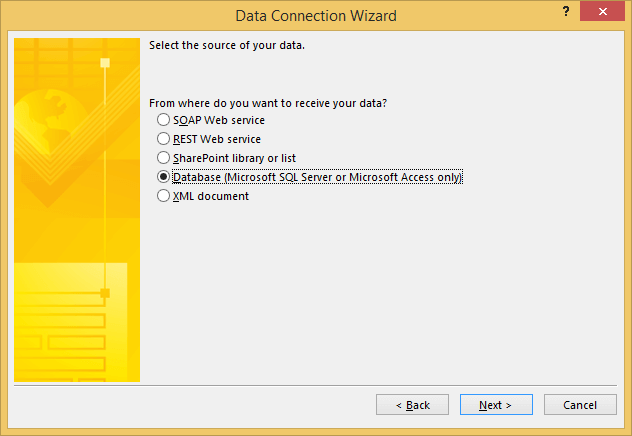
So, first thing – let’s create a new Data Connection to our SQL Server database. My database is called ‘msst_test’ and stores customer information. When you create the form, the Data Connections Wizard will be displayed automatically. Begin by clicking ‘Select Database’, then ‘New Source’:

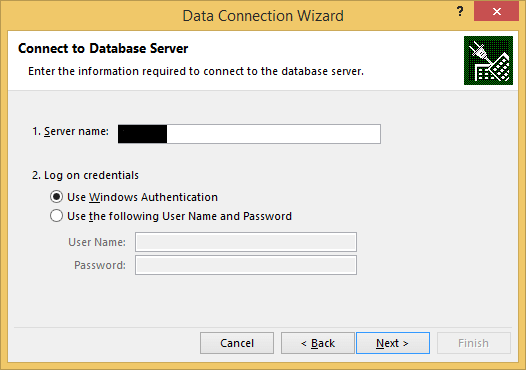
Now select SQL Server and click Next. Enter the server name and login credentials if needed.
Now select the msst_test database from the drop-down menu. Two tables will be displayed, Person and lookup_Animals, both in the dbo schema. Select ‘Person’ and make sure the Connect to a Specific Table checkbox is filled:

Now in the resulting box, you can save the connection as a data connection file. Check with your DBA first before saving this file as unauthorized access to these files can mean the breach of your login credentials. Give the connection a friendly name – mine is called ‘Test Connection’.

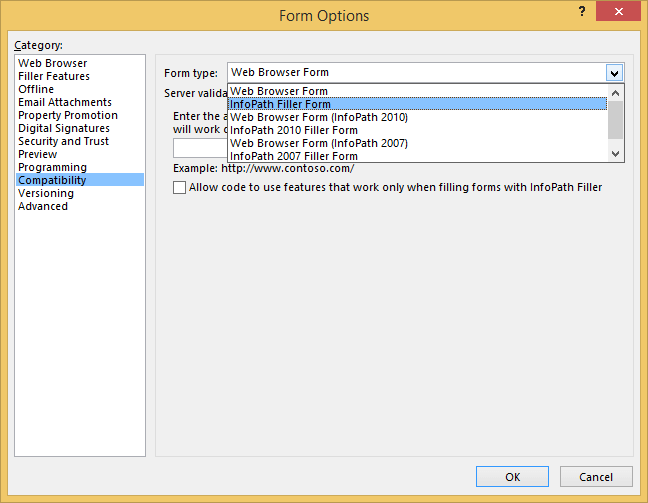
Now click Finish, Next and Finish. Ignore the warning about web browser form incompatibility, we will change the type of form now.
Click File -> Advanced Form Options. Click the Compatibility tab and in the ‘Form type’ drop-down box, select InfoPath Filler form. Click OK to close the window.
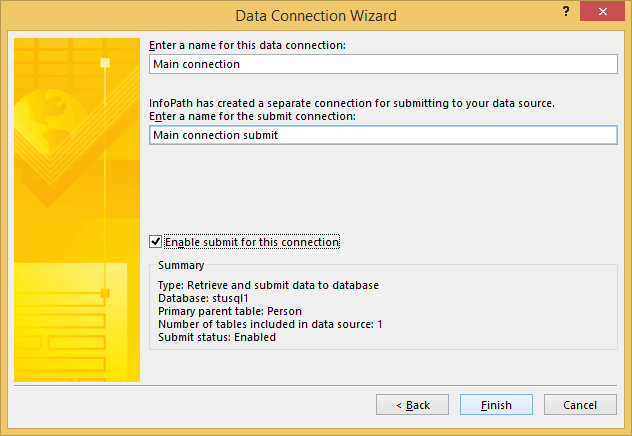
Now click Manage Data Connections in the bottom-right of the form window, under ‘Fields’. You’ll see the connection listed there – click Modify… then Next. In this window, click the ‘Enable submit for this connection’ checkbox to fill it, then Finish and Close.
Finally, delete every element in the form by clicking on it and pressing ‘Delete’. You should be left with a completely blank form. Save this form.
Designing the InfoPath 2013 Form
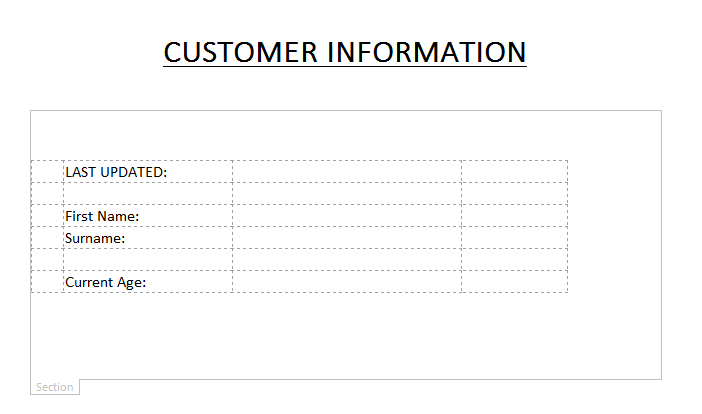
We now have a basic working connection to SQL Server and a blank form to play with. Let’s begin by adding a title. In the same manner as you would in Word, create a title by typing near the top of the page. Play with the size and font until you are happy with the result. Here is mine, quite plain:

Now we need to use Controls to fetch the data from the database. Controls are dynamic objects in InfoPath that need to be bound. Each control is bound to one field. Thus, one control is (in our example) necessary for each field we want to display.
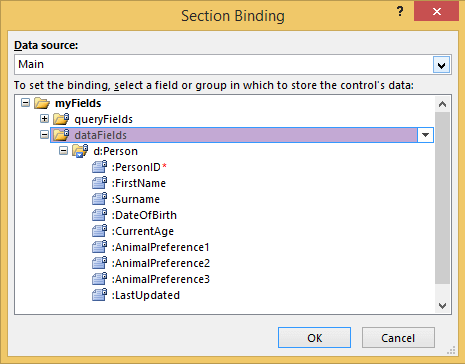
Let’s create a Section first. This Section is a section of form that will contain controls, and that will display data from a record (row) in the database table. Click the ‘Section’ button in the ‘Controls’ section of the Home tab in the Ribbon. In the resulting window, we need to select the binding. Select ‘Main -> myFields -> dataFields’ and click OK. This means that we are binding the section to all columns under ‘dataFields’ (i.e. the whole Person table):
The Section will show up on your form. Resize the section to suit your form (I expanded mine down the page to make room for more Controls). You can see the binding on the top-right of the Control:

Now, let’s add the columnar data to the Section. For our example, we only want to show one record at a time – remember, it has to be user-friendly, so dumping the data out as a table is probably not a good idea! We’ll need labels for each field too, and we’ll add ScreenTips to indicate what is required. First, let’s add a Text Box. Click the Text Box control in the Controls section of the Ribbon and select the ‘FirstName’ column under dataFields -> Person, then click OK. You’ll get the following warning message:

This warning message can be ignored for now – it is explaining that because the container you have chosen (Section) is non-repeating, only the first record in the set (the first row) will be shown. This is logical – if we’re only making room for one record, it can only show one record! We will counter this later by adding interactive buttons so ignore it for now. After you click Yes, the control will appear in the Section.
Now repeat this process for the columns Surname, CurrentAge and LastUpdated. Feel free to experiment with the layout and font tools which are much like Word. Tip: If you’re struggling to achieve a neat layout, use a table to fix indentation problems and arrange your fields.
Here is my example – yours will almost certainly vary:
You’ll notice I’ve left a gap between Surname and Current Age. Here, I’m going to add a different sort of Control – a Date Picker. Position the cursor where you’d like your Date Picker to go and click the Date Picker control from the Controls section of the Ribbon.
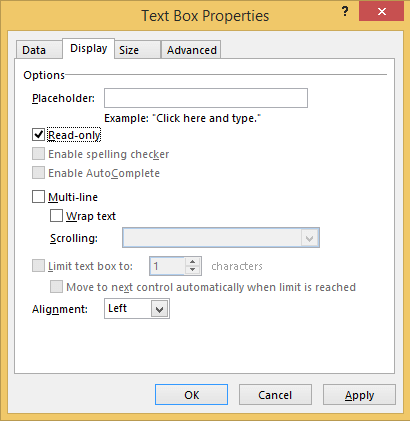
Now, if you reviewed the preparatory script referenced at the beginning of this tip, you may have noticed that the ‘Current Age’ column is computed as a function of Date of Birth and the current date/time. It follows, then that we do not want this field to be editable by the user – it should automatically populate, based on the entry in Date of Birth. Right-click on the field and click Text Box Properties, then click the Display… tab. Fill the ‘Read-only’ checkbox to set this field to read-only.
Incidentally, this is where you would set your ScreenTips (mouse-over text) – simply populate the ScreenTip field in this dialog box.
Adding More Data Sources to the InfoPath 2013 Form
Now, we need to add the remaining columnar data to our form. We’re not interested in displaying the PersonID as this is only for internal use, but we would like to display data on each person’s favorite animals. These are represented in columns AnimalPreference1, AnimalPreference2 and AnimalPreference3. However, the data in this columns is of type INT, and we can guess (although there is no explicit key defined – we could add a foreign key without difficulty) that these will correspond to the AnimalID for each animal listed in table lookup_animals.
So, we have a few things to do:
- Add the lookup_animals table to the form as a Secondary Data Connection
- Create some drop-down lists for these preferences
- Make sure the drop down lists show the animals, not the integers
- Make sure the value fetched/submitted is the integer, not the animal
To add in the second table, let’s click on Manage Data Connections and Add… Then click ‘Receive Data’, Next, and select ‘Database (Microsoft SQL Server only)’. By now you should have this window displayed:
Now, in the next Data Connection Wizard window, you can select the data connection file you want to use. As our connection remains the same (only the table varies), select the ‘Test Connection’ file and click OK. The Person table will populate automatically – click the ‘Remove Table’ button and ‘Add Table’ button, then select ‘lookup_Animals’. You should be left with the following window:

Click Next, Next, Finish and Close. Now, if you expand ‘QueryFields’ in the Fields dialog on the right side of the screen, you’ll see the lookup_Animals table listed in there. As a set of query fields only, it means the data in this table is never updated or added to by our form – it is only referenced (SELECTed by the form) where needed.
Build Drop Down Lists in InfoPath 2013
Let’s now address 2) above and create some drop-down lists to show the animals. Use the ‘Drop Down List’ control from the Controls section of the Ribbon. BE CAREFUL – when setting the binding, make sure you bind to the dataFields -> Person -> AnimalPreference fields, not the AnimalID or AnimalName query fields we just created! We need to tell the form that we are *storing* the result to the AnimalPreference field, not retrieving it from there.
Solving 3) and 4) above is a bit tricky. Once you’ve placed your first drop-down, right-click on it and go to ‘Drop Down List Box Properties’. In here, under List Box Choices, you’ll see three radio buttons enabling you to specify the source for the display values in the drop down box. Now we don’t want the user to have to choose between a set of integers instead of animals, but we do want to populate the table with integers (as it saves space!) that are keyed to the lookup_Animals table. Here is where we can specify a different set of lookup values.
Click ‘Get Choices from an External Data Source’. Select ‘lookup_Animals’ for the Data Source, then for Entries navigate to the QueryFields -> lookup_Animals table. In Value, select ‘@AnimalID’ and in Display Name, select ‘@AnimalName’. The result should look like the following:

Repeat the process for the AnimalPreference2 and AnimalPreference3 fields.
Adding Buttons to the InfoPath 2013 Form
Now, let’s put some buttons on the form. We need to be able to do four separate things in our example – scroll between records (left and right) based on the PersonID primary key, submit our changes to existing records, and create new records.
Use the ‘Button’ control in the Controls section and place four buttons on your form. It doesn’t matter whether these are inside or outside your section. Use the right-click -> Button Properties… option to rename them, and place them appropriately.
Now InfoPath doesn’t come with much ‘out-of-the-box’ support for buttons – you can manage them using either Rules (which can either Validate, Format or perform an Action) or VB code. For the purposes of this example, we’ve committed to a codeless solution, and there aren’t any Rules which allow us to traverse records easily. So we’ll have to be creative and put a Rule in place with multiple Actions that enable us to do this.
At this point, our form should have some fields representing our columnar data and four buttons. Here are mine:

Adding Interactive Controls in InfoPath 2013
Remember at the beginning of the form design we received a warning about using the Section control? Well, we now need to put in some components to make sure that we can retrieve a specific record when called. By retrieving a specific record, we can then move on to traverse records and create new records.
Let’s put in a new Text Box somewhere in the form which will contain the PersonID. It doesn’t matter where we put it since in reality, we’d make it invisible to the user.
Mine’s here:

Don’t bind the field just yet – let it be, we’ll come back to it in a moment.
Now, we need to put some work in so we can create a button that creates a new record. InfoPath does have functionality for this built into the Rules – close a form, or open a new form to fill out. Neither is what we want – we need to be able to skip to the last record in the set, then increment the PersonID ready for the details to be filled out and submitted. Because InfoPath isn’t great at supporting SQL querying (unless you want to write it in code, or do some inline SQL querying) we can shoehorn in our own SQL using a view, which at least can be version-controlled and reside database-side.
Create two views in SQL Server like so:
USE msst_test
GO
CREATE VIEW LatestRecord AS
SELECT MAX(PersonID) [MaxPersonID] FROM dbo.Person
GO
CREATE VIEW AllRecords AS
SELECT PersonID FROM dbo.Person
GO
Now we need to use the output of one of these views to bind to the new PersonID field we created. Hit ‘Manage Data Connections’ again and this time add a new data connection to ‘Receive’ (not submit) data. Select the same server connection, and click Modify… to change the table. You’ll see the new view names in the list. Select the ‘AllRecords’ view and click OK, then OK to close the window.
On the PersonID field, right-click and Change Binding… Under the QueryFields tree, select the PersonID column (this is the view output column). Click OK.
What we’ve just achieved is to tell InfoPath that we want the PersonID field to display the output of the view. Whatever number happens to be in the field will also be used to populate all the other fields on the form (as it is of type ‘QueryField’ not ‘DataField’).
Let’s pause here. This is a really tricky concept and worth going over again. The QueryFields list in the Fields window is split into two trees, the QueryFields tree and the DataFields tree. The general rule is that any fields on the form bound to a Query field is the value the form will use to populate any other fields on the form. Any form bound to a Data field will be updated when the form is submitted. This holds true for any *primary* connections (i.e. enabled for submission) but not for secondary connections. However, if any InfoPath gurus are reading this and disagree with my summary, please leave a comment and I’ll be happy to stand corrected!
Now we have done the groundwork, let’s start with setting up the Previous Record button. Click once on the button to highlight it then in the Ribbon, on the right under the Rules section click Manage Rules.

Now in the Rules pane on the right side of the screen, click the Add button and select ‘Set a field’s value’. Once selected (see screenshot below), in the dialog box that appears, use the drop-down under Field to select the AllRecords secondary data source and set Field as @PersonID (from QueryField) and Value as @PersonID – 1. This means that when the button is clicked, the value of the PersonID field (the field we just created) will decrease by 1.

Now click Add again and select ‘Query for Data’. In the resulting window set the Data Connection as ‘Main connection’ and click OK. The button should have two rules.
Do the same for the Next Record button. First, add the rule to increment the PersonID field by 1 (@PersonID + 1) and make sure the PersonID is from the AllRecords secondary data source, or it won’t work. Then, add the Query for Data step to the rule list.
Let’s do the third button. Click the ‘Submit’ button and in the Rules pane, select ‘Add’ then ‘Submit data’. Make sure in the dialog box that the ‘Main connection’ is selected in the drop-down menu.
Finally, we will do the fourth button, ‘New Record’. This is a tricky one. We are going to use the ‘LatestRecord’ view we created above to fetch back the maximum record number, and add 1 to it to create a new record. Then, when the user populates the fields and hits Submit, this record data will be stored to the database.
First, click Manage Data Connections. Add, Receive Data, Database then Select Database and select the server connection file we have been using throughout. Select the ‘LatestRecords’ view, Next, Next and Finish. The new exposed column in QueryFields will be called MaxPersonID.
Now Click the New Record button. In the Rules pane, hit Add and select ‘Set a field’s value’. For the Field value, select Main -> QueryField -> PersonID. For the Value column, select the LatestRecords view from the drop-down and the MaxPersonID column and enter @MaxPersonID + 1 as the formula.

Finally, use the Add button in the Rules dialog to add the ‘Query for Data’ action afterwards.
What we have done is tell InfoPath than when the button is clicked, fetch the latest record number and go to the record *after* this one. This means that a new record is created with the PersonID incremented.
And … that’s it! We now have a functional working form.
Use the ‘Preview’ button on the top-right of InfoPath to test it out.
InfoPath 2013 Known Issues and Further Work
Of course, this is a straightforward example without much in the way of customization, odd workarounds or hacks. There are some limitations with the model I’ve demonstrated – some are listed below.
- Using Previous / Next Record buttons on values < 1 yields 'Not a number (NaN)' errors - we could fix by adding hard limits in the formula using mathematics or CASE-like statements
- LastUpdated field doesn’t update to the latest date when any other field is updated – we could fix using a trigger on INSERT, or some custom VB code
- The aesthetics could use some work. I’ve found InfoPath to be in some ways more versatile than other tools in this regard. Background images, fonts, borders, behavior – all can be changed to fit the requirements. Play with the tools and see what’s possible.
- SECURITY! Make sure you secure your database connection files. If using Windows authentication, bear in mind the users of the form must have adequate permission to use the SQL Server database or connection to the data source will fail.
Preview the InfoPath 2013 Form
Here’s a screenshot of our form in Preview mode:

Publication Options with InfoPath 2013
Of course, it’s all very well creating the ideal form set but if no-one can use it, there’s not much point, right? Luckily, InfoPath is compatible with SharePoint and forms can be published too by e-mail, or to a shared network location with a single click. Users only need InfoPath Filler to view a form in this way, not the full Designer. In SharePoint, of course, no special tooling is needed.

It is beyond the scope of this article to guide you through SharePoint publication, testing and troubleshooting step-by-step, but it’s fairly straightforward – check the File -> Publish link in InfoPath for the options, and please check the Further Reading section for further assistance.
Next Steps
This is an unconventional article about SQL Server – not so much about SQL Server, but about the tools one can use to design a basic user interface for it. I have recently implemented six of these interfaces using InfoPath and SharePoint with some complex client-side validation and logic, and for those without the time, resources or patience to roll your own solution, I would highly recommend it.
For further reading about integrating InfoPath with SharePoint, I can also highly recommend the following book:
Mann, S., InfoPath with SharePoint 2010 How-To: Real Solutions for Using InfoPath with SharePoint 2010, 2010 1st Ed., Published by SAMS, ISBN 978-0672333422
Please also check out these other related tips from MSSQLTips:
- Ray Barley – Accessing SharePoint Lists with SQL Server Integration Services
- Ray Barley – Using a SharePoint List as a Data Source in SQL Server Reporting
- Jeremy Kadlec – Insert, Update or Delete Data in SQL Server from Excel

Dr. Derek Colley is the lead technical consultant for Optimal Computing, a boutique data consultancy based in the UK NW helping clients troubleshoot, configure, plan and deploy their data platforms. He specializes in data integration and database performance optimization, and is a PhD candidate with Staffordshire University, looking into methods of integrating AL query selection algorithms with the cost-based query optimizer. In his spare time, he enjoys building robots, going outdoors, and spending time with his four children.
- MSSQLTips Awards: Trendsetter (25+ tips)


in 2015 infopath should not be used as it will be obsolete if not already. there are better tools
Infopath was discontinued in 2014 and falls out of support in July 2026. If looking for a solution for this today, you may want to consider power apps.