Problem
We have SQL Server replication configured on a large database. The Publisher is located in the UK datacenter and the Subscriber is located in the Australia datacenter and the servers are connected via VPN. In the past when applying the initial snapshot we needed more than 12 hours to synchronize the databases. How can we speed up the process and also ensure this process is successful?
Solution
Applying the snapshot via command line on the local server solved my problem. Let’s look at the steps to apply a replication snapshot via the command line.
In this example I am using Merge replication.
Create the publication and the snapshot. Add the subscriber to the publication and make sure it is not synchronizing. You can open Replication Monitor and stop the subscriber from synchronizing.
Find Snapshot Folder
To find the snapshot folder on the Publisher right click on the publication and select Properties. On the Snapshot page we can see the folder where the snapshot files are created.

If you open the above path with Windows Explorer you can should see a folder called unc. The unc folder will have sub-folders and one should be for your publication which contains several files with extensions like .cft,.bcp,.dri,.prc and .trg. If you have multiple publications configured, make sure you get the appropriate snapshot folder. Also, if you have multiple snapshots make sure you get the correct snapshot.
So let’s say our server name is “PublisherServerName” and the published database is “PublisherDBName” and the publication name is “PublicationName” you will see something like this with a timestamp folder “20160614123049” for when the snapshot was created.
C:\Program Files\Microsoft SQL Server\MSSQL10_5.MSSQLSERVER\MSSQL\repldata\unc\PublisherServerName_PublisherDBName_PublicationName\20160614123049
Zip Up Folder Contents and Copy to Subscriber
You want the contents of the timestamp folder “20160614123049”.
Zip all of the contents of the snapshot folder and copy the zip file to the server where your subscriber resides using ftp or https or whatever is fastest. In our case we have our website hosted in the UK datacenter, so we copied the zip file to the website folder and downloaded the zip file using a browser from the server where the subscriber resides.
Unzip Folder Contents
Next unzip the folder on the subscriber server. In my environment I created the unc folder under the C:\Repl_Data\ folder on the subscriber and placed the unzipped snapshot folder contents under the unc folder.
So my folder path looked like this:
C:\Repl_Data\unc\PublisherServerName_PublisherDBName_PublicationName\20160614123049
Then use the commands below on the subscriber from a Windows command prompt. Depending on the version of SQL Server you may have a slightly different path. Also, substitute the names of your servers, databases and publications in the below command.
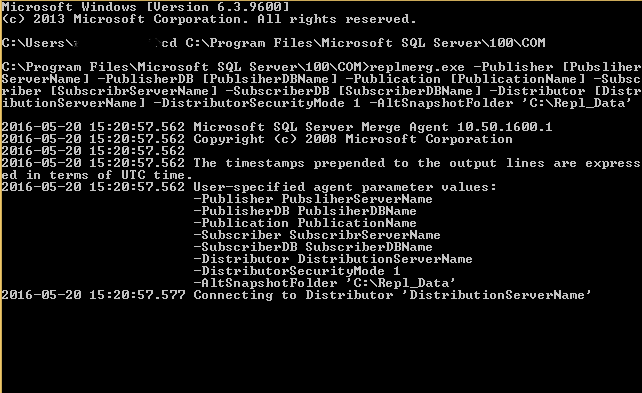
replmerg.exe -Publisher [PublisherServerName] -PublisherDB [PublisherDBName] -Publication [PublicationName] -Subscriber [SubscriberServerName] -SubscriberDB [SubscriberDBName] -Distributor [DistributionServerName] -DistributorSecurityMode 1 -AltSnapshotFolder
“C:\Repl_Data”
Here is a sample of what this will look like when the command is run.
Summary
By using the above procedure we applied the snapshot locally in less than 10 minutes.
After successfully applying the snapshot from the command line at the subscriber, use Replication Monitor to start synchronizing the publication again.
Next Steps
- Please test this on QA environment
- Check out theses other SQL Server Replication tips
- Read more about doing this for transactional or snapshot replication

Ranga Babu is a SQL Server DBA with experience in handling large Development, QA and Production database environments. I have worked on SQL Server high availability solutions like log shipping, replication, mirroring and clustering. I always like to work on SQL Server performance tuning and automation projects.