Problem
I need to backup my local SQL Server databases and upload the backup files to Azure automatically. Can this be completed in SQL Server Integration Services (SSIS)? Is it also possible to delete the local backup after the file transfer has completed? Read this tip for the step by step directions.
Solution
In this tip we will demonstrate the Feature Pack in SSIS to connect to Azure to copy your SQL Server database backups.
Requirements
- SQL Server 2016 or later.
- The SSDT should be installed.
- An Azure Subscription.
- Internet access.
Introduction
In this demo, we will do the following:
- In the Azure Portal, create an Azure Storage Account (a place to store in Azure).
- In Microsoft Azure Storage Explorer (MASE), create a BLOB container inside the Azure Storage account (we will explain what is MASE shortly).
- In SSIS, create a backup task, use the Azure Blob Upload Task to upload the backup in Azure and delete the local backup using the File System Task.
Getting Started
We will create an Azure Storage Account first in the Azure Portal.
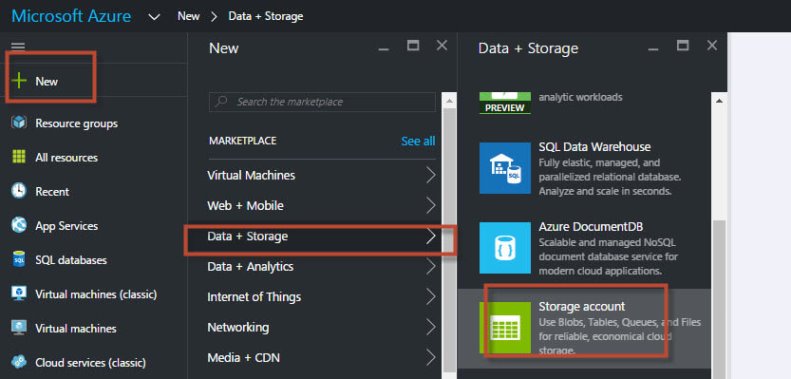
In your Azure Portal, go to New > Data + Storage > Storage Account:
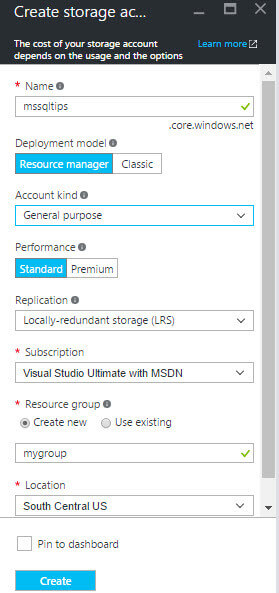
Specify a “Name” of your preference. With the Deployment model, use “Resource manager” (“Classic” is the old model). In “Account kind” you can use “General purpose” or “Blob storage”. Use “General purpose” if you need several types of storage like message queue, tables, etc. In performance, the cheapest option is “Standard”. The “Premium” option is used when higher performance is required. In replication, the cheapest option is “Locally-Redundant storage (LRS)”. You can replicate Geographically, in the same zone or geographically with read only access in the replica. In “Location”, specify the location closest to you:
Once you have an Azure Storage Account, install MASE. MASE is the easiest way to create a Blob Storage. The BLOB (Binary Large Object) storage is a place to store SQL Backups, Videos and other documents. You can Install MASE using the following link: Microsoft Azure Storage Explorer.
Once installed, go to Azure Account Settings and login with your Azure Account:

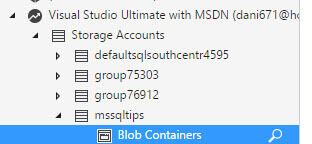
Go to the Storage Account created in step 2 and go to Blob Containers:
We will create a Blob Container named bc1 or any name of your preference:

We will now install Microsoft SQL Server 2016 Integration Services Feature Pack for Azure: SSIS Feature Pack.

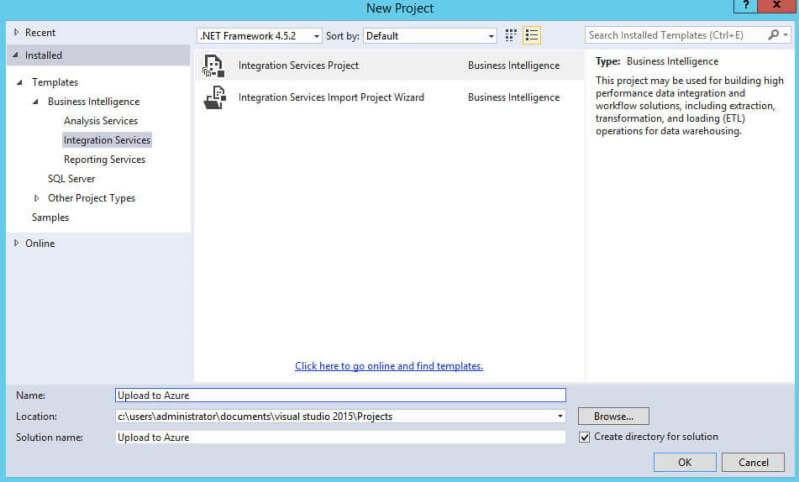
Once installed the feature pack in the SQL Server Data Tools (SSDT), go to File > New > Project:

Select Integration Services Project:
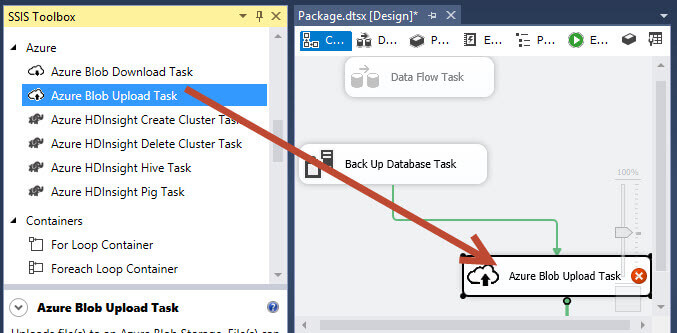
This Feature Pack installed will show new Tasks to Upload and Download files to an Azure Storage Account and to interact with Hadoop (HDInsight):

If you drag a Data Flow Task to the design pane, we will see new Data Flow Tasks installed:

In SSIS Toolbox, you will be able to see the Azure Blob Destination and Source. These are the new tasks installed:

In Control Flow Pane, drag and drop the Back Up Database task to the design pane and disable the Data Flow Task:

Drag and drop the Azure Blob Upload Task and join the Back Up Database task with the Azure Blob Upload task:
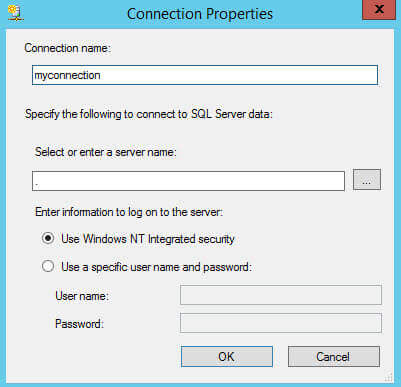
Double click on the Back Up Database task and press the New button for the Connection:

Add a descriptive Name for the connection then select a SQL Server Name and the authentication method:
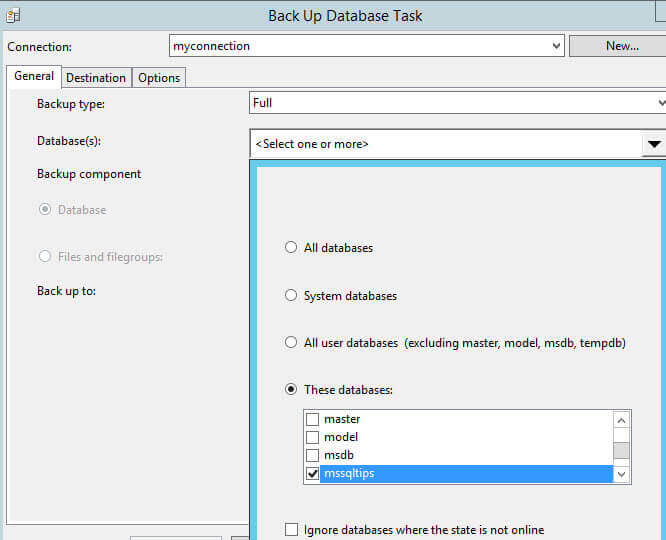
Select a database to backup (we would recommend a small one if you are just testing):
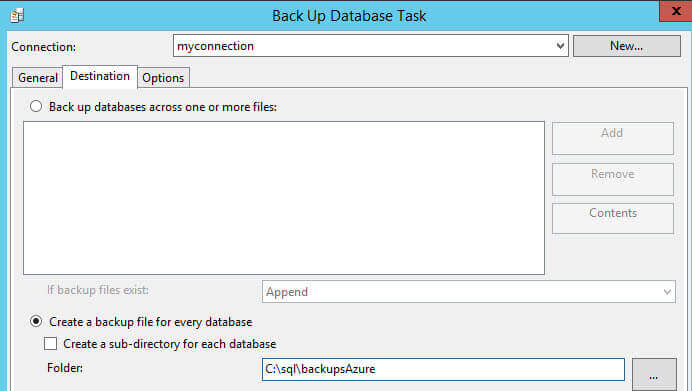
In Destination, specify an empty folder to store the SQL Backup:
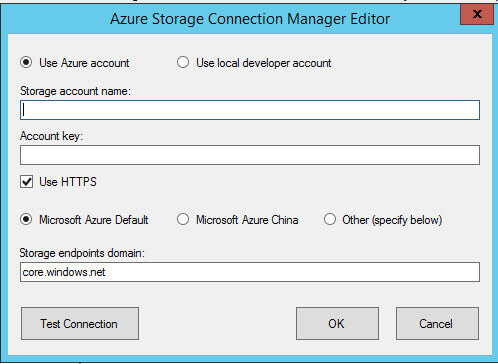
Return to the design pane and double click Azure Blob Upload Task. Click AzureStorageConnection and select New Connection:

You need your Storage account name and an Account Key:
To get the storage name and the account key go to the Azure Portal, All Resources > mssqltips (or the name used in step 2) > Access Keys:
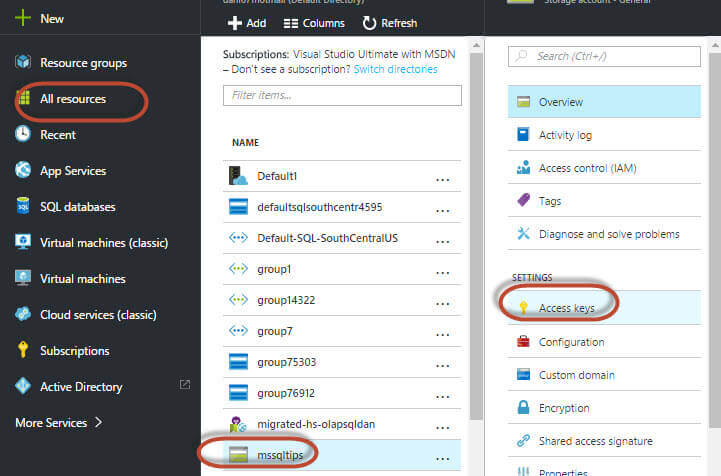
Copy the Storage account and key1:

Paste the information provided in step 22 and Test the connection:

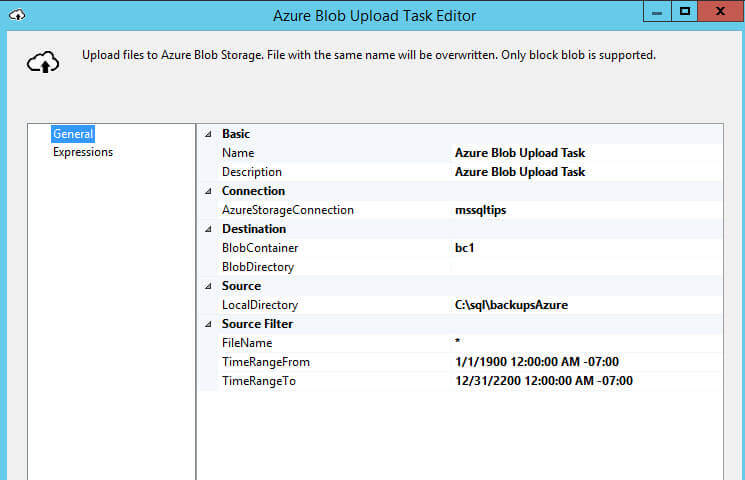
In the Blob Container specify the name created in step 6 and in a local directory use the path of the backup specified in step 18:
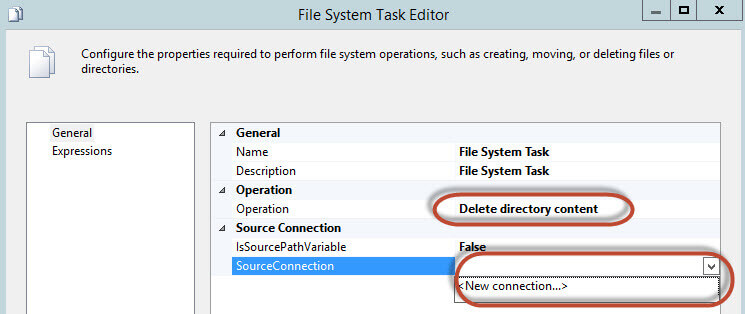
We will use the File System task to delete the local backup once it is in Azure. This is not a recommended task for most situations, but I just wanted to demonstrate this task that is not often used which can be very useful:

We will delete the contents of the folder (in this case, the local SQL backup) using the Delete directory content option and create a new connection to specify the path of the directory:
Specify the folder where the backup is stored specified on step 18:

Start the package:

If the SSIS Package runs correctly, in MASE you will be able to see the backup after refreshing the Blob Container:

Conclusion
In this tip, we learned how to create an Azure Storage Account in the Portal, we installed MASE to create a Blob Container and finally we installed the SSIS feature pack for Azure to automatically upload our SQL Backup to Azure.
Next Steps
For more information, refer to the following links:
- Azure Storage Pricing
- Move Data to or from Azure Blob Storage using SSIS connectors
- SQL Server Integration Services Tips
- SQL Server Integration Services Tutorial
- SQL Server Backup Tips
- SQL Azure Tips

Daniel Calbimonte is a Microsoft Most Valuable Professional, Microsoft Certified Trainer and Microsoft Certified IT Professional for SQL Server. He is an accomplished SSIS author, teacher at IT Academies and has over 10 years of experience as a QE and developer for SQL Server related software. He has worked for the government, oil companies, web sites, magazines and universities around the world. Daniel also regularly speaks at SQL Servers conferences and blogs.
- MSSQLTips Awards: Author of the Year Contender – 2015-2018, 2022, 2023 | Champion (100+ tips) – 2018