Problem
A data lake is a repository of data stored in its raw format. Typical formats include structured data (rows and columns), semi-structured data (formatted files), unstructured data (documents) and binary data (images, audio, or video). This raw data can be enriched by executing programs to process the raw data files as input and store the results back into the data lake as output files. How can we implement the storage layer of the data lake using Microsoft Azure?
Solution
PowerShell has always been the language of choice to automate system deployment and configuration. It is not surprising that we have a series of cmdlets to help us deploy and manage Azure Data Lake Storage (ADLS) using the resource manager model. Here is a reference to the resource manager cmdlets.
Business Problem
Azure Data Lake Storage is a high speed, scalable, secure and cost-effective platform that can be used to collate your company’s data in the cloud.
The core idea behind a modern data platform design is the ability for different organizational groups to use the information stored in one central place in the cloud. The data scientist can setup machine learning experiments using the raw data files. Enriched data can be stored in an Azure SQL database using a star schema. Typical data warehouse techniques can be used compress and partition data as well as track slowly changing dimensions. Holistic corporate reporting can be created by joining the fact and dimension tables using your favorite tool. In short, the data lake offers many possibilities to any organization.
Today, we are going to investigate how to deploy and manage Azure Data Lake Storage using PowerShell. Again, we are going to be working with the S&P 500 stock data files for 2017.
Sign into Azure Portal
This tip assumes you have an active Azure Subscription with money to spend. We must log in with a valid subscription owner before we can do any work. The Add-AzureRmAccount cmdlet will prompt you for credentials to login in.

An account might have several subscriptions associated with it. Use the Get-AzureRmSubscription cmdlet to list the subscriptions associated with your account. My account is associated with john@craftydba.com.
The output from this command shows one subscription. The Visual Studio Enterprise subscription has a monthly limit of $150 dollars. Last but not least, we could use the Set-AzureRmContext cmdlet to choose the correct subscription if we had more than one.

The PowerShell code below logs into the portal, lists the subscriptions and selects the correct subscription. Of course, manual intervention is needed for the sign on.
#
# Azure Subscriptions
#
# Prompts you for azure credentials
Add-AzureRmAccount
# List my subscriptions
Get-AzureRmSubscription
# Pick my Visual Studio Enterprise one
Set-AzureRmContext -SubscriptionId '26efaaba-5054-4f31-b922-84ab9eff218e'
List Azure Resource Manager CmdLets
Today’s data platform developer needs to be a jack of all trades. While you may not be a master of all trades, you need to be able to find out information for an Azure Service when asked.
The Get-Module cmdlet retrieves information about all locally installed PowerShell modules. Using the -ListAvailable parameter, you are shown all modules that can be downloaded from the PowerShell Gallery.
The first snippet of code below is used to select, filter, group and order the output of the Get-Module cmdlet for only Resource Manager modules. There are two modules related to Azure Data Lake and each module has three different versions installed on my computer. We are only going to investigate a handful of storage cmdlets today.

The second snippet of code builds upon the fact that the raw output of the Get-Module command was stored in an object array named $CmdList. Therefore, we can very easily list the names of the cmdlets and which module they belong to.
In a nutshell, the PowerShell code below summarizes all the Azure Resource Manager modules by total cmdlets and lists the name of all cmdlets associated with Data Lake.
#
# Azure RM cmdlets
#
# Clear the screen
Clear-Host
# 1 - List module & no of cmdlets
$CmdList = Get-Module -ListAvailable | Where-Object { $_.Name -like 'AzureRM.DataLake*' } `
    | ForEach-Object { $_.ExportedCommands.Values }
$CmdList | Group-Object Source, Version | Select-Object Name, Count | Sort-Object Name
# Spacing
Write-Host ' '

# 2 - Show Data Lake Store cmdlets
$CmdList | Where-Object { $_.Source -like 'AzureRM.DataLake*' } `
    | Select-Object Name, Source | Sort-Object Name  -Unique
Registering the provider
One might try to execute a New-AzureRmDataLakeStoreAccount cmdlet to start our journey off. More than likely, this command will fail the first time. Unlike other services, the provider must be registered at the subscription level.
The image below shows a typical error message when the subscription does not have the provider (namespace) registered correctly.

The PowerShell code below performs three actions: show me the current registered services, what locations a service exist in and how I register the service. The last action is the most important since it is required as the first step before creating your first data lake store.
#
# Register azure data lake storage services
#
# Is ADLS a registered service?
Get-AzureRmResourceProvider
# List locations of availability
$ListRegions = @()
Get-AzureRmResourceProvider -ListAvailable `
| Where-Object { $_.ProviderNamespace -eq 'Microsoft.DataLakeStore' } `
| Select-Object Locations | foreach-object { $ListRegions += $_.Locations }
$ListRegions | Sort
# Register the service
Register-AzureRmResourceProvider -ProviderNamespace "Microsoft.DataLakeStore"
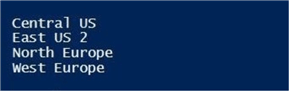
The Get-AzureRmResourceProvider cmdlet can be used to find out what providers are already installed and what providers are available. Please note that Azure Data Lake Storage is available in only the following four locations at this time.
The output below shows the successful registration of the Microsoft.DataLakeStore namespace using the Register-AzureRmResourceProvider cmdlet.

Defining Resource Group
A resource group is a logical container that can be used to group Azure objects by environment, project or any usage pattern you deem necessary. When crafting a PowerShell script, there are two design patterns you can use. One is to tear down all the current environment and rebuild from scratch. The other is to add objects to the environment if they do not exist.
Resource groups are very effective in the first pattern. Removing the resource group deletes all objects associated with the logical container. However, any data that was load into the objects is lost.
Remember that Azure is based upon REST API services. While the portal might show the object as gone, the web service might still be working on deallocating the resources. Executing any cmdlet that creates an object, during this period of time with the same name might fail.
The code below is designed to add a resource group to the current subscription if it does not exist. Otherwise, it returns information on the existing resource group.
#
# Create a resource group
#
# Set variables
$region = "East US 2"
$group = "rg4tips18"
# Does the group exist?
$present = Get-AzureRmResourceGroup -Name $group -ErrorAction SilentlyContinue
# Only create if does not exist
if (! $present)
{
    Write-Host "Creating resource group"
    New-AzureRmResourceGroup -Name $group -Location $region
}
# Show the existing resource group
else
{
    Write-Host "Resource group already exists"
    Get-AzureRmResourceGroup -Name $group
}
The image below shows our new resource group.

We now can define our Azure Data Lake Storage account within the rg4tips18 resource group.
Data Lake Storage
Most Azure services have three cmdlets defined to create new, list current, and remove existing services. The Data Lake Storage object is no different.
| Cmdlet | Description |
|---|---|
| New-AzureRmDataLakeStoreAccount | Create a new storage account. |
| Get-AzureRmDataLakeStoreAccount | List the current storage account. |
| Remove-AzureRmDataLakeStoreAccount | Remove the existing storage account. |
The code below is designed to add a new data lake storage account to the specified resource group if it does not exist. Otherwise, it returns information on the data lake storage account.
#
# Create the data lake storage
#
# Set variables
$name = "adls4tips18"
# Does the factory exist
$present = Get-AzureRmDataLakeStoreAccount -ResourceGroupName $group -Name $name `
    -ErrorAction SilentlyContinue
# Only create if does not exist
if (! $present)
{
    Write-Host "Creating azure data lake storage"
    New-AzureRmDataLakeStoreAccount -ResourceGroupName $group -Name $name -Location $region
}
# Show the existing storage
else
{
    Write-Host "Azure data lake storage already exists"
    Get-AzureRmDataLakeStoreAccount -ResourceGroupName $group -Name $name `
    | Select-Object Name, Type, Location, EncryptionState, EndPoint, FirewallState
}
The image below shows information about the ADLS account that I think is important. First, we want to know the name of the object. In our case, we created an object called adls4tips18. There is a limited number of data centers that support this offering. We can see that the object is located in the eastus2 region.
Security is a very important consideration when all your data is in the cloud. By default, ADLS encrypts your data at rest and TLS is used to communicate with the end point. See this article from Microsoft for all the details. Keep track of the endpoint URL since this will be needed when you write code or use a tool such as Azure Storage Explorer. Last but not least, I suggest you turn on the firewall to restrict traffic to known IP ranges within your company.

I always like to use the portal to verify the develop operations (DEVOPS) scripts I wrote using PowerShell. The image below shows the newly created storage account.

Now we are ready to manage files and folders within our data lake storage account.
Managing Files and Folders
Most Azure services have three cmdlets defined to create new, list current, and remove existing objects. The Data Lake Storage object is no different.
| Cmdlet | Description |
|---|---|
| New-AzureRmDataLakeStoreItem | Create a new file or folder in the data lake store. |
| Get-AzureRmDataLakeStoreItem | List the current file or folder in the data lake store. |
| Remove-AzureRmDataLakeStoreItem | Remove the existing file or folder in the data lake store. |
The code below is designed to add a new folder under the root directory in the ADLS if it does not exist. Otherwise, it returns information on the data lake child item.
#
# Create folder in ADLS
#
# Does the folder exist
$present = Get-AzureRmDataLakeStoreChildItem -AccountName $name -Path "/" `
    | Where-Object {$_.Name -eq "STOCKS"} -ErrorAction SilentlyContinue
# Only create if does not exist
if (! $present)
{
    Write-Host "Creating folder named /STOCKS"
    New-AzureRmDataLakeStoreItem -Folder -AccountName $name -Path $path
}
# Show the existing folder
else
{
    Write-Host "Folder named /STOCKS already exists"
    Get-AzureRmDataLakeStoreChildItem -AccountName $name -Path  "/"
}
The snippet below was taken from the Azure Portal. The ADLS service has a data explorer that can be used to manually maintain objects. This picture was taken after the first execution of the PowerShell script.

If we execute the PowerShell script again, we get details on the folder named STOCKS.

I leave investigation of the delete commands for both the storage account and/or folder as an exercise for you to try. Now that we have a folder to place our S&P 500 stock data into, let us import some data into the lake!
Importing and Exporting Data
A data lake would be useless unless we can transfer data to or from the storage layer. This Azure service has two commands to transfer files into or out of the data lake.
| Cmdlet | Description |
|---|---|
| Import-AzureRmDataLakeStoreItem | Import a file into the data lake store. |
| Export-AzureRmDataLakeStoreItem | Export a file from the data lake store. |
There are 505 comma separated value files that make up the S&P 500 list for 2017.
How can we import the files into our newly created folder in ADLS?
A simple for each loop with some variables to dynamically create both the source and target file names will do. The program below uses the Get-ChildItem cmdlet with a filter to create an array of file names. This array is traversed to import each file into the azure data lake. See the program below for details.
#
# Upload files to azure (S&P 500 stock data)
#
# Set source path
$srcpath = "C:\COMMUNITY WORK\STAGING\DATA\S&P-2017\"
# Set counter
$cnt = 0
# Local file path
$list = Get-ChildItem $srcpath -Filter *.csv
# For each stock
foreach ($file in $list)
{
    # Create file names
    $localname = $srcpath + $file.Name
    $remotename = "/STOCKS/" + $file.name
    # Show progress
    Write-Host $cnt
    Write-Host $localname
    Write-Host $remotename
    Write-Host " "
    # Increment count
    $cnt = $cnt + 1
    # Upload file to azure
    Import-AzureRmDataLakeStoreItem -AccountName $name -Path $localname -Destination $remotename `
    | Out-Null
}
The image below shows the output from the Power Shell Integrated Scripting Environment (ISE). The last file we processed is ZTS. Zoetis, Inc. (ZTS) is the world's largest producer of medicine and vaccinations for pets and livestock.
Since there were not errors during the execution of the program, all the files should be in the data lake.

Again, I am going to use the data explorer in the portal to view the files in ADLS. Since there are a lot of files in this folder, the listing is paged at the bottom.

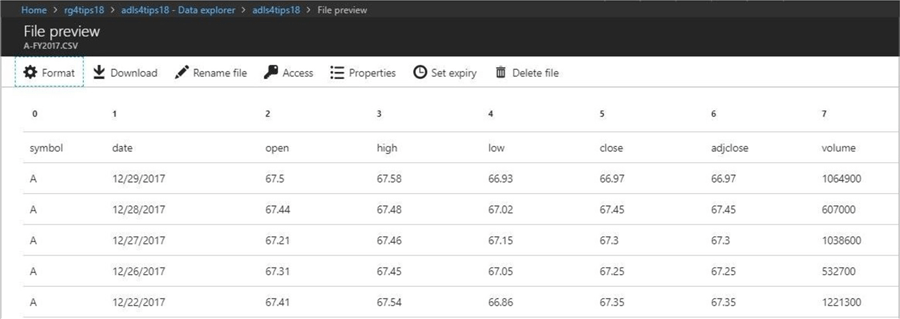
One nice feature of the data explorer is the ability to preview a file. If I double click on the first file, I can get a preview (snapshot) of data within the file.
There is a file named PACKING-LIST.TXT that is associated with yearly data set. I am going to be working with this file to demonstrate how to import, rename, export and delete a file in ADLS. The code below uploads the packing list file into our working directory in ADLS named STOCKS.
# Set variables
$localname = "C:\COMMUNITY WORK\STAGING\DATA\S&P-2017\PACKING-LIST.TXT"
$remotename = "/STOCKS/PACKING-LIST.TXT"
# Upload file to azure
Import-AzureRmDataLakeStoreItem -AccountName $name -Path $localname -Destination $remotename
The data explore in the portal allows you to apply a filter when searching for a file. The current filter is the regular expression P*.TXT. We can see the file exists in our data lake.

Many times, programmers use a staging directory to land files for asynchronous processing. After a file is uploaded into Azure SQL database table, the file might be moved to another directory.
How can we move or rename a file in ADLS?
The Move-AzureRmDataLakeStoreItem cmdlet can be used to solve our problem.
# Set variables
$src = "/STOCKS/PACKING-LIST.TXT"
$dst = "/STOCKS/PACKING-LIST-2017.TXT"
# Rename the file
Move-AzureRmDataLakeStoreItem -AccountName $name -Path $src -Destination $dst
The above snippet renames the file in the same directory. If we click the refresh in the data explorer window, we can see the updated file.

There might be a situation in which we now have an enriched file in our data lake.
How do we export the file to a local temp directory?
The snippet below uses the export cmdlet to save the file locally.
# Set variables
$src = "/STOCKS/PACKING-LIST-2017.TXT"
$dst = "C:\TEMP\PACKING-LIST-2017.TXT"
# Download the file
Export-AzureRmDataLakeStoreItem -AccountName $name -Path $src -Destination $dst
If we open windows explorer and browse to our previously empty c:\temp directory, we can now see the selected file has been exported from ADLS.

Last but not least, there are times in which files have to be removed from the Azure Data Lake Store after processing. That is when we want to use the Remove-AzureRmDataLakeStoreItem cmdlet to delete the file.
The code below removes the packing list file from the ADLS.
# Set variable
$src = "/STOCKS/PACKING-LIST-2017.TXT"
# Remove the file
Remove-AzureRmDataLakeStoreItem -AccountName $name -Paths $src –Force
If we click the refresh in the data explorer window, we can see there are not files matching our filter pattern.

In a nutshell, we covered many of the typical file actions that a developer will need to interact with Azure Data Lake Store. In the next section, we will talk about strengthening the security of ADLS by enabling a firewall.
Enabling the Firewall
Enabling the firewall restricts access to the Azure Data Lake storage to specific IPs or a range of IPs. This reduces the surface area for attack by malicious individuals.
If you are planning using an Azure service such as Azure Data Factory, it is important to allow access for Azure services. I will go over how to enable and configure the firewall using the Azure portal. Also, I will supply the PowerShell code to perform the same operations.
Under the Azure Data Lake Store blade, find the firewall menu option. Double click this option to configure the firewall. By default, the firewall is not enabled. The image below was taken from the Azure portal before enabling the firewall.

Once the firewall is enabled, there are some options that we can configure. First, we want to allow access to Azure services. Second, we want to add a firewall rule to allow our external IP access to the Data Lake Store. The image below shows all three actions being done at the same time using the Azure Portal.

Most Azure services have three cmdlets defined to create new, list current, and remove existing objects. The Data Lake Storage object in regards to firewall rules is no different.
| Cmdlet | Description |
|---|---|
| Add-AzureRmDataLakeStoreFirewallRule | Create a new firewall rule in the data lake store. |
| Get-AzureRmDataLakeStoreFirewallRule | List the current firewall rules in the data lake store. |
| Remove-AzureRmDataLakeStoreFirewallRule | Remove an existing firewall rule from the data lake store. |
Enabling the firewall can be done with the Set-AzureRmDataLakeStoreAccount cmdlet. The code below turns on both options if the ADLS account exists.
#
# Enable the firewall
#
# Does the factory exist
$present = Get-AzureRmDataLakeStoreAccount -ResourceGroupName $group `
    -Name $name -ErrorAction SilentlyContinue
# Only create if it does exist
if ($present)
{
    Write-Host "Enabling the firewall for ADLS"
    Set-AzureRmDataLakeStoreAccount -ResourceGroupName $group -Name $name `
        -AllowAzureIpState Enabled -FirewallState Enabled
}
else
{
    Write-Host "Azure data lake storage does not exist!"
}
Last but not least, we might want to add a firewall rule for allowing my laptop access to ADLS. I am using the Invoke-WebRequest cmdlet to make an internet call to a service provider to identify my external IP. Next, I am calling the Add cmdlet described above to create the firewall rule if the ADLS account exists.
#
# Add laptop ip to firewall
#
# External ip
$MyIp = (Invoke-WebRequest ifconfig.me/ip).Content -replace "`n",""
$MyRule = "firewall_rule_" + $MyIp.Replace(".", "_")
# Does the factory exist
$present = Get-AzureRmDataLakeStoreAccount -ResourceGroupName $group -Name $name -ErrorAction SilentlyContinue
# Only create if it does exist
if ($present)
{
    Write-Host "Creating firewall rule for laptop"
    Add-AzureRmDataLakeStoreFirewallRule -AccountName $name `
    -Name MyRule -StartIpAddress $MyIp -EndIpAddress $MyIp
}
else
{
    Write-Host "Azure data lake storage does not exist!"
}
In a nutshell, I went over how to enable and configure the firewall for an Azure Data Lake Store account. I suggest you turn this additional security on when storing confidential company data in the cloud.
Summary
Azure Data Lake Storage (ADLS) is a high speed, scalable, secure and cost-effective platform that can be used to collate your company’s data in the cloud.
Today, I showed how to programmatically create a storage account, define a storage folder, and manage files within the data lake. Storing the data in the cloud is the first step in creating a Modern Data Platform.
To reduce the attack surface area, I suggest you enable the firewall and create rules to allow on premise users access to your data lake in Azure.
Naming conventions and directory locations are very important when defining your data lake. This governance process prevents your data lake from becoming a data swamp. Assigning rights to the objects in the data lake using Azure Active Directory (AAD) is key to giving the right access to the right people. Both of these topics will be addressed in my next article.
In conclusion, I hope you enjoyed my article on Managing Data Lake Storage using PowerShell. For more information, please see the Microsoft Azure documentation on this subject.
Next Steps
- Applying governance to the Azure Data Lake Store.
- Securing the Azure Data Lake Store with Azure AD.

John Miner is a Senior Data Architect at Insight Digital Innovation helping corporations solve their business needs with various data platform solutions.
He has over thirty years of data processing experience, and his architecture expertise encompasses all phases of the software project life cycle, including design, development, implementation, and maintenance of systems.
His credentials include undergraduate and graduate degrees in Computer Science from the University of Rhode Island. Also, he has earned certificates from Microsoft for Database Administration (MCDBA), System Administration (MCSA), Data Management & Analytics (MCSE), Data Science (MPP), Databricks Certified, and Fabric Certified.
John has been recognized with the Microsoft MVP award nine times for his outstanding contributions to the Data Platform community.
When he is not busy talking to local user groups or writing blog entries on new technology, he spends time with his wife and daughter enjoying outdoor activities. Some of John’s hobbies include wood working projects, crafting a good beer and playing a game of chess.
- MSSQLTips Awards: Author of the Year – 2019, 2022, 2023 | Champion (100+tips) – 2023


