By: Ron L'Esteve | Comments | Related: > Azure
Problem
Numerous organizations are needing to establish data governance processes, standards and methodologies and have been able to do this with on-premises SQL Server tools such as Master Data & Quality Services, however there has been a major gap in the Azure space for such data governance products. Previously, Microsoft has attempted to bring data governance to Azure through hosting an MDS database on an Azure managed instance or through Azure Data Catalog which hasn't really been a full-fledged unified data governance product. Microsoft Azure recently announced the public preview release of Azure Purview to centrally manage data governance across your data estate, spanning both cloud and on-premises environments. How can we get started with Azure Purview?
Solution
Azure Purview's easy to use UI and catalog makes data sources easily discoverable and understandable by the users who manage the data assets. Azure Purview provides a cloud-based SAAS service into which users can register data sources while maintaining a copy of the indexed metadata as well as a reference to the source location. Additionally, this metadata can be further enriched in Purview through tags, descriptions and more. Azure Purview is intended to address some of the challenges for data consumers and producers that have been captured in the Microsoft's article What is Azure Purview? In this article we will explore how to get started with Azure Purview and then explore some of the features within Purview Studio.
Create Azure Purview
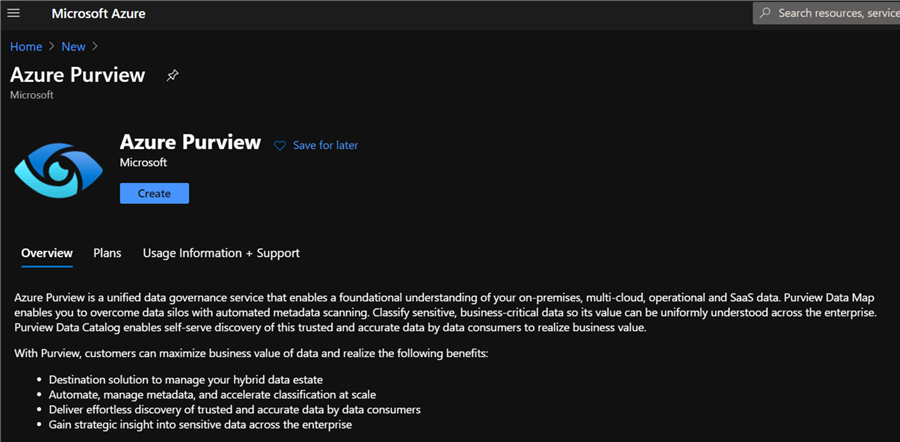
Since Azure Purview is now publicly available for preview, it can be accessed via the Azure Portal.
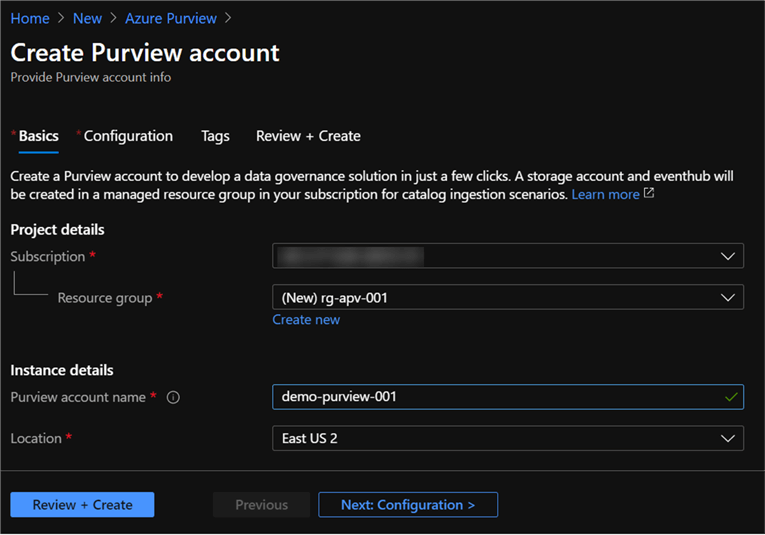
As with all Azure resources, Purview also requires both project and instance details, as depicted below.
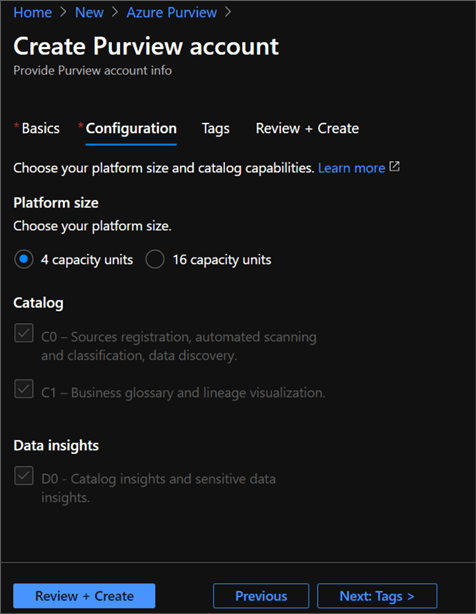
Additional configuration options are also available for selection.
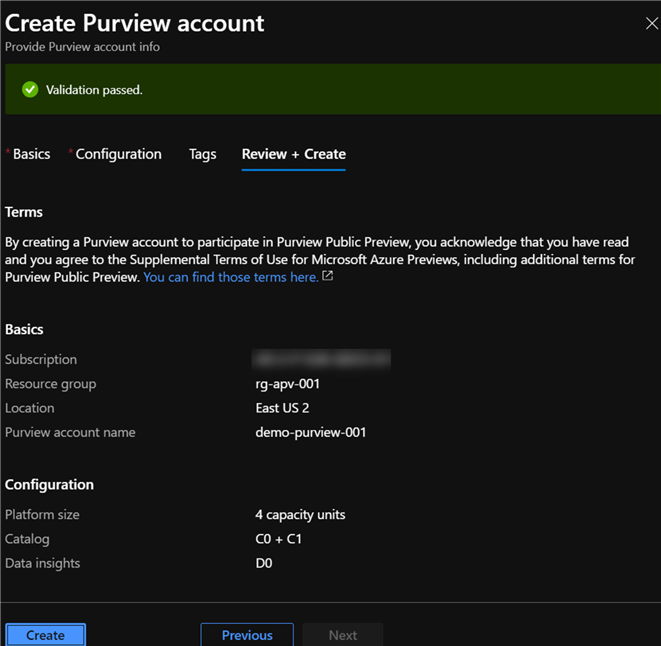
Platform size: The following link captures capacity units, which are a provisioned set of resources to keep Purview Data Map up to date and running. A minimum of four units need to be selected.
Catalog features: While in preview, there is no option to select these features yet but may be related to feature set levels that will be defined as this product approaches GA.
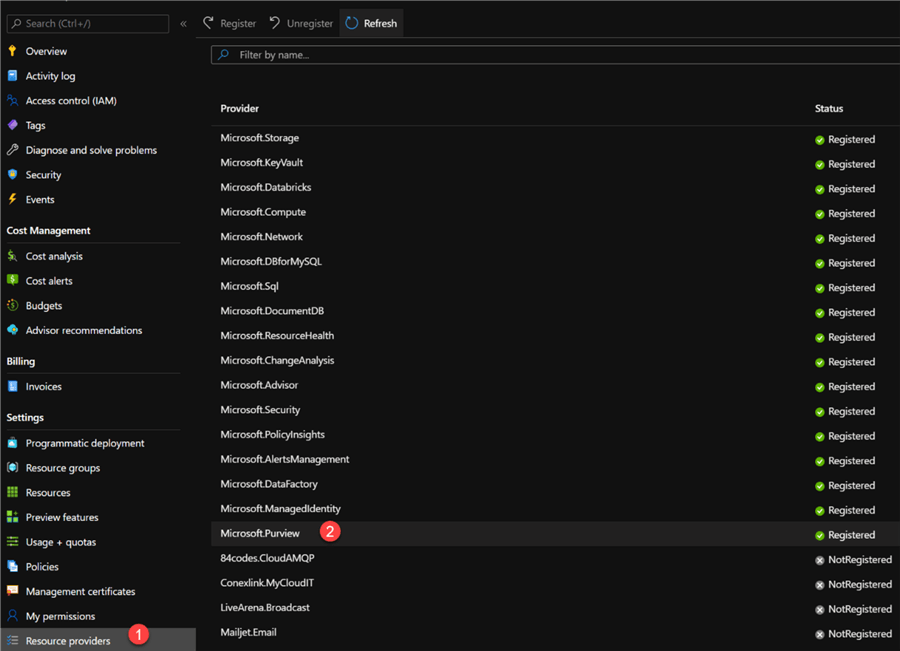
Initially, users may run into errors when trying to create Azure Purview instance as Purview will need to be added as a provider at the subscription level. Also, users must have full AD permissions or ability to view and search AD.
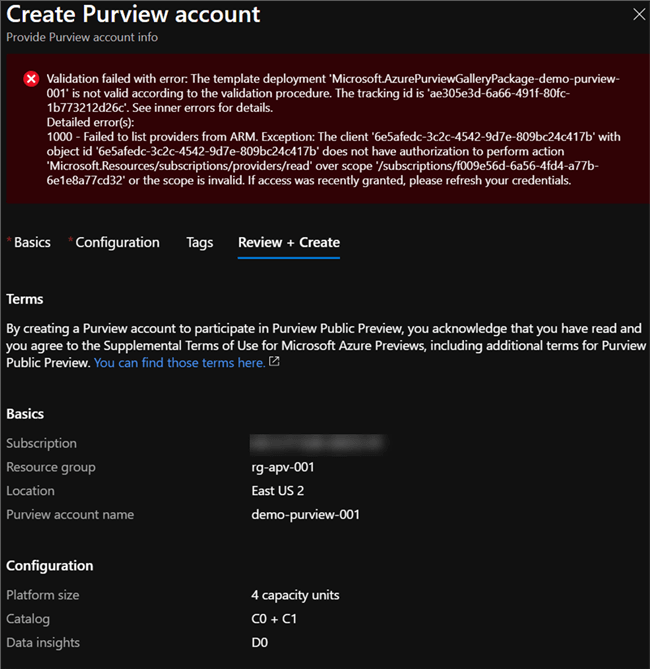
Below are the steps to add Purview as a resource provider at the subscription level.
Once added as resource provider, we can see that Purview has successfully validated and ready to be created.
Explore Azure Purview
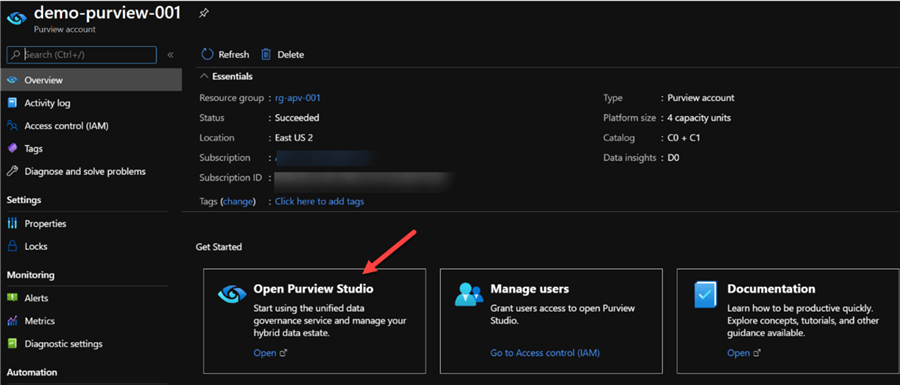
Once created, clicking 'Open Purview Studio' will launch the studio.
Create and Register Data Source
Once in the Azure Studio, the data sources can be added and registered with your Purview account.
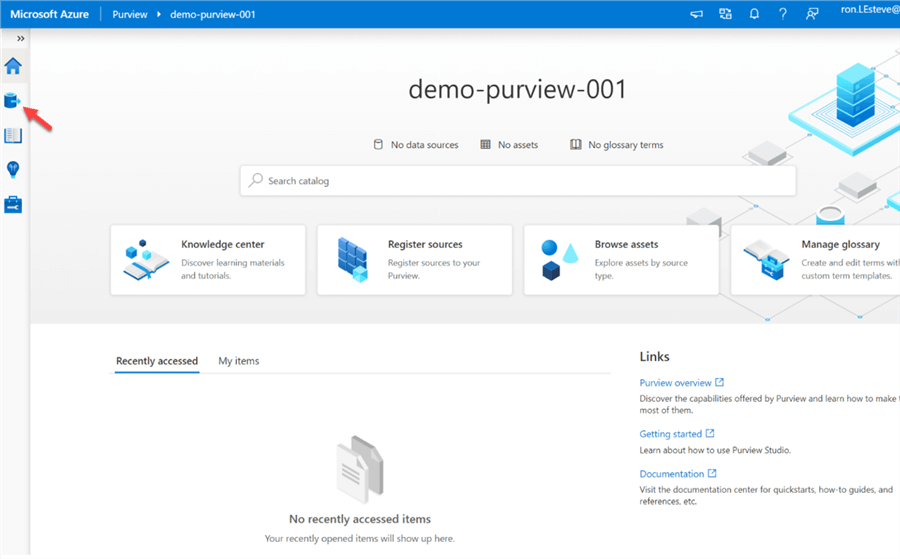
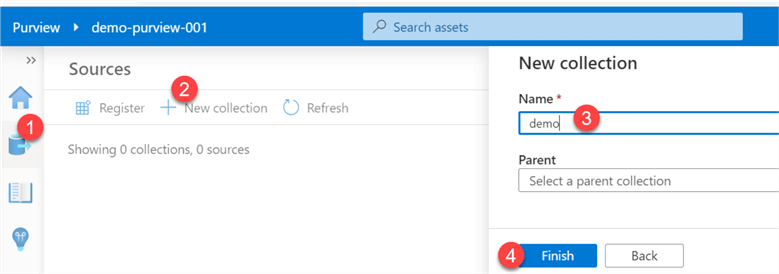
To add a new source we must first create a collection by: 1) clicking sources, then 2) new collection, 3) give it a name and 4) click finish.
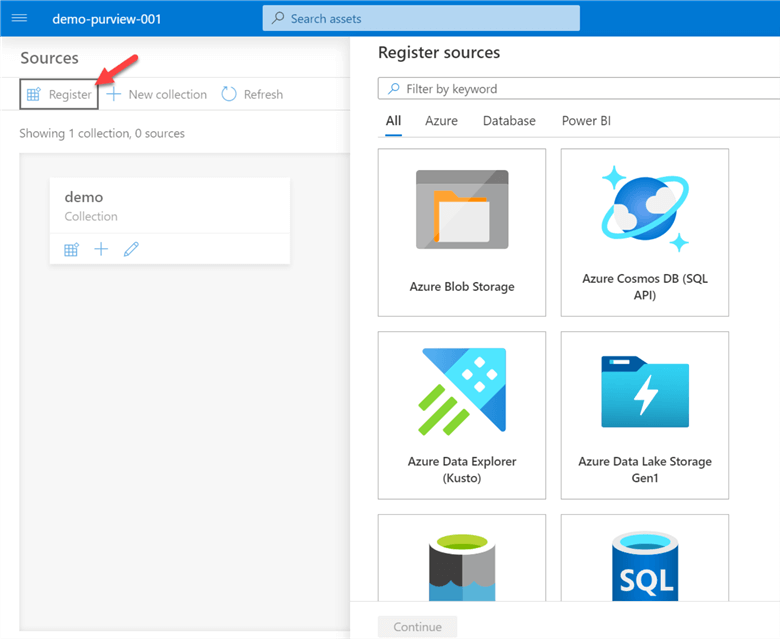
Next, a source will need to be registered by searching from and selecting from the list of registered sources (Azure Blob Storage, Azure Cosmos DB (SQL API), Azure Data Explorer (Kusto), Azure Data Lake Storage, Azure Data Factory, Azure SQL Database, SQL Server, etc.).
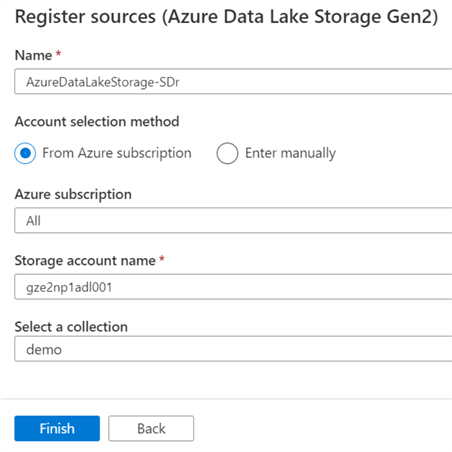
Also, the details for the source will need to be entered.
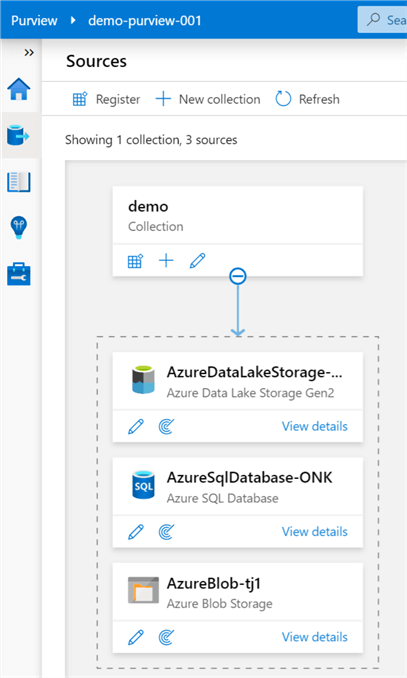
As we can see, the sources begin to be added to the collection under which they are registered. A collection can have multiple sources and there can be multiple collections in the canvas.
Manage Credential and Access
Within Azure Purview, credentials are needed to quickly reuse and apply saved authentication information to your data source scans. Additionally, Purview enforces the need to use key vault to store passwords and secrets as a minimum requirement. For more detail, please read: Create and manage credentials for scans - Azure Purview | Microsoft Docs
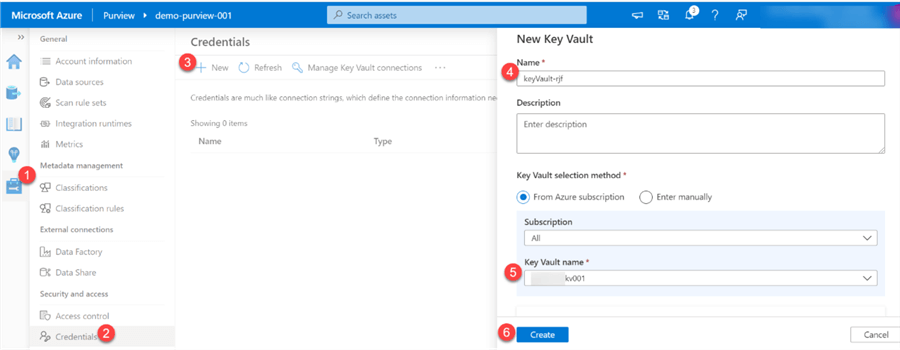
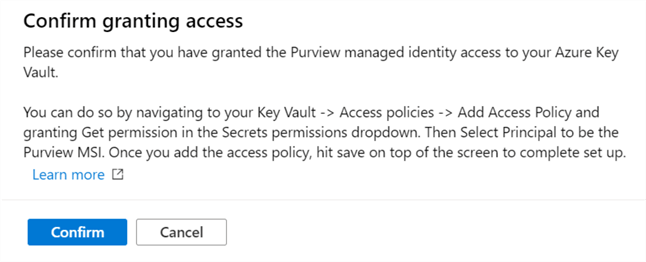
Purview will display a message a how to grant Purview access to Key Vault.
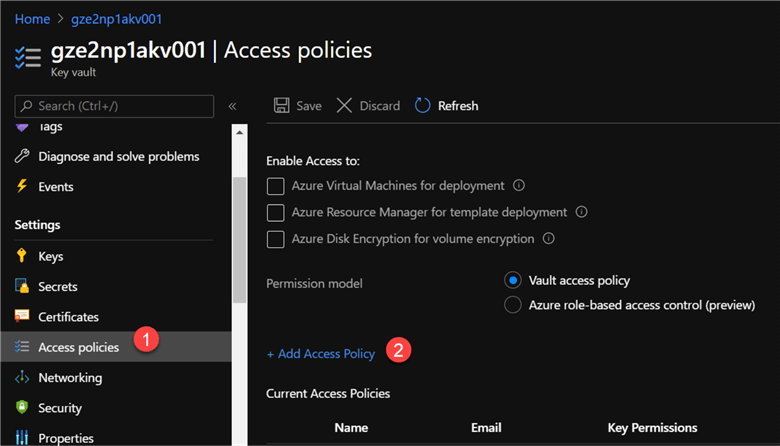
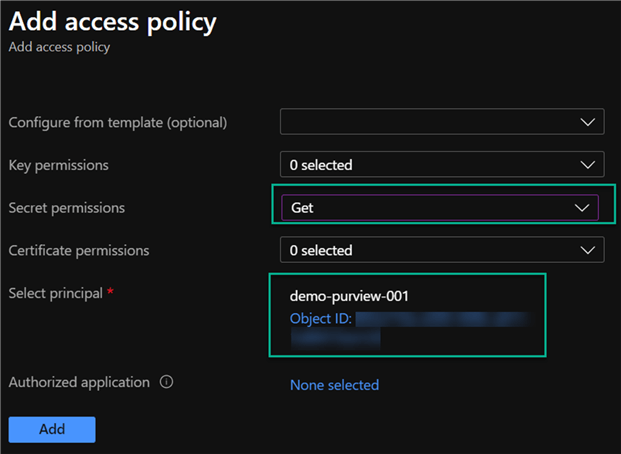
The image below illustrates steps taken to provide the necessary GET access permissions to Purview from Azure Key Vault.
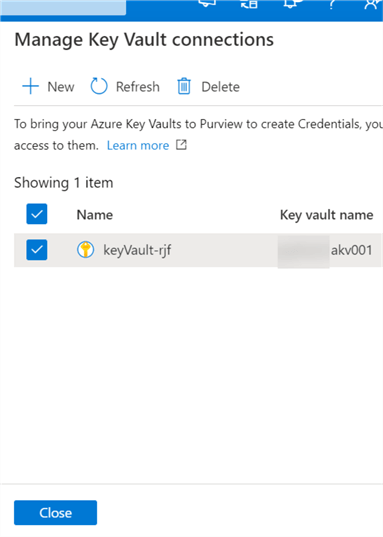
Once the connections are created and verified in Purview, they will appear in the 'Manage Key Vault Connections' section, as depicted below.
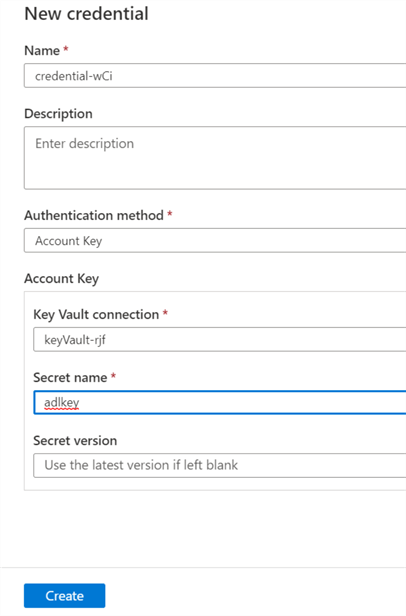
The key vault connection can then be configured within the credential authentication UIs when adding new data sources and connections. For example, the below image uses key vault to extract the account key for the respective ADLS2 account.
Create a Scan
Within the Azure Purview catalog, there is the capability to create scan rule sets to enable users to quickly scan data sources within the organization.
A scan rule set is a container for grouping a set of scan rules together to easily associate them with a scan. For more detail, read Create a Scan Rule Set.
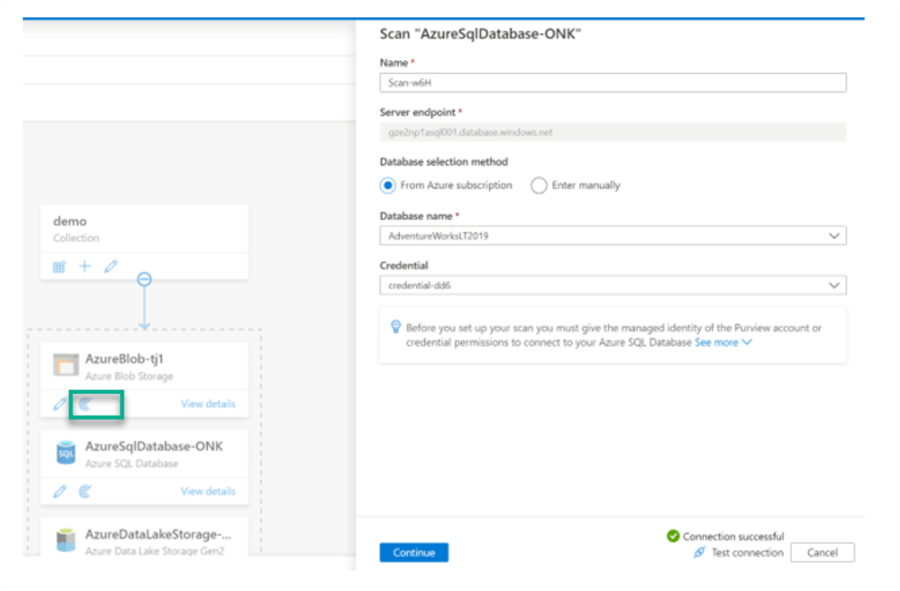
A new scan can be set up for the various sources by clicking the scan icon as illustrated below and then populating the required credential details.
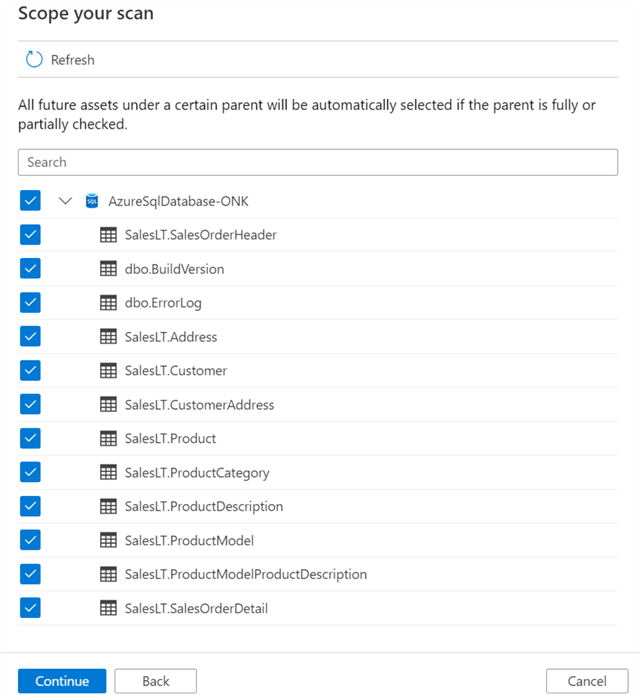
Additionally, the scope of the scan can be customized and altered to either select or de-select objects within the source.
A scan rule set can utilize either a default rule set to include all supported system classification rules.
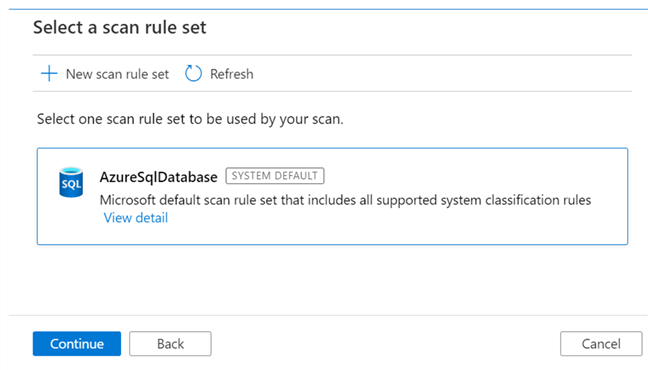
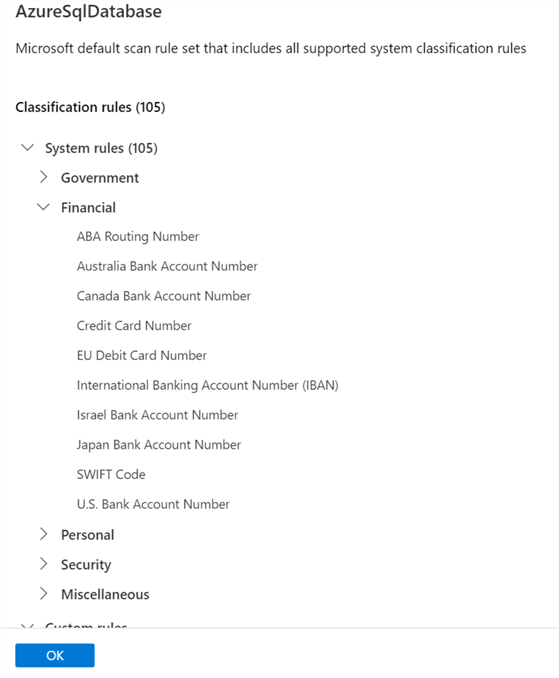
Here is a sample list of classification system rules available.
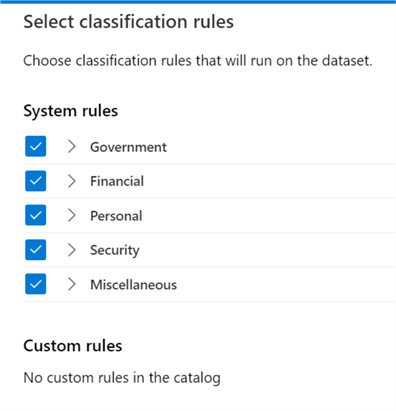
Alternatively, a new customized scan rule set can be created to specify the rules that should be applied from either a list of available rules or custom rules that can be defined.
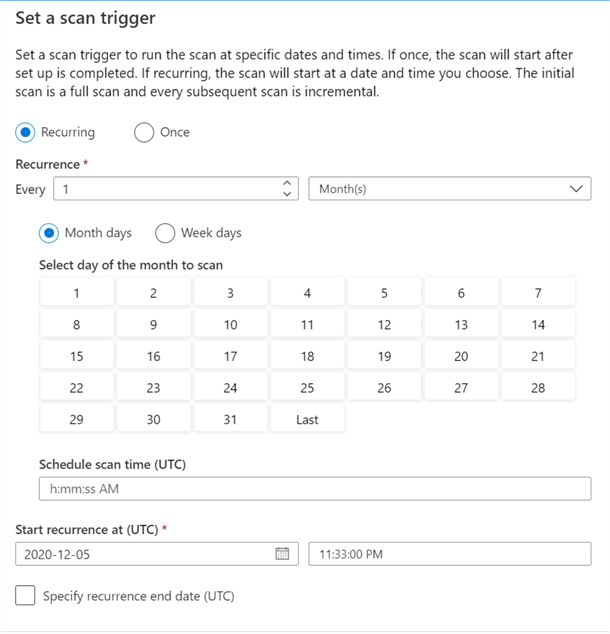
The final step to creating a scan rule set is to set either a manual (one time) or recurring (defined by schedule) trigger. Note that there is also an option to set the recurring end date.
Once the scan rule set is configured, it can be reviewed, saved and run.
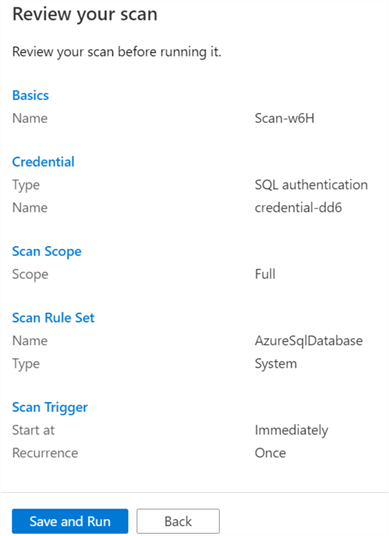
Similar to the Azure SQL Database Source, a new scope and scan rule set can be added for the ADLS2 account as well.
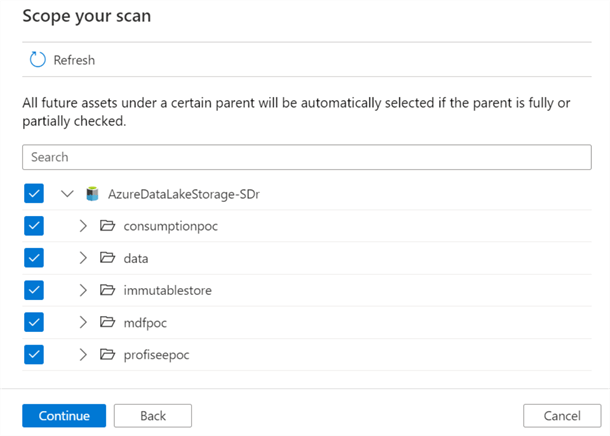
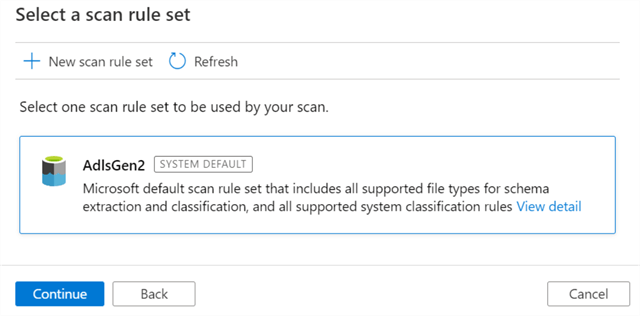
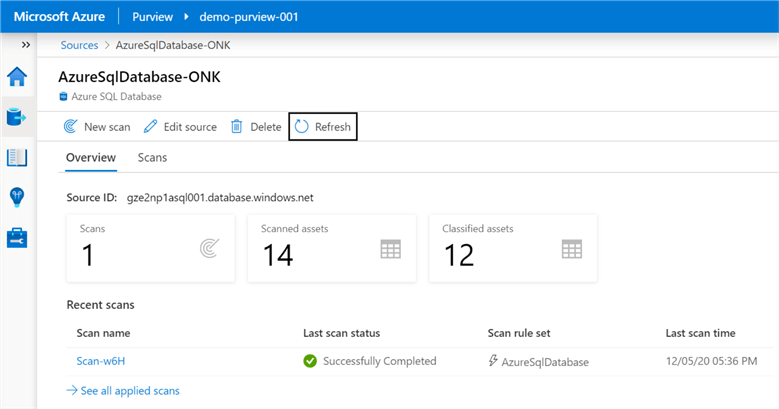
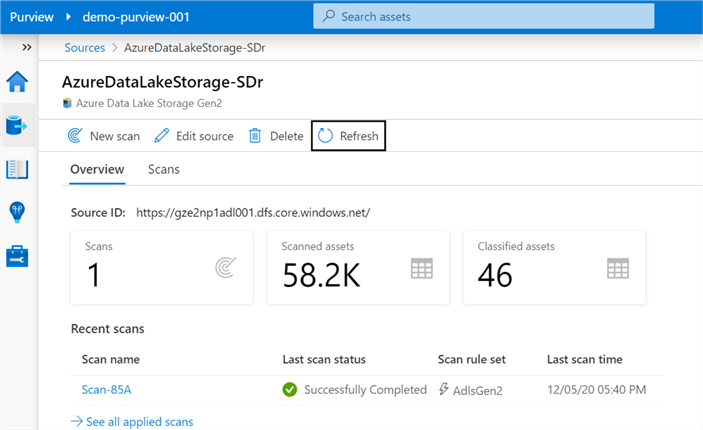
Once the scans complete, the overview section provides additional details related to the number of scans performed, along with the assets scanned.
Explore the Glossary
Purview's business glossary lets users define and manage glossary terms easily. For more detail, please read 'Understand business glossary features in Azure Purview'.
The following image illustrates the steps required to create glossary terms.
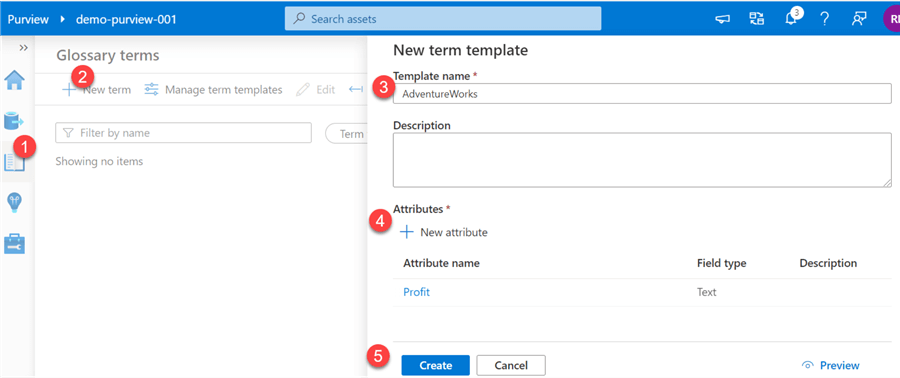
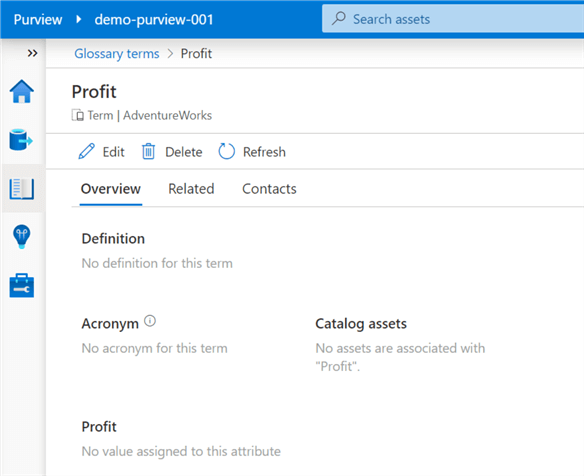
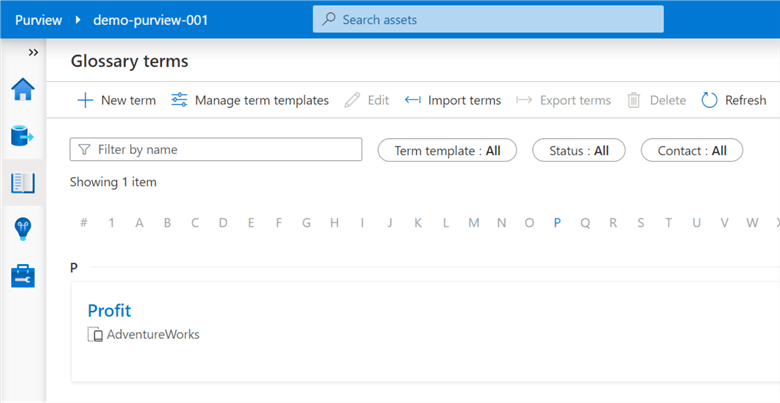
Once the glossary terms have been created, additional data, contacts, related items can be added and lined to the terms to enrich the terms. Additionally, these glossary terms can be linked to assets to further enrich the assets' meta data.
Browse Assets
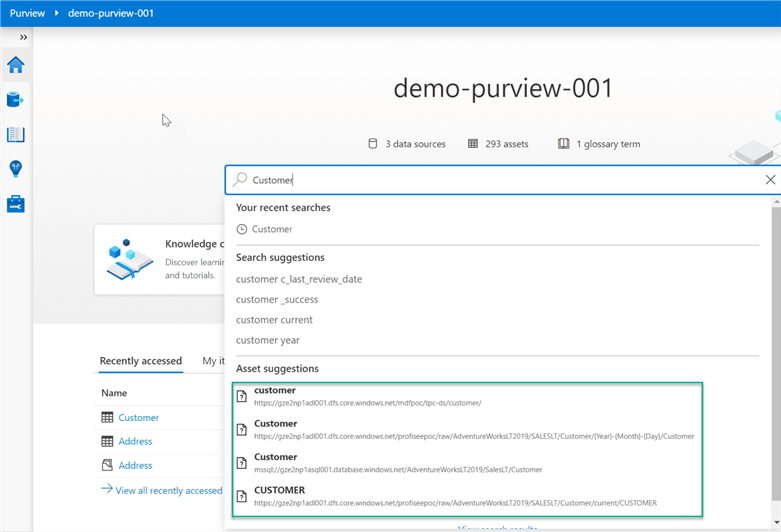
Finally, once assets have been registered in Purview, they can be accessed from the home page by searching for them in the search box.
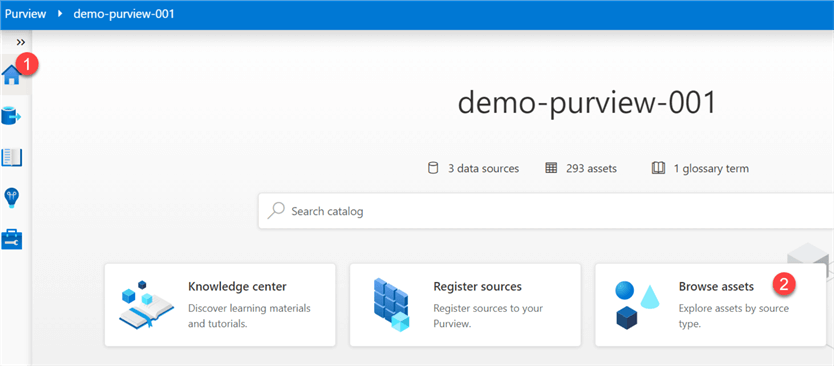
Alternatively, assets can be accessed from the 'Brow Assets' icon on the home page.
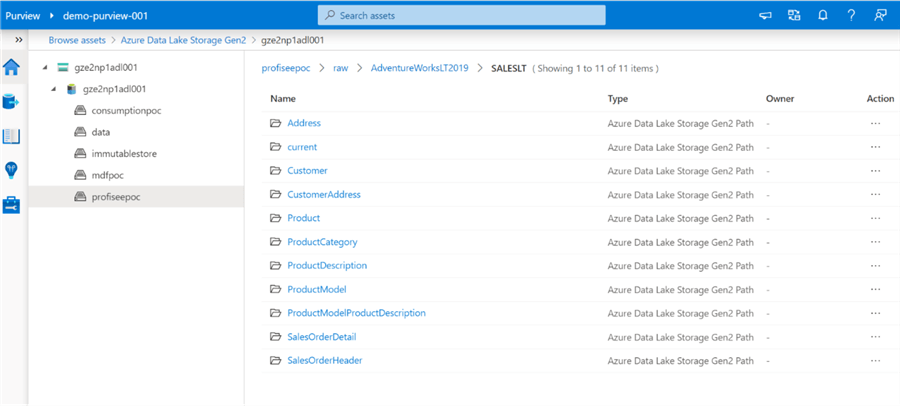
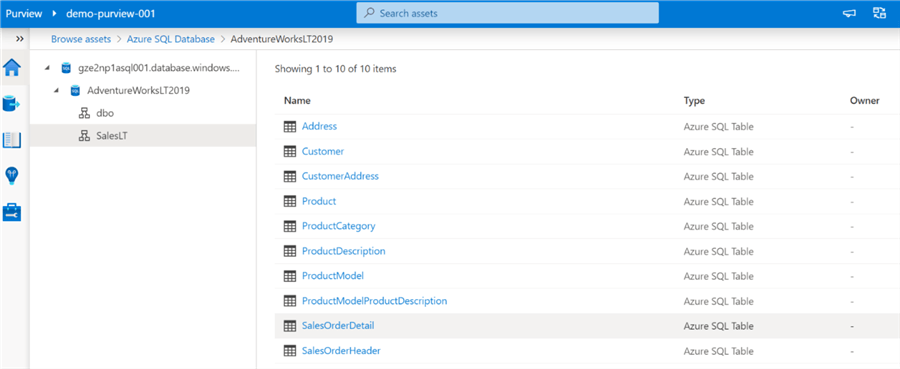
The registered list of assets will be available at a granular level.
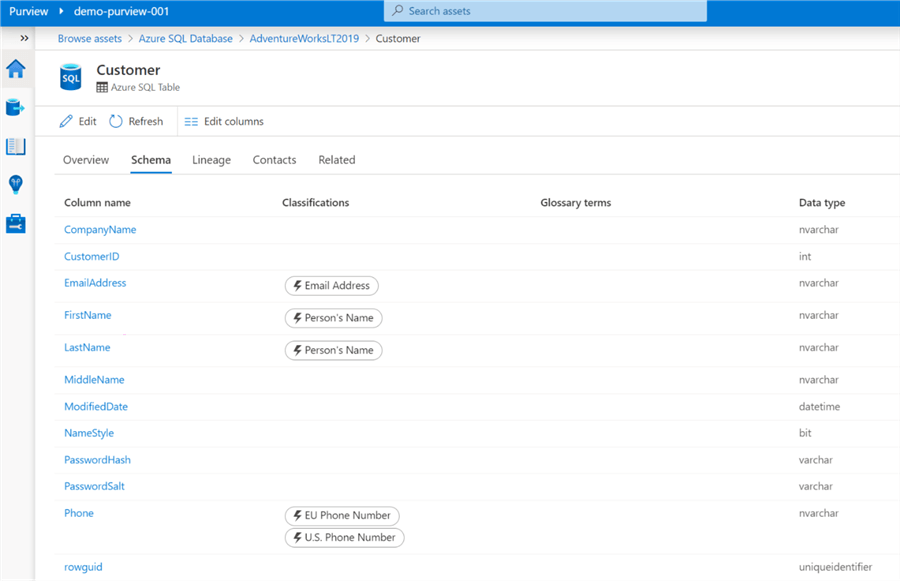
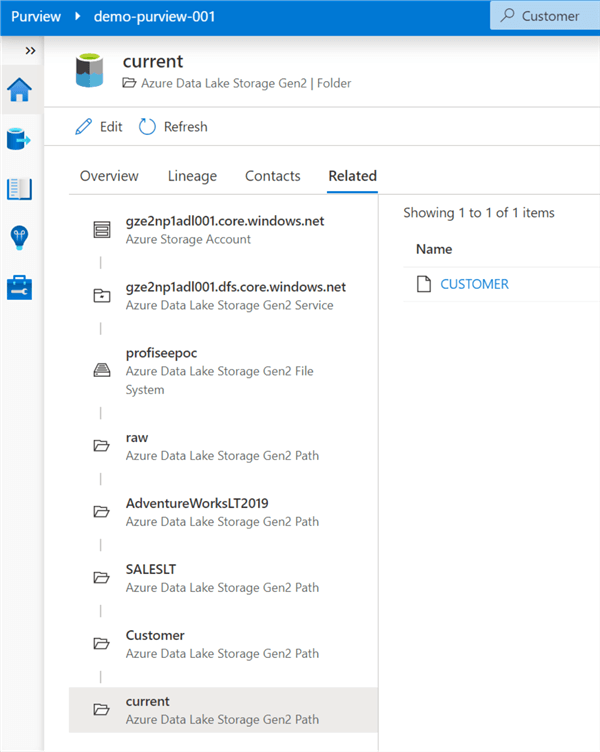
Details along with the data lineage can be explored, edited and enriched in these sections.
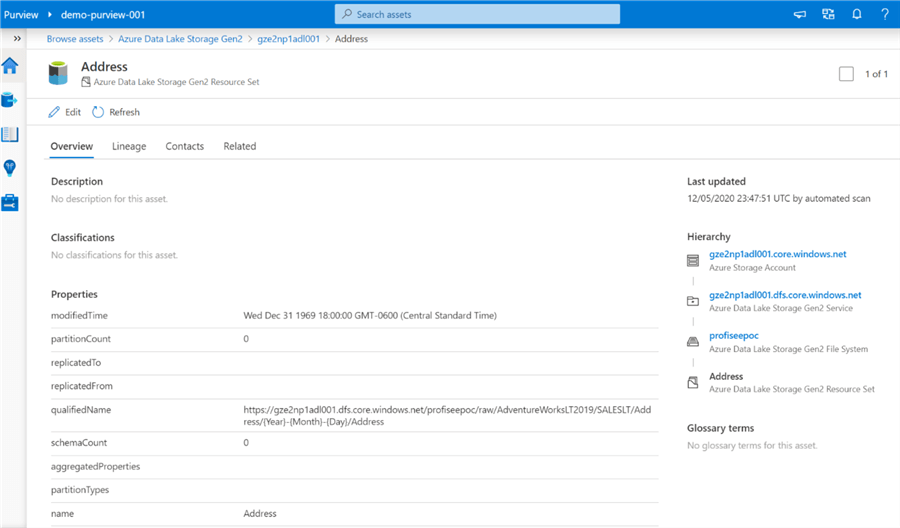
Note that the classification section auto-captures the fields that adhere to the defined sensitivity and privacy rule sets.
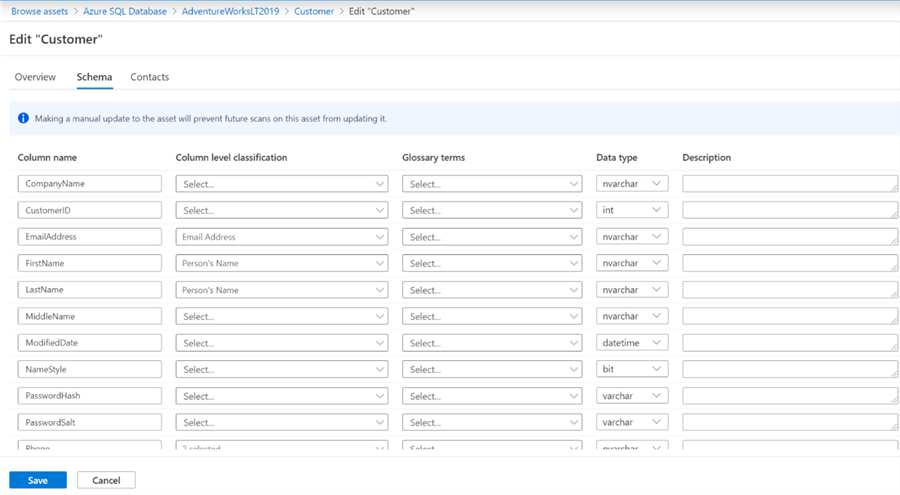
Interestingly, within the schema section, there is an option change column names and data types of the tables so this should be used sparingly and well governed from an access perspective.
Additionally, every field in the sample Customer table can be linked to a glossary term, capture descriptions at the column level, and alter column level classifications as needed, which help to further enrich the meta-data and truly provide a detailed and unmatched data governance experience within Azure that has been missing in this space for quite some time.
Next Steps
- For more detail on configuring a Master Data Services database on a managed instance in Azure read, Host an MDS database on a managed instance.
- Read more about the benefits of Azure Data Catalog.
- Learn more about how to use Azure Purview from Microsoft's Azure Purview documentation.
- Explore and Understand Insights in Azure Purview.
About the author
 Ron L'Esteve is a trusted information technology thought leader and professional Author residing in Illinois. He brings over 20 years of IT experience and is well-known for his impactful books and article publications on Data & AI Architecture, Engineering, and Cloud Leadership. Ron completed his Masterís in Business Administration and Finance from Loyola University in Chicago. Ron brings deep tec
This author pledges the content of this article is based on professional experience and not AI generated.
View all my tips


