Problem
The process of classifying a company into an industry segment has been around since the 1950’s. Wikipedia has listed several popular taxonomies that are in current use. Some industries are more regulated and have stricter compliance regulations than others. The business requirement to provide an audit trail to a compliance officer when a security issue arises is “table stakes” in most organizations.
SQL Server has had the ability to define an audit specification at the server or database level since 2008. However, the actual changed data is not readily available for reversing the unwanted action. In today’s complex team environments, certain key tables need to be protected against inserts, updates and deletes. As a database administrator, how can we audit and prevent unwanted table changes?
Solution
A design pattern using an audit schema, a central audit table and table triggers can be used to log all user actions against a group of tables. For larger databases, the central audit table can be transitioned to one audit table to one data table design. Spreading the audit data across multiple tables will allow the system to scale. Because this design pattern uses database objects that are core to every modern version of SQL Server, this design will work with both on premise and in-cloud databases.
Business Problem
The medical industry has to comply with the Health Insurance Portability and Accountability Act of 1996 (HIPAA). If you are interested, detailed information can be found on the Department of Health and Human Services website.
I am going to re-use the simple database schema for a fictitious urgent care center called “The Last Stop”. Please see my prior article for details on how to setup this test database. Our boss has asked us to showcase these new design patterns.
Use existing Azure SQL database
I am going to use SQL Server Management Studio to manage my existing Azure SQL database. Choose the database engine as the server type and enter the fully qualified name of the Azure SQL Server. Pick SQL Server authentication as the security option and supply the login/password of the server administrator. The image below shows a typical connect to server login window.

Right now, there is one custom user defined database. Use the object explorer to drill into the hippa database and expand the tables list. There are three tables in the active schema.
The patient_info table contains patients that visited the clinic and the doctor_info table contains doctors that saw the patients. The visit_info table has the overall medical readings taken during the visit as well as a medical diagnosis.

If we take a closer look at the user defined objects, we can see that each of the three tables have a surrogate primary key. The visit_info table is used to join all tables together with foreign key relationships.

Please make sure that your test database is all ready for the rest of the article. Since the build script can be deployed to either locally using on premise resources or remotely using in cloud resources, it is up to you on where you want to do your testing.
Securing Audit Data
I think user defined database schemas are under-utilized in the real world. One great feature behind this security object is the ability to group like objects and assign permissions to the group.
 /*
   1 - Create audit schema
*/

-- Delete existing schema
DROP SCHEMA IF EXISTS [audit]
GO

-- Add schema for audit purposes
CREATE SCHEMA [audit] AUTHORIZATION [dbo]
GO

-- Show database schemas
SELECT * FROM sys.schemas
WHERE principal_id < 16384
GO
The above code creates a new schema named audit. We can query the system catalog view named sys.schemas to see our three user defined schemas: active, stage and audit. See the screen shot below for details.

Containing a database user
The contained database user feature was introduced in SQL Server 2012. All Azure SQL database users should be defined this way since they will not be dependent upon the master database. This is especially important when active geo-replication is used for high availability.
 /*
   2 - Create contained user
*/

-- Add new user.
CREATE USER [hippa_user]
WITH PASSWORD=N'SzfX6ThnLeDPwpelMHYdV2MW', DEFAULT_SCHEMA=[active]
GO

-- Show the user
SELECT * FROM sys.database_principals
WHERE type_desc = 'SQL_USER'
GO
The T-SQL code above creates a contained database user. We can query the system catalog view named sys.database_principles to view our new user named hippa_user.

The image above shows the default schema is set to active. This is important since we will only give this user access to that schema via a database role.
Granting access via database roles
Another rarely used feature in database design is a user defined database role. Roles are great when you are using either standard or mixed security. They serve the same purpose as an active directory group. The code below creates a role named hippa_role.
 /*
   3 - Create database role
*/

-- Delete existing role.
DROP ROLE IF EXISTS [hippa_role]
GO

-- Create database role
CREATE ROLE [hippa_role] AUTHORIZATION [dbo]
GO
The next step in assigning security is to grant permissions to the role. I am going to give out CRUD (create, read, update and delete) rights to the user. Of course, we can’t forget to add the user to the role.
 /*
   4 - Add user 2 role & apply permissions 2 schema
*/

-- Apply permissions to schema
GRANT INSERT ON SCHEMA::[active] TO [hippa_role]
GRANT UPDATE ON SCHEMA::[active] TO [hippa_role]
GRANT DELETE ON SCHEMA::[active] TO [hippa_role]
GRANT SELECT ON SCHEMA::[active] TO [hippa_role]
GO

-- Add user to role
EXEC sp_addrolemember N'hippa_role', N'hippa_user'
GO
The sys.database_role_members catalog view is a little more difficult to query than most. It is a paired list of role and user ids.
 /*
   5 - Show role membership
*/

-- Show role membership
SELECT
  DP1.name AS Roles_Name,
  isnull(DP2.name, 'No members') AS Users_Name
FROM
    sys.database_role_members AS RM
RIGHT OUTER JOIN sys.database_principals AS DP1
    ON RM.role_principal_id = DP1.principal_id
LEFT OUTER JOIN sys.database_principals AS DP2
    ON RM.member_principal_id = DP2.principal_id
WHERE
    DP1.name = 'hippa_role'
The query above will return the role name and user name in the current database. See the screen shot below for details.

Make a central audit table
It is time now to leverage the audit schema that we created previously. The name of our audit table is log_table_changes. Basic information such as change date, change type, change by, schema name and object name will be recorded.
What makes this table interesting are the default constraints. We are capturing the user name, application name, and host name via calls to system functions. Last but not least, the changed record(s) are stored as an XML document.
 /*
   6 - Audit data changes (table for DML trigger)
*/

-- Delete existing table
DROP TABLE IF EXISTS [audit].[log_table_changes]
GO

-- Add the table
CREATE TABLE [audit].[log_table_changes]
(
  [chg_id] [numeric](18, 0) IDENTITY(1,1) NOT NULL,
  [chg_date] [datetime] NOT NULL,
  [chg_type] [varchar](20) NOT NULL,
  [chg_by] [nvarchar](256) NOT NULL,
  [app_name] [nvarchar](128) NOT NULL,
  [host_name] [nvarchar](128) NOT NULL,
  [schema_name] [sysname] NOT NULL,
  [object_name] [sysname] NOT NULL,
  [xml_recset] [xml] NULL,
  CONSTRAINT [pk_ltc_chg_id] PRIMARY KEY CLUSTERED ([chg_id] ASC)
);
GO

-- Add defaults for key information
ALTER TABLE [audit].[log_table_changes]
  ADD CONSTRAINT [DF_LTC_CHG_DATE] DEFAULT (getdate()) FOR [chg_date];

ALTER TABLE [audit].[log_table_changes]
  ADD CONSTRAINT [DF_LTC_CHG_TYPE] DEFAULT ('') FOR [chg_type];

ALTER TABLE [audit].[log_table_changes]
  ADD CONSTRAINT [DF_LTC_CHG_BY] DEFAULT (coalesce(suser_sname(),'?')) FOR [chg_by];

ALTER TABLE [audit].[log_table_changes]
  ADD CONSTRAINT [DF_LTC_APP_NAME] DEFAULT (coalesce(app_name(),'?')) FOR [app_name];

ALTER TABLE [audit].[log_table_changes]
  ADD CONSTRAINT [DF_LTC_HOST_NAME] DEFAULT (coalesce(host_name(),'?')) FOR [host_name];
GO
The screen shot below shows the new table named log_table_changes.

This current database only has three tables. Therefore, creating a table trigger by hand is not a problem. What happens when the database has hundreds of tables. In the next section, we will create a stored procedure named manage_table_triggers which will automate the process.
Managing table triggers
The actual code behind the stored procedure is quite large. Therefore, I am more concerned about explaining the complete algorithm versus you understanding each line of code. The manage_table_triggers stored procedure takes three parameters as input.
The @target_schema_name parameter defaults to the active schema. However, you can supply any schema name with one exception. Creating a trigger on the log_table_changes table will cause a never ending cycle when the trigger fires.
The @command_action parameter has two correct values. The drop action removes all audit triggers from all tables in a given schema. The create action clobbers the current audit trigger with a new one.
The @verbose_flag is used to optionally print the transact SQL statements that are being executed by the stored procedure.
Using a cursor to compose and execute dynamic transact SQL inside a maintenance procedure is an excepted practice. This custom stored procedure assumes the number of tables to create an trigger on is limited. The resulting DML after triggers use the inserted and deleted tables to capture and store the changed data as a XML document in the audit table.
The enclosed script creates the custom stored procedure and is provided as reference. However, you do not need to understand the code to start auditing your tables.
The code snippet below creates triggers on the active schema. If we query the sys.triggers, sys.tables and sys.schemas system catalog views, we can list the newly created triggers.
 /*
   7 - Dynamically make DML after triggers to capture changes
*/

-- Add triggers to tables
EXEC [audit].[manage_table_triggers] @target_schema = 'active', @command_action = 'create', @verbose_flag = 1
GO

-- Show the triggers
SELECT
  s.name,
  tr.name,
  tr.type_desc,
  tr.is_instead_of_trigger
FROM
  sys.triggers tr
  join sys.tables t on tr.parent_id = t.object_id
  join sys.schemas s ON t.schema_id = s.schema_id
WHERE
  s.name = 'active'
GO
As expected, there are three triggers for the three tables in the active schema. See screen shot below for details.

Testing audit security
It is important that the audit logs and/or triggers created in this process can’t be tampered with by the average user. Otherwise, why create our auditing design pattern?
Let’s connect to the SQL Server engine using the hippa_user account. Since there are not login entries for this contained database user in the master database, it is important to specify the default database using the connection properties tab.

Unlike the jminer account that can see the centralized logging table and custom stored procedure, the hippa_user account does not have any rights to the audit schema.

The typical user can see the audit trigger on the tables. However, they do not have rights to view the definition of the trigger. This action executed thru SSMS was denied below.

The worst case scenario would be the ability for the user to drop the auditing trigger. Again, the typical user does not have such rights. See the denial of this action via SSMS below.

In a nutshell, we now have auditing in place on the three user defined tables in the active schema. Add new users to the hippa_role to keep everything secure. The next task in this proof of concept is to test auditing of DML statements.
Testing audit logging
The software development life cycle dictates that we test each object that we create. Some testing scenarios have both positive and negative inputs.
For instance, if we bulk insert into an Azure SQL database, does the stored procedure work if the file exists. That is our positive test case. In contrast, does the bulk insert correctly fail and alert us when the file does not exist? That is our negative test case. Let’s start testing.
The Campbell family has visited the urgent care center today. The hypothetical application software returns all patients with the correct last name.
 -- Show the Campbell family
select * from active.patient_info where last_name = 'CAMPBELL'
go

Ashely is complaining of influenza like symptoms. A record of her vitals is logged for the visit.
 -- Add a new visit
insert into active.visit_info values (getdate(), 125, 60, 98.6, 120, 60, 487, 'Influenza', 11, 1);
go

However, the data entry was incorrect since she has a low grade temperature. An update to the record is made by the nurse.
 -- Update the visit
update active.visit_info
set diagnosis_desc = upper(diagnosis_desc), patient_temp = 98.4
where visit_id = 21
go

The current software keeps the most recent visit in the active schema. Thus, the older record is deleted from the system.
 -- Delete first visit
delete from active.visit_info where visit_id = 11;
go
The above actions might be a test script you write for your system. Did the actions get correctly recorded to the log table? Of course the answer is yes. We have an insert, update and delete action stored as positive test cases. We can consider the select statement a negative test case since nothing is logged for that action.
See the image below for details.

If you double click on the xml document, SQL Server Management Studio will open the information in a new window. The screen shot below shows the record that was deleted from the visit_info table.

This design pattern is better than SQL Server Auditing. Not only does it record changes, the information to readily available to reverse the unwanted action.
Reversing Unwanted Actions
As a database administrator, there will be times in which the business line will want to reverse an unwanted action. This section goes over the code necessary to perform these tasks.
The delete statement can be reversed with an insert statement. I am not using the chg_id in the where clause since there is only one action. In real life, you would supply this value. The code below inserts the captured xml record.
 /*
    8 - Reverse delete Action
*/

-- Find deleted record
DECLARE @xml1 XML
SELECT @xml1 = xml_recset FROM [audit].[log_table_changes] WHERE chg_type = 'DELETE';

-- Insert lost record
WITH cte_Captured_Record
as
(
SELECT
  Tbl.Col.value('visit_id[1]', 'int') as visit_id,
  Tbl.Col.value('visit_date[1]', 'datetime') as visit_date,
  Tbl.Col.value('patient_weight[1]', 'real') as patient_weight,
  Tbl.Col.value('patient_height[1]', 'real') as patient_height,
  Tbl.Col.value('patient_temp[1]', 'real') as patient_temp,
  Tbl.Col.value('patient_systolic[1]', 'int') as patient_systolic,
  Tbl.Col.value('patient_diastolic[1]', 'int') as patient_diastolic,
  Tbl.Col.value('diagnosis_icd9[1]', 'int') as diagnosis_icd9,
  Tbl.Col.value('diagnosis_desc[1]', 'varchar(128)') as diagnosis_desc,
  Tbl.Col.value('patient_id[1]', 'int') as patient_id,
  Tbl.Col.value('doctor_id[1]', 'int') as doctor_id
FROM @xml1.nodes('//Record') Tbl(Col)
)
INSERT INTO [active].[visit_info]
SELECT * FROM  cte_Captured_Record;
GO
The update statement can be reversed with another update statement. Again, I am not using the chg_id in the where clause since there is only one action. The code below updates the current record with the captured xml record.
 /*
    9 - Update Action
*/

-- Find updated record
DECLARE @xml2 XML
SELECT @xml2 = xml_recset FROM [audit].[log_table_changes] WHERE chg_type = 'UPDATE';

-- Reverse record change
WITH cte_Captured_Record
as
(
SELECT
  Tbl.Col.value('visit_id[1]', 'int') as visit_id,
  Tbl.Col.value('visit_date[1]', 'datetime') as visit_date,
  Tbl.Col.value('patient_weight[1]', 'real') as patient_weight,
  Tbl.Col.value('patient_height[1]', 'real') as patient_height,
  Tbl.Col.value('patient_temp[1]', 'real') as patient_temp,
  Tbl.Col.value('patient_systolic[1]', 'int') as patient_systolic,
  Tbl.Col.value('patient_diastolic[1]', 'int') as patient_diastolic,
  Tbl.Col.value('diagnosis_icd9[1]', 'int') as diagnosis_icd9,
  Tbl.Col.value('diagnosis_desc[1]', 'varchar(128)') as diagnosis_desc,
  Tbl.Col.value('patient_id[1]', 'int') as patient_id,
  Tbl.Col.value('doctor_id[1]', 'int') as doctor_id
FROM @xml2.nodes('//Record') Tbl(Col)
)
UPDATE cur
SET cur.patient_temp = prv.patient_temp
FROM [active].[visit_info] as cur JOIN cte_Captured_Record as prv
ON cur.visit_id = prv.visit_id
GO
The insert statement can be reversed with a delete statement. Please supply the chg_id when you use this code in production. The code below deletes the current record.
 /*
    10 - Insert Action
*/

-- Find inserted record
DECLARE @xml3 XML
SELECT @xml3 = xml_recset FROM [audit].[log_table_changes] WHERE chg_type = 'INSERT';

-- Remove identified record
WITH cte_Captured_Record
as
(
    SELECT Tbl.Col.value('visit_id[1]', 'int') as visit_id
    FROM @xml3.nodes('//Record') Tbl(Col)
)
DELETE
FROM [active].[visit_info]
WHERE visit_id in (SELECT visit_id FROM cte_Captured_Record)
GO
Unfortunately, each of the three statements is tightly bound to the table structure of the audited table. I leave the task to dynamically create the statement, given the schema and table name, as an exercise for you to try.
Preventing unwanted actions
So far, the article has been centered on auditing unwanted actions. How can we prevent inserts, updates and/or deletes on the doctor_info table? Table triggers can be used to ROLLBACK the unwanted actions.
The code below prevents changes from happening to our static table.
 /*
    11 - Preventing unwanted data changes (static data)
*/

-- Remove trigger if it exists
IF OBJECT_ID('[active].[trg_sd_doctor_info]') IS NOT NULL
  DROP TRIGGER [active].[trg_sd_doctor_info]
GO

-- Add trigger to prevent data changes
CREATE TRIGGER [active].[trg_sd_doctor_info] ON [active].[doctor_info]
FOR INSERT, UPDATE, DELETE AS
BEGIN

  -- Detect inserts
  IF EXISTS (select * from inserted) AND NOT EXISTS (select * from deleted)
    BEGIN
        ROLLBACK TRANSACTION;
        RAISERROR ('inserts are not allowed on table  [active].[doctor_info]!', 15, 1);
        RETURN;
    END

  -- Detect deletes
  IF EXISTS (select * from deleted) AND NOT EXISTS (select * from inserted)
    BEGIN
        ROLLBACK TRANSACTION;
        RAISERROR ('deletes are not allowed on table  [active].[doctor_info]!', 15, 1);
        RETURN;
    END

  -- Detect updates
  IF EXISTS (select * from inserted) AND EXISTS (select * from deleted)
    BEGIN
        ROLLBACK TRANSACTION;
        RAISERROR ('updates are not allowed on table  [active].[doctor_info]!', 15, 1);
        RETURN;
    END

END;
GO
Testing the preventative trigger
Right now, we have two triggers defined on one table. I do not want to log audit actions that will be rolled back. Therefore, I will use the code below to disable the audit trigger.
-- Disable audit trigger
DISABLE TRIGGER [active].[trg_ltc_doctor_info] ON [active].[doctor_info];
GO
Let’s try adding Jack Kevorkian’s wife to our list of doctors.
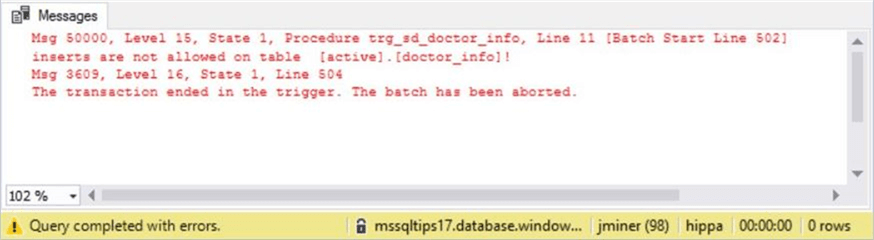
-- Inserts will fail
INSERT INTO active.doctor_info ( first_name, last_name, infamous_desc )
VALUES ('Jackie', 'Kevorkian', 'Euthanasia');
GO
This action was blocked by our user defined trigger.
Many people have a nick name of Jack but a real first name of John. Let’s try changing Mr. Kevorkian’s first name.
 -- Updates will fail
UPDATE active.doctor_info SET first_name = 'John' WHERE doctor_id = 1;
GO
Again, this action was blocked by our user defined trigger.

For some reason, many of the older patients under Jack Kevorkian’s care have died. The director of the urgent care center has decided to let him go. Let’s try deleting his record from the system.
 -- Deletes will fail
DELETE FROM active.doctor_info WHERE doctor_id = 1;
GO
Okay. Something unexpected has happened. There is a foreign key constraint on the visit_info table. Therefore, we can’t remove Mr. Kevorkian’s record without producing orphan records.

I do not care about bad data since I am testing out my new trigger. We can disable the foreign check constraint with the following command.
 -- Disable foreign key constraint
ALTER TABLE [active].[visit_info] NOCHECK CONSTRAINT [fk_visit_2_doctor];
GO
After trying to remove his record a second time, we get the expected result.

To recap this section, table triggers can be used to prevent unwanted user actions. Any table constraints violated by an action will fire first before our user defined trigger.
Summary
Today, we implemented an audit design pattern using an audit schema, a central audit table and audit table triggers to log all user actions against a group of tables. This design is an improvement over standard SQL Server auditing since we have captured the actual changed data as an XML document.
Any unwanted insert, update or delete actions can be reversed using the XML record data. Sample code for each DML statement was created and tested.
Unlike SQL Server auditing, table triggers can be used to prevent actions by rolling back the offending transaction. Again, the three standard DML statements were tested. It was surprising to find out that table constraints that are violated are triggered before any custom after triggers.
In short, the new design pattern satisfies stricter business requirements for auditing. However, this design pattern does not capture the records that an employee is looking at via a SELECT statement. In a future talk, I will go over custom stored procedures to track what data is viewed or manipulated by a user.
Next Steps
- Exploring the available audit action groups.
- Using database triggers to audit or prevent database changes.
- Using custom stored procedures to track actual data that was viewed and/or manipulated by a user.

John Miner is a Senior Data Architect at Insight Digital Innovation helping corporations solve their business needs with various data platform solutions.
He has over thirty years of data processing experience, and his architecture expertise encompasses all phases of the software project life cycle, including design, development, implementation, and maintenance of systems.
His credentials include undergraduate and graduate degrees in Computer Science from the University of Rhode Island. Also, he has earned certificates from Microsoft for Database Administration (MCDBA), System Administration (MCSA), Data Management & Analytics (MCSE), Data Science (MPP), Databricks Certified, and Fabric Certified.
John has been recognized with the Microsoft MVP award nine times for his outstanding contributions to the Data Platform community.
When he is not busy talking to local user groups or writing blog entries on new technology, he spends time with his wife and daughter enjoying outdoor activities. Some of John’s hobbies include wood working projects, crafting a good beer and playing a game of chess.
- MSSQLTips Awards: Author of the Year – 2019, 2022, 2023 | Champion (100+tips) – 2023