By: Scott Murray | Comments | Related: > Power BI
Problem
How can I share or embed my Power BI Reports and App within other sites?
Solution
The process of embedding a Power BI object within an internal or external site has been evolving rapidly, just as the Power BI Service has been changing. The expectation is that these changes will continue, but with the latest few updates the overall embedding process has improved drastically for in-house embedding and sharing. For this particular tip, we will cover embedding within our own organization and also sharing to the outside world. We will not, however cover API type calls to Power BI, but I am hoping to cover API calls in another tip soon. As some additional background, some of the prior methods of embedding that have been covered in the past have been simplified with the new processes which we will outline in this tip.
Before a sample embedding process can be setup, you need to be sure to download the latest version of Power BI desktop from: https://powerbi.microsoft.com/en-us/get-started/. The download and install process has changed, in that it now uses the Microsoft Store to complete the install. For those wanting the more traditional download and install method, you can still use this site: https://powerbi.microsoft.com/en-us/desktop/. Additionally, we will complete the bulk of our embedding work on Power BI Service, but first we must use Power BI Desktop to develop a dataset and report.
Power BI Embed Externally
Our first approach is to share our Power BI Report externally. However, before we dive in to our example, we need to complete some setup work. For this tip, we will be using the AdventureWorks2016 database as our data source (take a look at these tips https://www.mssqltips.com/sqlservertip/4016/querying-sql-server-data-with-power-bi-desktop/ or https://www.mssqltips.com/sqlservertip/4170/connect-to-onpremises-data-sources-with-power-bi-personal-gateway/ as some examples for connecting to various data sources).
Now that Power BI Desktop and the related databases are setup, we will need to create a sample report using Power BI Desktop. As shown below, we have created a simple cost report with year and location as the categories. The report also contains two slice filters, one for product line and one for category.
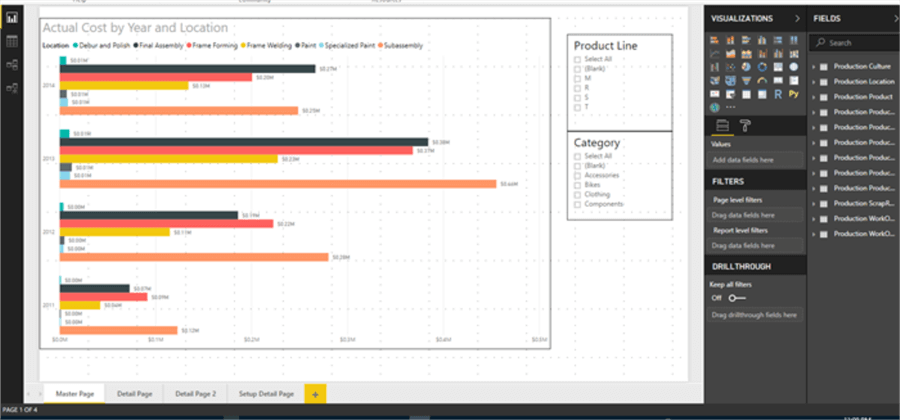
After saving the report, we need to publish it to the Power BI Service; the Power BI Service is where we will setup the bulk of the embed options, both for external and internal sharing.
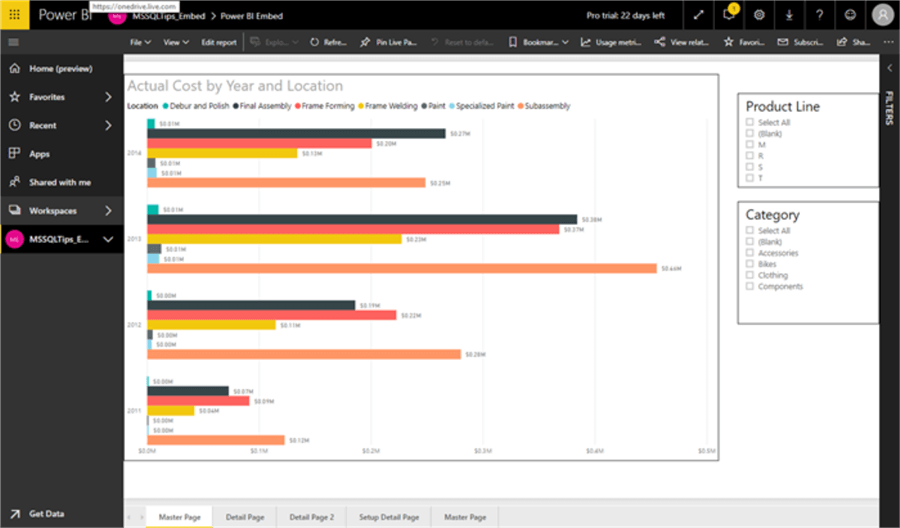
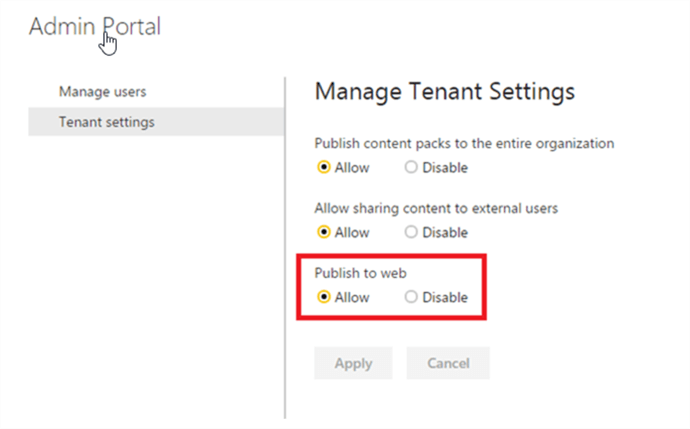
We are now ready to start sharing reports externally. If you want to share your Power BI Reports with the "World", the Power BI Service makes that process very easy and seamless to achieve. Of course, sharing with the world does truly mean you are exposing your report and data to everyone with an internet connection. As we will see Microsoft makes it blatantly clear that you are exposing your data when you complete this process. Only use this option with data that is open for public review! You may be thinking, why would anyone use this method; surprisingly there are some valid use cases for this type of publishing. For instance, an online blog or online newspaper may want to publish a graphic for its readers to see. Alternatively, a company may have a certain set of statics that it would like to publicly "brag" about and wants to use Power BI to display these results. Again, these are items that could potentially be used for the Publish to the Web option. One significant caveat before we get started is that Publish to the Web must be enabled by your Enterprise Power BI Administrator. This feature is enabled on the Admin Portal, under the Manage Tenant Settings area.
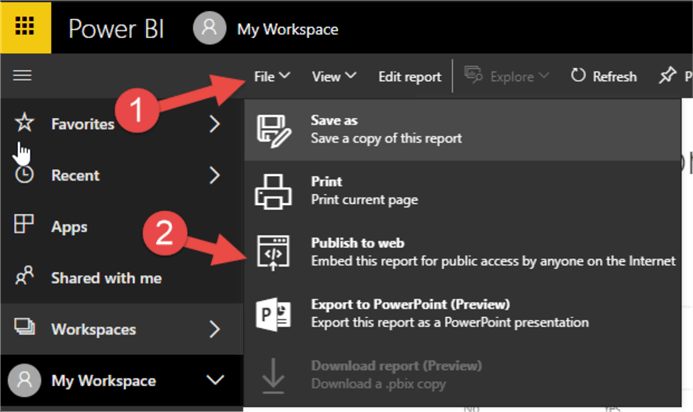
The actual process of Publishing to the Web is quite simple. Open the Report in your workspace, select File and then Publish to the Web.
Microsoft institutes two warning screens, displayed below, to validate that you really do want to publish these Power BI Visuals to the Web for all to see.
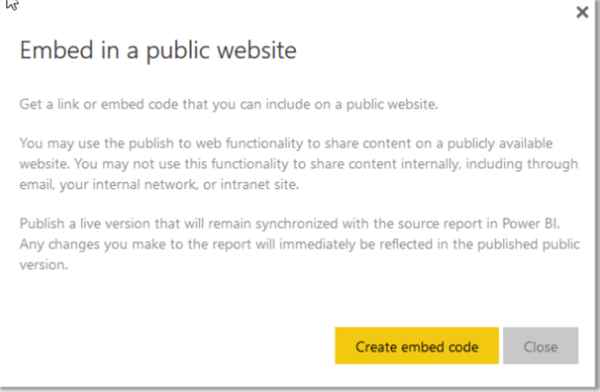
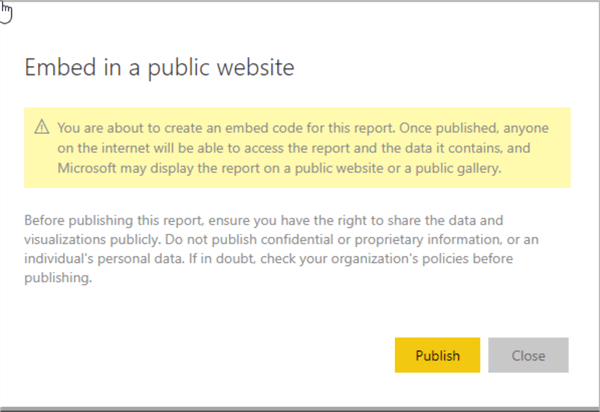
You will even notice that Microsoft can additionally use the published report in its own Public Galleries if it desires to do so. Once the process is complete, the following screen is displayed. You are free to copy from the link for email or copy the html text to add to another webpage. You even get the option to set the size of the embedded report.
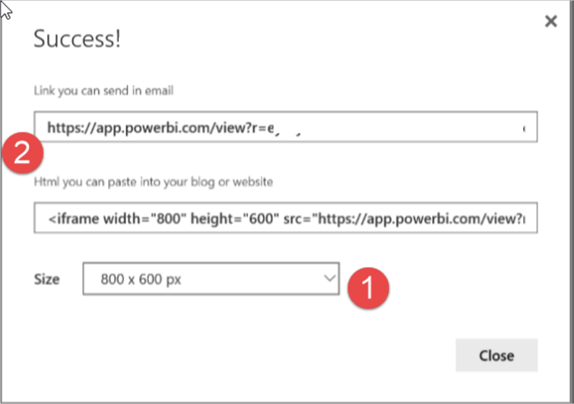
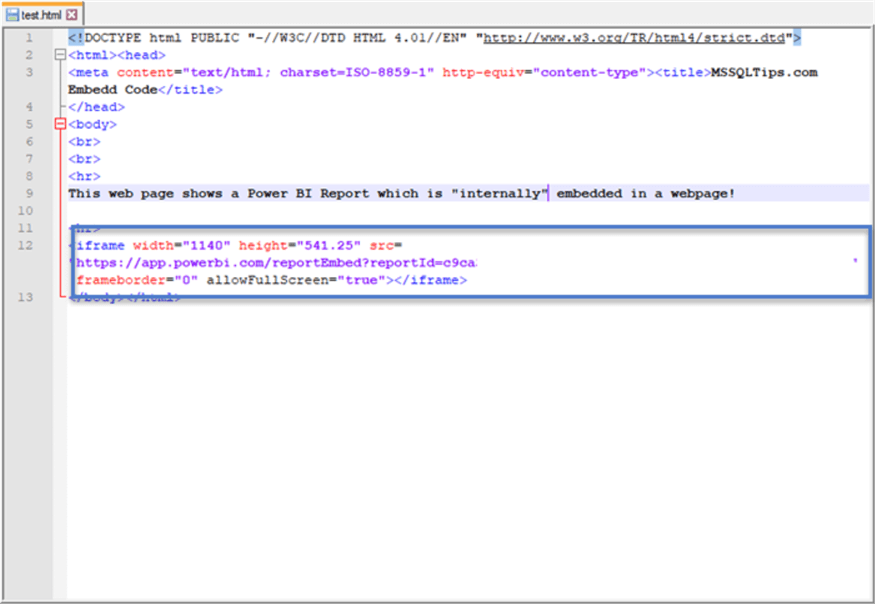
As you can see in the below text file, the copied html code can be easily added to a simple webpage.

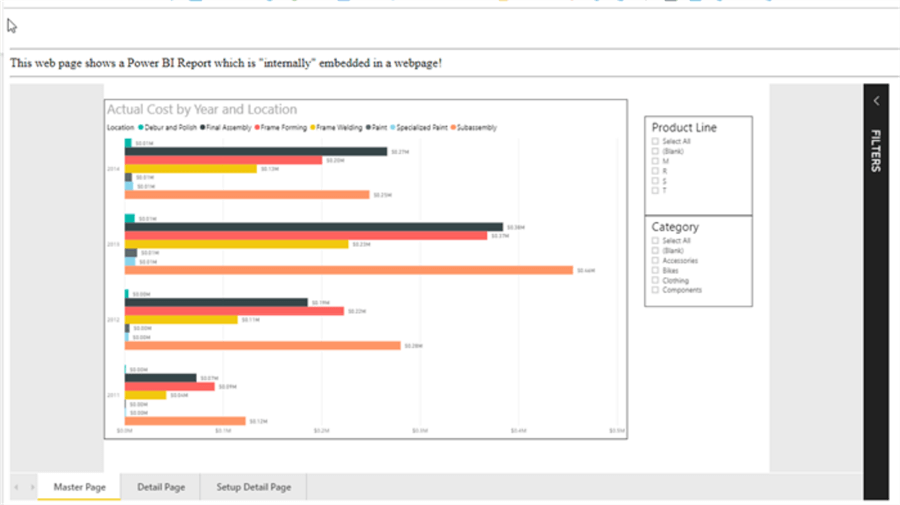
Loading up that webpage now displays our report for the World to see!
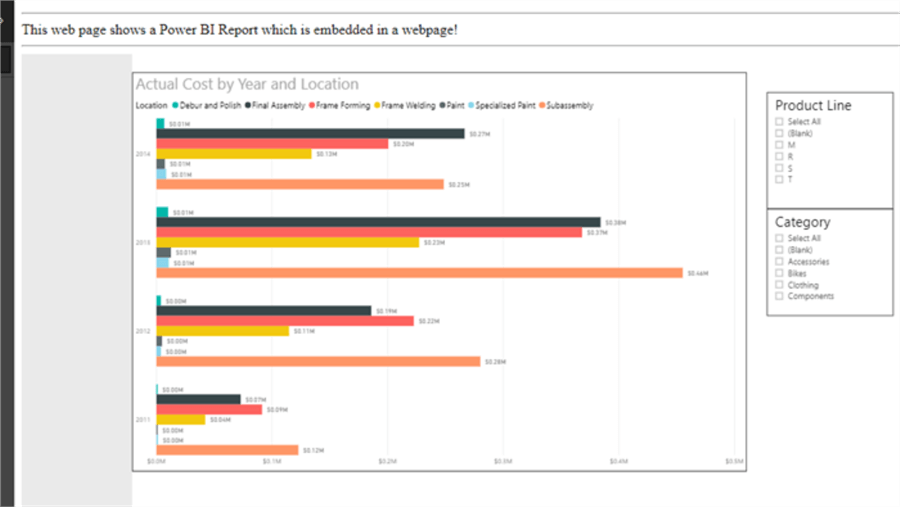
Of course, you may be thinking, how can I "unpublish" this report in case we do not want everyone to see it? Fortunately, you can unpublish the report by using Settings and then selecting Manage embed codes.
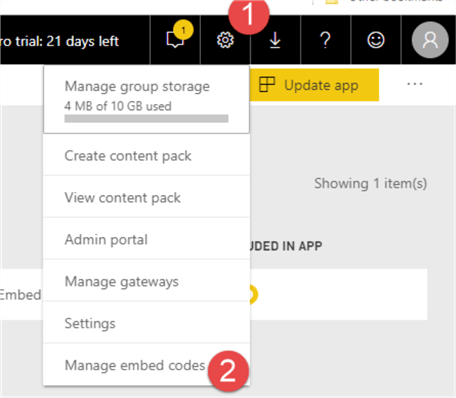
Finally, you can use the ellipse button and select Delete to remove the Public Access.
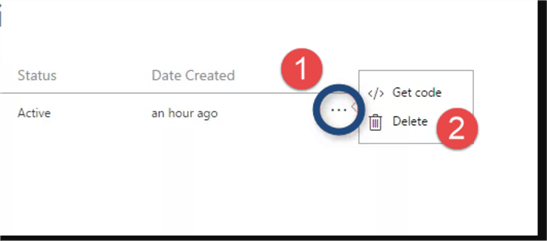
Hopefully by now you have gotten the point that Publish to the Web is a neat tool, BUT it come with lots of caveats and warnings!
Power BI Embed Internally
After all the warning, you may think there is no secure way to embed reports within Power BI. However, you will be happy to know that methods exist for a Power BI Admin to do this securely and easily. The "easy" part was provided in a recent update to Power BI which delivers a method like the Publish to the Web functionality outlined earlier in this tip. To the contrary, this method does not come with all the warnings that Publish to the Web encounters. Furthermore, security is not tied to the embed process, but instead the security and permissions setup for App, Report, or Dashboard are inherited into the process. Thus, access must be established in the Power BI Report or App before a report consumer can access the embedded report. Additionally, if Row Level Security (RLS) is in place, then RLS will be subsequently applied once the user logs in.
To get started with internal embedding, first navigate to the Power BI Service and then to the Report we are wanting to share. Next, select the File option and then Embed.
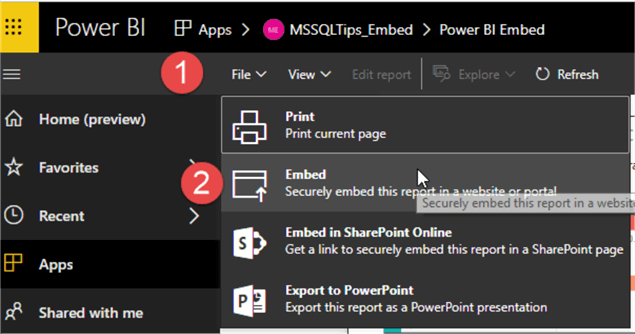
Here is where the "easy" process comes into play. The next screen notes, somewhat like the Publish to the Web options, a link and a HTML set of code that can be copied for use as link in a web page. Prior to this functionality the code for embedding was somewhat complicated and required a fair amount of coding.
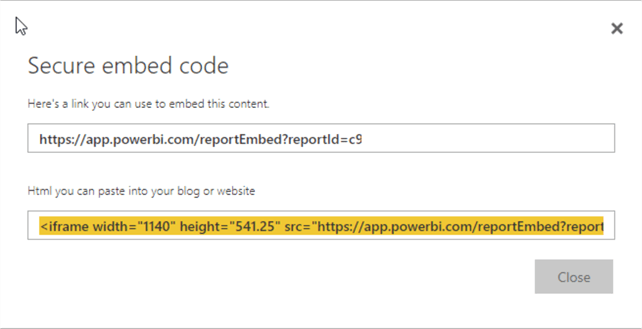
Copying and pasting the link details to our HTML page allows us to complete the embed process.
Now we have our report embedded within our "internal" webpage available for viewing. Depending on if the report consumer is signed in or not, a sign in screen may require a user to login to Power BI before viewing the report. You can interact with the report as if you were on the Power BI Service site including adjusting slicer values, drilling into values, and navigating through the various worksheet tabs.
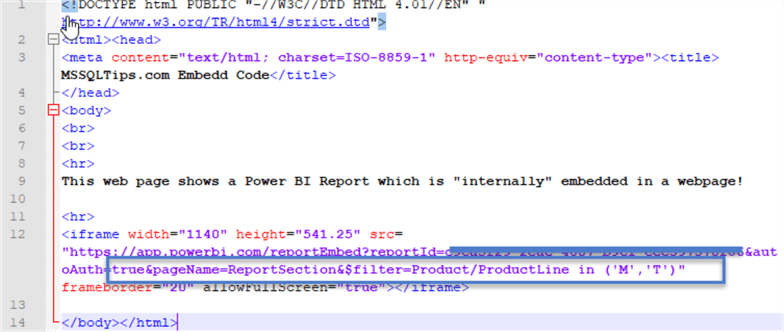
Furthermore, you can pass filter values to the URL from your html code which opens up a whole range of possibilities including adding filters and adjusting the Iframe size. Say for instance, you would like to always show the "M" and "T" product lines in the above visual. This filtering is achieved by adding the page name and filter options the link URL; the following is added for our report &pageName=ReportSection&$filter=Product/ProductLine in ('M','T'). The pagename option is actually name from the main URL (see the first screen print below). The second item is the filter which is in the form of &$filter=TableName/Field Name = 'value'. For our example the table name in Power BI is Product and the field name is ProductLine while "in" is the operator employed. Other operators include: eq (equal), ne (not equal), gt (greater than), ge (greater than or equal to), lt (less than), le (less than or equal to), and in (in).

Now the report is filtered at the Report level based on the URL filters for the product lines, all embedded within another website.
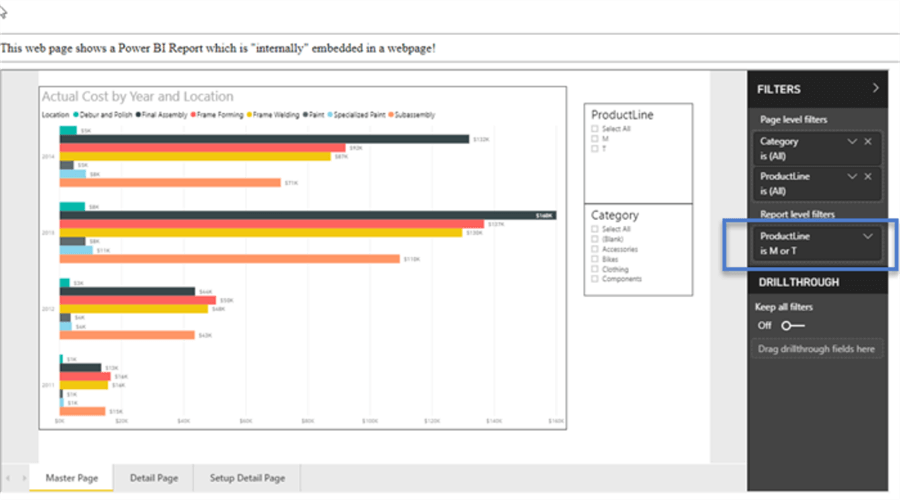
Remember, that you may be asked to sign on to Power BI if you are not authenticated.
As you can see in our examples, embedding Power BI Reports and Dashboards is not only handy, but also offers way to include a report in a website, both internally and securely, externally, but insecurely.
Next Steps
Learn more about Power BI in this 3 hour training course.
About the author
 Scott Murray has a passion for crafting BI Solutions with SharePoint, SSAS, OLAP and SSRS.
This author pledges the content of this article is based on professional experience and not AI generated.
View all my tips


