Problem
Sometimes we need to add databases to an existing SQL Server Always On configuration to setup High Availability (HA) and Disaster Recovery (DR) solutions for that database. Today, I am going to show you how to add a database to existing Always On Availability Group using T-SQL. I have also written a tip on the same topic using SQL Server Management Studio (SSMS).
Solution
As we know, Always On Availability Groups (AOAG) is an advance feature to achieve HA and DR solution for SQL Server databases. In this tip, I will demonstrate the step by step process to add a database to an existing Always On configuration to enable HA/DR capabilities for that database. Before going ahead, let me give you details about the existing configuration. I have an Availability Group with one database between two replicas. Now I will show you how to add another database to this AOAG configuration. Make sure that your AOAG configuration is running healthy before starting this exercise.
NOTE: BE SURE TO TEST THIS SOLUTION IN A LOWER LIFE CYCLE FIRST. DO NOT MAKE ANY CHANGES IN PRODUCTION WITHOUT PROPER TESTING IN LOWER LIFE CYCLE ENVIRNOMENTS.
Add SQL Server Database to Always on Availability Group using T-SQL
Step 1: The first step is to check the existing AOAG configuration and its state. The AOAG should be healthy before proceeding with the next steps. You can check the dashboard report as well as Availability Group tree in SSMS by expanding its folders. In the image below, you can see the AOAG state looks healthy and there is only one database that is part of the Availability Group. We will add another database to the same Availability Group using T-SQL statements in this tip.

Step 2: Now identify your database that needs to be added to the existing Always On Availability Group. Once you have identified the database, you need to prepare it on the secondary replica as a secondary database by restoring the database in norecovery mode with a copy of the full backup and a transaction log backup of the primary database of the identified database.
You can see in the below screenshot where I have created a new database “Add_DB_AOAG” then I have created a table named “Location” and added some data in this table.
USE [master];
GO
CREATE DATABASE Add_DB_AOAG;
GO
-- Create table.
USE Add_DB_AOAG;
GO
CREATE TABLE [Location] (
    [Sr.No] INT IDENTITY,
    [Date] DATETIME DEFAULT GETDATE (),
    [City] CHAR (25) DEFAULT 'Gurugram');

--Insert Rows.
USE Add_DB_AOAG
GO
INSERT INTO Location DEFAULT VALUES;
GO 100
Once you execute the above commands, you will get the below output.

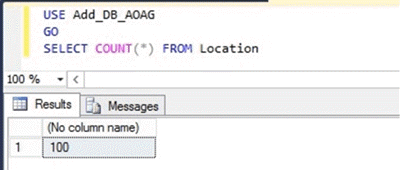
You can verify the total inserted rows in the table by running the below command to validate the data in your database. Later you can check that you have the same number of rows on the secondary replica after adding it to the AOAG.
USE Add_DB_AOAG
GO
SELECT COUNT(*) FROM Location
This is the output from the above query.
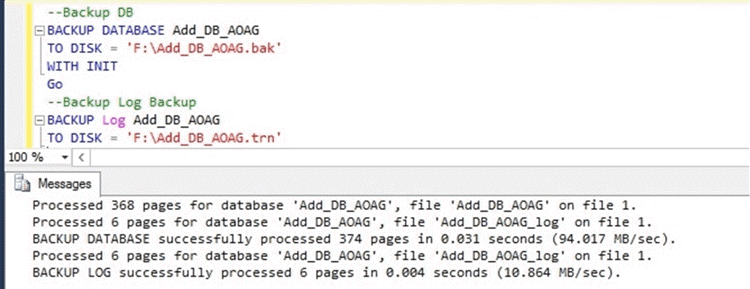
Step 3: Now we will run the full backup and subsequent log backup of this newly created database to prepare the database on the secondary replica using this backup file. Run the below T-SQL commands to execute the full backup and transaction log backup for this database.
--Run Full Backup
BACKUP DATABASE Add_DB_AOAG
TO DISK = 'F:\Add_DB_AOAG.bak'
WITH INIT
Go

--Run Log Backup
BACKUP Log Add_DB_AOAG
TO DISK = 'F:\Add_DB_AOAG.trn'
WITH INIT
Once the backup is executed successfully, you will get the below output in SSMS.
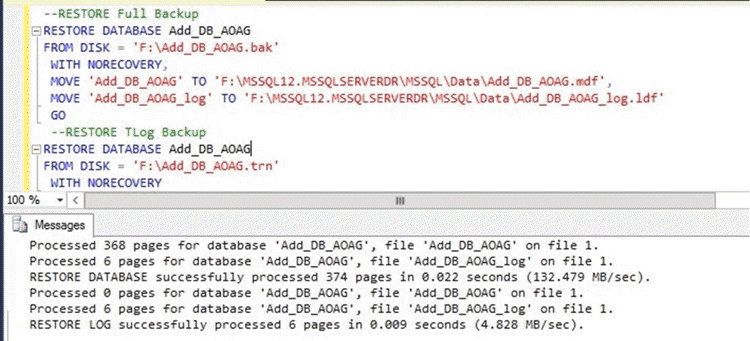
Step 4: Copy the above backup files to the secondary replica to restore them on that server to prepare the secondary database. Run the below commands to restore the secondary database with the help of the above copied backup files.
--RESTORE Full Backup
RESTORE DATABASE Add_DB_AOAG
FROM DISK = 'F:\Add_DB_AOAG.bak'
 WITH NORECOVERY,
 MOVE 'Add_DB_AOAG' TO 'F:\MSSQL12.MSSQLSERVERDR\MSSQL\Data\Add_DB_AOAG.mdf',
 MOVE 'Add_DB_AOAG_log' TO 'F:\MSSQL12.MSSQLSERVERDR\MSSQL\Data\Add_DB_AOAG_log.ldf'
 GO

--RESTORE TLog Backup
RESTORE DATABASE Add_DB_AOAG
FROM DISK = 'F:\Add_DB_AOAG.trn'
 WITH NORECOVERY
Step 5: Once you prepared the secondary database, our next step is to add this database to the AOAG configuration. Connect to the primary replica and run the below T-SQL commands to add this newly created database to the Always On Availability Group.
-- Connect to the server instance that hosts the primary replica to add a database to the availability group.
ALTER AVAILABILITY GROUP DBAG_ABC ADD DATABASE Add_DB_AOAG;
GO

Step 6: Now we will again check the SSMS dashboard report to see the status of this newly added database “Add_DB_AOAG” to the Availability Group. Launch the dashboard report by right clicking on Always On Availability Group name from the Object Explorer.

We can see the new database “Add_DB_AOAG” has been successfully added to the Availability Group, but it is showing a warning on the secondary replica and its status is showing as “Not Synchronizing”. You can click on the warning link to get more details about this error as shown below.

The error details indicate something went wrong with the data synchronization. When we checked the secondary replica, the secondary database was shown in a restoring state then we decided to run the same command that we ran in step 5 on the secondary replica to add the secondary database to the Availability Group.
--Add Secondary database "Add_DB_AOAG" to AOAG "DBAGXXX.
ALTER DATABASE Add_DB_AOAG SET HADR AVAILABILITY GROUP = DBAG_ADS;

Once the above command is executed successfully we will again check the SSMS dashboard report to validate the AOAG configuration.
Step 7: Now our newly created database “Add_DB_AOAG” has been added to the existing AOAG configuration. Next, we will check and validate this change. We can run the dashboard report or we can also check in SQL Server Management Studio by expanding the respective folders. I checked both ways and you can see the database “Add_DB_AOAG” has been added to this AOAG configuration as shown in the below image. The AOAG configuration is healthy after adding this database.

Next Steps
- Your database has been added to AOAG configuration. Now you can monitor it for few days to understand how your AOAG configuration behaves after getting another database.
- Read these articles to learn more about AOAG configurations.
- Explore more knowledge with these SQL Server Database Administration Tips.

Manvendra is a passionate database lover currently working as a Technical Architect at one of the top MNCs. He has extensive experience on all versions of SQL Server since 2000 and has built Big Data skills. He has lead projects on the following database features: Database Mirroring, Always ON, Replication, Log Shipping, Geo-Clustering and Performance Tuning and delivered many SQL Server projects on consolidation, upgrades, heterogeneous replication, HA / DR solutions, automation and major performance tuning projects. You can also follow Manvendra on his blog, Twitter, LinkedIn and Facebook.
- MSSQLTips Awards: Champion (100+ tips) – 2018 | Author Contender – 2015-2018, 2021-2022

Thank you very much for document. It will help me lots.