Problem
SQL Server Reporting Services offers several options for maintaining past executions of reports. Both the cache and snapshot history options were established in many prior versions and have only been made better with time. Surprisingly these options are somewhat unknown and used only sporadically and are often misunderstood. The two different methods also cause further confusion as some of the wording and the functionality is intermixed into both methods. So, what can I use SQL Server Reporting Services snapshots history and cache for?
Solution
Before we go much farther, it probably would be great to explain the hierarchy of ways to save prior executions of reports. The first of history is the caching of a reports execution. Similar to the cache on you PC; this method stores recent execution(s) of your report. So, if you ran a sales report for the Georgia region covering last month, when enabled, SSRS would cache that report execution. Thus, if the cache has not changed (more later on how this happens), the next person running that same report for those same parameters, would retrieve the report from the SSRS cache. Please note this cache is different than what SQL Server is using for SQL Server itself. Snapshot history works in a similar but not the same way. A history snapshot is a specific point in time version of the report with specific parameters being set; many versions of the report can be saved in the snapshot history. In either case, both of these functions are designed to save your report users time when running reports especially those reports whose executions take a significant amount of time. Let us take a look how to implement each of these methods.
To get started you will first need to install Reporting Services if not already installed. You can use this tip from Rajendra Gupta to assist with installing the latest version of reporting services. SQL Server Reporting Services 2017 can currently be downloaded from here. Be sure you are getting the latest edition and SSRS.
SQL Server Reporting Services Report Cache
As previously mentioned, a report cached works similar to the cache used by other computing functions. In essence, it stores a copy report data and report structure for later executions of the report. One thing it does not store is the rendering details which allows you to still benefit from report caching without being tied to a specific render format (such as pdf, Excel, etc.). To setup a report to use the cache, you must go to the report you would like to turn on caching. Next, you will want to manage the report by going to eclipse (3 dot) to the right of the report and then selecting Manage.

Next go to Caching Window for the report, as shown below.

On the Caching properties window, shown above, several alternative methods of expiring and refreshing the cache for the report exist. Of course, the default option for a report is to “Always run the report with the most recent data”, which I call the NO Cache option.
The second option is the pure caching option which allows us to actually set up a Cached copy of the report. When this option is selected, the subsequent execution of the report must use the same parameters in order for the cached copy of the report to be used. Furthermore, the cache expiration schedule is defined. Upon the cache expiration, the report will execute as if no cache copy existed (which will in turn create a new cached copied).
On the same cache properties window, we can define how often a cached version expires. The cache expiration time can either be defined in n number of minutes or on a specific defined individual schedule or a shared schedule (that a SSRS system administrator has defined).

Again, as soon as a report cache expires, the report will need to be “run again” to reload the cache for future users. So, for reports whose data only changes monthly, it may be beneficial to expire the report cache only once per month, for instance. Furthermore, not only can the expiration time frame be set for a report’s cache, but also a refresh plan can be established for a cached report. The plan creates a new cache which replaces the current cache version; a snapshot, discussed in the next section, can also be created as opposed to an individual cached report.
To initiate the Cache refresh plans, you will first need to click the apply button as shown below.

Upon clicking Apply, the Manage Refresh Plan link appears.

From this window, a new cache refresh plan can be added, a new plan can be created by copying an old plan, a plan can be deleted, and finally, the plan as a whole can be Refreshed now.

As illustrated next, the refresh plan must be named, a schedule, either shared or specific to the report, is selected (or created), and finally, the default parameters or user selected values are selected. Be sure the cache expiration time frame does interfere with the refresh schedule (for example, the cache expiration time expires every night at midnight while the cache refresh schedule runs daily at 11.45pm. That sort of schedule would defeat the purpose of having the refresh plan).

As shown below, the refresh plan is now running at 02:00.

SQL Server Reporting Services Snapshots
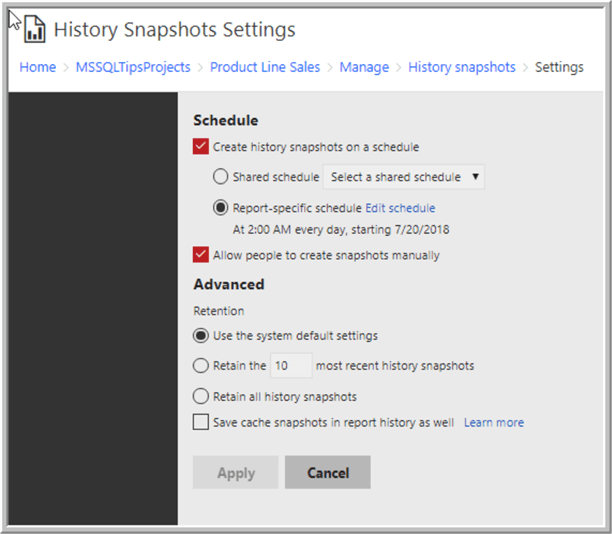
Whereas caching a report is done somewhat automatically, snapshots require more setup, but also provide additional flexibility. Snapshots are established in the same area as caching. Just click on the three dots to the right of the report name and the select Manage. Next you will want to select the Schedule and settings option.

The first setting to be set is whether to create the history snapshot, and if yes, then on either a shared or individualized schedule. Under the advanced options, we must specify how many copies of the snapshot should be retained. Either the system default values, a n number of snapshots, or retain all options can be selected. The last option provides a way for saving the cache history into the report history.
Subsequently, we could go ahead and select the New history snapshot option.
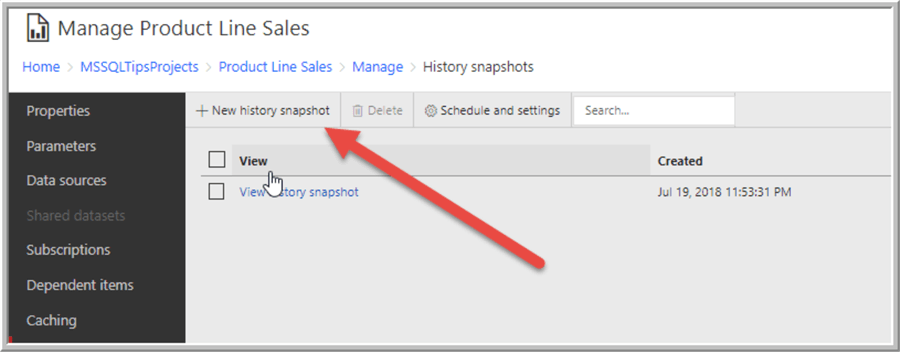
Upon clicking the New history snapshot button, an actual snapshot is created. You will notice in the below screen print, I created three report snapshots. In thinking through this process, please note these historical snapshots are generally accessed by navigating to the History Snapshots window.

The times shown in the above screen print are shown for each snapshot that has been saved.
One alternative to retrieving a historical snapshot is to actually use a render tag in the URL to retrieve a specific snapshot; tag is rs:Snapshot. Thus, the basic format is: http://locahost/ReportServer/MyReport&rs:Snapshot=YYYY-MM-DDThh:mm:ss. An example of such a rendering method is included below.

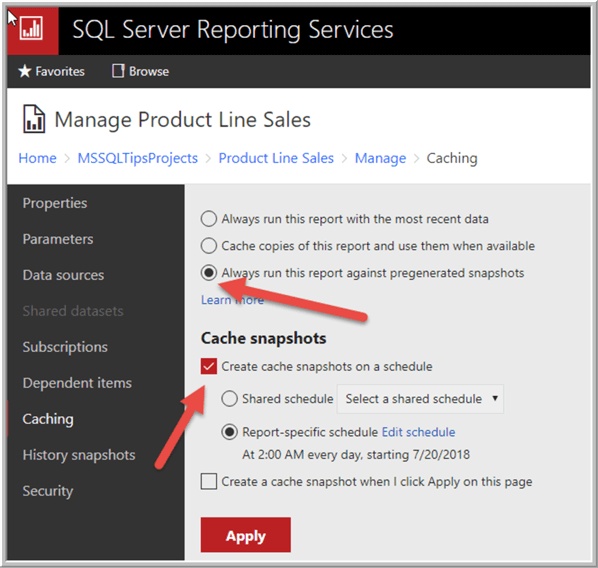
To run the report from the most current snapshot, you would actually select the Caching tab and then select the radio button next to: Always run this report against pre-generated snapshots. Upon selecting this option, you will then select the appropriate Cache snapshots options related to when this snapshot will be generated, including creating the cache snapshot now.
Of course, with both cached reports and snapshots, there are certain instances that do not allow for a report to be saved either in a cached version or snapshot. If the report uses Windows Authentication or Prompts the user for credentials, it cannot be cached nor a snapshot saved.
Next Steps
- Check out these related tips

I have a passion for crafting Business Intelligence Solutions for my user groups. My experience includes almost 15 years of SQL Server involvement with the last 12 years focused specifically on Business Intelligence, SharePoint, OLAP, SSRS, and Decision Support solutions. Currently, I am a Business Intelligence Architect in the healthcare industry, and I also teach database and analytics classes for Kennesaw State University, Southern New Hampshire University, and Reinhardt University. My education includes an MBA and an undergraduate in Accounting (yes I am a reformed accountant!), both from Kennesaw State University. I enjoy every day by trying to grow my faith and spend precious time with my family. I have been happily married to my wife of over 20 years, and we have two teenagers one who we home school with the help of a University Model School, Cornerstone Prep in Acworth, GA (cornerstoneprep.org). Our other child is a Construction Management major at KSU’s Southern Poly / Marietta campus. We are a soccer and Cross Country (XC) family who play, coach, and referee soccer or run for fun most every day. For several years, our family has volunteered (and played with the dogs and cats) at Etowah Valley Humane Society in Cartersville, GA.
- MSSQLTips Awards: Champion (100+tips) – 2016 | Author of the Year – 2015 | Author Contender – 2014, 2016-2021