Problem
Your business is growing and so are your databases and application complexities. It is getting harder and harder to take time to upgrade or migrate your databases. Clients expect that their application should be available within a few hours in case of a disaster. Your employer is making profit now and they can spend some cash on Disaster Recovery and Business Continuity infrastructure for critical databases. In such a case, which SQL Server upgrade methods make more sense?
Solution
In Part 1 and Part 2, we discussed 4 different methods of upgrading and\or migrating SQL Server. In this tip, we are going to go into some advanced upgrade methods. Side by side upgrade involves upgrading SQL Server either to a new SQL instance on the same machine or on a different machine. In case of new SQL instance on the same machine, check the documentation of the new SQL Server to see if it supports the existing operating system. For example, SQL Server 2016 and 2017 does not support Windows Server 2008 or 2008 R2.
Side by Side SQL Server Upgrade with Log Shipping
Log Shipping has available in SQL Server from the very beginning (or at least from SQL Server 7.0 based on my experience) and onwards. This method is in place for more than 2 decades and still widely used across various industries around the world as a primary Disaster Recovery solution. The concept of Log Shipping is very simple. There is a pair of servers primary and secondary. The SQL Server database on the primary server is available for all read write activities for all users. Transaction logs from the primary database keep getting applied, via SQL Server Agent Jobs, to a secondary database on a secondary server. The database on a secondary server can be in one of two modes: Standby mode or No Recovery mode. Standby mode allows this database to be used as a read-only copy and for reporting purposes along with ability to apply additional transactional logs. No Recovery mode does not allow reads on the secondary database. The secondary database will be in restoring state and additional transactional logs can be applied to it.
Scenario:
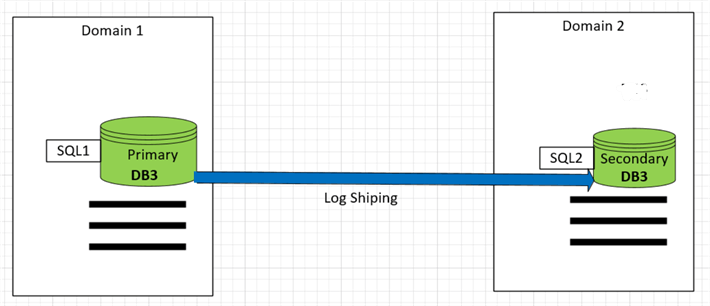
You have 2 SQL 2012 Enterprise Edition (EE) servers: SQL1 is primary in Domain1 and SQL2 is secondary in Domain2. The operating system on these 2 servers is Windows Server 2012 R2. Transaction Log shipping is setup for database DB3 (500 GB in size) from SQL1 to SQL2. DB3 currently uses Database Compression and Database Snapshot features which are only available in EE of SQL Server 2012. The business wants to upgrade these Enterprise Edition (EE) 2012 SQL Servers to Standard Edition (SE) SQL Server 2017 to save on the licensing cost. They also want to take advantage of some of the new features in SQL Server 2017 such as Temporal Tables and Row Level Security. Microsoft has made available many EE level features in SE since SQL Server 2016 SP1. DB3 will still be able to use Compression and Database Snapshot features after upgrading to SE SQL Server 2017 and there is no additional configuration required.
Execution:
You decided to do a side by side upgrade using the current Log Shipping setup. SQL Server 2017 is supported on the current Windows OS (Windows Server 2012 R2) so you do not need to upgrade your OS. You planned to upgrade SQL2 first. If anything goes wrong, your rollback plan is to connect your application back to the database DB3 on SQL Server 2012 instance SQL1.
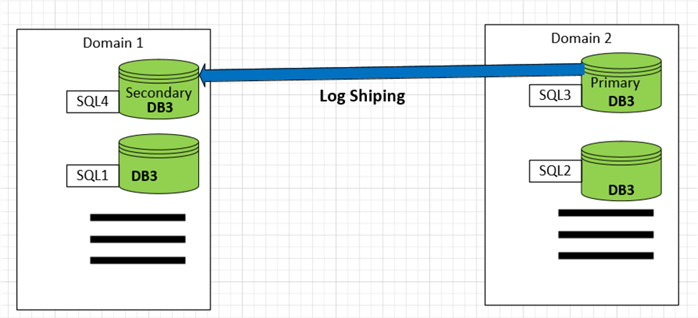
This is how your current production Log Shipping environment looks:
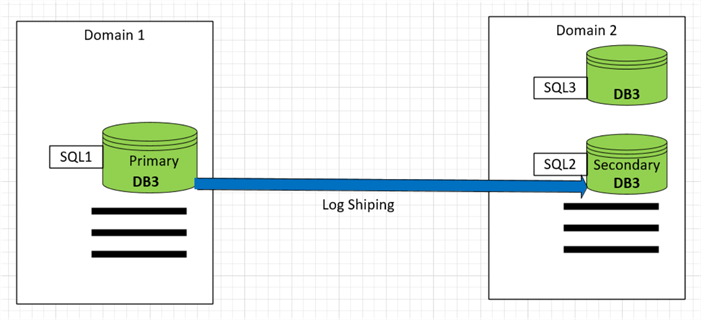
During your research you found that SQL server 2012 EE cannot be upgraded to SQL Server 2017 SE due to the fact that upgrade goes from a higher edition of SQL Server to a lower edition. You decided to install another instance of SQL Server SQL3 in Domain2 with SQL Server 2017 SE version.
Here are general steps of upgrading and\or migrating databases using SQL Server Log Shipping:
- Turn off the log shipping jobs on both Primary (SQL1) and Secondary (SQL2) servers.
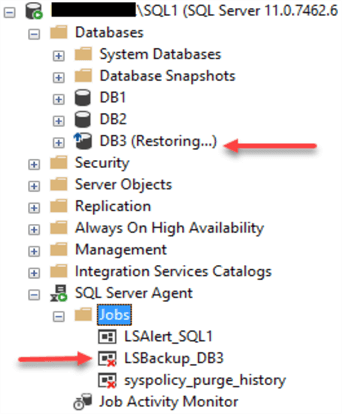
- On SQL1, take the last transaction log backup of DB3 with no recovery. When log backup is taken with NoRecovery option, it puts the DB3 database in Restoring mode on SQL1 and no users can connect to it.
BACKUP LOG [DB3] TO DISK = 'C:\SQLBackups\DB3.trn' WITH NORECOVERY;
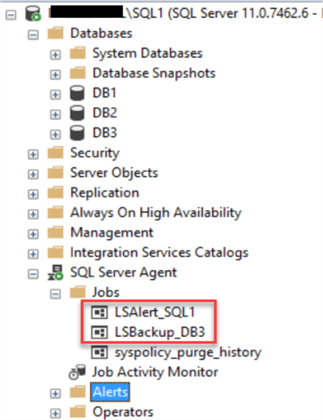
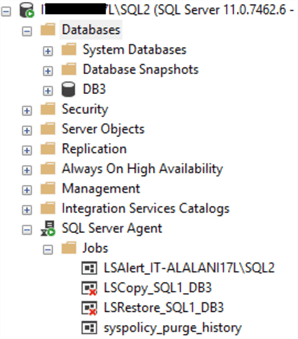
Here are two side by side screen shots of the “Before” on the left and “After” on the right based on the two steps above:
- Run the copy and restore jobs on SQL2 manually to make sure all the logs are applied.
- Then manually copy the last log backup you took of DB1 and manually restore it on SQL2 DB3 with Recovery. When you apply the log with recovery option, DB3 comes online on SQL2.
RESTORE LOG DB3 FROM DISK = 'C:\SQL2012\SQL2\LogShip\DB3.trn' WITH RECOVERY
- Take a full backup of DB3 on SQL2.
- Restore DB3 on SQL3. Since SQL2 and SQL3 are on the same server, you eliminated the step of copying the backup file. This will save a quite a bit of time.
- Update DB3 compatibility level to 140.
USE [master]
GO
ALTER DATABASE [DB3] SET COMPATIBILITY_LEVEL = 140
GO
- Connect application to SQL3.DB3 and smoke test. SQL3 is now your new primary instance. NOTE: Downtime starts when you took the last log backup of DB3 on SQL1 because log backup with No Recovery option will put the database in restoring mode on SQL1. Downtime finishes when you successfully connect your application to SQL3.DB3.
- You can stop here as your upgrade completed successfully. But if you want to create the log shipping back, follow these next steps.
- Install SQL server 2017 instance SQL4 in Domain1. This is a new secondary SQL Server.
- Create a Transaction Log Shipping from SQL3 to SQL4. Here is the article that describes in detail how to setup Transaction Log Shipping.
- Uninstall SQL1 and SQL2 instances.
Here are some pros and cons of using Log Shipping in general and for upgrades in particular.
- Most of the data can be moved beforehand to the target SQL Server and therefore less down time is needed when actual data migration cutover happens. This is especially helpful if a database is very large and also if the Source and Target SQL instances are in different domains.
- Compared to in-place database upgrade (Part 2) on same server, you do have some contingency plans available with this Log Shipping method. The database on the old primary is still available in a Restoring state. So, if your upgrade of the secondary database did not go well, you can rollback by connecting application back to your old database version. To bring old database online you only need to issue the following command:
RESTORE DATABASE [DB3] WITH RECOVERY;
- The log shipped secondary database is a read-only copy of the production database and can be put to use by offloading reporting queries to run there. It saves resource pressure on your primary database, which is serving queries for the primary application.
- One the primary database can log ship to multiple secondary servers. Once one secondary database is upgraded, it can act as a Primary for rest of the secondary servers.
- There is no automatic failover, you have to perform it manually.
- Some application downtime is unavoidable.
- Using Log Shipping requires another SQL Server and hence additional hardware and licensing costs.
- Transactional Log Shipping has to be setup for each database. If you have more than 20 databases, it will become tedious. In such cases, for those databases that are greater than 50 GB, use Log Shipping. For databases smaller than 50 GB, use Backup and Restore upgrade method. 50 GB is not a number set by Microsoft. It is, I find in my experience, a good cut over number.
Summary
In this tip we covered how to upgrade SQL Server using Log Shipping. We saw that although log shipping is very easy to setup, it still requires application down time. Careful planning and advance preparation can shorten the upgrade process. I used very simple example in this tip to illustrate the concepts. But these learning points can be applied to any real-world upgrade situation. Hope this may also encourage you to have your Disaster Recovery plan documented and reviewed and tested by you and your peers.
Next Steps
- Learn to configure Log Shipping in more details from Microsoft documentation.
- Read more MSSQLTips articles on Log Shipping.
- Stay tuned to Part 4 of this series.

Ameena Lalani is a SQL Server veteran and started her journey with SQL Server 2000. She is a Microsoft Certified Solution Associate on SQL Server 2016. She is a Chapter leader of the Chicago SQL Server User Group. She has implemented numerous High Availability and Disaster Recovery solutions at various companies. Ameena loves to share her knowledge about SQL Server and learn from others who like to share their knowledge. She really believes that no one is smarter than all of us combined. She volunteers and speaks at SQL Saturday events throughout the United States.