Problem
If you are new to modern day development, you might think that the words Agile and Scrum are interchangeable concepts since many project managers refer to them during team discussions. However, there is an important distinction between them.
Agile refers to a set of principles expressed in the Agile Manifesto. Collaboration, self-organization, and cross functionality are some of the traits of an agile team. On the other hand, Scrum is a frame work used to implement agile development.
Microsoft Azure DevOps is the next generation of Visual Studio Team Services in the cloud. This product combines scrum project management tools and software version control into one service.
How can we plan, track and execute tasks using Azure Dev Ops?
Solution
The Boards menu can be used by a Scrum master to create product backlogs and plan sprints. The Repository is a standard offering of the Git version control software. Visual Studio 2017 integrates nicely with the Repository you defined in your Azure DevOps project.
We just need to learn how to integrate (link) project planning with task execution. This includes creating code branches, linking project tasks to code branches, pulling and pushing code to/from the cloud, and merging code branches when work is complete.
Business Problem
Our boss has asked us to investigate how to execute an Agile Sprint using Azure DevOps. I will be continuing with the Adventure Works Data Warehouse sample that I have been using for this series of articles.
Adding Team Members
Usually, there are between 5 and 9 people assigned to an agile team. Right now, the craftydba0785 DevOps account only has one team member. How can we add additional members to the team?
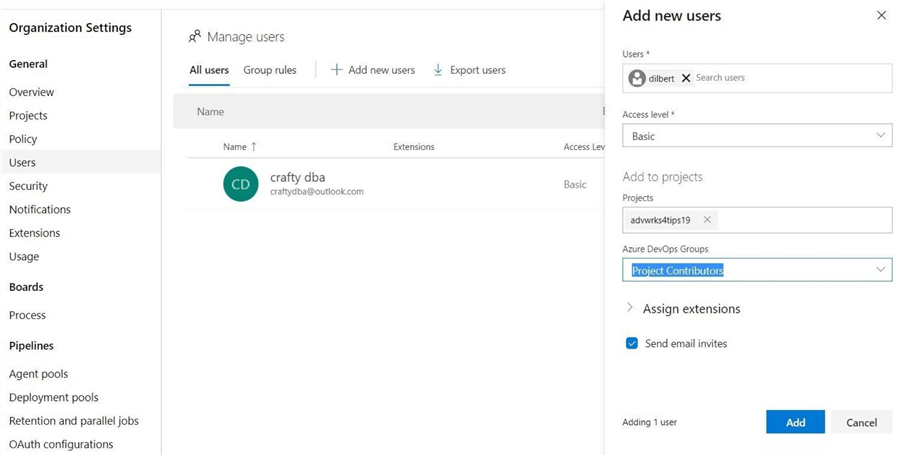
I am assuming that a team member or user account named Dilbert is already part of Azure Active Directory. The first step is to login into Azure DevOps service. The image below shows the section of the menu named organizational settings which will allow you to add additional users.
We can use the search feature in the user’s box to find our team member named Dilbert. If you have more than one project going on at the same time, we can assign him to additional projects at this time. For now, we will add Dilbert to the advwrks4tips19 project as a project contributor. Click the add button to complete the task.
Now that we have two members on the team, we can start creating our project back log.
Scrum Lifecycle
The customer or client approaches the software manager with a list of enhancements that they like to see in the next iteration of the software product. This manager will break down each of the enhancements into discrete tasks that the team needs to design, code and test. These tasks are called product backlog items (PBI).
During execution, the project manager will create a sprint and plan which items can be accomplished during the two-week period. The actual time period of the sprint depends on your organization.
These items will be assigned to the team members and work will begin during the sprint. Each day, team members review what has been accomplished yesterday, what is planned today and what blockers were encountered in a daily scrum. It is the responsibility of the Scrum master to make sure blockers are resolved. The actual length of the team meeting or standup is keep to 15 minutes for productivity. Any issues that require more attention are moved to a separate meeting with only required team members.
At the end of the sprint, a review and/or retrospective is used to see if things can be executed more efficiently or back log items have to be moved to the next sprint. Hopefully, if all back-log items were completed and any dependencies were fulfilled, the code repository will potentially have a shippable software release with an incremental change.
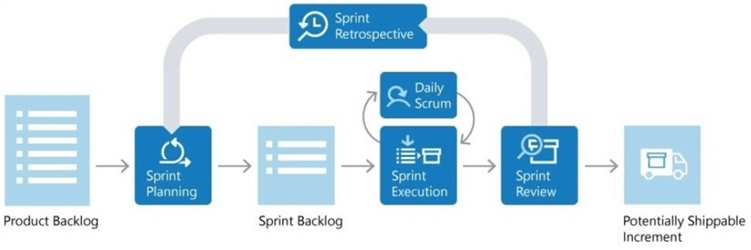
The above image shows the ideal way a sprint would be executed. Project sprints are executed in series until all product back log items are completed and a fully functional software release is available for the customer.
Boards Menu
The boards menu is where you can manage work items, list them in backlogs as details, show them as cards on boards, and plan your weekly work in sprints. Of course, any major software release will have multiple sprints and finding a product backlog item might be challenging. Therefore, the queries menu allows you to search all the meta data about your project.
The image below shows you the five menu items that you will be working with if you are the project manager or scrum master. Azure DevOps supports both the Scrum and Kanban agile methods. I will be only covering Scrum in the talk. Please see Microsoft’s online documentation for details.

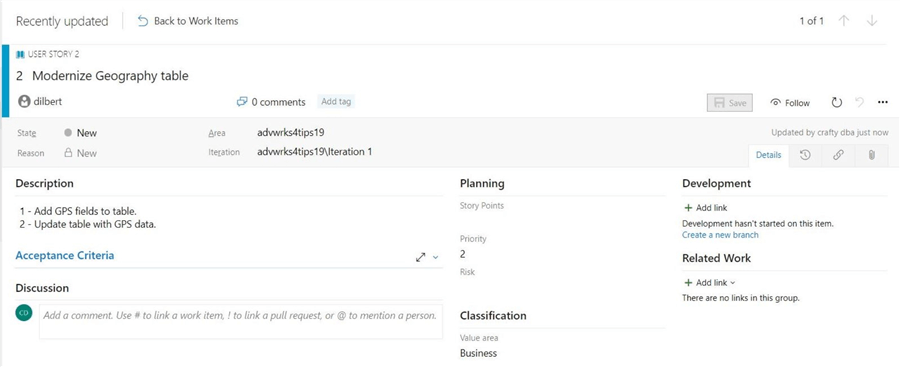
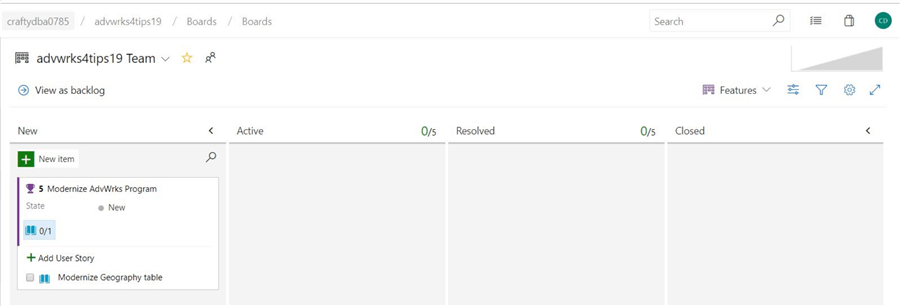
From the boards screen (blade), we can add a new user story. User stories are a way to group multiple related work items into one unit. I am naming this story “Modernize Geography Table“. The story has been assigned to Dilbert as the project lead. We can see this story is part of sprint “Iteration 1” for the “advwrks4tips19” project. I added a description describing the two tasks associated with this story.
After saving our information about the story, we can return to the boards screen. The new story shows up as a card on the board under the new status. Right clicking the card gives us several options. We can add a task, a bug, or a test to this story. Also, we can move the story to another iteration (sprint) or create a new branch in our code repository.
Right now, we want to create two tasks associated with story. The image below shows the right click menu option for cards.
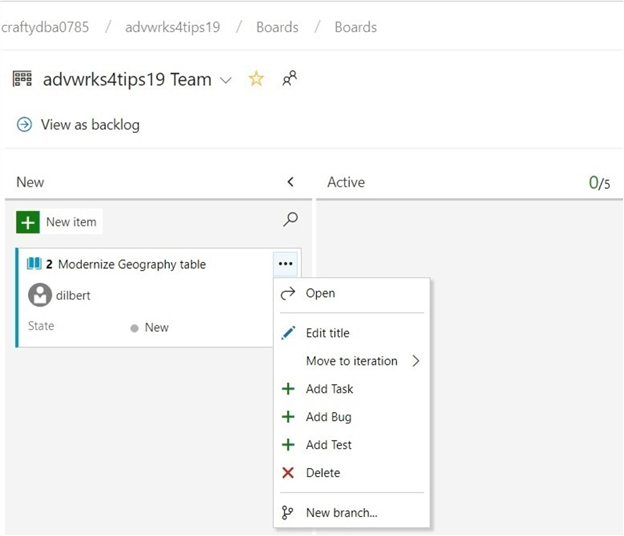
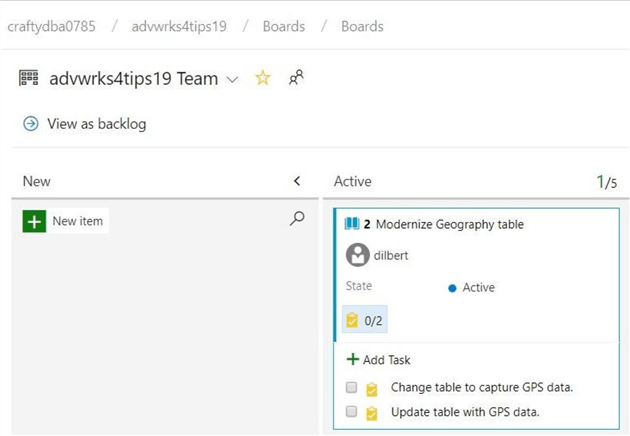
Each object defined in the agile project is given a unique number. We can see that the story is number 2. The image below shows the two named tasks (items) associates with the story. I moved to story from new to active status. The next step is to enter details about each task as well as a time estimate for completion.
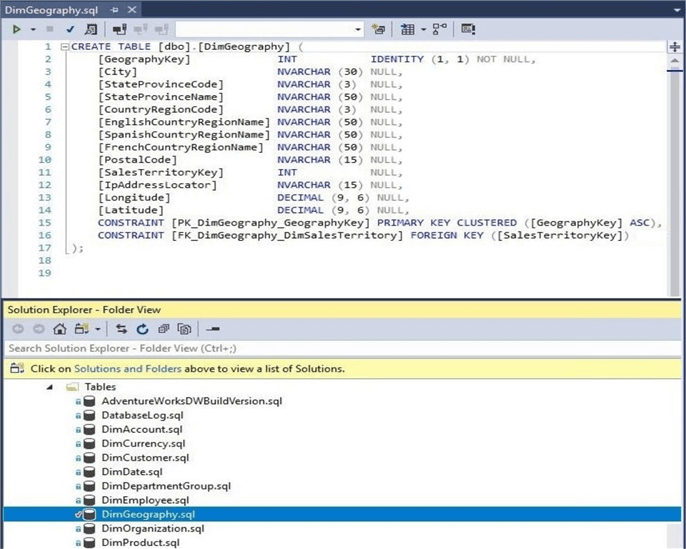
The first step in adding GPS information to the Geography dimension table is to create two new fields. I am over estimating that the actual change will take a day or eight hours. Two hours have already been spent on the task and six hours are remaining. See the image below showing the details behind changing the table.

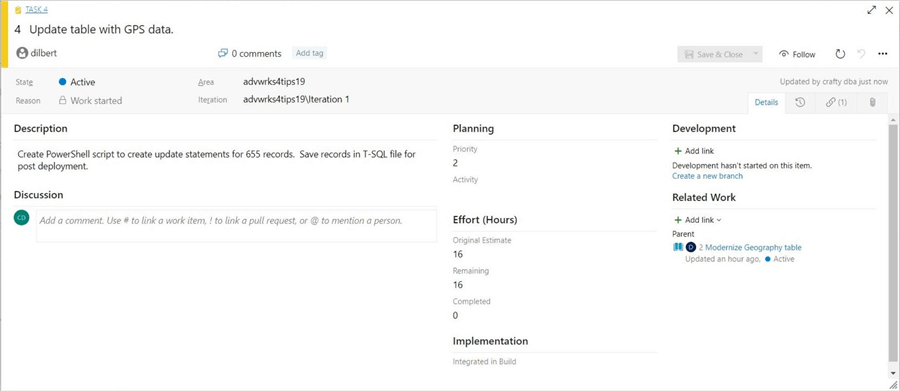
The second step in adding GPS information to the Geography dimension table is create UPDATE statements that can be executed against an existing table. I am going to write a PowerShell program to lookup the GPS coordinates using Google Maps API and create a T-SQL file with the required UPDATE statements.
The following five fields from the DimGeography table are required to get a GPS value for each record. The primary key to each record and the two new GPS values are required to create the final update script. Since the addresses are not exact locations, we will be using the center most location of a given postal code area.
| No | Field | Data Flow |
|---|---|---|
| 1 | [GeographyKey] | Input / Output |
| 2 | [City] | Input |
| 3 | [StateProvinceName] | Input |
| 4 | [EnglishCountryRegionName] | Input |
| 5 | [PostalCode] | Input |
| 6 | [Longitude] | Output |
| 7 | [Latitude] | Output |
If you are interested in how the update statements were created, please download the zip file from here and read the code. This script can be added as a post deployment task in our database project. This tip covers the design pattern used in previous article that I wrote. Now that we have our tasks defined, it is time to plan a sprint and figure out the work load for each team member.
Sprints Menu
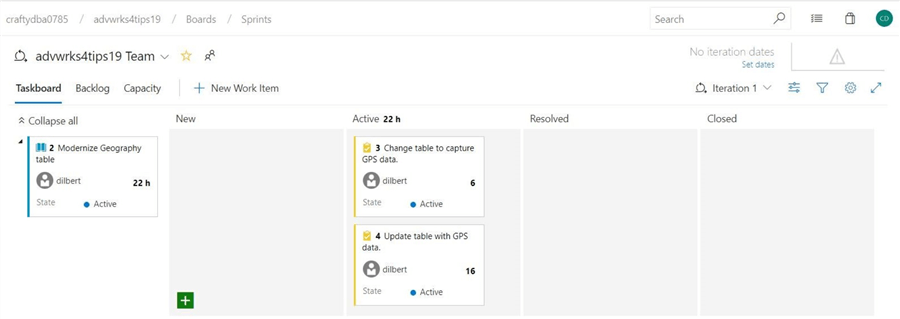
The sprints screen has three sub menus: the task board, the backlog and the capacity. We can see that all work is currently being done by Dilbert. Let’s add “crafty dba” to the team and shift the work assignments around.
The capacity screen is where we can add users and dictate how much time they have each day to devote to a given project. Since the “crafty dba” is a busy person, (s)he can only spent 25 percent of the week on this project. That equates to 2 hours per day. The image below shows this resource addition to the team.
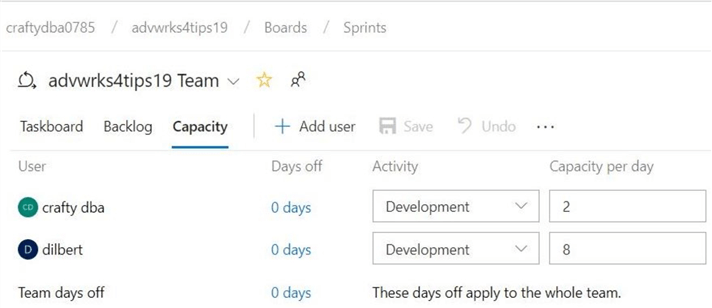
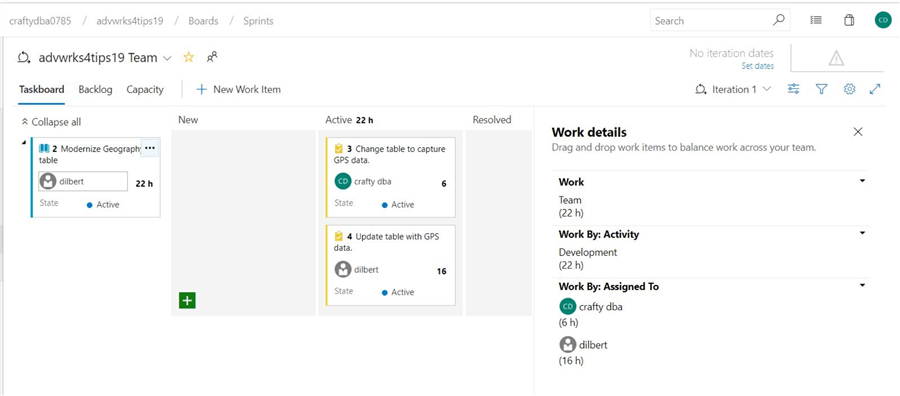
To recap the results of our work, the image below shows work item number 3, which is the addition of two fields to the table, has been assigned to “crafty dba“. The remaining work is assigned to Dilbert. Both tasks assigned to the team should be completed this week given the available capacity.
Now that we know how to create back log items and plan sprints, how do we link these tasks to code branches in our Git repository?
Linking Code Branches to Work Items
The Azure DevOps service allows you to create a branch from either the Boards or Repos menus. I like creating the branch for the Repos menus since you are allowed to attach as many work items as you like. I am creating a new branch called geo-project using the appropriate dialog box.

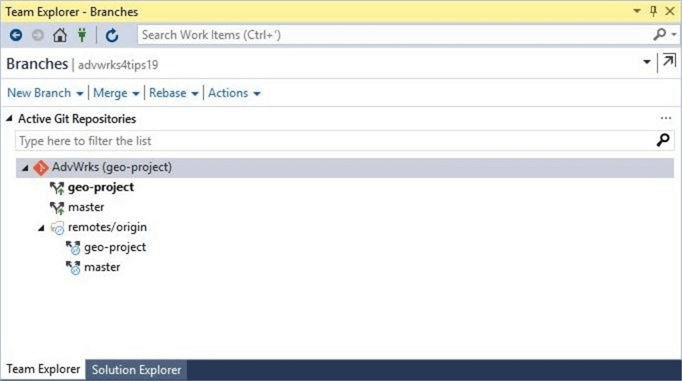
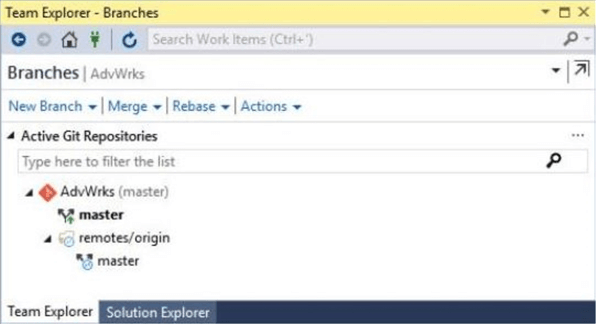
If we open the Visual Studio project that is linked to source control, we can see that the new branch shows up under remotes. We need to use the branches menu in team explorer to checkout a copy of the branch for local use.

If the action completed successfully, the local and remote branches should mirror each other. The image below is the state in which you want Visual Studio to be in.
The next step is to open the file named “DimGeography.sql” and add the two new fields to the table. Upon saving the file, we see that a check mark appears since the code has changed.
I am assuming that you deployed and tested the changes to a local development server. Now that we have good code, we need to check the changes in. Use the Changes menu under team explorer to complete this action. I added an appropriate description to track the change. Choose the commit all to push changes to both the local and remote repositories.
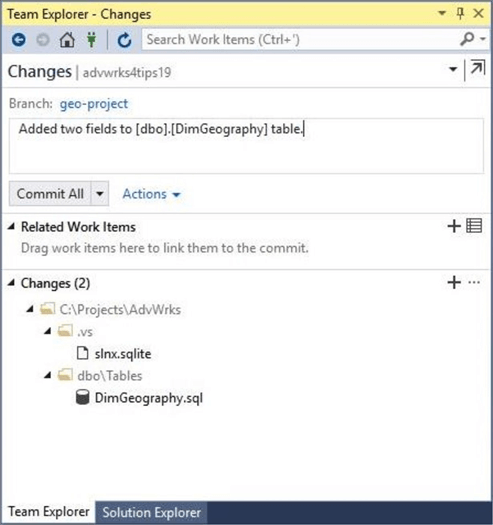
The History menu under the team explore brings up a menu that shows all the changes in the local repository. We can see that a new branch has been created and checked in.

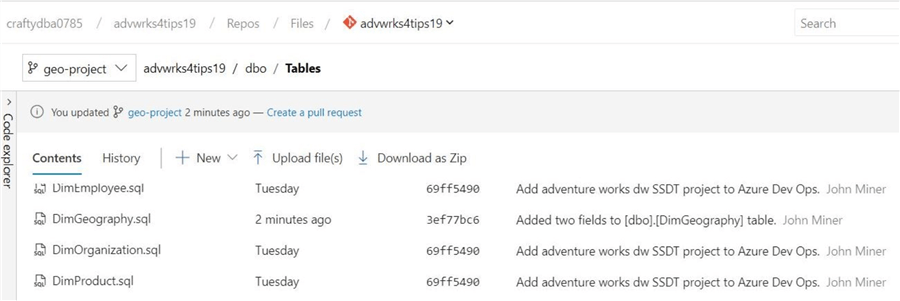
It is always good to double check your work. If we look at the code explorer in Azure DevOps, we can see the same change being checked into the geo-project branch.
In a nutshell, linking a code branch to a series of work items is quite easy to do with Azure DevOps.
Merging Code Branches
An agile software development team might have several branches of code being worked on at the same time. After successfully unit testing the code changes, the project manager will request an integration test to be executed. That means all the separate branches need to merged into one branch.
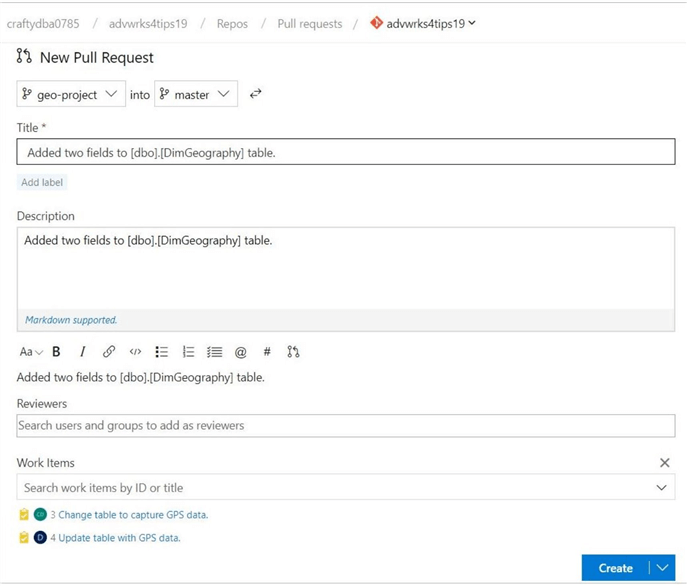
The Pull Requests menu can be used to initiate the merge action. There are two gateways in which users are asked to fill in information. First, the pull request has to be approved with a comment. Second, the pull request has to be marked as complete.

The complete action requires additional check boxes to be marked.
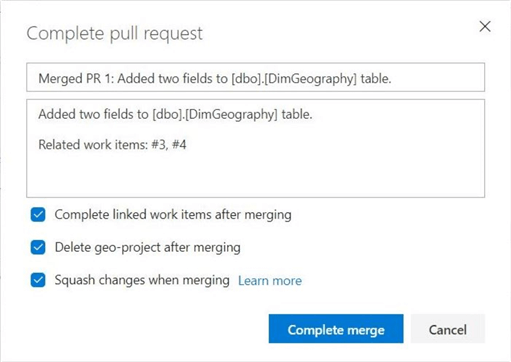
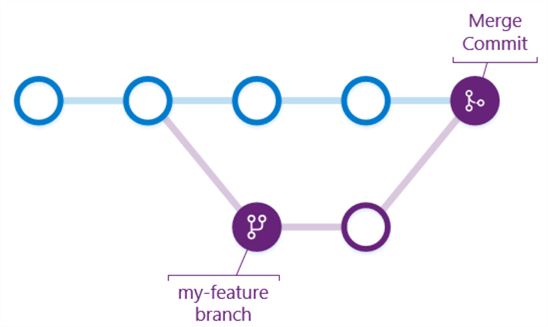
The above image shows the dialog box when that pulls the geo-project branch into the master branch. I am showing the extreme example of a merge in which the branch is deleted and changes are squashed. All commit history for the branch is lost. See diagram below for process flow.

A typical merge adds the file changes to the final branch. In our case, we are using master as the final branch. The files and the commit history are retained in the feature branch. Please compare diagrams to see difference.
The merge action of the remote code repository will be reflected in Visual Studio right away. However, we have a local copy of the geo-project repository. To remove this branch from Visual Studio, we need to use the Sync menu in Team explorer.

The above image shows the local copy of the geo-project branch. The image below shows how to synchronize the local and remote branches. We can see that the comment from the pull action in Azure DevOps made its way down to the team explorer.

Last but not least, taking a look at the branches menu in team explorer will reflect the state of both the local and remote branches. Be careful when using the squash commit action since any history of the feature branch is destroyed.
Organizing Back Log Items
There are five different statuses that can be associated with a backlog item. I have already talked about the new and active statuses. The resolved status can be used when a bug item has been added and the closed status reflects a closed item. Sometimes, a request is added as a backlog item but has been decided to not implement the task. This item can be set to a removed status. The diagram below shows a state diagram for item statuses.

So far, we have talked about how stories can be used to group items. However, some project management tools implement themes, initiatives, epics, user stories and items for grouping of tasks. One way to think of this hierarchy is to look at a Russian doll in which a smaller dolls fit into a larger doll.
A work item is a task that can be completed in hours. A story is a group of tasks that can be completed in days. A feature is a group of stories that can be completed in weeks. An epic is a group of features that can be completed in months. Azure DevOps allows the project manager to use these four concepts.
If we go back to the boards menu, we can use the right most drop down box to look at features. The image below shows the “Modernize AdvWrks Program” feature that I created. Changing the geography table is just one story under this feature.
If this was a real-life example, I would rename the title of the feature to be “Adv Wrks – DB Changes” to reflect any back-end changes that are required to the system. The “Adv Wrks – GUI Changes” would reflect any front-end changes required by the system. Of course, we would have to add a Visual Studio project to the code repository that contains our web application.

Last but not least, I would create an epic named “Modernize AdvWrks Program” to group both the front and back end features. By default, epics are not enabled in Azure DevOps. Use the settings icon or the gear to bring up the settings dialog box. Make sure the epics option under backlog navigation levels is checked to enable.
Summary
Today, companies are creating agile teams in which members collaborate with each other, teams self-organize the work load, and cross functional skills sets of the members allow for rapid delivery of work items. It is not surprising that Microsoft Azure DevOps combines scrum project management tools and software version control into one service.
The first step in leveraging this Scrum tool is to add team members to the DevOps account. We want to figure out the capacity of each team member for resource planning.
The second step is the addition of product backlog items to the backlog. Every software project has a dependency graph on how the components will be created or modified. The project manager can use epics, features and stories to group the product back log items into a logical hierarchy.
The third step is to plan a sprint. This is choosing all the items that can be accomplished within the two-week period and assigning the items to team members. The self-organizing developers can weigh in at this time about which tasks will be checked out as a feature branch. One or more branches may be checked out at this time.
The fourth step is to have each developer pull down a feature branch. Designing, deploying and testing the new or modified code can call be done with Visual Studio. I did not go over creating automatic test cases for database projects. I leave this open as a topic to cover in the future. After completion of the assigned tasks, the code changes are checked into the repository.
The fifth step is to create a pull request so that all changes get merged into the final release branch. Some organizations use the master branch for this purpose. A final unit test of all the feature branches that were created during a sprint is required to test the completeness of the system.
The great thing about using this tool is the ability to back out a feature branch if bugs were introduced. The commit history captures the incremental details about the changes and the links to the work items shows the reasoning behind the change. In summary, Azure DevOps allows both agile project planning and software version control to co-exist.
Next Steps
- Leveraging pre-deployment and post deployment scripts
- Using Azure Test Plans for Quality Assurance
- Continuous Database Deployment with Azure DevOps

John Miner is a Senior Data Architect at Insight Digital Innovation helping corporations solve their business needs with various data platform solutions.
He has over thirty years of data processing experience, and his architecture expertise encompasses all phases of the software project life cycle, including design, development, implementation, and maintenance of systems.
His credentials include undergraduate and graduate degrees in Computer Science from the University of Rhode Island. Also, he has earned certificates from Microsoft for Database Administration (MCDBA), System Administration (MCSA), Data Management & Analytics (MCSE), Data Science (MPP), Databricks Certified, and Fabric Certified.
John has been recognized with the Microsoft MVP award nine times for his outstanding contributions to the Data Platform community.
When he is not busy talking to local user groups or writing blog entries on new technology, he spends time with his wife and daughter enjoying outdoor activities. Some of John’s hobbies include wood working projects, crafting a good beer and playing a game of chess.
- MSSQLTips Awards: Author of the Year – 2019, 2022, 2023 | Champion (100+tips) – 2023
