Problem
In my previous articles, Getting Started with Azure Blueprints and Using Azure Blueprints to deploy Azure SQL Server and Database with Key Vault Secrets, I covered details on how to get started with Azure Blueprints to deploy Azure artifact resources through ARM Templates in the Azure Portal. While this is a great option for provisioning, updating and managing Azure Resources as Infrastructure as Code (IaC) through the Azure Portal, what is a good way of getting started with managing Azure Blueprints with PowerShell?
Solution
Azure PowerShell provides a powerful set of cmdlets for managing Azure resources through the PowerShell command line. In this article, we will go over the Azure PowerShell cmdlet for Azure Blueprints (Az.Blueprint) in the Azure Resource Manager framework. Specifically, we will go over how to Export, Import, Publish, and Assign Azure Blueprints with the Az.Blueprint PowerShell cmdlets.
Create an Azure Blueprint in Azure Portal
To be able to export an Azure Blueprint using PowerShell, a blueprint will first need to exist in Azure. Read the steps outlined in my previous article Getting Started with Azure Blueprints to create, publish and assign an Azure Blueprint definition from the Azure Portal.
To keep it simple, let’s create one resource group and one Azure Key Vault in this initial blueprint.

To confirm, the Azure Blueprint contains one Resource Group and one Azure Key Vault. Once the artifacts have been added to the blueprint, remember to save, publish and assign the blueprint through Azure Blueprints in the portal.

Prepare and Connect to Azure PowerShell
If you need more information on how to install PowerShell, be sure to read the next steps section of this article which contain links to the PowerShell installation details.
Once PowerShell is installed, Run it as an Administrator.

Notice the word Administrator in the console to confirm that PowerShell is running in an Administrator-mode.

Next, run the following script to check the version of PowerShell.
$PSVersionTable.PSVersion
Azure PowerShell is compatible with PowerShell 5.1 on Windows so if you have a version that is lower than 5.1, be sure to update PowerShell. Visit the links in the Next Steps section for more information on un-installing and installing PowerShell.

Once the version of 5.1 or higher is confirmed, run the following script to install the Azure Az module. Note that both Azure RM and Azure Az modules cannot be installed at the same time and therefore one will need to be uninstalled before the other is installed. The Az module is similar to AzureRM, but is more advanced in that used shorter and more consistent cmdlet names.
if ($PSVersionTable.PSEdition -eq 'Desktop' -and (Get-Module -Name AzureRM -ListAvailable)) {
    Write-Warning -Message ('Az module not installed. Having both the AzureRM and ' +
      'Az modules installed at the same time is not supported.')
} else {
    Install-Module -Name Az -AllowClobber -Scope CurrentUser
}

To uninstall the existing AzureRM and Az PowerShell modules, close all the active PowerShell sessions, and run the following cmdlets:
Get-Module -Name Azure* -ListAvailable | Uninstall-Module -Force -Verbose -ErrorAction Continue
Get-Module -Name Azs.* -ListAvailable | Uninstall-Module -Force -Verbose -ErrorAction Continue
Get-Module -Name Az.* -ListAvailable | Uninstall-Module -Force -Verbose -ErrorAction Continue
Notice the PowerShell messages indicating the successful un-installation of the AzureRM modules.

Next, try running the Az installation script again.
if ($PSVersionTable.PSEdition -eq 'Desktop' -and (Get-Module -Name AzureRM -ListAvailable)) {
    Write-Warning -Message ('Az module not installed. Having both the AzureRM and ' +
      'Az modules installed at the same time is not supported.')
} else {
    Install-Module -Name Az -AllowClobber -Scope CurrentUser
}
This time we can see that the Az module is being installed and begins with a prompt to which we will respond [Y].

Also select [Y] for any additional questions.

The Az module will then begin its installation process.

After the Az module has been installed, run the following script to install Az.Blueprints to allow us to work with Azure Blueprints in PowerShell.
Install-Module -Name Az.Blueprint -Verbose ; Update-Help -Force -ErrorAction SilentlyContinue
Remember to respond [Y] to any questions or prompts.

This time, I will select [A] for Yes to All additional questions and prompts.
Finally, we will see a message indicating that the Az.Blueprint module has been successfully installed.

Now that we have all the right Azure PowerShell modules installed, we are ready to log into our Azure account through PowerShell.
Run the following script to connect to your Azure account.
Connect-AzAccount

Notice the Microsoft Azure account sign in prompt that comes up and enter the appropriate username and password to connect to Azure.

Once connected, the account, subscription, tenantID, and environment will be displayed.
Verify that you have connected to the correct account and proceed to the next steps of working with Azure Blueprints using PowerShell.

Export Azure Blueprint
Now that we have successfully completed the steps to 1) create an Azure Blueprint in the Azure Portal, and 2) install the Azure Blueprint PowerShell module, let’s go ahead and run the following script to export the desired Azure Blueprint.
Remember to replace the SubscriptionId in the script. Note that the subscriptionid can also be replaced with the managementgroupid to define and customize the scope of the blueprints.
$blueprints = Get-AzBlueprint -SubscriptionId 'Enter Subscription ID Here' -Name 'bp-rl-demo-dev-prereq' -Version 1
$blueprints
Notice that we can see the details about the specified blueprint in PowerShell.

Run the following script to export this blueprint to the desired Output Path.
Export-AzBlueprintWithArtifact -Blueprint $blueprints -OutputPath 'D:\blueprints'

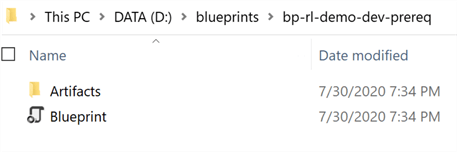
Once the export script completes, I can see that there is a new folder ‘blueprints’ along with another folder with the name of my blueprint ‘bp-rl-demo-dev-prereq’.
With this folder structure, I’ll be able to add additional blueprints to this ‘blueprint’ folder.

The blueprint folder contains a blueprint.json file along with a folder that contains the Artifacts that must be provisioned.
This blueprint JSON file includes properties about the blueprint, any resource groups to create, and all of the blueprint level parameters.
The artifact that we are trying to provision is Azure Key Vault, however, the exported artifact file does not contain a meaningful name.

Upon opening the artifact file, I can confirm that it truly contains the Azure Key Vault artifact details.

Friendly names of the artifacts will be useful if I need to add additional artifacts, so I will rename the artifact to ‘AzureKeyVault’.

Import Azure Blueprint
In the previous section, Azure PowerShell’s Az.Blueprint module was used to export an Azure Blueprint that was created in the Azure Portal.
Now, we are ready to re-import the Blueprint back into my Azure subscription.
Since I already have an Azure Key Vault and Resource Group created, I can delete the existing resource group using the following script. Remember to take caution and careful consideration when deleting Azure Resource Groups.
Remove-AzResourceGroup -Name rl-rg-demo001
Type [Y] to confirm the deletion of the resource group and note the ‘True’ message once the resource group is successfully deleted.

Run the following script to import the blueprint specified in the Input Path. Additionally, name the blueprint and remember to enter the subscriptionid.
Import-AzBlueprintWithArtifact -Name 'bp-rl-demo-dev-prereq-POWERSHELL_IMPORT' -SubscriptionId ENTER-SUBSCRIPTION-HERE -InputPath D:\Blueprints\bp-rl-demo-dev-prereq

After running the script, I navigated back to Azure Blueprints in the Azure Portal to confirm that I can see the new blueprint created as a draft. The next step would be to publish the blueprint.

Publish Azure Blueprint
In the previous section, I had imported an Azure Blueprint using the Az.Blueprint PowerShell Module. Next, I will run the following script to publish the blueprint. Remember to enter the SubscriptionId.
The first section gets the blueprint that needs to be published.
$bp = Get-AzBlueprint -Name bp-rl-demo-dev-prereq-POWERSHELL_IMPORT -SubscriptionId 'ENTER-SUBSCRIPTION-ID'
This second script publishes the blueprint along with a version number that we specify.
Publish-AzBlueprint -Blueprint $bp -Version 1.0

After the publish completed successfully, I navigate back to Blueprints in the Portal and can see that the latest version on 1.0 has been published. Next, we are ready to assign the blueprint.

Assign Azure Blueprint
In the previous section, I published an Azure Blueprint using the Az.Blueprint PowerShell module. Next, I will run the following scrip to assign the blueprint.
Remember to specify the assignment location as this is a required parameter for the assignment process. For more information on variations for managing assignments through parameters or assignment files, see: How to manage assignments with PowerShell.
New-AzBlueprintAssignment -Blueprint $bp -Name 'bp-rl-demo-dev-prereq-POWERSHELL_IMPORT' -Location 'centralus'

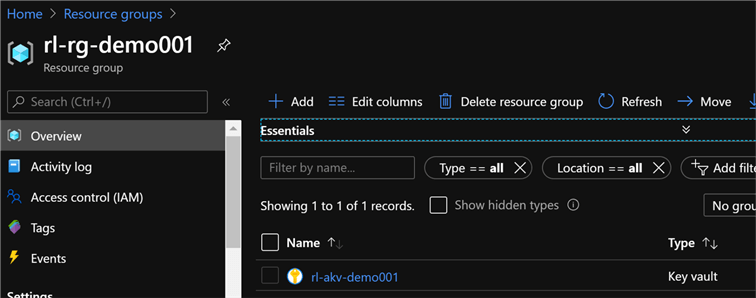
After the resources have been successfully provisioned, I can navigate back to the portal to see that a new resource group along with an Azure Key Vault has been created as expected.
Next Steps
- For more detail on using PowerShell with Blueprints, see: How to manage assignments with PowerShell.
- For a list of Azure PowerShell cmdlets for Azure Blueprints in the Azure Resource Manager framework, see: Az.Blueprint.
- For more detail on installing Azure PowerShell, see: Install Azure PowerShell.
- For more information on uninstalling Azure PowerShell, see: Uninstall the Azure PowerShell module.
- For more information on installing Azure PowerShell AZ, see: Install PowerShell Az preview module for Azure Stack Hub.
- For more information on Azure Management Groups, see: Create management groups for resource organization and management.
- For more on signing in with Azure PowerShell, see: Sign in with Azure PowerShell.
- For PowerShell scripts to delete Azure Resources and Groups, see: Azure Resource Manager resource group and resource deletion.

Ron C. L’Esteve is a Data and AI Leader and professional Author residing in Chicago, IL, USA. He is well-known for his impactful books and article publications on Azure Data & AI Architecture, Engineering, and Leadership. Ron holds a Master of Business Administration (M.B.A.) and Master of Science in Corporate Finance (M.S.F.) from Loyola University Chicago. Ron possesses deep technical skills and experience in designing, implementing, leading, and delivering modern Azure Data & AI projects for numerous clients around the world. He is a Motorola Certified Six Sigma Green Belt, a Microsoft Global Challenger, and also holds numerous additional Microsoft, Snowflake, and Databricks professional certifications in Big Data Engineering, Artificial Intelligence, Apache Spark and Data Platform Architecture.
- MSSQLTips Awards: Champion (100+ tips) – 2023 | Author of the Year – 2020-2021 | Rookie of the Year – 2019
