By: Rick Dobson | Comments | Related: > Views
Problem
Please present a quick summary of some T-SQL statements for creating, dropping, and changing views. Also, clarify when I might want to use a view for T-SQL application development. Finally, give some demonstrations of T-SQL code for creating, dropping, modifying, and using views.
Solution
A view is a T-SQL SELECT statement encapsulated in a SQL Server object. MSSQLTips.com previously published a quick and easy-to-read introduction to views. This tip digs more deeply into the topic with coverage of syntax, including how to drop views and alter views, data setup for a view, and different ways to use a view once it is created or modified.
There are at least two other SQL Server objects that can satisfy this top-level description of a view as one which encapsulates a SELECT statement. These other objects are stored procedures and inline table-valued user-defined functions. The encapsulation of the T-SQL SELECT statement makes it easier to extract data from multiple tables because you can return the outcome of a SELECT statement without re-specifying a complex join each time there is a need to run the SELECT statement. Views, along with both stored procedures and inline table-valued functions, can also permit the display of selected portions of underlying tables without granting read and write permissions to underlying tables. In this way, all three types of objects can enable access to some of the rows or some of the columns while still denying unrestricted access to all the rows and columns of a set of underlying tables. This feature can restrict access to sensitive data, such as salary or social security number.
So why are views called virtual tables, but stored procedures and inline table-valued user-defined functions not called virtual tables? One reason is that properly configured views can permit inserts, updates, deletes to the underlying tables through the view. While you can modify a data source in a view with a stored procedure, the changes are made directly to the source tables. You can reference a view as the data source within insert, update, and delete statements. User-defined functions, including inline table-valued user-defined functions, return a value or values without changing underlying data already in a database. A follow-up tip to this one will demonstrate how to insert and delete rows from underlying tables through views.
Create, Drop, and Alter Statements for Views
Create View
You can encapsulate a SELECT statement in a view with CREATE VIEW statement. For example, you can write:
create view Myview
as
select my_select_list from my_data_source
- A basic CREATE VIEW statement has a view name and a SELECT statement separated by an as keyword. As with stored procedures and user-defined functions, it is good practice to use a schema qualifier for the view name. For example, you may care to replace Myview with Myschema.Myview.
- The my_select_list term can consist of one or more column names with table qualifiers and aliases if required and/or preferred. By omitting some columns and including other columns from a data source, you can restrict access to sensitive data while permitting access to other data that is essential for some function.
- The my_data_source term can include a single table or multiple tables joined together.
There are lots of variations of the basic SELECT statement design shown above. For example, you can specify where clauses and group by clauses. A where criterion or a having criterion within a group by clause can restrict access to a subset of rows through a view.
Drop View
If a view already exists with the same name as the one specified in a CREATE VIEW statement, then you need to drop the previously created view before invoking the CREATE VIEW statement for the new view. Otherwise, the CREATE VIEW statement will throw an error. You can use a DROP VIEW statement to remove a previously existing view from a database. You can drop a view simply by including its name at the end of a DROP VIEW statement. Again, you may prefer to qualify the view name with a schema name (Myschema.Myview). This statement can be as simple as:
drop view Myview
Alter View
You do not need to drop a view if you want to modify it. Instead, you can change a previously existing view with the ALTER VIEW statement. This statement has the same design as CREATE VIEW statement, except that it modifies a previously existing view. An ALTER VIEW statement can be as simple as the following one. Notice that the syntax for CREATE VIEW and ALTER VIEW is the same. The ALTER VIEW statement requires a previously existing view with the same name in order to succeed, but the CREATE VIEW statement fails if there is a previously existing view with the same name.
alter view Myview
as
select my_select_list from my_data_source
Populating tables for View demonstrations
The following script sets up two data sources, such as might be used in the creation of a view. T-SQL code in subsequent sections will demonstrate how to create views from these two data sources.
- A use statement designates CodeModuleTypes as the default database. This database was initially created and populated in a series of tips on stored procedures (for example, here and here) and user-defined functions. When trying to run the sample code in this tip, you can use any other database you prefer as a default database context.
- Next, the code creates a fresh copy of the dbo.employees table in the default database. The dbo.employees table is merely an excerpt of selected columns for all rows from the Employee table in the Human Resources schema of the AdventureWorks2014 database. This prior MSSQLTips.com article presents step-by-step instructions for downloading a backup of the AdventureWorks2014 database that you can use to restore the database on any computer.
- The script concludes by creating another fresh data source named dbo.persons; this data source is a copy of selected columns for all rows from the Person table from the Person schema in the AdventureWorks2014 database.
-- set-up code for view creation and querying

-- designate a default database
use CodeModuleTypes
go

-- remove prior version of dbo.employees
begin try
   drop table dbo.employees
end try
begin catch
   select
       error_number() [Error Number]
      ,error_message() [Error Message]
end catch

-- create and populate dbo.employees, a staging table
-- copied from adventureWorks2014.HumanResources.Employee
select
    BusinessEntityID
   ,OrganizationLevel
   ,JobTitle
into dbo.employees
from adventureWorks2014.HumanResources.Employee

-- remove prior version of dbo.persons
begin try
   drop table dbo.persons
end try
begin catch
   select
       error_number() [Error Number]
      ,error_message() [Error Message]
end catch

-- create and populate dbo.persons, a staging table
-- copied from adventureWorks2014.Person.Person
select
   BusinessEntityID
  ,FirstName
  ,LastName
into dbo.persons
from AdventureWorks2014.Person.Person
Creating the first sample View
The next script starts by conditionally dropping any previously existing version of a view named dbo.employee_persons. If the view does exist, then the code drops the prior version of the view. If the view does not exist, the DROP VIEW statement fails with a message that the view does not exist or the user running the code may not have permission to remove the view.
Next, a CREATE VIEW statement defines a fresh version of the dbo.employee_persons view.
- After the CREATE VIEW term, the code designates a name for the view.
- Then, the as keyword serves as a delimiter between the view name and the SELECT statement in the view.
- The SELECT statement in the CREATE VIEW statement specifies the T-SQL for returning a results set from the view. In this example, the view is an inner join of the dbo.employees table and the dbo.persons table. The tables are matched by the BusinessEntityID column values in each table.
After the CREATE VIEW statement completes, the database has a new view object in its dbo schema based on the SELECT statement in the CREATE VIEW statement. Subsequent code can display data from the view just as if it were a table. In this sense, the view serves as a virtual table.
-- remove prior version of dbo.employee_persons view
begin try
  drop view dbo.employee_persons
end try

begin catch
   select
       error_number() [Error Number]
      ,error_message() [Error Message]
end catch
go

-- create a view based on join of the dbo.employees and dbo.persons tables
create view dbo.employee_persons
as
select
   em.*,
   per.FirstName,
   per.LastName
from dbo.employees em
inner join dbo.persons per on em.BusinessEntityID = per.BusinessEntityID
Sample SELECT statements invoking the employee_persons View
The following script includes three different SELECT statements that reference the dbo.employee_persons view as if it were a table.
- The first SELECT statement displays the first ten rows from the dbo.employee_persons view. Notice that it uses the Top keyword to designate how many rows to display.
- The second SELECT statement extracts persons who report to the CEO with the Organization = 1 criterion as well as the CEO with the Organization is null criterion.
- The third SELECT statement returns rows from the dbo.employee_persons view whose JobTitle column includes the term sales. This is an attempt to denote employees who currently work in the sales department.
-- display top 10 employees by BusinessEntityID
select top 10 *
from dbo.employee_persons
order by BusinessEntityID

-- display top level employee from employee_persons
-- and direct reports to top level employee by OrganizationLevel
-- from employee_persons view
select *
from employee_persons
where OrganizationLevel is null or OrganizationLevel = 1
order by BusinessEntityID

-- display all employees with sales in their job title and order by OrganizationLevel
select *
from employee_persons
where JobTitle like '%sales%'
order by OrganizationLevel
To help you better understand the operation of the preceding SELECT statements, the results sets are listed below in three separate panes of a Results tab. The first pane is for the first SELECT statement; the second and third panes are for the second and third SELECT statements.

Populating some tables for an additional View demonstration
The following script adds two new tables to the default database, which is CodeModuleTypes in this tip (remember, you can replace CodeModuleTypes database with any other database you prefer). The new tables are for identifying the current department membership of employees so that users can write queries to display the employees in a department without devising ad hoc criteria to extract the employees in a department, such as the like criterion for the employees in the sales department in the preceding section.
It turns out that the AdventureWorks2014 database does not have a single table for denoting the current department name to which an employee belongs. This is partially because over time an employee can work in more than one department. As a result, the table with historical departmental employee assignments must have start dates for each assignment and end dates for all assignments except the current one. Also, the table tracking the departments in which an employee ever worked does not include department names. Instead, the table includes just a numeric indicator for the department. Another table contains paired value sets for mapping numeric indicators for departments to department names. Therefore, two tables are used in AdventureWorks2014 to track the department name to which an employee belongs.
One of these tables is named EmployeeDepartmentHistory. This table allows a developer to extract the current department to which an employee belongs. The table has two foreign keys and two fact columns.
- One foreign key links the EmployeeDepartmentHistory table to the Employee table by BusinessEntityID.
- Another foreign key links the EmployeeDepartmentHistory table to the Department table by DepartmentID.
- The fact columns have names of StartDate and EndDate.
- The StartDate column value indicates when an employee began working in a department.
- The EndDate column value specifies when an employee left a department. If the EndDate column value is null, then the employee still works in that department.
The second table facilitates looking up the name for a department based on the DepartmentID value from the EmployeeDepartmentHistory table. This tip extracts two columns from the Department table in the AdventureWorks2014 database.
- DepartmentID is a column of integer values. The table has a distinct number for each department in the AdventureWorks2014 database.
- Name is a column of string values with a distinct name for each department in the AdventureWorks2014 database.
The following script shows an approach to copying rows from the EmployeeDepartmentHistory and Department tables from the AdventureWorks2014 database to corresponding tables in the default database for this tip.
- Before copying rows from either AdventureWorks2014 table into a corresponding table in the default database, the code conditionally drops the target table in the default database.
- The dbo.employeedepthistory table in the dbo schema of the default database receives BusinessEntityID, DepartmentID, StartDate, and EndDate column values from the EmployeeDepartmentHistory table in the HumanResources schema of the AdventureWork2014 database. Before copying the values into the employeedepthistory table, the code drops any prior version of the table in the dbo schema.
- The dbo.departments table in the dbo schema of the default database receives DepartmentID and Name from the Department table in the HumanResources schema of the AdventureWorks2014 database. Any previously existing version of dbo.departments is dropped before attempting to populate a fresh version of the table.
-- add these data sources to demonstrate views based on more complex queries

-- remove prior version of dbo.employeedepthistory
begin try
   drop table dbo.employeedepthistory
end try
begin catch
   select
       error_number() [Error Number]
      ,error_message() [Error Message]
end catch

-- create dbo.employeedepthistory, a staging table copied
-- from adventureWorks2014.HumanResources.EmployeeDepartmentHistor
select
   BusinessEntityID
  ,DepartmentID
  ,StartDate
  ,EndDate
into dbo.employeedepthistory
from AdventureWorks2014.HumanResources.EmployeeDepartmentHistory


-- remove prior version of dbo.departments
begin try
   drop table dbo.departments
end try
begin catch
   select
       error_number() [Error Number]
      ,error_message() [Error Message]
end catch

-- create dbo.departments, a staging table copied
-- from adventureWorks2014.HumanResources. Department
select
   DepartmentID
  ,Name
into dbo.departments
from AdventureWorks2014.HumanResources.Department
Altering a View for a more complex join
One of the main purposes for adding dbo.employeedepthistory and dbo.departments to the default database in the current tip is to allow a simple, direct way of extracting the current employees in a department. The section with the title "Sample select statements invoking the employee_persons view" illustrates how to filter for employees in the sales department based on whether sales is in the JobTitle for an employee. However, it is not straightforward to identify all employees across all departments by JobTitle. Even if you were able to devise code that implemented this approach, the filters would be complex and vary by department (and subject to change whenever JobTitle names were revised). Having a DepartmentID numeric field for departments or a Name field for department names offers a much easier and more consistent approach for filtering employees based on the department in which they currently work.
The following code script illustrates how to modify the employee_persons view developed earlier in this tip to simplify the filtering of employees based on the department for which they currently work.
- An ALTER VIEW statement specifies new defining code for a previously existing view. As a result, you should not drop the prior view before invoking the ALTER VIEW statement.
- After the ALTER VIEW term, the code designates the name of the previously existing view that will have its defining code changed. In this case, the name of the view is employee_persons.
- An as keyword separates the view name from the defining T-SQL code for the modified view.
- The SELECT statement inside the ALTER VIEW statement joins four tables.
- The dbo.employees table is the initial base table for the view. All other tables either directly or indirectly join to this table. The alias for the initial base table is em. Because of the joins, all rows in the modified employee_persons view can be uniquely identified by the BusinessEntityID value from this table.
- The dbo.persons table is the second base table for the modified view. The alias for this table is per. The per table is inner joined to the em table based on BusinessEntityID values from both tables.
- The dbo.employeedepthistory table has an alias of edh. The edh table is left joined to the em table based on BusinessEntityID.
- The dbo.departments table has an alias of d. The d table is inner joined to the edh table based on DepartmentID.
- The SELECT list items draw from columns in the em, per, and d tables. No columns from the edh appear in the SELECT list, but the DepartmentID column value from the edh table is inner joined to the DepartmentID column value in the d table.
- The where clause criterion only retains rows with a null EndDate column value. This ensures that the department designation for an employee is always for the most recent one in which an employee works.
-- alter dbo.employee_persons to track employees in the current department
alter view dbo.employee_persons
as
select
      em.BusinessEntityID
     ,em.OrganizationLevel
     ,em.JobTitle
     ,per.FirstName
     ,per.LastName
     ,d.DepartmentID
     ,d.Name Dept_Name
from dbo.employees em
inner join dbo.persons per on em.BusinessEntityID = per.BusinessEntityID
left join dbo.employeedepthistory edh on edh.BusinessEntityID = em.BusinessEntityID
inner join dbo.departments d on d.DepartmentID = edh.DepartmentID
where edh.EndDate is null -- to keep only current department assignment
Sample SELECT statements invoking the modified employee_persons View
The script in this section shows how easy it is to filter employees for any given department through the modified view created in the prior section. All the SELECT statement needs is a from clause referencing the name of the modified view and a where clause criterion with the name of the department for which you want a list of current employees. An optional order by clause arranges the results set so that the list of employees appears by rank (OrganizationLevel) within a department. This query design is vastly simpler to specify than one with joins between four base tables.
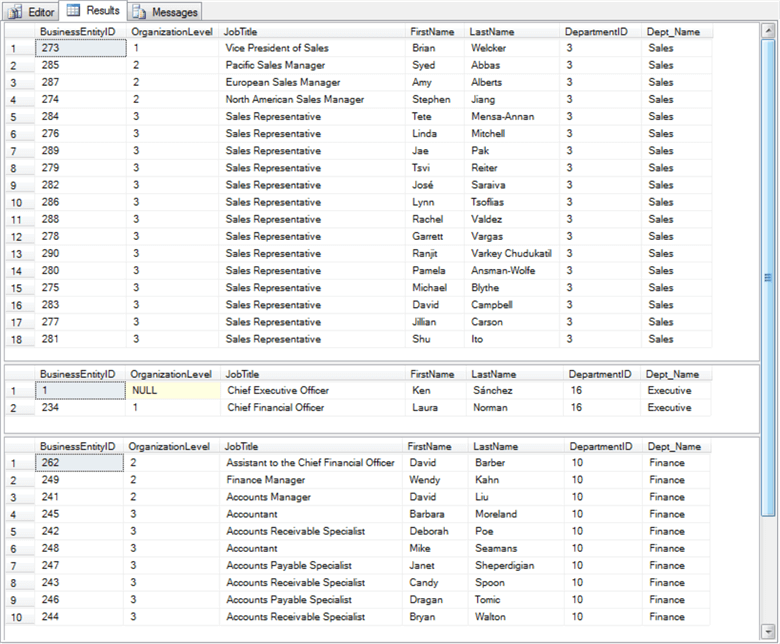
-- display employees from the Sales department with DepartmentID and Dept_Name
select *
from employee_persons
where Dept_Name = 'Sales'
order by OrganizationLevel

-- display employees from the Executive department with DepartmentID and Dept_Name
select *
from employee_persons
where Dept_Name = 'Executive'
order by OrganizationLevel

-- display employees from the Finance department with DepartmentID and Dept_Name
select *
from employee_persons
where Dept_Name = 'Finance'
order by OrganizationLevel
Here’s the Results tab from the preceding script.
- The Results tab has three panes – one for each SELECT statement in the script above.
- Each pane shows the employees ordered by OrganizationLevel value within a single department.
- The employee lists across panes appears in the order of the where criterion
for the three SELECT statements.
- Sales department employees appear in the first pane.
- Executive department employees appear in the second pane.
- Finance department employees appear in the third pane.
Next Steps
- You can run the scripts in this tip from any default database that you choose so long as your server has the AdventureWorks2014 database loaded. A link that points to a reference to help you load this sample database is available in the "Populating some tables for view demonstrations" section of this tip.
- One key reason for a view is because the same complex joins recur in multiple code blocks within a database application. When this happens, you can code the complex join once in a view, and then re-use the view in place of the complex join at multiple points across different code blocks within a database.
- Another key reason for using a view is to allow access to some data from a table while still restricting access to other data from the same data source. For example, you might use a view to restrict access to a salary column in a table of employee data, while you grant access to employee name, emergency contact name, and department name.


About the author
 Rick Dobson is an author and an individual trader. He is also a SQL Server professional with decades of T-SQL experience that includes authoring books, running a national seminar practice, working for businesses on finance and healthcare development projects, and serving as a regular contributor to MSSQLTips.com. He has been growing his Python skills for more than the past half decade -- especially for data visualization and ETL tasks with JSON and CSV files. His most recent professional passions include financial time series data and analyses, AI models, and statistics. He believes the proper application of these skills can help traders and investors to make more profitable decisions.
This author pledges the content of this article is based on professional experience and not AI generated.
View all my tips
