Problem
SQL Server on Linux only allows creating linked servers to another SQL Server, so what options do you have when you want to consume data from an Oracle database table inside a SQL Server query when working on Linux?
Solution
In this tip we will show you how to copy data from an Oracle database table to SQL Server on Linux. We will use two docker images, one with Oracle and the other with SQL Server, so we can test every step taken and indicate the possible errors you may encounter.
Unfortunately, SQL Server on Linux only allows you to create a linked server to another SQL Server, and the PolyBase feature will only be available in the 2019 version.
One option would be to have an intermediate Windows SQL Server which has a linked server to the Oracle database, then you can create a view on this intermediate server and query it from SQL Server on Linux once you create a linked server between them, but currently there is no docker image with Windows SQL Server.
Another option would be to create the linked server on the Oracle side; it is called a database link, and you can use it to copy the data to SQL Server and perform joins between the tables.
Overview
The steps to follow are:
- Install Docker and create an Oracle container
- Create a SQL Server container
- Install Oracle InstantClient in the SQL Server container
- Extract data from the Oracle table and load it into SQL Server
Install Docker and create an Oracle container
I installed Docker Desktop in Windows and used the latest stable image from Oracle, with the command below:
docker run -d -it --name OracleTest -P store/oracle/database-enterprise:12.2.0.1

Note: You need to be logged in Docker Hub web page, agree to the terms of service for this image, and be logged in Docker Desktop using the command docker login.
Once it’s been downloaded, you can confirm it’s running with this command:
docker ps -f 'name=OracleTest'

Now, you need to know which IP address was assigned to it; this is found using this command:
docker inspect -f '{{range .NetworkSettings.Networks}}{{.IPAddress}}{{end}}' OracleTest
The output is: 172.17.0.2
To login into this container, you can do with the following command:
docker exec -it OracleTest /bin/bash:
Create a SQL Server container
I used the latest stable image for Microsoft SQL Server using this command:
docker run --name SqlTest -e "ACCEPT_EULA=Y" -e "SA_PASSWORD=@Sq1T3st" -p 1433:1433 -d mcr.microsoft.com/mssql/server

Once it’s been downloaded, you can confirm it’s running with this command:
docker ps -f 'name=SqlTest'

Now, you need to know which IP address was assigned to it; this is found using this command:
docker inspect -f '{{range .NetworkSettings.Networks}}{{.IPAddress}}{{end}}' SqlTest
The output is: 172.17.0.3
To login into this container, you can do with the following command:
docker exec -it SqlTest /bin/bash
Install Oracle InstantClient in the SQL Server container
The installers are located in this page. I searched for the latest version and downloaded the files instantclient-basiclite-linux.x64-19.3.0.0.0dbru.zip and instantclient-odbc-linux.x64-19.3.0.0.0dbru.zip, this is because the OS in the container is Ubuntu, in other Linux distributions there is a command to download and install automatically.
You can copy them to the SqlTest container with the following commands:
docker cp c:\instantclient-basiclite-linux.x64-19.3.0.0.0dbru.zip SqlTest:/opt/
docker cp c:\instantclient-odbc-linux.x64-19.3.0.0.0dbru.zip SqlTest:/opt/
Then you need to login into this container with the command: docker exec -it SqlTest /bin/bash
You need to install additional required tools with the following commands (an internet connection is required):
apt-get update
apt-get install unzip
apt-get install libaio1


Then you can proceed to unzip InstantClient with the following commands:
cd /opt
unzip instantclient-odbc-linux.x64-19.3.0.0.0dbru.zip
unzip instantclient-basiclite-linux.x64-19.3.0.0.0dbru.zip
cd instantclient_19_3/
ls

Note there is a script you can run and it will automatically update the ODBC, it is run with the following command:
./odbc_update_ini.sh /
You can verify it succeeded viewing the content of this file (the first entry was already set for SQL Server):
cat /etc/odbcinst.ini

Now you need to verify the libraries are correctly linked (no missing files) with the following command:
ldd libsqora.so.19.1

And you need to add a TNS entry for the Oracle instance with its assigned IP address (press Ctrl+D to finish):
cat >> /opt/instantclient_19_3/network/admin/tnsnames.ora
OracleTest =
(DESCRIPTION =
    (ADDRESS = (PROTOCOL = TCP)(HOST = 172.17.0.2) (PORT = 1521))
        (
            CONNECT_DATA =
            (SERVER = DEDICATED)
            (SERVICE_NAME = ORCLCDB.localdomain)
        )
)
And an ODBC entry for the same (press Ctrl+D to finish):
cat >> /etc/odbc.ini
[OracleTest]
Driver = Oracle 19 ODBC driver
ServerName = OracleTest
Then add some environment variables required by Oracle:
export LD_LIBRARY_PATH=/opt/instantclient_19_3:$LD_LIBRARY_PATH
export TNS_ADMIN=/opt/instantclient_19_3/network/admin
ORACLE_HOME=/opt/instantclient_19_3; export ORACLE_HOME
ORACLE_SID=asdb; export ORACLE_SID
And now you can confirm the connection with the following command:
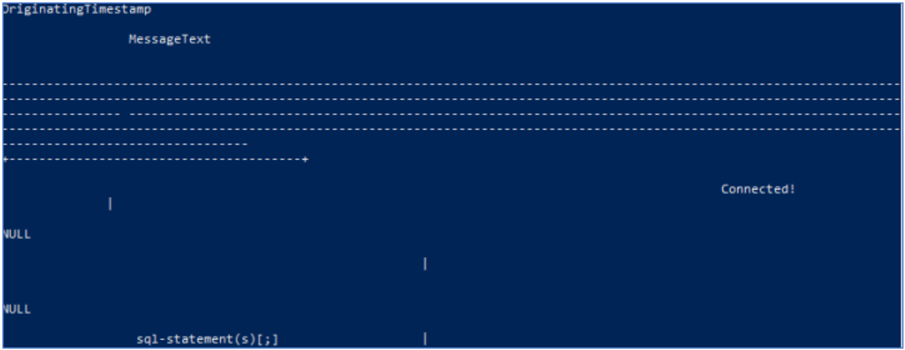
isql -v OracleTest SYSTEM Oradoc_db1

Extract data from the Oracle table and load it into SQL Server
You can export the result of a query in Oracle (in this case the error log of the last three hours, note you have to escape the $ symbol with a backslash) to a text file /home/out.txt using the following command:
isql -v OracleTest SYSTEM Oradoc_db1 -n > /home/out.txt << EOF
SELECT MAX(A.ORIGINATING_TIMESTAMP) ORIGINATING_TIMESTAMP, A.MESSAGE_TEXT
  FROM V\$DIAG_ALERT_EXT A
 WHERE A.ORIGINATING_TIMESTAMP > CAST(SYSDATE-3/24 AS TIMESTAMP)
GROUP BY A.MESSAGE_TEXT;
go
EOF
And now you can import the file into SQL Server with the following command:
/opt/mssql-tools/bin/sqlcmd -S localhost -U sa -P @Sq1T3st -Q "
CREATE TABLE VDiagAlertExt([OriginatingTimestamp] VARCHAR(MAX), [MessageText] VARCHAR(MAX))
GO
BULK INSERT VDiagAlertExt
FROM '/home/out.txt'
WITH
(
    FIRSTROW = 1,
    LASTROW = 473,
    FIELDTERMINATOR = '|',
    ROWTERMINATOR = '\n',
    MAXERRORS = 500,
    ERRORFILE = '/home/error.log',
    TABLOCK
)
GO"
You can see the imported rows with the following command:
/opt/mssql-tools/bin/sqlcmd -S localhost -U sa -P @Sq1T3st -Q "SELECT * FROM VDiagAlertExt"

There are several things to note here:
- The exported file contains the output from
isql, those are the first 23 rows in the table. You can omit them by settingFIRSTROW = 23in the import or you can remove those first rows once the data is imported. - You have to use
VARCHAR(MAX)data type because otherwise you may get trimmed data or data type conversion failures. Once the data is imported, you can easily perform the conversion to the correct data types. - For every row, there is an entry with
NULLvalues, this comes from the imported file and that’s why you have to setMAXERRORS = 500. Once the data is imported, you can remove those rows easily. - The error log file
/home/error.logand its companion file/home/error.log.Error.Txthelps you to determine the last row with valid data, because you will be getting the errorBulk load: An unexpected end of file was encountered in the data file., then you will be able to setLASTROW = 473.
Note if performance is a must, then you should consider a producer/consumer approach loading the information in batches or in parallel, or using SQL Server Integration Services for that from a third server.
Next Steps
- Learn more about Docker from this link.
- Here are the latest docker stable images from Oracle and Microsoft SQL Server.
- The Oracle InstantClient installers are located in this page.
- Learn how to filter the SQL Server Error Log, which was the basis for this tip.

Pablo Echeverria has worked for more than 10 years as a software programmer and analyst, during which time I studied parallel programming and became a senior programmer specialist. Afterward, he switched to a DBA position implementing new processes and creating better monitoring tools, while growing his data scientist skills to improve my customer’s businesses. Check out Pablo’s most recent book, “Hands-on Data Virtualization with Polybase“. This book brings exciting coverage on establishing and managing data virtualization using Polybase. It teaches how to configure Polybase on almost all relational and nonrelational databases, to setup a test environment for any tool or software instantly without any hassle, and to rapidly design and build high performing data warehousing solutions.
- MSSQLTips Awards: Rising Star (50+ tips) – 2024 | Author Contender – 2018, 2022, 2023 | Rookie Contender – 2017


