Problem
Usually, in many big companies, there are several SQL Server environments such as development, test, pre-production, and production. Generally, SQL Server databases in such environments need to have almost identical configurations. Therefore, to configure these environments, DBAs need to install database management systems on several servers. In this article, we are going to discuss how to facilitate this routine task by setting one configuration file and installing SQL Server in different environments using this file as a template.
Solution
We will divide this article into two parts. In the first part, we will provide a step-by-step description of how to configure and generate an installation file as a template for deploying SQL Server in other environments. While SQL Server’s necessary options such as services, server features, collation, authentication mode, etc., can be provided in the configuration file, some components such as Instance Name, Data Directories, user names, and passwords generally are specific to an environment and should be edited manually. Thus, in the second part of the article, we will illustrate how to use a preconfigured installation file to install SQL Server in a new environment.
Create a SQL Server Installation File
Let’s assume that we need to install SQL Server 2017 services in different environments with the same configuration. In our particular example, we need to install SQL Server Database Engine services (with Replication) and Analysis Services. We need to have installed the instances in all our environments with the same features, collation, authentication mode, and so on. The configuration file can be generated even without installing the SQL Server. Hence, we will generate this file on our local computer (we are using a computer with Windows 10 operating system). It is assumed that we have downloaded the SQL Server 2017 installation files on our computer. The generation of the configuration file is almost identical to the installation of SQL Server. To begin with, we perform a double-click on the setup file. When the installation center is started, we choose “Installation” > “New SQL Server stand-alone installation or add features to an existing installation”:

After that, we continue as we are installing a new instance on our local machine:

We are using the “Developer” edition in our example:

Then, we accept the license terms:

Now, it’s time to choose the instance features. As it is mentioned above, we need the Database Engine (with Replication) and Analysis services in all our environments. Therefore, we choose only these options. Additionally, we do not change the default path for the instance root directory as it can be different in different environments:

We type some symbolic name as the instance name as this will also be edited during the real installation, according to each environment:

It is decided to choose the same collation for all environments, so we select the necessary collation and will not change this setting during the installation:

The mixed authentication mode will be used in our instances, allowing users to login using the domain as well as SQL Server credentials:

The data directories can be different in different servers. Thus, we leave the default values and will choose the appropriate ones while installing in a particular environment:

With regard to the Analysis Services, we choose the Multidimensional and Data Mining Mode for the Server Mode:

After all, when the services are ready to be installed, instead of clicking on “Install”, we just locate the configuration file – “ConfigurationFile.ini”:

We can copy the file path and find it easily:

This file contains all settings chosen during the preparation for the installation. We can see these setting in text mode by opening the file via a text editor:

Finally, having generated this file, we can cancel the setup:

Hence, we possess an installation file, with predefined settings that can serve as a template for deploying the SQL Server instances in new environments.
Installing SQL Server from a configuration file
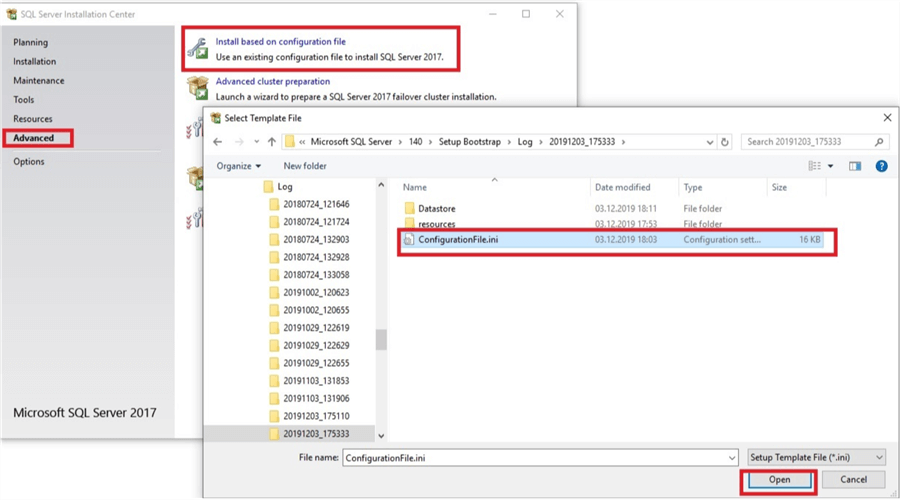
As the next step, we are going to demonstrate how to install SQL Server via the UI using a configuration file. It is important to mention that it is possible to install SQL Server from a configuration file using the command line as well. Now, we are going to install SQL Server on one of our environments using the preconfigured file. To do this, we double-click on the installation file and choose “Advanced” > “Install based on configuration file”. Then we find the configuration file, choose it and click “Open”:
Then, we click “Next” to move forward:

The first steps are similar to the standard installation. We just click on the “Next” button and leave the options as they were selected:

We are moving forward, leaving the Developer edition checked:

Here we need manually accept the license terms:

In the next step, we can see that all necessary features and services have been already selected (they are highlighted in green):

If we need to add or remove some features, we can do it during this process. Instance directories (highlighted in red), however, will probably need to be edited according to the new environment. Therefore, we will choose the appropriate path. The new instance name will be also edited in our case. We will type MSSQL3 as the new instance name:

Now, we need to change our service accounts due to the new server’s user accounts and will enter their passwords. We will leave the collation settings as it is in the configuration file:

The authentication mode also comes from the configuration file and we will not change it:

Probably, for each environment, we will need to modify the data directories:

The configuration settings of the Analysis Services we leave as they were preconfigured:

Nevertheless, the data directories will be modified:

In the final step, we review our settings and click on “Install”:

As a result, we will have SQL Server installed on a new environment. The usage of the predefined configuration file significantly facilitates the process of installing SQL Server with identical settings in several environments. This will also save time, as we do not need to remember and select all necessary options for each environment separately. Moreover, if we are using UI to install, we can easily modify some settings specific to a particular environment.
Conclusion
To sum up, the SQL Server installation wizard allows us to easily configure an installation file. Having a preconfigured installation file can really facilitate the standard installation processes. This can be very helpful particularly when it is needed to install SQL Server instances with similar settings in various environments.
Next Steps
For more information, please use the links below:
- https://docs.microsoft.com/en-us/sql/database-engine/install-windows/install-sql-server-using-a-configuration-file?view=sql-server-ver15
- https://docs.microsoft.com/en-us/sql/database-engine/install-windows/install-sql-server?view=sql-server-ver15

Sergey Gigoyan (LinkedIn) is a Senior Technical Architect specializing in data and databases with more than 15 years of experience. Sergey focuses on modern data architectures, database design and development, performance tuning and optimization, high availability solutions, BI development and DW design. He has worked with SQL Server, Oracle, and PostgreSQL databases, as well as cloud-based data solutions (AWS and Azure). Sergey also has extensive experience with modern data stacks such as Snowflake and dbt.
Sergey’s experience spans various industries. He had the privilege of working with IT giants such as Oracle as a Principal Data Engineer and BlackBerry as well as innovative startups. He helped deliver complex database solutions and advanced data strategies.
Sergey is also the author of “Building a Successful Career in IT – How I Did It” where he provides actionable advice on thriving in the ever-evolving IT industry.
- MSSQLTips Awards: Champion (100+ tips) – 2024 | Author of the Year – 2020