Problem
In this series, we have already converted Oracle database objects to SQL Server in SSMA for Oracle. Now we will load the converted objects into the SQL Server target database. Keep reading this article to understand how to convert all relevant objects from Oracle to SQL Server.
Solution
We are using SQL Server Migration Assistant for Oracle to perform the migration. We are going to perform the next phase that is synchronization of converted objects to a SQL Server database.
Note: The source and target versions of this migration are Oracle 10G and SQL Server 2014. We used SQL Server 2014 because of some application compatibility issues and we have plans for upgrade this instance at a later time. Although, the steps in this article are used for SQL Server 2014, they are applicable to other SQL Server versions as well. Also, I suggest you to perform a migration test in another lower life cycle system before converting your production system.
Below is high level approach for this migration.
- First you need to install SQL Server on a target server where your migrated database will be hosted. Ensure you have proper connection and accessibility between the source Oracle server and target SQL Server
- Next you need to install the Oracle Client and SQL Server Migration Assistance (SSMA)
- Launch SSMA and connect to the source Oracle database. Make sure to check the connectivity due to port or firewall issues
- Now, connect to the target SQL Server that you installed at step 1
- Map the Oracle schema which you want to migrate to the SQL Server database
- Convert Oracle objects to SQL Server
- Load converted objects to SQL Server
- Finally, migrate the loaded data to the target database
Steps 1 through 6 are covered in the articles below:
- How to Install SQL Server Migration Assistant for Oracle - Part 1
- How to Install SQL Server Migration Assistant for Oracle Extension Pack - Part 2
- How to Migrate an Oracle Database to SQL Server using SQL Server Migration Assistant for Oracle – Part 1
- How to Convert Database Objects from Oracle to SQL Server using SQL Server Migration Assistant for Oracle - Part 2
Step 7 – Load Converted Objects to SQL Server
From the previous steps, the database objects have been converted to the target SQL Server database. If you do not have issues during the conversion phase, the next step is to load the data to SQL Server using SSMA for Oracle. Below you can see all of the converted objects in the SSMA for Oracle tool.

Now we will load all the converted objects to the SQL Server database. You can do this in one of the following ways:
- Use SSMA to synchronize the database objects
- Save a script and run it in SQL Server
You can either have SSMA create the objects, or you can script the objects and run the scripts yourself.
- If you do not have to modify any objects or you do not need any customization at the object or code level then you should choose SSMA to perform and create all converted schemas into the SQL Server database. This is very easy and simple process.
- If you want to modify some code, then it is recommended to choose the script approach. You can generate the script of all converted objects and save it. Then you can make changes to the T-SQL scripts and deploy them to the SQL Server database. So, if you need any customization during the load then use the script mode option.
Load Converted Oracle Schema to SQL Server using SSMA
If you closed your SSMA window after converting the Oracle schema to SQL Server during the last step, then you need to launch SSMA and open the project file that you had created for this migration. Remember, you must save all the changes you make in the project file to access them later for future steps.
1 – Launch SSMA for Oracle and open your migration project file which you created to convert the Oracle schema to SQL Server. If you have not closed it yet, then you do not need to open it again and you can just go to step number 2 and follow the next steps. Make sure to save all your work frequently to avoid any data loss.
2 – Focus on SQL Server Metadata Explorer, you can see the target database TF10 or your desired database name.

You can see converted schema names i.e. “TF10” as well in the below image.

Once you expand this schema, you can see all the objects that have been converted to SQL Server. Have a look at below image for better understanding.

3 – Now we will use SSMA for Oracle to load the converted objects to a SQL Server database. We will use the synchronization process between SSMA and SQL Server for this activity.
Expand the database folder in the SQL Server Metadata Explorer in SSMA for Oracle tool and click the checkbox for the database that has been identified for this migration. Our database name is TF10. Now, right click on database TF10 and click “Synchronize with Database” option as shown in the below image. This option will allow you to load the whole database that is shown below including all database objects. If you want to load an individual object or some selected objects then you should uncheck objects you do not want.

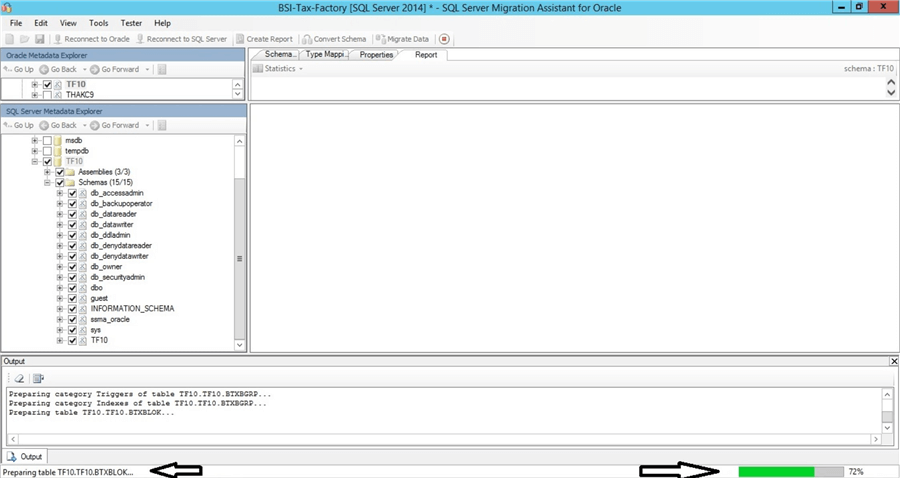
Once you click the above option to start the synchronization, the SSMA tool will freeze and be grayed out for processing. You can also see the status of processing at the bottom of the below screen, showing “Loading objects…”.

If you keep watching the SSMA tool at the bottom, you can see all objects that are in process along with the progress completion percentage.
4 – SSMA first prepares all objects for load and then displays a window showing the source and target details along with the action items that SSMA is going to take during the synchronization process. Have a look at the below image.

You can see 3 columns in the below image. SSMA shows selected database objects represented in a tree on the left side, whereas you can see a tree representing the same objects in SSMA metadata on the right side. The direction of the synchronization is shown in the Action column placed between the two trees.

You can click the plus sign to expand and see more details about the database objects. You can also see various action signs toward multiple objects. You can also validate whether the new objects are in the database. If not, then it will display “Not Found” and it will be created during the synchronization process.
An action sign can be in three states:
- A left arrow means the contents of metadata will be saved in the database (the default).
- A right arrow means database contents will overwrite the SSMA metadata.
- A cross sign means no action will be taken.
Click on the action sign to change the state. Actual synchronization will be performed when you click the OK button of the Synchronize with Database dialog. Review the action column and if you are fine with all details, then click the OK button to start the actual synchronization.

5 – You can also validate your SQL Server target database to ensure nothing is there before starting this synchronization. You can compare them post this process, to ensure that all new objects have been added or created on your database.
For example, there is no schema named TF10 in the SQL Server database in the below image. Once the synchronization process completes, the TF10 schema along with other database objects will be created. I will show you similar screenshot post completion of this load. You can also validate that there are no user tables present in our target database.

Since we already started the synchronization process, you can see the progress in the output window below. The progress bar completion percentage is also shown.

6 – Once synchronization completes, the grayed out window will be enabled with the loaded objects in the target database and any errors will be in the output window.
You can see our process is completed in the below image along with some errors in the error list tab of the output window. You should look into the errors and modify the code where needed to fix the errors being reported. You can also ignore them if these issues are not important objects or you can go ahead and create new objects to fulfill similar requirements in the future.

If you click on the “Error List” tab, you can get all details about the errors. Below is a list of all of the errors from above:
Loading to database new table TF10.ssma_oracle.db_error_list ...
Dropping metadata procedure TF10.ssma_oracle.vpd_dyn_proc ...
Starting Phase #1
Loading to database new function TF10.ssma_oracle.to_date2 ...
  ... sql execution failed
Loading to database new function TF10.ssma_oracle.to_number2 ...
  ... sql execution failed
 Errors: Must declare the scalar variable "@tddd".
Synchronization error: Must declare the scalar variable "@tddd". On: TF10.ssma_oracle.to_date2
 Errors: Must declare the scalar variable "@Param2".
Must declare the scalar variable "@Param2".
Must declare the scalar variable "@Param1".
Must declare the scalar variable "@Number_value5".
Must declare the scalar variable "@Param2".
Must declare the scalar variable "@Nulls_part1".
Must declare the scalar variable "@Param2".
Must declare the scalar variable "@Nulls_part2".
Must declare the scalar variable "@Nulls_part1".
Must declare the scalar variable "@Nulls_part1".
Must declare the scalar variable "@Nulls_part1".
Must declare the scalar variable "@Param1".
Must declare the scalar variable "@hexadecimal".
Must declare the scalar variable "@hexadecimal".
Incorrect syntax near the keyword 'else'.
Must declare the scalar variable "@Number_value3".
Must declare the scalar variable "@s_right_minus".
Synchronization error: Must declare the scalar variable "@Param2".
Must declare the scalar variable "@Param2".
Must declare the scalar variable "@Param1".
Must declare the scalar variable "@Number_value5".
Must declare the scalar variable "@Param2".
Must declare the scalar variable "@Nulls_part1".
Must declare the scalar variable "@Param2".
Must declare the scalar variable "@Nulls_part2".
Must declare the scalar variable "@Nulls_part1".
Must declare the scalar variable "@Nulls_part1".
Must declare the scalar variable "@Nulls_part1".
Must declare the scalar variable "@Param1".
Must declare the scalar variable "@hexadecimal".
Must declare the scalar variable "@hexadecimal".
Incorrect syntax near the keyword 'else'.
Must declare the scalar variable "@Number_value3".
Must declare the scalar variable "@s_right_minus". On: TF10.ssma_oracle.to_number2
The error stated there was an issue with a function and the SSMA tool also allows you to display the code that has the issue, as shown below. We shared the error and code with one of our developers to make the fix post migration. We preferred this approach, because we had limited issues and none were critical. If you face issues with many objects, then I would recommend fixing them first or find a way to create the identical object in the target database.

Below is sample code for the correction.

7 – Now, we will validate whether the database objects have been created in the target SQL Server database. Connect to your database instance and expand the database folder inside SQL Server Management Studio as shown in the below image. You can see multiple user tables are now showing, where none existed before starting the synchronization process.

Similarly, you can expand schema folder to check whether the TF10 schema and its associated objects have been copied. You can see this schema is now displayed under the SQL Server schemas folder.

Load Converted Oracle Schema to SQL Server using Scripts
This is another approach to load all converted Oracle schemas to SQL Server. There are 3 stages in this approach:
- Generate scripts of all converted schemas
- Modify them if required as per business needs
- Run them on the target SQL Server database

Below are the steps you should follow to generate the script:
1 – Connect to SQL Server Metadata Explorer in SSMA for Oracle. Right click on the database and select “Save as Script” to generate a script for all objects in the database. Save this script on your target machine. This file will be saved with *.sql extension which can be easily opened with SQL Server Management Studio.
2 – You can also generate scripts for individual objects by only selecting specific objects to migrate.
3 – Now you can open the saved *.sql file in SSMS and modify as needed.
4 – Once modification is done, you can run the script on the target database to create the objects.

Next Steps
- Synchronization is complete to the SQL Server database during this phase. The next step is to assign or deny the required permissions on these objects to secure your database. It is always recommended and good idea to do this before migrating data to SQL Server.
- Now, we are only one step away from a successful migration. The last step of this exercise is to migrate the data. Stay tuned for the last part of this series.

Manvendra is a passionate database lover currently working as a Technical Architect at one of the top MNCs. He has extensive experience on all versions of SQL Server since 2000 and has built Big Data skills. He has lead projects on the following database features: Database Mirroring, Always ON, Replication, Log Shipping, Geo-Clustering and Performance Tuning and delivered many SQL Server projects on consolidation, upgrades, heterogeneous replication, HA / DR solutions, automation and major performance tuning projects. You can also follow Manvendra on his blog, Twitter, LinkedIn and Facebook.
- MSSQLTips Awards: Champion (100+ tips) – 2018 | Author Contender – 2015-2018, 2021-2022