Problem
This tip continues the series on using SQL Server Migration Assistant for Oracle to convert a database from Oracle to SQL Server. In this last phase, we will perform and explain migrating the data from Oracle to SQL Server.
Solution
We are using SQL Server Migration Assistant for Oracle to perform the data migration part of the process.
Below is high level approach for this migration:
- First you need to install SQL Server on target server where your migrated database will be hosted. Ensure you have proper connection and accessibility between source Oracle server and target SQL Server system
- Next you need to install Oracle Client and SQL Server Migration Assistance (SSMA) on that server
- Launch SSMA and connect to the source Oracle database. Make sure to check the connectivity due to port or firewall issues
- Connect to the target SQL Server that you installed in step 1
- Map Oracle schema which you want to Migrate to SQL Server database
- Convert Oracle objects to SQL Server
- Load converted objects to SQL Server
- Finally, migrate the loaded data to the target database
Steps 1 through 7 are covered in the articles below:
- How to Install SQL Server Migration Assistant for Oracle - Part 1
- How to Install SQL Server Migration Assistant for Oracle Extension Pack - Part 2
- How to Migrate an Oracle Database to SQL Server using SQL Server Migration Assistant for Oracle – Part 1
- How to Convert Database Objects from Oracle to SQL Server using SQL Server Migration Assistant for Oracle - Part 2
- Load Database Objects for Conversion from Oracle to SQL Server using SQL Server Migration Assistant – Part 3
Data Migration from Oracle to SQL Server using SSMA
If you closed SSMA after synchronizing the converted objects to SQL Server, then launch SSMA and open the project file that you created for the migration. Remember, you must save all your work you are doing in a project file to be able to access them later.
Customize or Review Project Settings
First, I would recommend reviewing the SSMA project settings before moving ahead with the data migration. This is a time consuming step so we should give proper attention to ensure a smooth data transfer otherwise the migration can fail and you will need to do it again which will take more time and effort.
There are various settings and options you need to review and modify considering the size of your migration. Here, I will give you some of the important settings that you must review before starting the data migration. If your database is not very big then I would recommend using the default settings.
First thing is to decide which migration mode to use. SSMA’s migration engine allows us two types of data migrations:
- Client-Side Data Migration Engine
- Server-Side Data Migration Engine
Client-side data migration refers to SSMA client retrieving the data from the source and bulk inserting that data into SQL Server.
Server-side data migration refers to SSMA data migration engine (bulk copy program) running on the SQL Server box as a SQL Server Agent job retrieving the data from the source and inserting directly into SQL Server thus avoiding an extra client-hop.
The difference between both types are, client-side data migration engine resides inside the SSMA application and is not dependent on an extension pack whereas the server-side data migration engine resides on the target database and it is installed through an extension pack. You have already installed the extension pack during the SSMA installation.
You can select either option in the Project Settings dialog box in SSMA to select the appropriate migration engine.
Another thing you should look at in the Project Migration options in the Project Settings dialog box is how you can control or limit the batch size, table locking, constraint checking, null value handling, etc.
The Migration page of the Project Settings dialog box contains settings that customize how SSMA migrates data from Oracle to SQL Server. I have described some of the important settings that you should review before starting the data migration. Below is the table along with their description and default values.
Feel free to customize these settings based on your requirements. Remember, any changes in these settings can hamper or improve the migration.
| Parameters | Descriptions | Default Value |
|---|---|---|
| Migration Engine (Mode) | Specifies database engine used during Data Migration. There are 2 modes available:
| Client-Side Data Migration Engine |
| Parallel Data Migration Mode | Specifies the mode used for threads to enable parallel data migration. In Auto mode, SSMA chooses the number of threads (10 by default) split to migrate the data. In Custom mode, the user can specify the number of threads split to migrate data (minimum is 1 and maximum is 100). Currently, only the client-side data migration engine supports parallel data migration. | Auto |
| Data Migration Timeout | Specifies the timeout used during the data migration | 15 |
| On Error | Stops Data migration when an error occurs. It has three options:
| Proceed to the next batch |
| Batch Size | Specifies the batch size used during data migration. | 10000 |
| Check constraints | Specifies whether SSMA should check constraints when it inserts data into SQL Server tables. | False |
| Extended Data Migration Options | Shows extra data migration options for each table in a separate detail tab. | Hide |
| File triggers | Specifies whether SSMA should fire insertion triggers when it adds data to SQL Server tables. | False |
| Keep Identity | Specifies whether SSMA preserves the identity value when it adds data to SQL Server, regardless of the default values that are specified in SQL Server. | True |
| Keep nulls | Specifies whether SSMA preserves null values in the source data when it adds data to SQL Server, regardless of the default values that are specified in SQL Server. | True |
| Mark string Trim operation with error | If the target column size is less than the source string length, the value will be trimmed and marked as an error. | Yes |
| Replace unsupported dates | Specifies whether SSMA should correct dates that are earlier than the earliest SQL Server datetime date (01 January 1753). To keep the current date values, select Do nothing. SQL Server will not accept dates before 01 January 1753 in a datetime column. If you use older dates, you must convert the datetime values to character values. To convert dates before 01 January 1753 to NULL, select Replace with NULL. | Do Nothing |
| Table Lock | Specifies whether SSMA locks tables when it adds data to tables during the data migration. Obtains a bulk update lock for the duration of the bulk copy operation. If the value is False, a lock is set at the row level. | True |
Source – Project Settings (Migration) (DB2ToSQL)
Step 8 – Migrate Data from Oracle to SQL Server Database
We have already customized the Project Setting parameters to optimize the migration process in the above section. Now, we will start the data migration in this section. Before going ahead just validate the below steps as prerequisites.
- The Oracle providers are installed on the computer that is running SSMA.
- You have synchronized the converted objects with the SQL Server database.
- If you are choosing server-side migration engine, then ensure the below two points are addressed before performing data migration:
- The SSMA for Oracle Extension Pack is installed on the instance of SQL Server.
- The SQL Server Agent service is running on the instance of SQL Server.
If you have started the migration with server-side data migration configuration without installing SSMA for Oracle Extension Pack, then you will get the below error while migrating the data:
migration will not be possible. Please check if Extension Pack is installed
correctly'.
Step 1 – Launch SSMA for Oracle and open your migration project file under which you have converted the Oracle schema to SQL Server. If you haven’t closed it yet, then you don’t need to do open it again and you can just go to step 2. Be sure to save all your work frequently to avoid any data loss.

Step 2 – Right click the identified Oracle schema that we are migrating to SQL Server and check off this schema. Click the “Migrate Data” option from the options shown in the below image.

Step 3 – SSMA for Oracle will ask you to connect to source and target databases systems once again during this exercise. Enter the credentials the way we had entered during mapping the objects in previous articles. I had entered all credentials and clicked the “Connect” button.

Once you connect to the Oracle database, SSMA will ask you to enter connection details for the target database system. Enter these details and click the Connect button to establish the connections.

Step 4 – Migration will start after establishing the connections between Oracle and SQL Server databases through SSMA for Oracle. You can see the preparation step has been started in the output window in below screenshot. The completion progress bar can also be seen in the bottom right of the below image.

Step 5 – Dealing with possible errors, if there are issues. If there are not any issues the process will continue to step 6.
In the below image, SSMA has become accessible again versus being grayed out during processing. SSMA will remain grayed out until the data migration process completes. In the screen below, we can see what has happened so far.

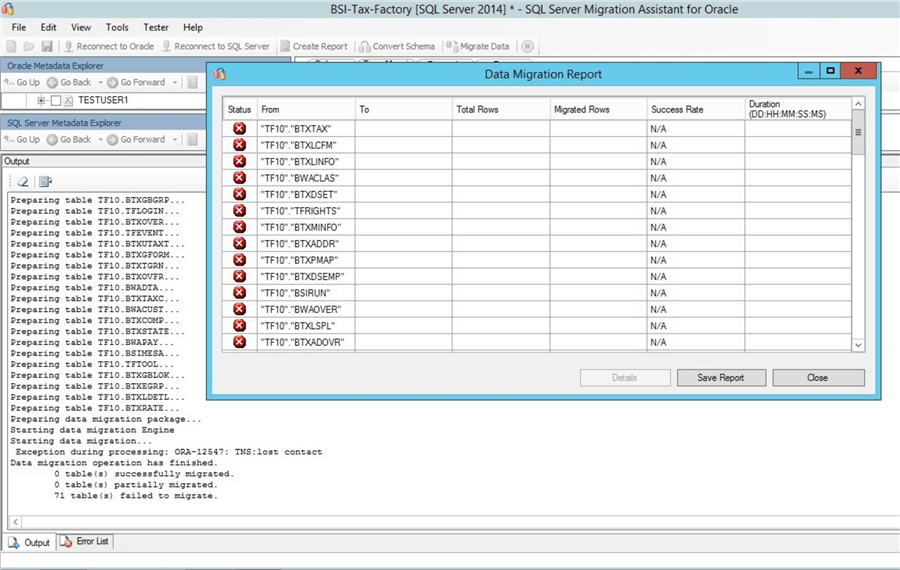
If you look at “Error List” tab in the output section, you can read in last line “71 table(s) failed to migrate”. Data Migration Report also displays the status of all tables as a red X and success rate shows N/A. You can save the report for further investigation, if needed.
The above issue was related to a TNS issue, we engaged the Oracle DBA to investigate, but nothing was changed to fix the error. We reinitiated the process and it worked this time.
6 – You can skip step 5 to continue the flow. Everyone will not get issues so let’s continue from step 4 to show a successful migration. We can see the preparation step was completed followed by starting the migration of individual tables.

You can keep reading the output section to see information about the migration start and finish time for a table, the output section will also show number of rows migrated to SQL Server along with the time it takes to migrate.

You will also notice most of the small tables have been successfully migrated whereas the biggest table is still in process to migrate. This can be seen in the bottom section of SSMA. You will also notice the number of migrated rows keeps incrementing.

The SSMA screen is still grayed out because the migration is still in progress. Only two tables are in progress right now because of their large size. You can see this in the below image along with the number of migrated rows.

One of the big tables BSIRUN that was running along with another big table has been successfully migrated now whereas the BSIMESA table is still in process. You can read the output log in the below image. You can also see the time taken to migrate all rows for this table.

I am not capturing anymore screenshots now and leaving the SSMA to process all rows for this table. You can see 23% of the data has been migrated to SQL Server in the above image whereas 100% of data have been migrated in the below image. Almost all rows have been processed for the BSIMESA table, have a look at bottom of the below image.

Step 7 – Once all tables and data are migrated, you will get the below output. If there is any problem in migrating any table, you can get this information in the below section. All tables have been migrated successfully is shown for this migration.

The Data Migration Report will also appear for all tables that have been migrated. If any data did not migrate, click the row that contains the errors, and then click Details. When you are finished with the report, click Close. You can also see the total number of rows, migrated rows, success rate and duration of each migrated table in the data migration report. You can save the data migration report for documentation and future reference.

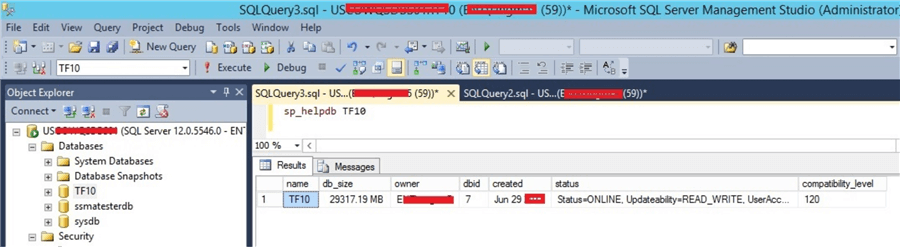
Step 8 – We have migrated an Oracle database to SQL Server. Next you can validate the details in SQL Server by accessing the database, checking the size of the tables and the data. Here we checked the database details using sp_helpdb and you can see the details below.
Next Steps
We have successfully migrated an Oracle database to SQL Server in a step by step manner. Next you can work on application and database performance tuning as we have migrated from different RDBMS.
Read the below previous articles to understand the sequence of this migration.
- How to Install SQL Server Migration Assistant for Oracle - Part 1
- How to Install SQL Server Migration Assistant for Oracle Extension Pack - Part 2
- How to Migrate an Oracle Database to SQL Server using SQL Server Migration Assistant for Oracle – Part 1
- How to Convert Database Objects from Oracle to SQL Server using SQL Server Migration Assistant for Oracle - Part 2
- Load Database Objects for Conversion from Oracle to SQL Server using SQL Server Migration Assistant – Part 3

Manvendra is a passionate database lover currently working as a Technical Architect at one of the top MNCs. He has extensive experience on all versions of SQL Server since 2000 and has built Big Data skills. He has lead projects on the following database features: Database Mirroring, Always ON, Replication, Log Shipping, Geo-Clustering and Performance Tuning and delivered many SQL Server projects on consolidation, upgrades, heterogeneous replication, HA / DR solutions, automation and major performance tuning projects. You can also follow Manvendra on his blog, Twitter, LinkedIn and Facebook.
- MSSQLTips Awards: Champion (100+ tips) – 2018 | Author Contender – 2015-2018, 2021-2022
good work. Thank you for posting this. it is very helpful.
Hi Carlos,
There are many factors which can impact the migration process. We must carefully plan before triggering actual migration. Some of the best practices i am giving below.
1-Ensure you have high-end system on target system. Later you can downsize system resources post migration.
2-Make sure to create a database with a target size in SQL Server and let you system increase database files during migration
3-Drop indexes before migration and plan to create them after migration
Remaining settings i have mentioned in attached link: https://techyaz.com/sql-server/performance-tuning/improve-sql-server-bulk-data-import-performance/
Any performance tuning tips? I have a database with 1.7billion across 1,700 tables and this process takes almost 48hrs. Does allocating larger table space help? We can’t have too large of a commit size for many reasons so we keep it at 5,000.