Problem
You have a SQL Server database with a table that stores a lot of records. Occasionally, you delete large amounts of data from the table. For example, you only need to keep records for the last five years. Anything older than five years needs to be deleted.
However, you noticed that when you deleted the old records, your database file size did not change. Let’s say that the file size for the table was 60GB, and you remove 20GB of old records. You expect the file size to drop to 40GB, but instead it stays at 60GB.
This also holds true if you “truncate” the table. The file size will remain the same as it was before you truncated it.
Solution
When you create a database, you initially set a base size for the data and log files. This is just a minimum starting point. The file size will grow with the addition of more data in the table(s). After deleting a large amount of data from the database, you notice the mdf and ldf file sizes remain the same as they were before deleting the data. This is due to SQL Server keeping that max file size as reserved space. If you absolutely must regain that reserved space, you can use SHRINKFILE and SHRINKDATABASE to get it back. Optionally, you can let SQL Server keep the reserved space for use when the amount of records again grows within the database.
Precautions
If you want to shrink the reserved space of the database after you delete data and the reserved space needs to be increased later as data is inserted again, then this procedure may create physical disk fragmentation and affect performance. Be sure to run a disk defragmentation afterwards.
Things to know:
- You cannot shrink a database that is currently being backed up nor can you backup a database that is currently in the shrink process.
- The database cannot be reduced to a size smaller than the minimum or original size of the database. For example, if a database was created with an initial size of 8MB but grew to 4GB, the smallest you can shrink the database to is the original size of 8MB.
- To use the SHRINK function, you must have either the “sysadmin” fixed server role or “db_owner” database role permission. A user with “read-only” permissions cannot use the “SHRINKFILE” or “SHRINKDATABASE” functions.
CAUTION:
- First and foremost, do not try this experiment on a production server. Always use a test server for this type of training / testing, even if you must build a new test server environment.
Building a Test Environment
In this sample, we will be creating a test database named “SampleDataBase” to work with.
USE master;
GO

CREATE DATABASE SampleDataBase;
GO

USE SampleDataBase;
GO

CREATE SCHEMA Sales AUTHORIZATION dbo;
GO

-- Create a table to work with.
CREATE TABLE Sales.Customers (
   CustomerID INT NOT NULL
   , CustomerName CHAR(100) NOT NULL
   , CustomerAddress CHAR(100) NOT NULL
   , Comments CHAR(189) NOT NULL
   , LastOrderDate DATE
   );
GO
Get Size of Databases
Before we start inserting data, we need to look at and document the file size for the “mdf” and “ldf” files for the database. This will provide us a baseline for comparison. We have a number of ways to accomplish this, I have listed two of them for your convenience.
Option 1 – Using T-SQL
Run this simple script to find out the initial or current size of the “SampleDataBase” file.
USE SampleDataBase;
GO
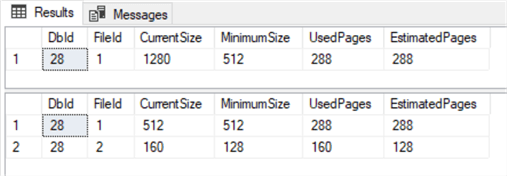
EXEC sp_spaceused;The results should look something like this, depending on your settings of minimum file size during the creation of the database.

Option 2 – Using Windows File Manager (GUI)
Navigate to the folder that holds the “mdf” and “ldf” files and take a screen shot like in image 001 below. By default, this will be the folder path where SQL Server stores your data files. Depending on your specific configuration and version of SQL Server.
This is where it is on my machine: C:\Program Files\Microsoft SQL Server\MSSQL11.MSSQLSERVER1\MSSQL\DATA\
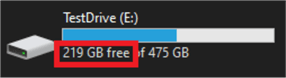
Or, if you put the files on a different drive during creation, simply navigate to the drive/folder where you put them. In the screenshot below, I have my data files on drive E:

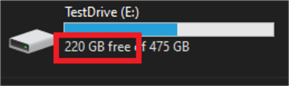
Below is a screen shot of my hard-drives available space prior to inserting any data.
Now, let’s populate the table with ten million rows of data with random dates ranging from the year 2001 to 2021. I’m using ten million so there will be an obvious file size difference for your reference. Remember to make sure you have enough available drive space before starting this insert. Also, this process could take about 20 to 25 minutes, depending on your computer’s performance.
(Bonus: if you don’t already have a generic data generator in your arsenal, here’s a free version that you are welcome to use, modify and share.)
USE SampleDataBase;
GO

DECLARE @rdate DATE
DECLARE @startLoopID INT = 1
DECLARE @endLoopID INT = 10000000 -- Amount of Rows you want to add
DECLARE @i INT = 1
WHILE (@i <= 10000000) -- Make sure this is the same as the "@endLoopId" from above
WHILE @startLoopID <= @endLoopID
BEGIN
    SET @rdate = DATEADD(DAY, ABS(CHECKSUM(NEWID()) % 7300 ), '2001-05-24'); -- The "7300" represents 20 years, the date provided is the starting date.
    SET @startLoopID = @startLoopID + 1;

    INSERT INTO Sales.Customers(CustomerID, CustomerName, CustomerAddress, Comments, LastOrderDate)
   VALUES
   (
      @i,
      'CustomerName' + CAST(@i AS CHAR),
      'CustomerAddress' + CAST(@i AS CHAR),
      'Comments - Lorem ipsum dolor sit amet, consectetur adipiscing elit' + CAST(@i AS CHAR),
      (@rdate)
   )
   SET @i += 1;
END
Now that we have ten million rows of generic data, let’s start working with it. First and foremost, let’s look at the file size of the “mdf” and “ldf” as well as the available space on the hard drive.


Notice the file size has grown from 4,096KB to over 4GB and the amount of available drive space has decreased from 220GB to 216GB, about 4GB as expected.
Make Some Database Changes
Now that we have our test bed of ten million rows of data, let’s assume that we want to remove anything older than five years. This is going to remove about eight million records from our database. Which will equate to approximately 3GB depending on how many rows were randomly created with dates older than five years. Remember, this is a “random” record generator so, every time you run the generator, you will get different results.
Here’s the script we will use to do that.
DELETE
FROM Sales.Customers
WHERE LastOrderDate < '2016-12-31';
GO
Looking back at the file sizes after deleting approximately eight million rows of data, we can see that the size of the mdf file has not changed. Conversely, the ldf file has grown tremendously. Remember, the log file is just as it seems, it logs all insert, update, delete, etc. transactions that have happened to the database. Our ldf file grew to this size because there were about eight million “delete” actions run on the Sales.Customers table in the database.

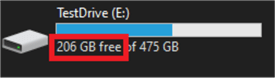
Notice also the available free space on the drive has decreased when we were expecting an increase. This is due primarily to the increased ldf file size and the size of the mdf file retaining at that peak reserved space.
Now that we have a scenario set in place, let’s start shrinking those file sizes to something a little closer to what they were in the beginning.
Shrink SQL Server Database
SQL Server offers a couple of ways you can shrink the database and file size. Like many things, this will boil down to personal preference. While some people prefer the GUI way of doing things, others will want to be more hands on and work in “terminal mode”.
Option 1 – Using the GUI interface in SQL Server Management Studio
In the left pane where your databases are listed, right-click on the “SampleDataBase” and from the “Tasks” option select “Shrink” then “Files”, as in the image below.

On the next dialog box, make sure the File type is set to “Data” to shrink the mdf file. Near the bottom of the dialog box you have three radio buttons with the options to Release unused space, Reorganize pages before releasing unused space or Empty file by migrating the data to other files in the same filegroup. If you’re not sure, just leave the default “Release unused space” selected.

Once again, in the left pane where your databases are listed, right-click on the “SampleDataBase” and from the “Tasks” option select “Shrink” then “Files”, as in the image below.

On the next dialog box, change the File Type to Log to shrink the Log file size. Near the bottom of the dialog box you have three radio buttons with the same options. If you’re not sure, just leave the default “Release unused space” selected.

Option 2 – Using T-SQL to shrink the SQL Server database file size
Optimally, the best option (in my opinion) is to use the T-SQL commands.
USE SampleDataBase
GO
-- Shrink the mdf file
DBCC SHRINKFILE(N'SampleDataBase', 0
GO
-- Shrink the log.ldf file
DBCC SHRINKFILE(N'SampleDataBase_log', 0
GO
The results should look similar to the ones below.
Results: Your values may be different based on data removed.
Now, let’s go back and check our file sizes once more along with the available space on our hard drive.
The mdf file size should have reduced only slightly in size. Remember, although we removed approximately eight million rows of data, we did retain about two million rows and SQL is keeping some degree of reserve file space.

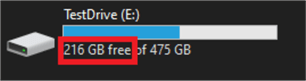
And looking at the hard drive’s available space, we should be back to about what we had prior to inserting the ten million rows of data, with the exception of the 4gb of reserved space.
![]() Your numbers may not be exactly what you expected, but as long as they are close, then you know you have successfully completed the database “shrink” operation. Bear in mind, your computer may be adding data to one or more other databases as you perform these functions so your numbers will not be exact.
Your numbers may not be exactly what you expected, but as long as they are close, then you know you have successfully completed the database “shrink” operation. Bear in mind, your computer may be adding data to one or more other databases as you perform these functions so your numbers will not be exact.
A Step Further
Okay, so you just must have that extra 3GB freed up on your drive that the mdf file is holding hostage. There is a way to do this with a few extra steps, but be very careful and follow these steps in the order they are laid out.
Create a new table to hold the remaining 2+ million records that you want to keep; we will call this table Sales.TempHold.
- Copy all the rows of data from Sales.Customers to Sales.TempHold
- Truncate the Sales.Customers table
- Run the shrinkfile commands on the mdf and ldf files
- Copy all the rows of data from Sales.TempHold back to Sales.Customers
- Truncate the table Sales.TempHold
- Drop the Sales.TempHold table
- Re-run the shrinkfile commands one last time.
The images below show the new mdf file size, the ldf file size and the free space on the hard drive.
Notice, we still have 1GB used. That covers the 2.5 million or so rows of data that we retained.

Summary
As mentioned at the beginning of the article, this process will cause disk fragmentation. So, you really need to weigh your options and determine if this is right for you and your hardware. Shrinking the database to free up space on your drive might a viable solution in a desperate situation, but it is not something I would recommend putting on any kind of recurring schedule. If you know your database will regrow to that max size (or more) on a regular basis, then your best option would be to leave the reserved space as is.
If you really must free up some drive space, (like in this sample) use VARCHAR instead CHAR for your data types. This simple change fore the test we did makes a difference of three gigs of storage. So, plan your database and tables carefully before you create them.
In situations like the one in this article, it is always better to increase your drive size, as apposed to decreasing your data size.
Next Steps
- SQL Server Maintenance Plan Shrink Database Task
- How to shrink the transaction log
- Shrink SQL Server Transaction Log for all Databases
- Shrink a Database (Microsoft Learn)
- How do I shrink my SQL Server database?

Aubrey Love is a self-taught DBA with more than six years of experience designing, creating, and monitoring SQL Server databases as a DBA/Business Intelligence Specialist. Certificates include MCSA, A+, Linux+, and Google Map Tools with 40+ years in the computer industry. Aubrey first started working on PC’s when they were introduced to the public in the late 70’s.
- MSSQLTips Awards: Author of the Year – 2022 | Trendsetter (25+ tips) – 2023


Yuri,
You are correct, that “delete” script should have this date in it.
‘2017-01-01’
Correct script.
DELETE
FROM Sales.Customers
WHERE LastOrderDate < ‘2016-12-31’;
GO
Thanks for catching that.
SELECT *
FROM Sales.Customers
WHERE LastOrderDate < ‘2001-05-24’;
GO
This script shouldn’t delete anything. There are no orders in the table before 2001-05-24.
Larry,
Thanks for the correction. Yes you can shrink the file size to something smaller than the original file size. Since I rarely do this, I had forgotten that the option existed and I wouldn’t recommend it as an option except in rare cases.
But it’s nice to know that there is a method when needed.
https://docs.microsoft.com/en-us/sql/t-sql/database-console-commands/dbcc-shrinkfile-transact-sql?view=sql-server-2016
“You can shrink a file to less than its size at creation, resetting the minimum file size to the new value.”