By: Manvendra Singh | Updated: 2022-12-05 | Comments (1) | Related: > Azure SQL Database
Problem
Azure SQL Database has several business continuity features and in this article, we will look at auto-failover groups. What are the steps to configure an auto-failover group for Azure SQL databases hosted on a SQL Server?
Solution
Business continuity is a capability that ensures our systems continue to function with minimal impact in the event of any disaster or unplanned disruption. It's important to understand the target database's business criticality, RTO, and RPO, along with the failover requirement, whether manual or automatic, before choosing the right business continuity solution.
Auto-failover groups use a geo-replication mechanism to replicate data to another region with additional features not in geo-replication. Auto-failover groups support automatic and manual failover and can also be configured for SQL-managed instances, unlike active geo-replication. It also uses two listener endpoints (one for the primary server for read\write operations and another for the secondary server for read-only transactions) to manage database connectivity despite having any server as primary or secondary. It supports 1 hour as RTO and 5 seconds as RPO. Consider this solution if your RTO and RPO are within the offered limits.
This tip will show how to configure the auto-failover group. The high-level steps are:
- Identify the SQL databases and their SQL Server resource on which databases are hosted
- Access SQL Server resources to configure a failover group
- Test failover
Step 1: Identify Target SQL Database and SQL Server Resources
Log in to the Azure Portal. Search for the target Azure SQL databases. If no SQL databases exist, it is recommended to create a few to follow along with this tip.
I used Azure SQL in the search bar for this demonstration to jump to its dashboard page and see all the SQL Server resources. As seen in the image below, two databases, mds and mds-prod, are hosted on a SQL Server named mds-sql-server in the East US region.

Step 2: Configure Auto-Failover Group
Auto-failover groups are configured using SQL Server resources, not individual SQL databases. So, our next step is to access SQL Server mds-SQL-Server by clicking on this link, or you can also access your target SQL Server, which is identified for the auto-failover group from servers or your SQL databases pages.
Failover Groups
Once mds-sql-server is selected, click on the Failover groups option under the Data management tab, as seen below.

No failover group has been created for this SQL Server. Click on the + Add group button and the screen below will appear.
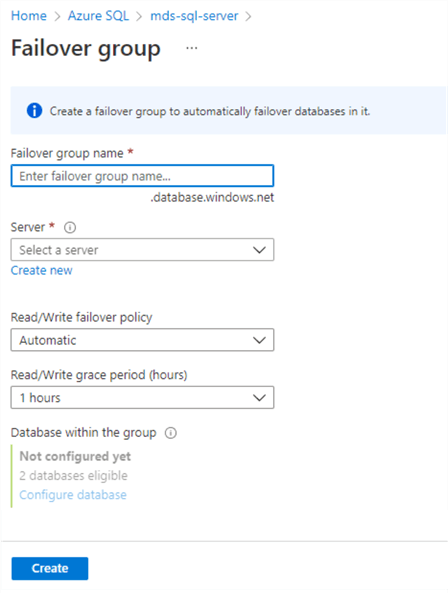
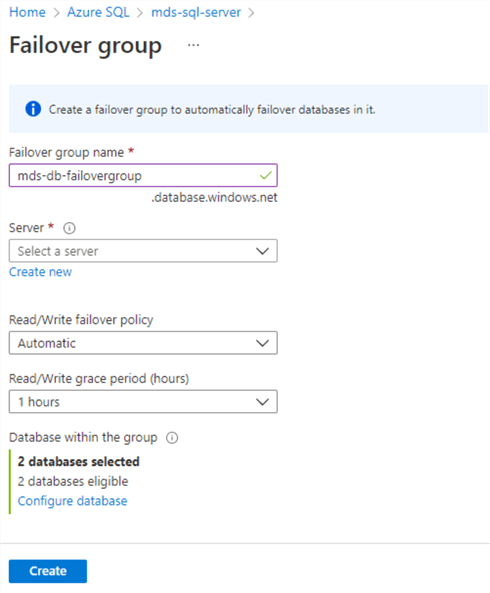
- Failover Group name: enter the failover group name; it must be unique in the database.windows.net domain. I have chosen the Failover group name of mds-db-failovergroup.
- Server: choose a secondary server name from the drop-down or click Create new to create a new server. I made a new secondary SQL Server as we have only one SQL Server resource.
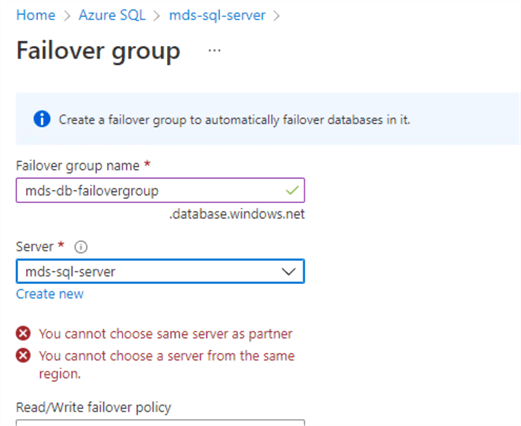
If you choose the same SQL Server resource hosted by your primary databases, you will get the below error. The same server cannot be selected for a secondary or even from the same region where your primary databases are hosted. So, I clicked on the Create new link to set up another server.
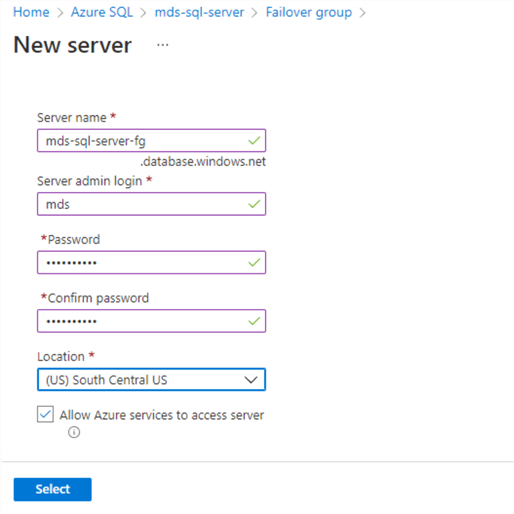
The New server window will appear (below) to configure a secondary SQL Server as a partner geo-replica resource. I used the server name mds-sql-server-fg along with server admin account details and chose the secondary region as South Central US. This new server will host secondary databases replicated using this failover group. Click Select to return to the failover group creation page.
- Read/Write failover policy: Automatic or Manual. For this demonstration, I have kept it Automatic.
- Read/Write grace period: Can be set to a minimum of 1 hour or maximum as per given values from the drop-down.
- Configure database: Add or configure Azure SQL databases. This option was greyed out in the first failover group page, but now it can initiate its configuration. Click the Configure database link to include your databases from your SQL Server mds-sql-server to this failover group.
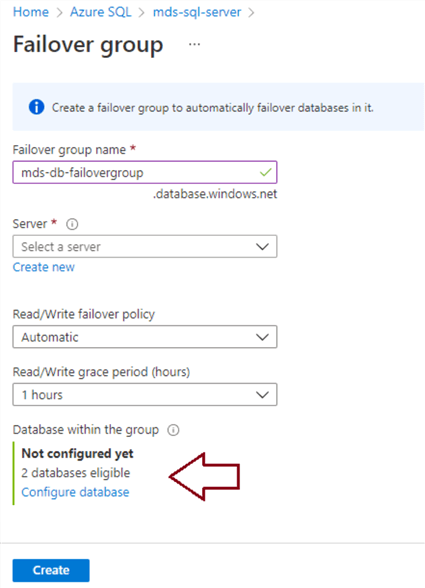
The screen below will appear.
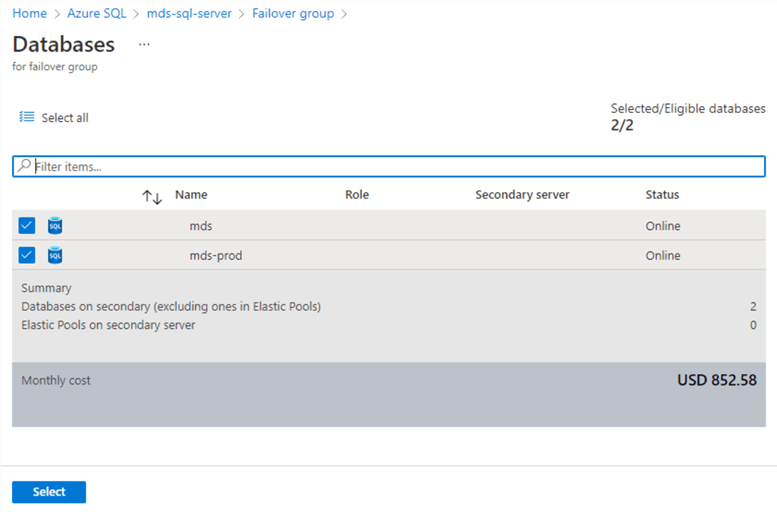
Click on the check box of each database you want to include in the failover group. For this demonstration, I checked both databases. We can also see the expected monthly cost. Click Select to return to the failover group creation page.
We have configured the failover group and can now see the number of databases selected on this screen. Click Create to deploy this failover group creation.
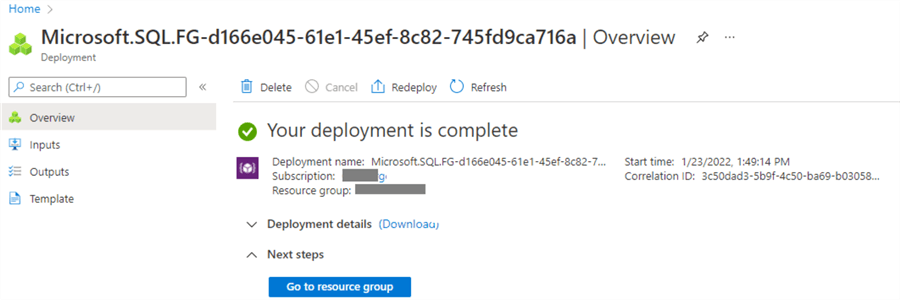
Below is the successful deployment confirmation window.
Validation
Now that the configuration is complete, it can be validated by looking at the Azure SQL page to verify that new resources and services have been provisioned. The image below shows that three more resources have been added to the Azure SQL dashboard page in the South Central US region, where we created a secondary server, mds-sql-server-fg.
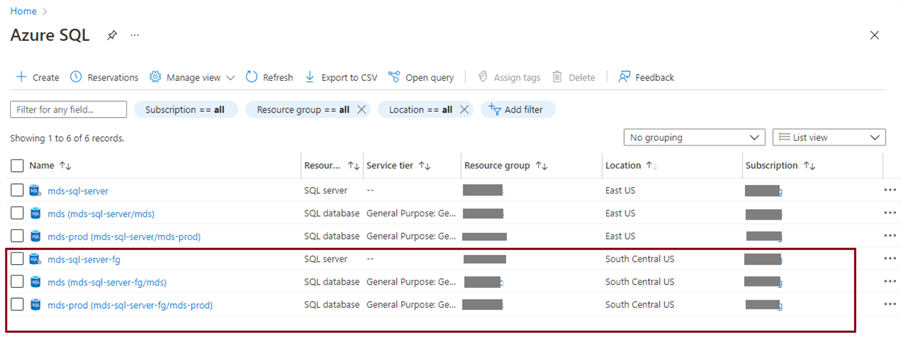
Let's validate the new failover group by accessing it from the SQL Server resource.
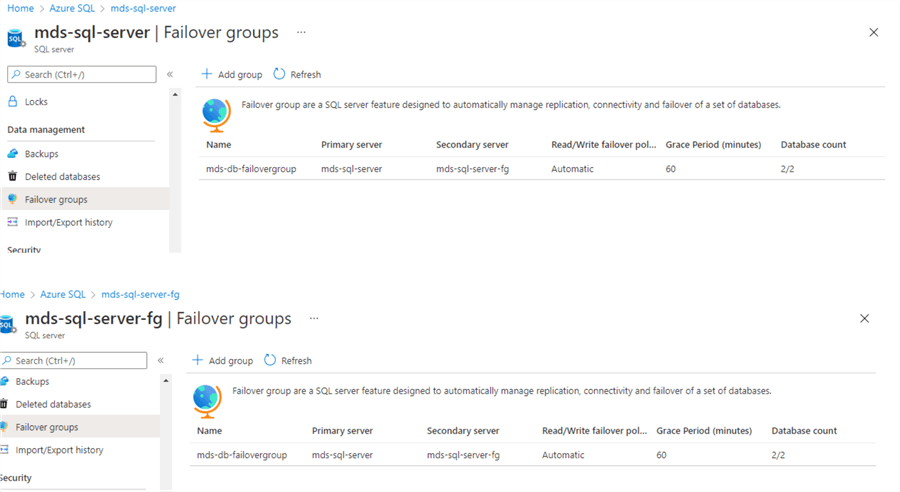
Click Failover groups under Data management. Below are screenshots of the new failover group from both SQL Server resources mds-sql-server and mds-sql-server-fg. Note the configuration details like primary server, secondary server, failover policy, grace period, and the number of databases eligible and added to this failover group.
Next, click on the new failover group name mds-db-failovergroup to access its details and properties. The screen below will appear.
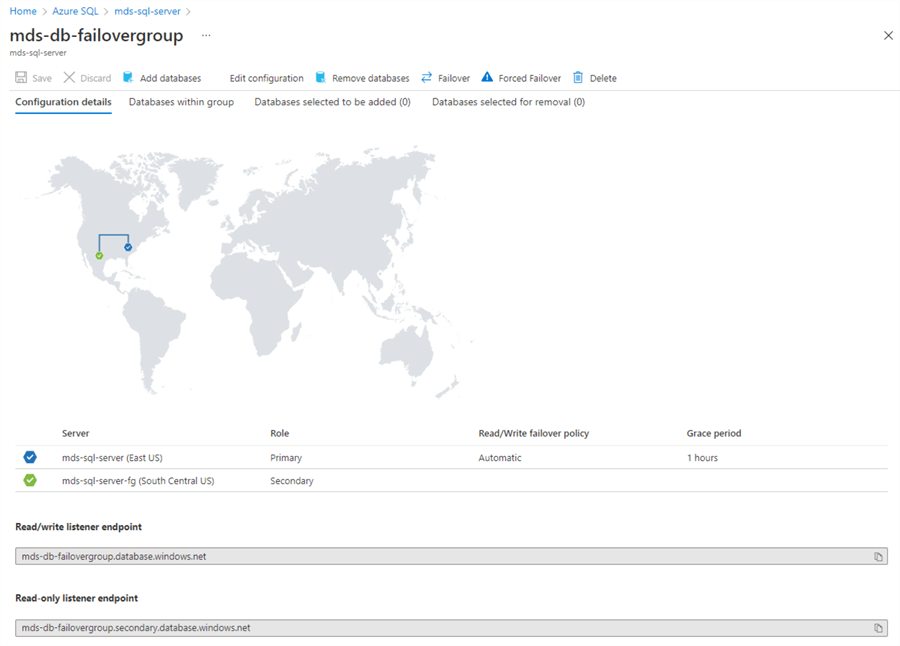
From this view, it is possible to modify the configuration, add/remove an Azure SQL database from the failover group, and trigger a failover. Additionally, primary and secondary listener endpoints can be accessed from this page. The screenshot above shows the read\write listener endpoint that will route all connections to the primary server is mds-db-failovergroup.database.windows.net. In contrast, the read-only listener endpoint that routes all connections to the secondary servers is mds-db-failovergroup.secondary.database.windows.net. The connection string will be the same as it has included failover group names despite having any change in primary and secondary server roles. The respective listener will route to the primary server, whichever server will act as primary in the background.
Step 3: Test Failover
After successfully configuring the auto-failover group for two Azure SQL databases, it's time to perform a smooth failover to show if roles are being changed using this failover group. On the failover group configuration page (below), locate the two buttons: Failover and Forced Failover. Click on Failover to initiate the failover trigger. A warning will appear stating that the secondary role will become primary, and all TDS sessions will be disconnected and rerouted to the new primary server. Click Yes to initiate the process.

The failover process will begin, a notification stating Failover in progress… will appear (below), and the screen will grey out during this role transition process.
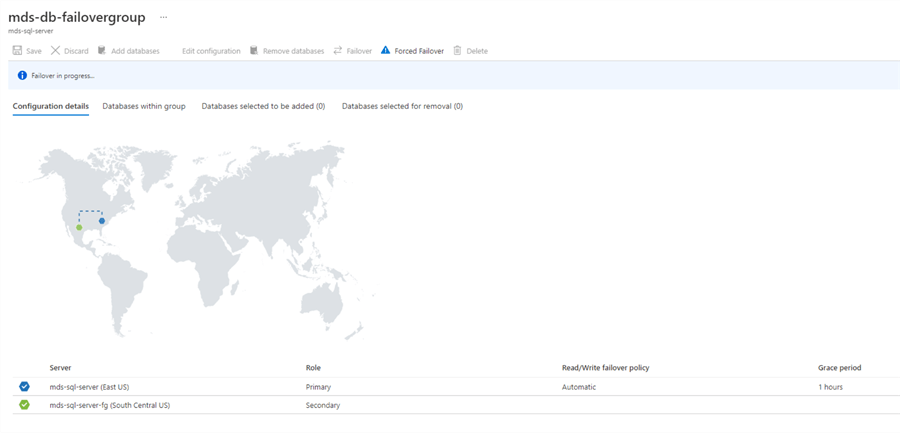
Server roles will switch once failover is completed.
Note in the image above the roles of the servers. Upon failover completion, see in the image below that SQL Server mds-sql-server-fg has become primary (initially secondary), and mds-sql-server is now secondary (initially primary).
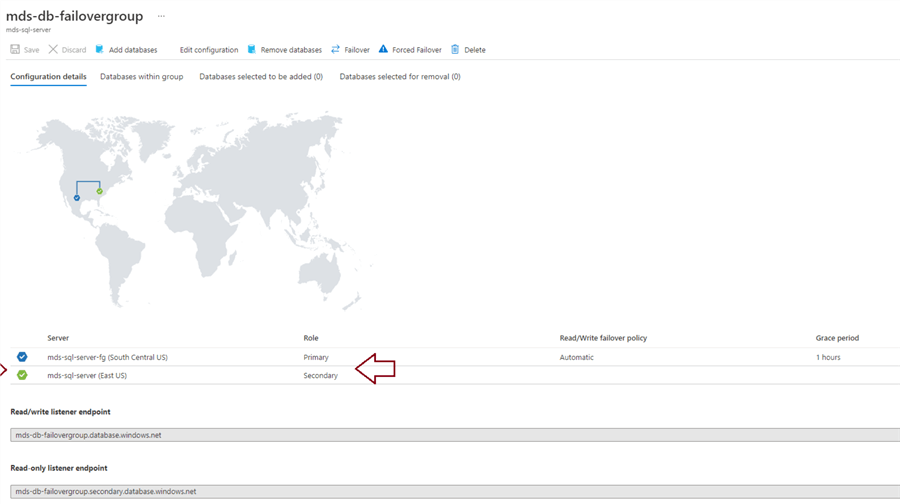
Going one step further, it's possible to verify if the database is online, and if they are online, from which server. Click Databases within group. The image below shows that both databases from the South Central US region are online. The databases hosted in the East US region work as secondary for read-only transactions.
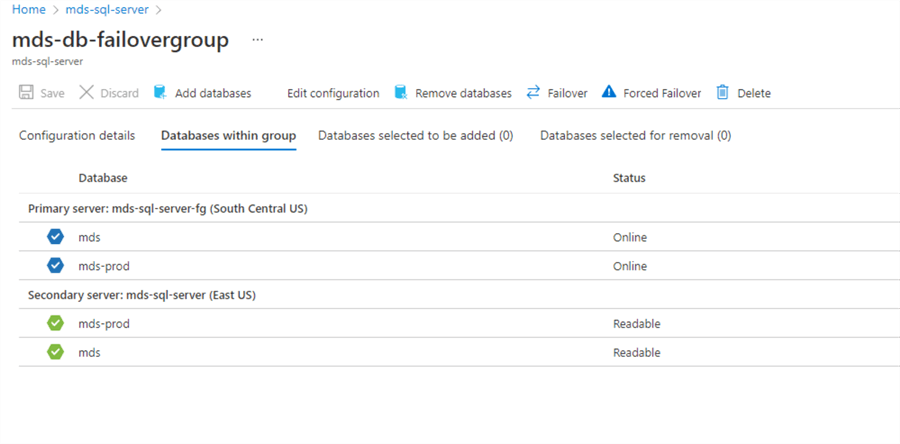
Additionally, you can get validation by accessing the failover group tab on the SQL Server resource page that server roles have been changed and the previous secondary has become primary (below).

There may be some latency or performance issues post-failover and after bringing the secondary database online as primary if your applications are still hosted in the primary region. You have only failed over the database layer; the rest of the components must also be configured or failover to run in the same region where the databases are hosted.
If you want to switch back to the original primary server and region, you can perform a failover activity again to fail it back to the previous primary server.
Additionally, an entry for your database will appear under the Replicas option under Data management of an Azure SQL database, as you can see in the image below.

Summary
This tip discussed auto-failover groups of Azure SQL databases. We learned how to configure a failover group and tested its failover process to ensure the role was being transitioned smoothly. Auto failover groups automatically manage data replication, failover, and connectivity for Azure SQL databases.
Next Steps
- Check out these other Azure articles.
About the author
 Manvendra Singh has over 5 years of experience with SQL Server and has focused on Database Mirroring, Replication, Log Shipping, etc.
This author pledges the content of this article is based on professional experience and not AI generated.
View all my tips
Article Last Updated: 2022-12-05


