Problem
In past articles, we built a web-based employee application. In this article, we are going to add some additional functionality to generate unique QR codes for each employee.
Solution
In this tutorial, we will be utilizing an application that has been developed in the past. Build a basic web application using ASP.NET and SQL Server, with the goal of extending and enhancing the functionality to generate employee QR codes. To start this tutorial, please review the code in this download.
Step 1: Create the Database with Sample Data
We will use the SQL Script above to create the database and tables for this tutorial.
In the steps that follow, we will work through the changes that need to be made to complete this tutorial.
Take note of the following regarding the “Before” SQL Script:
- Note 1: Creates a Database – HRDatabase
- Note 2: Creates a SQL Login, HRDBLogin, and a SQL User, HRDBUser, to be used for logging in with the web application
- Note 3: Creates main tables, Companies and Employees
- Note 4: Changes the script to add a new column to the Employees table:
QRCreated VARCHAR(3) NOT NULL CONSTRAINT DF_QRCreated_Employees DEFAULT ('No'),
Take note of the DEFAULT when creating a new employee to save the value as ‘No’ in the newly created column, QRCreated, as in the above definition.
See the complete definition of the table below:
CREATE TABLE dbo.Employees (
   id           INT CONSTRAINT PK_Employees PRIMARY KEY IDENTITY(100,1),
   EmployeeName VARCHAR(80)  NOT NULL,
   ContactNo    VARCHAR(20)  NOT NULL,
   Email        VARCHAR(80)  NOT NULL,
   CompID       INT          NULL,
   AddressID    INT          NULL,
   TitleID      INT          NULL,
   GenderID     INT          NULL,
   QRCreated    VARCHAR(3)   NOT NULL CONSTRAINT DF_QRCreated_Employees DEFAULT ('No'),
   IsActive     BIT          NULL CONSTRAINT DF_IsActive_Employees DEFAULT(1),
   CreateDate   DATETIME     NOT NULL DEFAULT getdate()
);
- Note 5: Creates the supporting tables Addresses, Gender, Leave, LeaveTypes, and Title.
- Note 6: Creates the foreign keys to link the tables.
- Note 7: Inserts dummy data for all the above tables.
- Note 8: Creates the stored procedures for Select, Insert, Update, and Delete operations on the two main tables (Companies and Employees).
The following shows the changes to the following Stored Procedures to handle the QR Code:
Procedure: dbo.usp_GetEmployees
Adds a column in the select list to extract the QRCreated data for the list of employees:
CREATE OR ALTER PROCEDURE dbo.usp_GetEmployees
AS
BEGIN
   SELECT e.[ID]
      ,e.[EmployeeName]
      ,e.[ContactNo]
      ,e.[Email]
      ,e.[CompID]
      ,e.[CreateDate]
      ,c.[CompanyName]
      ,e.[QRCreated]
   FROM [dbo].[Employees] e
   LEFT JOIN [dbo].[Companies] c on c.ID = e.CompID
END;
GO
Procedure: dbo.usp_GetEmployee
Adds a column in the select list to extract the QRCreated data for the single employee:
CREATE OR ALTER PROCEDURE dbo.usp_GetEmployee
   @ID int
AS
BEGIN
   SELECT e.[ID]
      ,e.[EmployeeName]
      ,e.[ContactNo]
      ,e.[Email]
      ,e.[CompID]
      ,e.[QRCreated]
      ,e.[CreateDate]
      ,c.CompanyName
   FROM [dbo].[Employees] e
   JOIN [dbo].[Companies] c on c.id = e.CompID
   WHERE e.ID = @ID
END;
GO
Procedure: dbo.usp_UpdEmployee
Adds a @QRCreated variable and a section to do the update of the QRCreated column added in the Employees table:
CREATE OR ALTER PROCEDURE dbo.usp_UpdEmployee
   @ID           int = null,
   @EmployeeName varchar(80) = null,
   @ContactNo    varchar(80) = null,
   @Email        varchar(20) = null,
   @CompID       int = null,
   @QRCreated    varchar(3) = null
AS
BEGIN
   UPDATE [dbo].[Employees]
   SET employeeName = ISNULL(@EmployeeName, EmployeeName)
      ,ContactNo = ISNULL(@ContactNo, ContactNo)
      ,Email = ISNULL(@Email, Email)
      ,CompID = ISNULL(@CompID, CompID)
      ,QRCreated = ISNULL(@QRCreated, QRCreated)
   WHERE D = @ID
END;
GO
Step 2: Use Visual Studio to Make Changes to Create the QR Code for an Employee
A complete Visual Studio solution is provided (see the beginning of this tutorial) like in the previously mentioned blog (Build a basic web application using ASP.NET and SQL Server) that will enable you to use the database and SQL login as created in the steps above, to view a list, create a new, update or delete any of the records of the Company or Employee tables.
The main points to check in this step include the following:
Check 1: Make sure you use the correct detail in the web.config file of the solution:
- SQL Server to be used: Data Source=SQLServername
- Initial Catalog: HRDatabase
- User ID to connect to the database: User ID=HRDBLogin
- Password as created in the script: Password=MyP@ss3@1
See the extract of the web.config file below.
  <connectionStrings>
    <add name="HRDBConnection"
           connectionString="Data Source=SQLServernameHRDatabaseHRDBLoginMyP@ss3@1"
           providerName="System.Data.SqlClient" />
  </connectionStrings>
Check 2: When running the web application, you will see the following:
- Default home page – Only shows a default page with links to the Companies and Employees pages.
- Companies page – Shows a list of companies with a link to create a New company, Update (or show) the details of a company, or Delete a company.
- Employees page – Shows a list of all employees with a link to create a New employee, Update (or show) the details of an employee, or Delete an employee
The above operations are implemented using the stored procedures in the previous step where the SQL Script was used. See images of the three pages below.


Step 3: Create a Folder in the Solution to Host QR Code Images
The next step is to create a folder in the web application solution to host the images. Originally, the Solution Explorer will look like this in the image below:

Right-click on the Project: HRWebsite and select Add in the sub-menu. Select New Folder in the next sub-folder and rename the newly created folder to Images.

Now the web application is ready to host the images created for the QR code.
Step 4: Use NuGet Package Manager to Add Package to be Used to Create the QR Code
We need a NuGet package through the Visual Studio application to create a QR code called ZXing.Net.
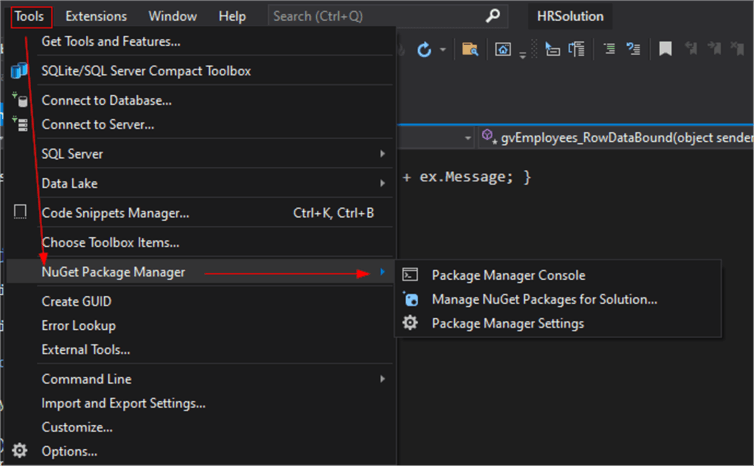
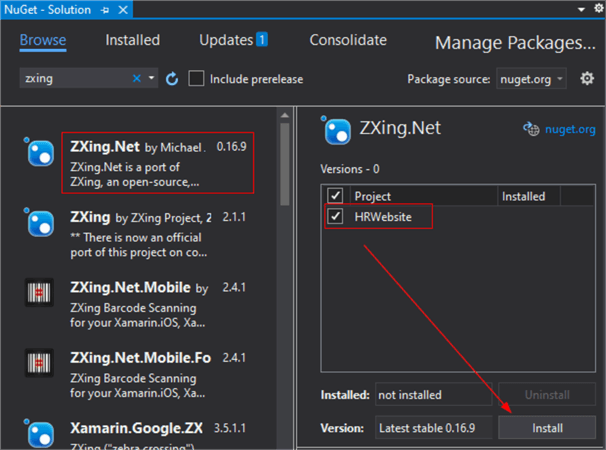
While Visual Studio is open with the HRWebsite project open, click Tools, then the sub-menu, NuGet package manager, and Manage NuGet Packages for Solution. On the window that opens, click on the Browse tab, and in the search textbox, type ZXing. In the search results, find the ZXing.Net package and install it. The version installed in this tutorial is 0.16.9.
After the package installs, you can see it in the References folder in the Solution Explorer window.

Step 5: Make a Change to the Employees.aspx HTML Page
We will be making changes to the Employees.aspx page, which is the page that handles showing a list of all the employees.
First, add a new TemplateField column to the grid that displays if a QR code was created or not:
<asp:TemplateField HeaderText="QR">
    <ItemTemplate>
        <asp:LinkButton ID="lbQREmp" runat="server" CommandArgument='<%# Eval("ID") %>'
            CommandName="QREmp" Text='<%# Eval("QRCreated") %>' Visible="true" />
        <asp:Label ID="lblQREmp" runat="server" Visible="false" />
    </ItemTemplate>
    <ItemStyle HorizontalAlign="Center" Width="50px" />
</asp:TemplateField>
Now, let’s make some changes to the modal window that shows the details of an employee: To show the created QR Code image (ID="imgQREmp") if it exists or show a link (ID="lbCreateQRImg") to create a new QR Code for the employee if it does not exist.
<div class="col-sm-6">
    <div class="row" style="margin-top: 20px;">
        <div class="col-sm-1"></div>
        <div class="col-sm-10">
            <asp:Image ID="imgQREmp" runat="server" Width="200px" Visible="false" />
            <asp:Label runat="server" ID="lblQRImageMsg" Visible="false" Font-Size="12px" Text="No QR Image available" Font-Bold="true" />
        </div>
        <div class="col-sm-1"></div>
    </div>
    <div class="row" style="margin-top: 20px;">
        <div class="col-sm-1"></div>
        <div class="col-sm-10">
            <asp:LinkButton runat="server" ID="lbCreateQRImg" Visible="false" Font-Size="12px" Text="Create Image" Font-Bold="true" OnClick="lbCreateQRImg_Click" />
        </div>
        <div class="col-sm-1">
        </div>
    </div>
</div>
Step 6: Make Change and Add Code to the Employees.aspx.cs Page
To show a list of all employees and, at the same time, check the Employee table to verify if a QR code has been created for the employee, use the following code:
protected void gvEmployees_RowDataBound(object sender, GridViewRowEventArgs e)
{
    if (e.Row.RowType == DataControlRowType.DataRow)
    {
        LinkButton lbQREmp = (LinkButton)e.Row.FindControl("lbQREmp");
        Label lblQREmp = (Label)e.Row.FindControl("lblQREmp");

        if (((LinkButton)e.Row.FindControl("lbQREmp")).Text == "Yes")
        {
            lbQREmp.Enabled = true;
            lbQREmp.Visible = true;
            lblQREmp.Visible = false;
            lbQREmp.Text = "Show";
        }
        else
        {
            lbQREmp.Enabled = false;
            lbQREmp.Visible = false;
            lblQREmp.Visible = true;
            lblQREmp.Text = "";
        }
    }
}
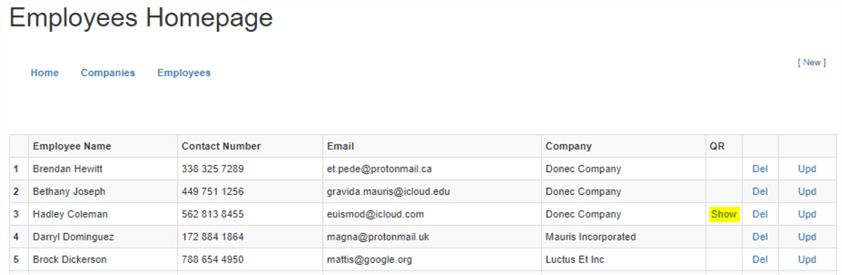
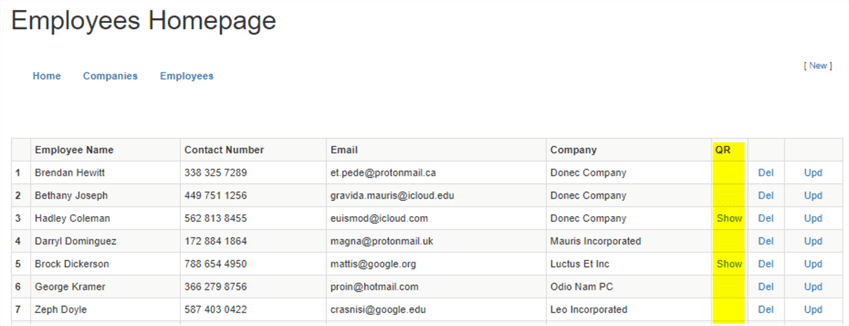
If a QR code has been created, it will show in the grid of employees next to the employee’s name (see image below), or nothing will be displayed if no QR code exists for the employee.
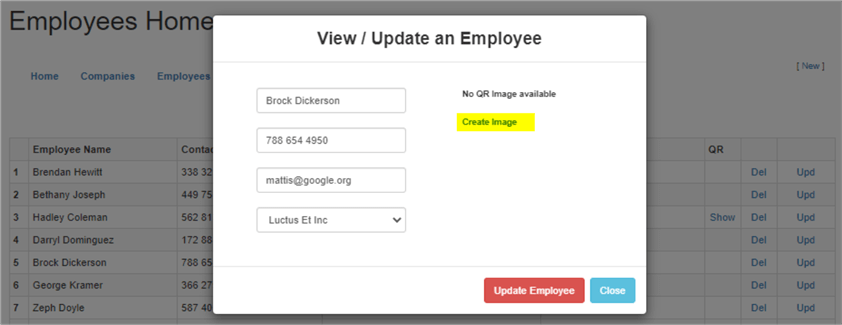
When clicking on the Upd link in the grid, a pop-up window will show details regarding the employee as well as an image of the QR code for the employee, or if no image has been created for the employee yet, a link will be displayed to create a QR code image. See the two images below.

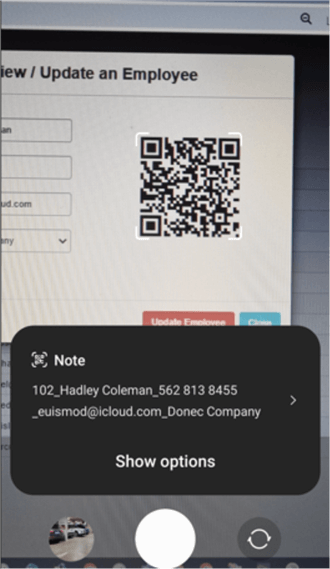
You can test the QR image by taking your smartphone camera and aiming it at the QR code while moving your camera back and forth until it recognizes the image and displays the text written into the QR Image.
The image below shows the scanned QR code of a cellphone camera and the visible text:
Step 7: Show a List of Employees
The result is a web application that provides a list of all employees with a column to show if a QR Code is available for the employee.
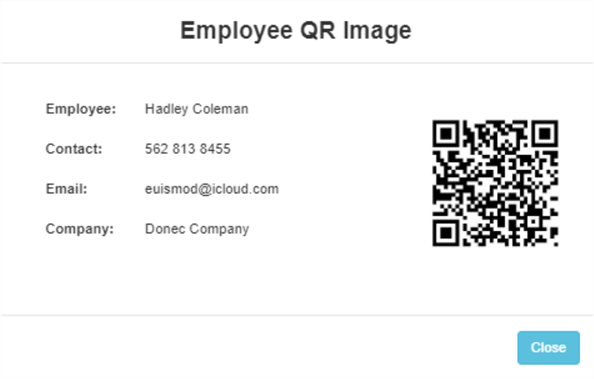
Clicking on the Show link in the QR column will also open a pop-up modal window showing the QR image, as seen below.
See the links below to the completed SQL Script as well completed Visual Studio solution:
Conclusion
In this tutorial, we have used the database that we produced in a previous tutorial for use with a web application to construct a functional website that can execute the CRUD operations on the database data and create a QR Code that can be used in an ID Card.
See the previous tutorial: Develop a Simple Web Application in ASP.NET with SQL Server
Next Steps
The above tutorial can also record workers’ attendance at events, such as when they come to work in the morning.
In the next tutorial in this series, we will be looking at expanding the project to enable scanning the employee’s QR code to record attendance of events like when arriving at the office in the morning and when leaving the office in the afternoon.

Jan has years of experience in Information Technology which ranges from Unix Administration through System Administration and development, Web and Database Development and Administration and applying Agile methodologies. Jan has been working with databases since 1996 when he had his first exposure to Sybase databases. He got involved with SQL Server in the early 2000’s and had exposure to SQL Server 2000, 2005, 2008 and all the rest. Jan likes to find easy and secure ways to host data and has been using Sybase, SQL Server, and MySQL. He has a great passion for working with data and believe the best way to become an expert in a field is by teaching the subject.
- MSSQLTips Awards: Rookie of the Year Contender – 2022


can i get source code for qr
The download has been fixed.
download link comes back with a 404