Problem
Amazon Web Services (AWS) is a popular cloud service for deploying infrastructure and applications with scalability, flexibility, and reliability. You can also use serverless computing to run codes without deploying any server. Amazon Athena is one such serverless computing application. This tip will give an introduction to SQL Athena and its use cases.
Solution
To work with the Amazon Athena, you need the following:
- AWS Credentials: You need an account to log in to AWS with your credentials. If you don’t have an account, register for the free-tier account.
- Sample Data: For this tip, we will use the sample employee datasets from GitHub and query it using Amazon Athena.
Follow the steps below to query CSV datasets using Athena.
AWS Simple Storage Account, AWS S3, is highly scalable cloud storage. Users can upload any data format file in this object storage. To create the S3 bucket, search S3 in AWS services and click Create Bucket. Enter the bucket name, choose the AWS Region, and click Create Bucket.

Open the S3 bucket, browse the local directory, and upload the sample file in the S3 bucket. Note the S3 bucket address shown in the summary page below. For this tip’s S3 bucket, the destination address is s3://mymssqlbucket.

Configuration of Amazon Athena
Search for the Athena service and launch it from the services page.

The launch screen of Amazon Athena shows different tabs: Editor, Recent queries, Saved queries, and Settings.
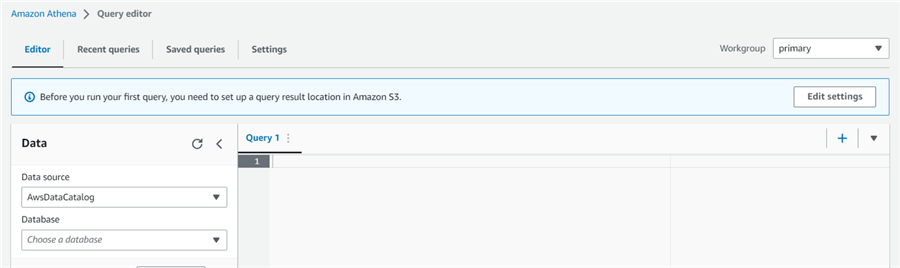
A message appears – “Before you run your first query, you need to set up a query result location in Amazon S3.” Click on Edit Settings.
Enter the S3 bucket address to save the query results. If you want query results in an S3 bucket folder, create the folder first and specify the folder name and address as S3://bucket/folder.

Click Save, and it takes you to the Settings page with the updated configuration.

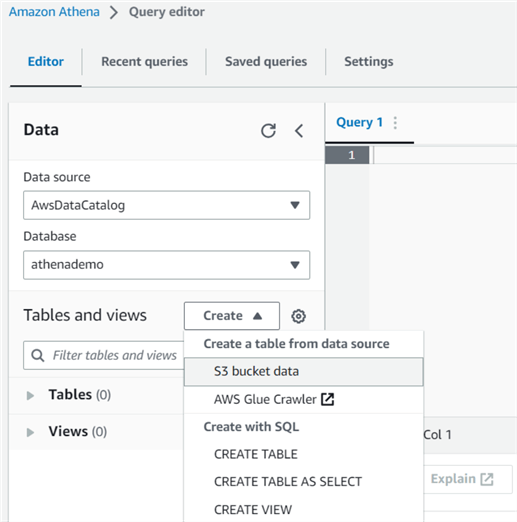
Click on the Editor tab. Under the Tables and views area, click Create, then Create a table from data sources and choose the S3 bucket data.
It opens the Create table from the S3 bucket data page. Enter the required table name and description (optional), as shown below.

On the Database configuration page, choose “Create a database” or “Choose an existing database” if you already have an Athena database. If you create a new database, enter a name from 1-128 characters.

The Data format page requires the following information to be provided:
- Table type: Amazon Athena uses the Apache Hive Table as the default table type. However, we can choose the values from Apache Hive, Apache Iceberg, or Delta Lake.
- File format: You can choose TSV, JSON, CSV, Parquet, etc., for the file format. In our case, choose the CSV as the input data file format.
- SerDe library:
- LazySimpleSerDe: If the CSV data does not have values enclosed in double quotes
- OpenCSVSerDe: If the CSV data have values enclosed in double quotes
- SerDe properties -optional: Choose the field delimiter as a Comma.

Next is the Column details page. Enter the column names and data types per your input data file. The following screenshot shows a few column details with their name and type.

Table Properties is an optional page. You can set table properties such as Write compression, Encryption, or choose the header line counts. I specified the value 1 to skip the first row while importing the data from CSV.

In the Preview table query, you can view the table script. You can note here that Athena uses a syntax similar to a regular SQL table. It uses the keyword EXTERNAL for the table.

Click Create Table to execute the script and deploy the table in the database. As shown below, the query runtime is 406 ms.

Querying the External Table in Amazon Athena
We have created the external table in Athena. Athena uses the logical namespace of the tables. These schema and data point to the Amazon S3 bucket for the read-time querying. Athena reads the data using the standard SQL language when you query the data.
Open a new query window and execute the SELECT statement to view all records from the CSV file stored in the S3 bucket. Athena processed the output in 422 ms for the 3.69 KBs of data scanned.

Check the query stats to see the number of rows processed, input bytes, output bytes, and runtime stats in chart format.

Like ANSI SQL, you can use the WHERE clause to filter the data in your SQL queries. For example, let’s filter out records for employees whose first name starts with the character D for our data analysis.

Similarly, we can use COUNT(*) to check the number of records in the CSV file.

Creating a Table from Query Results (CTAS)
You can use CREATE TABLE AS SELECT, aka CTAS, in Athena to create new tables using the result of SELECT statements. It is similar to SELECT * INTO in SQL Server.
You can use the CTAS query from the result of any executed Athena queries. For example, I ran the query to find out employees whose salary is greater than 10000.

Now, I want to store this result as a table. Therefore, click on Create -> Table from Query.

Enter the table name, choose the database, and choose the table location(S3 address).

Preview the CTAS query as shown below. Click Create table. It creates the table from the schema of the select statement.

We can also use the CTAS query format and create a table from the query window. For example, let’s create a table for those employees whose department id is 90.
CREATE TABLE "mssqltips"."FilterDeptEmp" WITH (
  format = 'parquet',
  external_location = 's3://mymssqlbucket/FilterDeptEmp'
) AS
Select *
from mssqlemployeesdata
where DEPARTMENT_ID= 90

The benefits of CTAS queries are:
- You do not need to define the schema for the table; it is automatically created from the SELECT statement output.
- In an extensive database with many rows and columns, you can create a table by selecting the required row and column to minimize data processing. It will be a cost savings for data processing of Athena queries as Athena would scan less data.
- You can create an empty copy of an existing table.
Create View in Amazon Athena
The view is a logical table that runs the query specified in it. The view helps query a subset of data or combine multiple tables in a single query. It eliminates the complexity of querying for reuse. It hides the underlying table schema and requires no changes in case the underlying table schema doesn’t change.
Like the SQL statement, Athena also uses the CREATE VIEW to define a view in the Athena database. Let’s create a view that returns the employees whose JOB ID is IT_PROG. The view contains the SELECT statement to filter the records matching criteria.
CREATE OR REPLACE VIEW EmployeeDeptFilter AS
SELECT employee_id, first_name, last_name
FROM mssqlemployeesdata
WHERE Job_ID='IT_PROG';

Users can directly execute the view without knowing the underlying table and column names.

You can use Describe View to return the list of columns for the specified view.

Similarly, SHOW CREATE VIEW returns the SQL statement used to create the view.

If you need to drop a view, use the DROP VIEW IF EXISTS statement.
DROP VIEW IF EXISTS mssqltips.EmployeeDeptFilter

Next Steps
- Read AWS Athena documentation on the AWS blog
- Read this related article SQL Athena Introduction – How it works, Use Cases and Advantages
- Read existing AWS tips on MSSQLTips.

Hi! I am Rajendra Gupta, Database Specialist and Architect, helping organizations implement Microsoft SQL Server, Azure, Couchbase, AWS solutions fast and efficiently, fix related issues, and Performance Tuning with over 14 years of experience.
I am the author of the book “DP-300 Administering Relational Database on Microsoft Azure.” I can be reached at: Rajendra.gupta16@gmail.com for any consulting help.
- MSSQLTips Awards:
- Author of the Year – 2022 | Author Contender – 2021/2023/2024 | Champion Award (100+ tips) – 2020