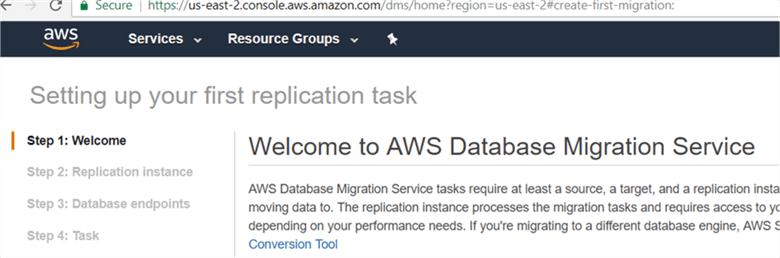
Migrating On-Premises SQL Server Data to Amazon RDS

By:   |   Comments (2)   |   Related: > Amazon AWS


Problem

We are migrating a SQL Server on-premises database to the Amazon RDS cloud.  This is a mission critical database for our business and we need to have little to no down time.  Are there any options to migrate our SQL Server database to Amazon RDS with limited downtime?

Solution

With minimal or almost zero down time we can migrate an on-premises SQL Server database to the Amazon RDS cloud. We will be using the database migration service (DMS) which allows us to migrate a database. We will assume that you have some knowledge about creating VPC, subnets, Amazon EC2, Amazon RDS, etc. In my last tips we built the enterprise environment in AWS (click here) and built an Amazon RDS environment (click here).

Different Types of Amazon RDS Migration Options

Amazon RDS has two options to migrate databases to RDS:

  1. Homogeneous – With a homogeneous migration we migrate SQL Server to RDS with a SQL Server native backup and restore.
  2. Heterogeneous – With a heterogeneous migration we use the Amazon Database Migration Service (DMS).  With a heterogeneous migration we can migrate a database from SQL Server to SQL Server on Amazon RDS.  There are other options to migrate between other platforms as well.

Migrating to Amazon RDS with Heterogeneous

Heterogeneous database migration does not require down time to migrate the on-premises database to the Amazon RDS cloud, but with DMS you can only migrate the tables, primary key and data. For secondary objects you need to create them manually or create an empty database structure and migrate the data using DMS – in this tip we will migrate a SQL Server database using the heterogeneous option.

Heterogeneous migration Limitations

  • To migrate a database using the heterogeneous migration option, the source SQL Server must be the default instance.
  • In heterogeneous migration DMS only migrates tables, primary keys and data.
  • In heterogeneous, secondary objects are not migrated like store procedures, views, functions, triggers, etc. This has to be done manually.

Step # 1 – Create Replication Subnet Group

To use the Database Migration Services, you need to create a replication subnet group or you can use the  default replication group. If you have more than one VPC then you need to select the VPC you want to use.  Also, Database Migration Services requires at least two availability zone subnets. If you have only one availability zone subnet then you will get this error “Replication subnet group doesn’t meet availability zones coverage requirement please add valid subnet to cover at latest 2 availability zones”. The CIDR block and IP address range will be the same as the main subnet group. You do not need to define the CIDR block.

Click on Services on the top left side under Migration and select Database Migration Services.  On the DMS dashboard page, click on Subnet groups. On the Subnet page, click on Create Subnet.

On the Create replication subnet group dialog box, give an Identifier name, description, if there is more than one VPC then select the correct one from the from drop down menu. Select the available subnet and click Add to add the subnet group and then click Create.

On Create replication subnet group dialog box, give Identifier name, discretion, if there are more than one VPC then select from drop down menu, select the available subnet and click Add to add subnet group click Create. - Description: On Create replication subnet group dialog box, give Identifier name, discretion, if there are more than one VPC then select from drop down menu, select the available subnet and click Add to add subnet group click Create.

Note: if you have only one availability zone subnet then you will get this error “Replication subnet group doesn’t meet availability zones coverage requirement please add valid subnet to cover at latest 2 availability zones”.

If you have only availability zones subnet then you will get error Replication subnet group doesn't meet availability zones coverage requirement please add valid subnet to cover at latest 2 availability zones. - Description: If you have only availability zones subnet then you will get error Replication subnet group doesn't meet availability zones coverage requirement please add valid subnet to cover at latest 2 availability zones¯.

Step # 2 – Create Replication Instance

With DMS migration, DMS will create a replication instance that will run on an EC2 instance server. You will be using this replication instance to migrate your database, to create a replication instance you need to provide some information and AWS will create the DMS replication instance.

To create the Replication Instance click on the Create migration button. Or from the menus you can go to Replication Instances and click on Create Replication Instance.

To create Replication Instance click on Create Migration or go to the Replication Instance and click on Create Replication Instance. - Description: To create Replication Instance click on Create Migration or go to the Replication Instance and click on Create Replication Instance.

On the Create Replication Instance dialog box, give the instance name, description, select instance class, replication instance version, VPC, if you want to use multi-AZ for the replication instance then you can change multi-AZ to yes, and if you want to replication instance to be publicly accessible then you need to check the option.

On Create Instance dialog box, give the instance name, description, select class, replication instance version, VPC, if you want to multi-AZ for the replication instance then you can multi-AZ yes, and if you want to replicate instance publicly accessible then you need to check the option. - Description: On Create Instance dialog box, give the instance name, description, select class, replication instance version, VPC, if you want to multi-AZ for the replication instance then you can multi-AZ yes, and if you want to replicate instance publicly accessible then you need to check the option.

On the Create Replication Instance dialog box, under Advanced specify allocated storage, select replication subnet group, select the availability zone where you want to create the replication instance, VPC security group where it has access defined, the KMS master key (note – if you have not created a KMS master key then the replication instance will use the default KMS key).

On Create Instance dialog box, under Advance specified allocated storage, select replication subnet group, select the availability zone where you want to create replication instance, VPC security group where it has access defined, KMS master key (Note  if you do not have created KMS master key then replication instance will use default  KMS key). - Description: On Create Instance dialog box, under Advance specified allocated storage, select replication subnet group, select the availability zone where you want to create replication instance, VPC security group where it has access defined, KMS master key (Note if you do not have created KMS master key then replication instance will use default  KMS key).

On Create Replication Instance dialog box, under Maintenance you can check Auto minor version update, so whenever there is a minor update AWS will release it automatically to the replication instance, you can specify the maintenance window for the replication instance and click Create Replication Instance.

On Create Instance dialog box, under Maintenance you can check auto minor version update, so whenever if there is any minor update AWS release it will automatically update the replication instance, you can specify maintenance window for the replication instance and click create replication. - Description: On Create Instance dialog box, under Maintenance you can check auto minor version update, so whenever if there is any minor update AWS release it will automatically update the replication instance, you can specify maintenance window for the replication instance and click create replication.

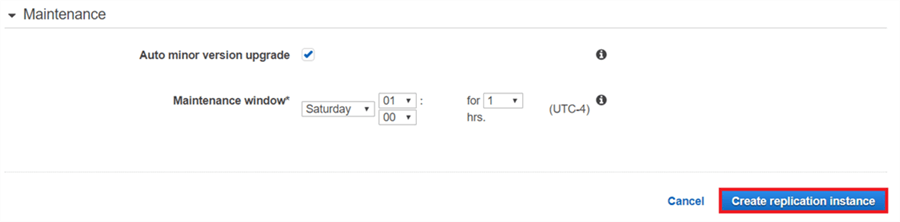
On the Replication Instances page the replication instance will appear with an available status to show that it is up and running.

On Replication Instance page the replication instance will appear available status and it is up and running. - Description: On Replication Instance page the replication instance will appear available status and it is up and running.

Step # 3 – Create Endpoints

AWS Database Migration Services (DMS) will access your source and target data using endpoints. The source endpoint allows AWS DMS to read data from a database (on premises or EC2 in the cloud), or from a non-database source such as Amazon S3. A target endpoint allows AWS DMS to write data to a database or to a non-database target.

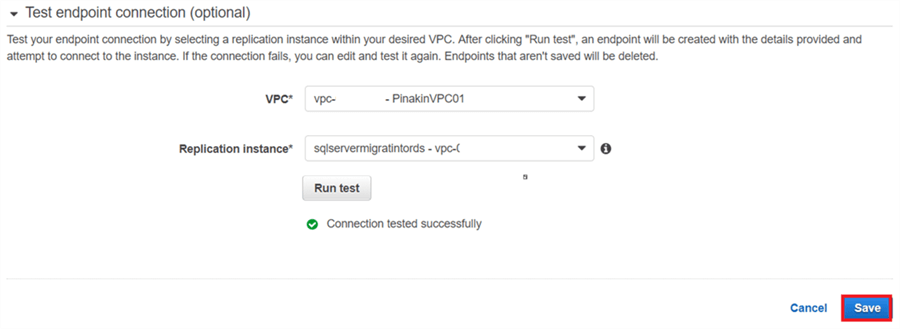
It is recommended that you test the connection to verify that your endpoint is valid and successfully connects to the source and target before creating the migration task in DMS AWS.

On the Endpoints page, click on Create endpoint.

AWS database migration services (DMS) will access your source and target data using endpoints. The source endpoint allows AWS DMS to read data from a database (on-premise or EC2 in the cloud), or from a non-database source such as Amazon S3. A target endpoint allows AWS DMS to write data to a database, or to a non-database target. - Description: AWS database migration services (DMS) will access your source and target data using endpoints. The source endpoint allows AWS DMS to read data from a database (on-premise or EC2 in the cloud), or from a non-database source such as Amazon S3. A target endpoint allows AWS DMS to write data to a database, or to a non-database target.  It is recommended that you should test the connection using "Run test" option, to verify that your endpoint is valid and successfully connect to source or target before creating migration task in DMS AWS.  On Endpoint page, click on create endpoint

On the Create endpoint dialog box, select the source endpoint type, give the endpoint an identifier name, select source database engine from drop down list. AWS provides a wide range of source database engine selections; here I have selected sqlserver as we are migrating from an EC2 SQL Server database to an Amazon RDS SQL Server database.

On create endpoint dialog box, select the source or target endpoint type, give the endpoint identifier name, select source database engine from down list; AWS provide wide range of source database engine selection; here I have selected SQLServer as we are migrating from EC2 SQL server database to Amazon RDS SQL server database. - Description: On create endpoint dialog box, select the source or target endpoint type, give the endpoint identifier name, select source database engine from down list; AWS provide wide range of source database engine selection; here I have selected SQLServer as we are migrating from EC2 SQL server database to Amazon RDS SQL server database.

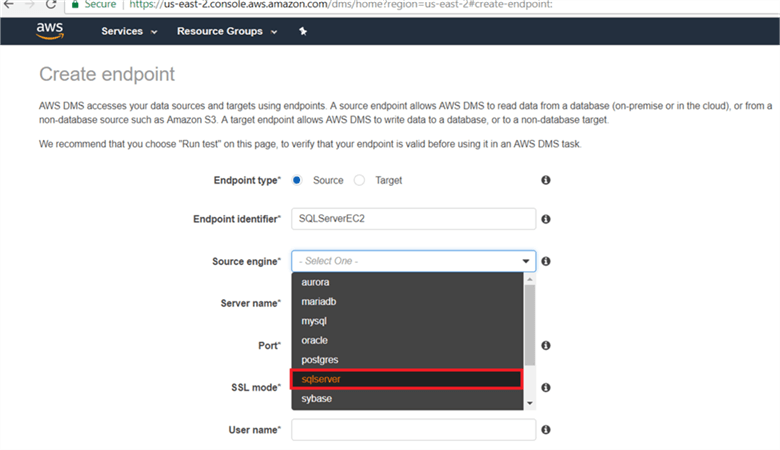
On the Create endpoint dialog box, give the source server name and port number, select the SSL mode and provide the user and password to access the source database and database name.

On create endpoint dialog box, give the source server name and port number, select the SSL mode and provide the user and password to access the source database and source database name. - Description: On create endpoint dialog box, give the source server name and port number, select the SSL mode and provide the user and password to access the source database and source database name.

On the Create endpoint dialog box, under Advanced select the KMS master key.

On create endpoint dialog box, under Advance option select the KMS master key. - Description: On create endpoint dialog box, under Advance option select the KMS master key.

On the Create endpoint dialog box, under Test endpoint connection select the VPC and replication instance and click Run test to make sure the connection works.

On create endpoint dialog box, under test endpoint connection (optional) select the VPC and replication instance and click on Run test or you can create Endpoint then test the connection but it is good to test the connection. - Description: On create endpoint dialog box, under test endpoint connection (optional) select the VPC and replication instance and click on Run test or you can create Endpoint then test the connection but it is good to test the connection.

On the Create endpoint dialog box, under Test endpoint connection once the connection test is successful click Save to save the settings.

On create endpoint dialog box, under test endpoint connection (optional) once the connection tested successfully then click on Save to save the setting. - Description: On create endpoint dialog box, under test endpoint connection (optional) once the connection tested successfully then click on Save to save the setting.

On the Endpoints page the source endpoint will appear with an available status and you can test the connection again if needed. You can also Modify the endpoint or Delete the endpoint.

On Endpoint page the source endpoint will appear available status and you can test the connection. You can modify the endpoint or delete the endpoint. - Description: On Endpoint page the source endpoint will appear available status and you can test the connection. You can modify the endpoint or delete the endpoint.

On the Create endpoint dialog box, select target endpoint type, give the endpoint identifier name, select the target database engine from the drop down list.

On create endpoint dialog box, select the source or target endpoint type, give the endpoint identifier name, select target database engine from down list; AWS provides wide range of target database engine selection; here I have selected SQLServer as we are migrating Server from EC2 SQL server database to Amazon RDS SQL Server. - Description: On create endpoint dialog box, select the source or target endpoint type, give the endpoint identifier name, select target database engine from down list; AWS provides wide range of target database engine selection; here I have selected SQLServer as we are migrating Server from EC2 SQL server database to Amazon RDS SQL Server.

On the Create endpoint dialog box, give the target server name and port number, select the SSL mode, and provide the user and password to access the target database and database name.

On create endpoint dialog box, give the target server name and port number, select the SSL mode, and provide the user and password to access the target database and target database name. - Description: On create endpoint dialog box, give the target server name and port number, select the SSL mode, and provide the user and password to access the target database and target database name.

On the Create endpoint dialog box, under Advances select the KMS master key.

On create endpoint dialog box, under Advance option select the KMS master key. - Description: On create endpoint dialog box, under Advance option select the KMS master key.

On the Create endpoint dialog box, under Test endpoint connection select the VPC and replication instance and click Run test.

On create endpoint dialog box, under test endpoint connection (optional) select the VPC and replication instance and click on Run test or you can create Endpoint then test the connection but it is good to test the connection. - Description: On create endpoint dialog box, under test endpoint connection (optional) select the VPC and replication instance and click on Run test or you can create Endpoint then test the connection but it is good to test the connection.

On the Create endpoint dialog box, under Test endpoint connection once the connection test is successful click Save to save the settings.

On create endpoint dialog box, under test endpoint connection (optional) once the connection tested successfully then click on Save to save the setting. - Description: On create endpoint dialog box, under test endpoint connection (optional) once the connection tested successfully then click on Save to save the setting.

On the Endpoints page the target endpoint will appear as shown below.

On Endpoint page the target endpoint will appear available status and you can test the connection. You can modify the endpoint or delete the endpoint. - Description: On Endpoint page the target endpoint will appear available status and you can test the connection. You can modify the endpoint or delete the endpoint.

Step # 4 – Create Task

When you want to migrate the data or database from on-premises or EC2 SQL Server you need to create a task. A task defines the source and target endpoints, migration type, etc.

Click on Tasks and then Create task.

When you want to migrate the data or database from On-premises or EC2 SQL server you need to create the task; in the task you need to define the source and target endpoint, migration type etc. - Description: When you want to migrate the data or database from On-premises or EC2 SQL server you need to create the task; in the task you need to define the source and target endpoint, migration type etc. To Task go to the task page, click on Create task.

On the Create task page, give the task name, select the replication instance, source/target endpoints, migration type and check the on Start task on create.

There are three options under Migration Type:

  • Migrate existing data - This option will migrate only existing tables, primary keys and data it won’t capture ongoing changes.
  • Migrate existing data and replicate ongoing - This option will migrate existing tables, primary keys and data and replicate ongoing changes.
  • Replicate data changes only - This option migrates only data changes.
On Create Task page, give the task name select replication instance, source/target endpoints, migration type and check mark on start task on create. - Description: On Create Task page, give the task name select replication instance, source/target endpoints, migration type and check mark on start task on create. Note if you are planning to migrate the existing data only then you need to select the migrate existing data. This option will migrate only existing table, primary key and data it won't capture the ongoing changes, the second migrate existing data and replicate ongoing changes option will migrate the migrate exiting table, primary key and data and the third replicate data changes only will migrate the changes only.

On the Create Task page, under Task Settings changes during the load are cached, so you need to select apply the cached changes and stop the task or stop the task and apply the cached changes.

  • Target table preparation mode
    • Do nothing will not do anything
    • Drop tables on target will drop the tables and the data
    • Truncate will truncate the target table data.
  • Stop task after full load completes
    • Don’t stop will not stop anything
    • Select Stop Before Applying Cached Changes
    • Stop After Applying Cached Changes.
  • Include LOB columns – If you have large object columns then you need to select this option.
  • Enable logging – This option will generate the log to monitor in Cloudwatch.
On Create Task page, under task settings the changes during load is cached changes, so you need to select apply the cached changes and stop the task or stop the task and apply the cached changes. - Description: On Create Task page, under task settings the changes during load is cached changes, so you need to select apply the cached changes and stop the task or stop the task and apply the cached changes. Target table preparation mode do nothing will not do anything, drop tables on target option will drop the tables and the data, Truncate option will truncate the target table data. Stop task after full load completes don't stop option will not stop anything; second option will stop before applying cached changes and the third option will stop after applying cached changes. LOB column if you have large object column then you need to select this option. Enable logging this option will generate the log to monitor in cloudwatch

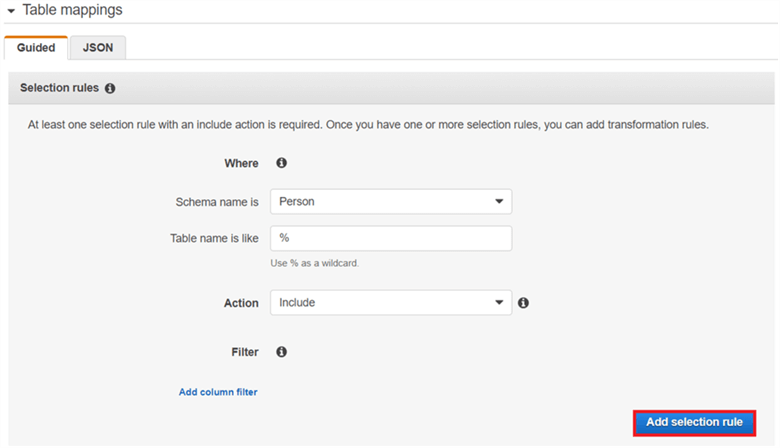
On the Create Task page, under Table mappings you need to select the schema you need to migrate any associated tables. You can use wildcards like % to migrate all tables within a given schema. You can also add column filters if you want to use a column level filter.

On Create Task page, under table mapping you need to select the schema you need to migrate and associated tables you can put wildcard % to migrate all tables with given schemes. You can add column filter if you want to put any column level filter. - Description: On Create Task page, under table mapping you need to select the schema you need to migrate and associated tables you can put wildcard % to migrate all tables with given schemes. You can add column filter if you want to put any column level filter.

On the Create Task page, under Table Mappings after selecting the options it will appear as shown below. Then click Add selection rule.

On Create Task page, under table mapping after selecting all it will appear as shown below; after that add the selection rules. - Description: On Create Task page, under table mapping after selecting all it will appear as shown below; after that add the selection rules.

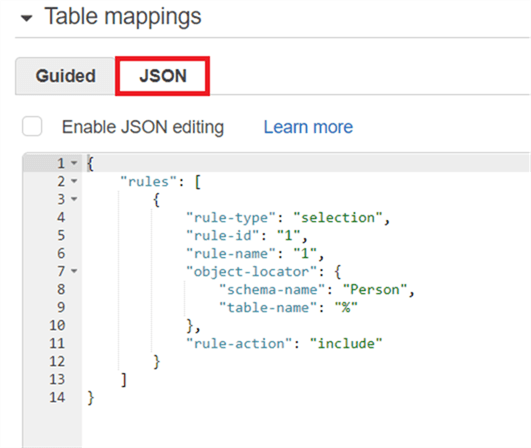
On the Create Task page, under Table Mappings you can make the change the JSON to customize.

On Create Task page, under table mapping you can make the changes in to JSON or create multiple schemas, tables with JSON. - Description: On Create Task page, under table mapping you can make the changes in to JSON or create multiple schemas, tables with JSON.

On the Create task page after you configured all required parameters click on Create task.

On create task page after you configured all required parameter then click on Create task. - Description: On create task page after you configured all required parameter then click on Create task.

On the Tasks page, the task will appear as created.  If you selected Start task on create it will also show completed as 100%.

On Tasks page, task will appear as created and load has been completed 100% - Description: On Tasks page, task will appear as created and load has been completed 100%

On the Tasks page, you can verify the table, data load on the table statistics tab to see full load rows and total number of rows.

On Tasks page, you can verify the table, data load on table statistic tab with full load rows total number of rows. - Description: On Tasks page, you can verify the table, data load on table statistic tab with full load rows total number of rows.

On the Tasks page, you can Modify the task as well as Start/Resume, Stop and Delete a task.

On Tasks page, you can modify the task, start/resume and stop and delete the task. - Description: On Tasks page, you can modify the task, start/resume and stop and delete the task.

Reviewing Data Replication

I connected to Amazon RDS SQL from SSMS and we can see the tables and data have been loaded in to the Amazon RDS SQL Server.

We have connected to Amazon RDS SQL server from SSMS and we can see the tables and data have been loaded in to Amazon RDS SQL server. - Description: We have connected to Amazon RDS SQL server from SSMS and we can see the tables and data have been loaded in to Amazon RDS SQL server.

After setting up the tasks for each schema and replicating the data, we can see that we have migrated the data from the AdventureWorks2016 database to Amazon RDS SQL server database AdventureWorks2016Test.

We have migrated AdventureWorks2016 database to Amazon RDS SQL server AdventureWorks2016Test database. - Description: We have migrated AdventureWorks2016 database to Amazon RDS SQL server AdventureWorks2016Test database.

Conclusion

In this tip we have migrated the AdventureWorks2016 database to Amazon RDS SQL Server AdventureWorks2016Test database using the heterogeneous migration option.

Next Steps
  • Check out these related tips:


sql server categories

sql server webinars

subscribe to mssqltips

sql server tutorials

sql server white papers

next tip


About the author
MSSQLTips author Pinakin Patel Pinakin Patel is a SQL Server Admin / AWS Solutions Architect with experience in SQL Server 2000 to 2016.

This author pledges the content of this article is based on professional experience and not AI generated.

View all my tips


Comments For This Article


Thursday, May 13, 2021 - 4:51:49 PM - Amit Back To Top (88682)
I need to know from on premise means my laptop if I want to migrate db sqlserver 2008 r2 to aws rds mysql via aws sct tool then after schema conversion I am trying to create endpoints for source so my question is

1. Do we need public ip in my on premise system where my db is to connect with source endpoints?

2. I am network issue while testing or source endpoints from dms

3. What should we put the server name in source endpoints configuration settings ?


Wednesday, June 6, 2018 - 3:04:13 AM - Rajeev Kumar Back To Top (76134)

 Hi Pinakin, 


Could you also let us know Pre and Post validation and Limitations, While migration the SQL Server 2012 to AWS Cloud RDS Instances.


Rajeev


get free sql tips
agree to terms