Problem
For this tutorial, I will guide you through how to easily migrate your on-premises SQL Server database to the AWS platform with minimal downtime and manageable overhead costs.
Solution
With the fast evolution of cloud platforms offering a highly available, elastic and at the same time cost effective infrastructure, many organizations are faced with challenges on how they can bring their legacy on-premises database to the cloud with minimum management headaches, downtime and of course staying cost effective throughout the migration process.
AWS cloud platform offers Database Migration Services (DMS) as a solution to avoid many database migration headaches. It is guided, easy and best of all a free service from AWS. With AWS DMS, you can perform a one-time full database migration and/or with replication of database changes while you keep your applications running. As DMS is part of AWS cloud, you can be assured that your database migration project (i.e. SQL Server, Oracle, MySQL, MariaDB, PostgreSQL, MongoDB, etc. database engines) will be easy, fast, secure, flexible and cost effective.
How the AWS DMS Data Migration Works
During the database migration, AWS DMS will create a replication instance for you. AWS DMS will connect to the source database and load the data into the target endpoint which is your target SQL Server database on AWS.
At a high level, for an AWS DMS migration project you will need to:
- Create a replication instance for the database migration
- Create source and target endpoints
- Create migration task(s) that will migrate the data between the source and target endpoints
In a nutshell, AWS DMS will need to read data from your source database, process the data in DMS replication instances via migration tasks, and load the processed data into the target database.
Your migration task may have 3 different data replication use cases:
- Migrate existing data
- Migrate existing data and replicate ongoing changes
- Replicate data changes only
To migrate existing data means that your migration tasks will involve only sourcing data from the source endpoint, formatting that data, if there is any formatting configured in the migration tasks, and loading that formatted data into the target endpoint. After completion of the migration task, your data on SQL Server on AWS is ready for use.
To migrate existing data and replicate ongoing changes means that your migration task will perform a full load of your data from source to target database servers and keep replicating data changes from the source database to your target database. This is a recommended migration task type option if you want to keep your downtime during application migration minimal. Note that this migration task requires you to enable SQL Replication on your existing SQL Server. It is not needed on the target SQL Server.
To replicate data changes only means to not perform a full load of data from source to target database, instead perform a replication of data changes only. This will also require you to enable SQL Replication on your existing SQL Server.
During the run of the migration task, AWS DMS loads data from the source database platform to the target database platform. While this is happening, any changes on the data are cached on the replication instances. Note that AWS DMS does not capture changes on a table until the full data load migration for that specific table has started. If your database has about a lots of tables, each table will then have a different cached version.
For planning your SQL Server database migration project, let's look at some of the limitations of using SQL Server as a source or target for your migration tasks.
Limitations when using SQL Server as Source Database
- Windows authentication is not supported. You need to prepare a SQL login for migration purpose.
- Use of sparse tables is not supported.
- Changes made to computed fields are not supported.
- Replicating indexed views is not supported.
- “Select * INTO (tablename) FROM (another table name)” statement is not supported.
- TDE (transaction data encryption) enabled at the database is not supported.
- Column level encryption is not supported
- AWS DMS does not support server level audits for SQL 2008 and SQL 2008 R2.
- AWS DMS does not support tables with included fields with cursor, sql_variant, and table data types.
- For the distribution database, when using SQL Server 2012 and 2014, when using DMS replication with Availability Groups, the distribution database cannot be placed in an availability group
- Geometry columns are not supported in full LOB mode. Instead, use the limited LOB mode to use inline LOB mode.
- Truncate events are not captured.
Limitations when using SQL Server as Target Database
- When manually creating a target table with a computed column, full load replication is not supported.
- DMS does not support Bring your own license (BYOL) for Microsoft SQL Server.
- Temporal tables are not supported. Migrating temporal tables might work with a replication-only task (CDC) if those tables are manually created on target.
- The AWS DMS account must have at least the db_owner user role on the SQL Server database you are connecting to.
Setting up AWS DMS
Sign up for an AWS Account. When you already have an AWS account, then AWS DMS will be available for you to use. Type ‘database migration service’ at the top menu search bar. You will be navigated to the dashboard for AWS Database Migration Service.

Notice that on the left pane menu, that the components for completing a migration task is already available. Remember that when you close your AWS Account, these components or resources are all deleted within 2 days. If you decide to perform another migration project and use another AWS account, you will need to recreate all your DMS components or resources.
Source and Target Endpoints
First, let’s establish connectivity to your source and target SQL Server databases. Here in the database migration tasks, they are referred to as endpoints. As both source endpoint and target endpoint will need a SQL login account, prepare a new one you can use with this migration project. Remember that we cannot use Windows authentication for both source and target endpoints.
From the dashboard left pane menu, click Endpoints. Select the endpoint type. For your source SQL server, click on radio button for Source endpoint. If you are not using an AWS RDS database as the source, leave the checkbox unchecked.

For details on source SQL Server, enter the IP address on the server name textbox. Enter the port number and select SSL details. You can leave this as the default if you are using the default settings on your SQL Server. Enter the SQL Login credentials for User name and Password textboxes. Enter the database name you want to migrate to the target endpoint. Leave all the other settings as is and proceed to click on ‘Create Endpoint’. We can do a test of the connectivity when we have created all the other components.

When you have the source endpoint, proceed to click on the target endpoint. When you have done the same for your target endpoint, go back to the dashboard. You should see 2 endpoints available.

Configure the Replication Instance
The next component or resource we need to create is the replication instance. Replication instances are the engines that run your migration tasks behind the scenes. These are EC2 instances that are visible and usable only in the AWS DMS dashboard. They will not be visible in the AWS EC2 dashboard.
From the left pane menu, click on the ‘Replication Instances’. This should open the replication instance configuration page as below:

When deciding on the instance type for your replication instance, it is recommended to start with AWS default settings and monitor the usage via AWS CloudWatch during the migration task run. From there you will have a better understanding of how AWS DMS is using your replication instance. You can modify the instance type after creating the replication instance.
Enter your preferred name and description for your replication instance. Select your existing VPC for the VPC dropdown list. Select ‘dev or test workload’ for the Multi AZ dropdown list.
Leave all the other advanced settings as is and proceed to click on ‘Create’ to create the replication instance. The creation process should take a few minutes.
Once creation is successful, you should have one available replication instance. This will be visible from the dashboard too.

When you have created the replication instance, you proceed to test connectivity of your source and target endpoints. You need to make sure that the replication instance can talk to your endpoints.
Go back to the Endpoints menu, click one of your available endpoints. Go to the ‘Connections’ tab. Click ‘Test Connection’ to start the connectivity test. If the test is not successful, you will need to resolve the issue first before you can run any migration task.

The below image is my example of an error message when the endpoint connectivity test is not successful. Hint: make sure your replication instance is in the correct VPC and connectivity within your VPC is already established. I had an error in selecting my own VPC.

Database Migration Tasks
Now that we completed configuring source and target endpoints, created the replication instance and completed the connectivity test, you can now move to creating your database migration task.
Database migration tasks is where you put all the ingredients for migration together and start the process to load the data from the source endpoint, load that data into the replication instance and move it to the target endpoint.
So, let’s start to migrate one database via an AWS DMS Task.
In the same AWS DMS dashboard, click ‘Database migration tasks’ from the left pane menu. This will open the ‘Create database migration tasks’ window as below:

Enter your preferred name for the task identifier and description fields. Select the replication instance, source database endpoint, target database endpoint in their respective dropdown lists. For the migration tasks dropdown list, for the purpose of this article, select ‘Migrate existing data’. As mentioned above, this task will perform an initial full load of your database from source endpoint to target endpoint.
In the ‘Task settings’ section, select the ‘Wizard’ button.
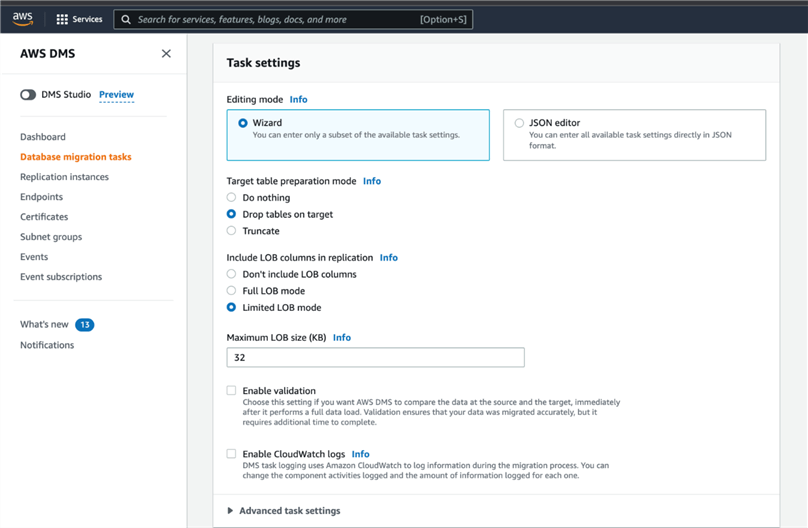
For the ‘Target table preparation mode’, select ‘Drop tables on target’ makes sure the database is empty and will drop and create the tables if already existing. This is perfect for target database that has been restore previously and you want to start with a fresh copy of the database from the source endpoint. You can leave the LOB settings as is.
When working with SQL databases with tables that have LOB columns, make sure to select the option for ‘Include LOB columns in replication’. Be aware that when migrating with full LOB mode, the LOBs are migrated in chunks depending on the Max LOB value. This option is slower than when migrating with limited LOB mode. I recommend playing with the settings in dev/test mode so you have an understanding of how this affects the performance of your migration task.
When running in production mode, you will need to tick the check boxes for ‘Enable validation’ and ‘Enable CloudWatch Logs’ for proper monitoring and checking the performance of your migration tasks.
For table mappings, select the Wizard option. This will guide you on the table and schema mappings. For the purpose of this article tutorial, I recommend to use the wildcard % option to migrate all existing schema and tables from source database. To conform to various migration tasks requirements, you can create multiple selections for each of your migration tasks.

For the Premigration assessment, this helps when running production workloads. This enables you to see potential migration issues with your migration task. When enabled, you will be able to export the assessment report to an S3 bucket location for your review.

Above is a sample configuration of when you opt to use premigration assessment for your production workloads.

You also have the option if you want to automatically start your migration task or manually start it at a later time. That’s how flexible the migration task options are. There are multiple settings to accommodate initial full load of data or with continuous replication after the initial full load of data.
Click on ‘Create tasks’ to create the database migration tasks. Now you are ready to run your first migration task!
Running a Migration Task
To start a migration task, simply select a migration task from the Database migration task dashboard and click on ‘Restart/Resume’.

While your migration task is running, you can view the task details by clicking on the migration task name. See below screenshot.

Here you are able to see the progress, the table statistics under the ‘Table statistics’ tab and CloudWatch metrics. Using the CloudWatch metrics will be helpful to assess if you are using the correct replication instance. When running production workloads, use the CloudWatch metrics to check for performance bottlenecks.
For the purpose of this article, I prepared a table with 1000 rows. Using the table statics in the same window, I can see that the migration task was able to copy the 1000 rows from source endpoint to the target endpoint. Take note of the ‘Elapsed load time’ to note which tables took the longest to load to the target endpoint. This column will also be helpful in case you run into performance bottleneck issues when running in production mode.

You can validate the row count under the ‘Full load rows’ with row count from source database. You can use the below TSQL statement to retrieve all tables and their row count in a database as part of your migration validation.
SELECT QUOTENAME(SCHEMA_NAME(sOBJ.schema_id)) + '.' + QUOTENAME(sOBJ.name) AS [TableName]       , SUM(sPTN.Rows) AS [RowCount]
FROM sys.objects AS sOBJ
INNER JOIN sys.partitions AS sPTN ON sOBJ.object_id = sPTN.object_id
WHERE sOBJ.type = 'U'
    AND sOBJ.is_ms_shipped = 0x0
  AND index_id < 2 -- 0:Heap, 1:Clustered
GROUP BY sOBJ.schema_id, sOBJ.name ORDER BY [TableName]
Or by simply running a count of rows.

Conclusion
For this tutorial, I have shown how easy it is to migrate an existing SQL Server database to SQL Server running on AWS. The AWS DMS dashboard is easy to use and very flexible for any type of SQL Server migration projects that you may have.
For all the AWS resources you created for this tutorial, make sure to clean them up so you don’t get surprises in your AWS bill. For more information on pricing for AWS DMS click here. Remember that AWS DMS service is free, however all resources created to use the service, such as the replication instance incur some cost.
Let me know in the comments section if you run into issues in your AWS DMS migration project.
Next Steps
- For more tips on how to manage your SQL Servers now running on AWS
- For more tips on migrating your SQL Server to AWS RDS
- Learn how to build your own RDS on AWS

Carla Abanes is a certified Microsoft SQL Server Database Administrator with extensive experience in data architecture and supporting mission critical databases in production environments. She is based in Manila and wears 2 hats at work as a SQL Server Technical Lead and as a Cloud Architect.
She holds a certification in AWS Solutions Architect – Professional and Azure Administration. I am passionate about conceptualizing proof-of-concepts, turning ideas into real applications and overcoming challenges that come with the execution and delivery of solutions.

Can we migrate TDE enabled SQL Server database from on premises to AWS RDS using DMS.