Problem
Many small and large enterprises want to move their SQL Server databases and applications into the cloud using Amazon Web Services. In this tip we look at how you can build an enterprise environment using AWS to get ready to make the move to the cloud.
Solution
This tip will help all technology professionals, DBA Managers and IT Directors to build an enterprise level environment. This tip is intended for anyone who doesn’t want to build or manage an on-premises data center or infrastructure.
How to build Enterprise Environment in AWS
Basic information about Amazon EC2
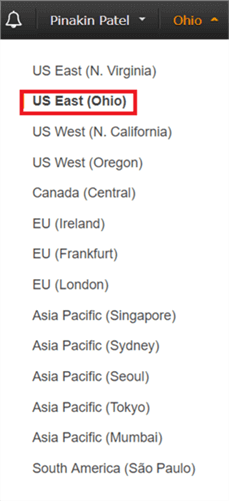
Amazon Web Services is available and accessible across the world. AWS has multiple regions and each region has multiple availability zones and each zone consists of one or more discrete data centers, with redundant power capabilities, networking and connectivity all housed in separate facilities. By default when you configure the services it will assign the nearest region, however you can change the region based on your needs.
Here is an example of how this looks for different regions.

In our case we are using the US East (Ohio) region which allows for 3 availability zones.
Amazon Elastic Compute Cloud (EC2) also referred to as an EC2 instance is a cloud based server. In the cloud based server you can install your own Windows server and SQL Server license or a license offered by Amazon Web Service (AWS). In EC2 you can create a Windows Server Data Center edition (free tier) or you can pay as you go on an hourly basis. To calculate what the hourly charges might be, click here.
You can build up your server with just a few clicks as per your needs - Amazon offers a wide selection for instance types to best fit your requirement - you can compare various types of instance combinations for memory, storage, networking and CPU capacity. For more information visit the Amazon AWS site.
Before we begin to build our first EC2 instance we need to create a virtual private could (VPC) with availability zones (subnets).
Here I will share how to create an EC2 instance with all related requirements on AWS (by default AWS provides the VPC, route table, security group, Internet Gateway, subnets, Network ACLs) when you open a new account.
First you need to create and open an AWS account to configure the EC2 window server with SQL server. To create an account follow the steps in this article by Tim Cullen.
OK, let’s start our AWS project - go to your AWS management console to get started.
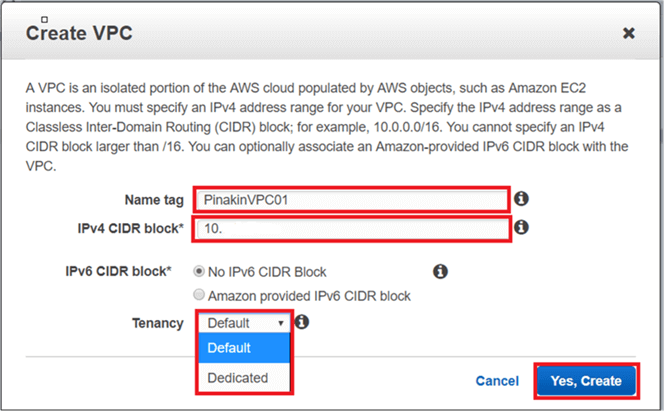
Step # 1 - Create Virtual Private Cloud (VPC)
A virtual private cloud (VPC) is a virtual network dedicated to your AWS account. You can launch your AWS resources, such as Amazon EC2 instances server into your VPC. By creating a Virtual Private Cloud (VPC) in AWS you will have complete control over your virtual networking environment including selecting your own IP address range, creating subnets, configuration of routing tables, and network gateways.
You can customize the network configuration for your Amazon virtual private cloud; for example create public facing subnets for web servers that have access to the internet and place backend items such as a database or application servers in a private-facing subnet with no internet access.
You can create multiple layers of security including security groups and network access. When you create the VPC you will get option to select the tenancy; if you select the Default Tenancy then the instance will run on shared hardware and if you select Dedicated Tenancy then the instance will run on single tenant hardware. In additional you can create a hardware and software virtual private network (VPN) to connect between your corporate data center and the AWS cloud environment.
Click on Services on the top left side and under Networking and Content delivery select VCP.

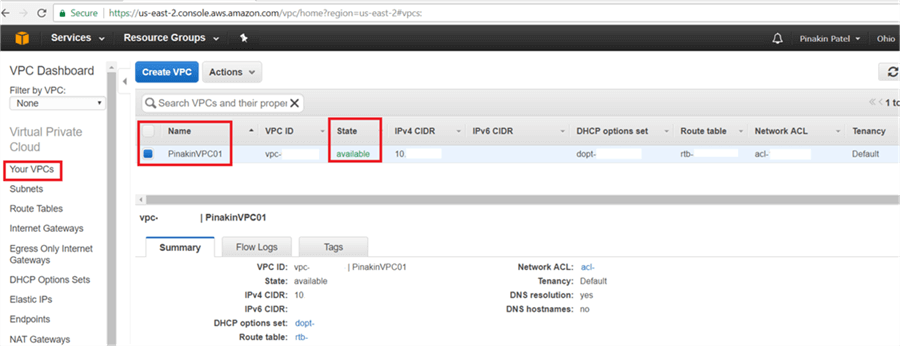
On the Your VPCs page, click Create VPC.

In the Create VPC dialog box, put the Name tag, IPv4 CIDR block and Tenancy. For Tenancy select Default or Dedicated. If you select Default then the instance will run on shared hardware and if you select Dedicated then instance will run on single tenant hardware. Now click on Yes, Create.

Here is a closer look.
After creating the VPC, it will appear with the VPC status as available.
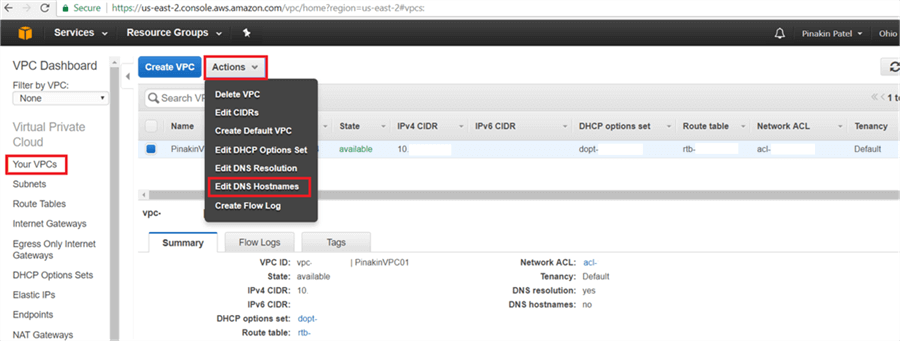
On Your VPCs page, select the VPC to change the DNS hostname and go to Actions and click on Edit DNS Hostnames.
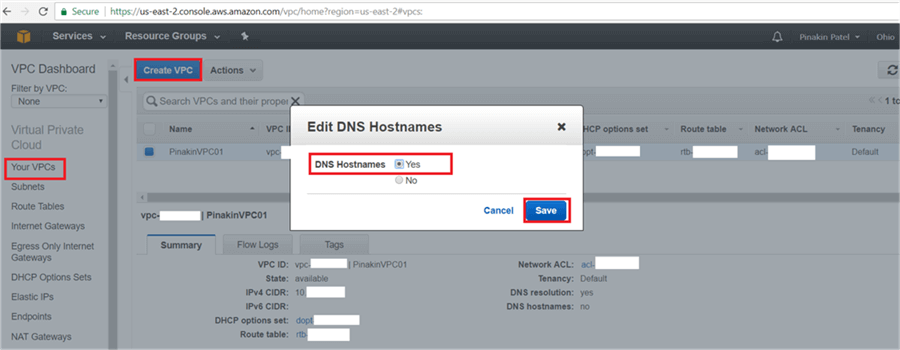
On the Edit DNS Hostnames dialog box select Yes and then Save.
Step # 2 - Create Subnets
When you create a VPC it spans all availability zones within the region and after creating a VPC you can add one or multiple subnets in one or more availability zones. When you create subnets you specify the CIDR block for the subnet. If you create more than one subnet in a VPC, the CIDR blocks of the subnets cannot overlap. For example, if you create a VPC with CIDR block 10.0.0.0/16, it supports 749 IP addresses and you can break this CIDR block into three subnets, each supporting 250, 250 and 249 IP addresses. You will get an option to select the availability zone or you can leave as no preference and AWS will assign it.
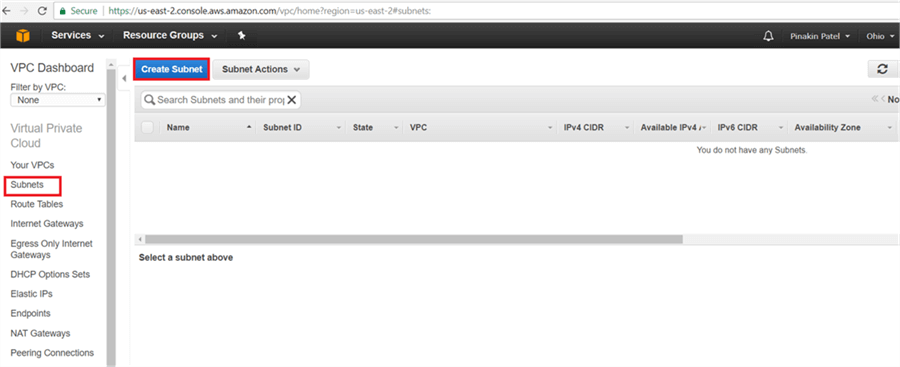
On the Subnet page, click on Create Subnet.
On the Create Subnet dialog box, enter a subnet name tag, the VPC will automatically get assigned. If there is more than one VPC then select from the drop down menu. Select the Availability Zone from drop down list, there are multiple availability zones in a region (some region have 3 or more Availability Zones). In Ohio there are 3 availability zones (us-east-2a; us-east-2b, us-east-2c). Put the IPv4 CIDR block and click on Yes, Create.

Here is a closer look.

Create all of the other subnets the same way to create multiple subnets. The other subnets can be placed into the same availability zone or a different availability zone. Here I have created a second subnet in a different availability zone.

Here is a closer look.

On the Subnet page, the newly created subnet will appear and the status shown as available. Here I have created three subnets, one in us-east-2a, one in us-east-2b and the third in the us-east-2c zone.

On the Subnet page, select subnet and go to the Subnet Actions and click on Modify auto-assign IP settings, to modify the auto-assign IP settings.
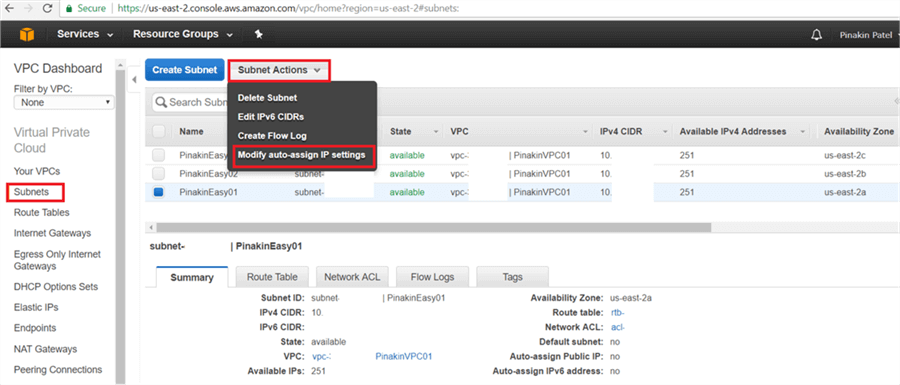
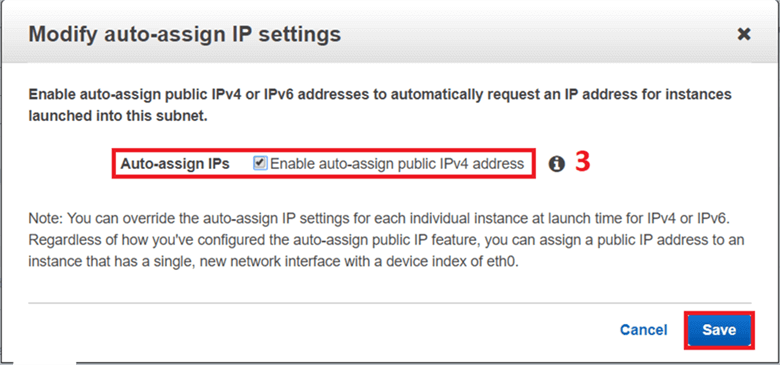
On the Modify auto-assign IP settings dialog box, check Auto-assign IPs and click on Save.
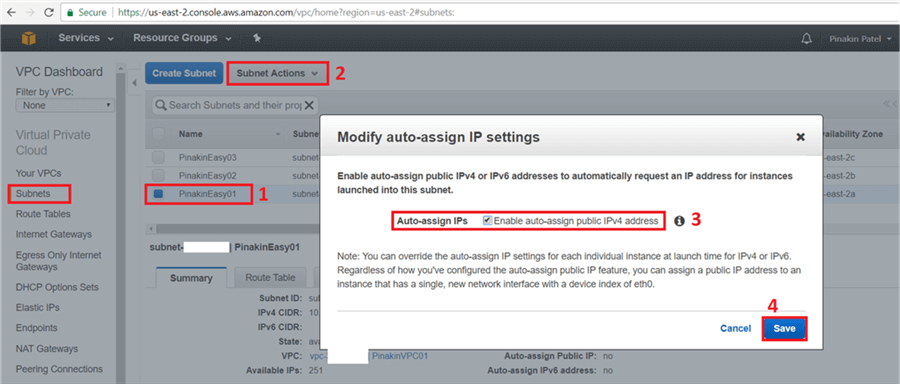
Here is a closer look.
A success message will appear once the Modify auto-assign IP Settings is done.

Modify the other subnets auto-assign IP setting the same way if there are multiple subnets.
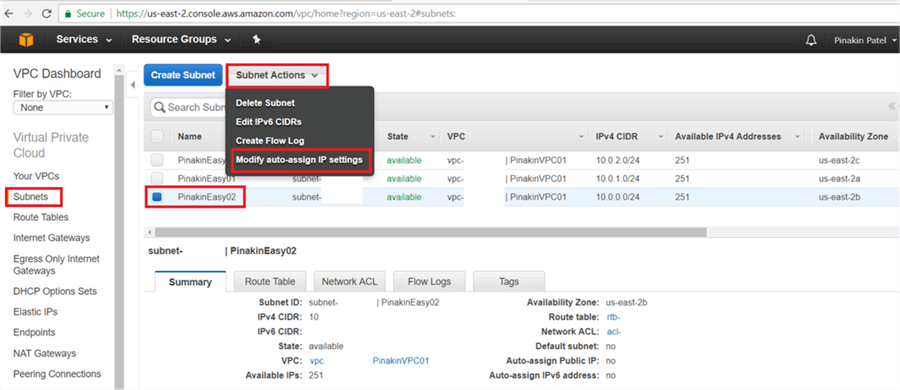
Configuration changes will appear as shown below.

Step # 3 - Create Internet Gateway
To connect/communicate via the internet with your AWS VPC cloud environment you need to create an Internet Gateway. An Internet gateway allows communication between the VPC and Internet. After creating the Internet Gateway you need to attach it with the VPC to allow communication between the Internet and VPC.
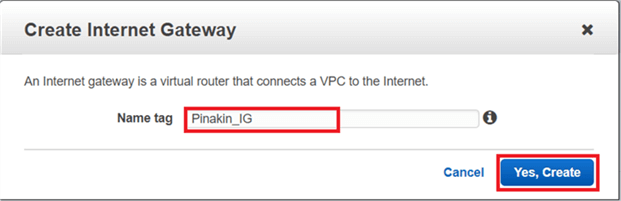
On Internet gateway page, click on Create Internet Gateway.

On the Create Internet Gateway dialog box, put the Name tag and click on Yes, Create.

Here is a closer look.
On the Internet Gateway page, select the newly created Internet Gateway and click on Attach to VPC.
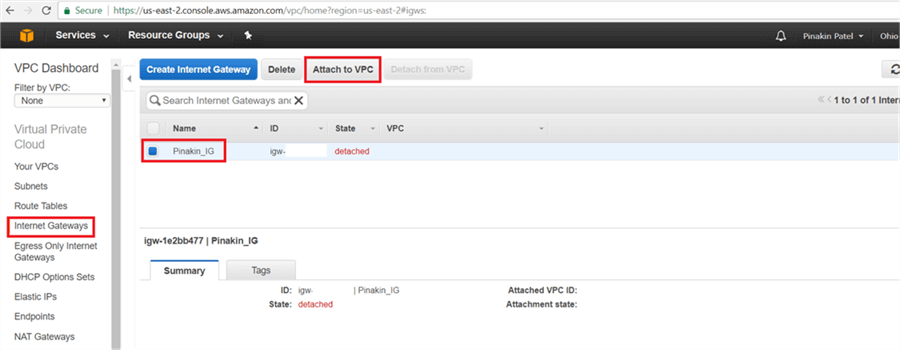
On Attach to VPC dialog box, select the VPC and click on Yes, Attach.

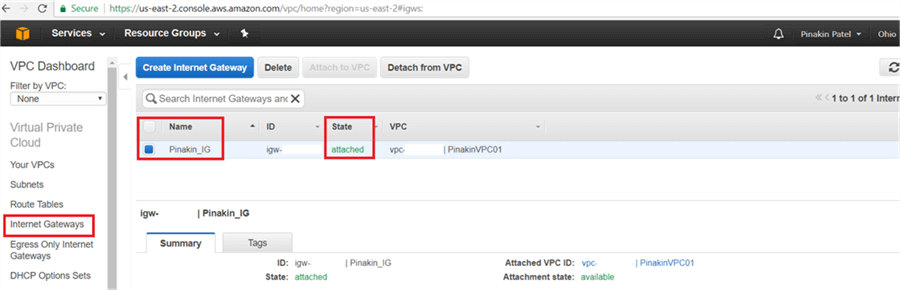
On the Internet Gateway page, the status will appear as attached.
Step # 4 - Create Route Table
A route table contains all the rules and routes to determine where network traffic is directed. By default, your VPC comes with a route table and if you want you can modify it or create a new custom route table. Each subnet must have a route table, which controls the routing for the subnet. If you do not associate the subnet with a route table then the subnet implicitly associates it with the main route table. You can change the main route table with a custom route table, but you cannot delete the main route table.
On the Route Tables page, click on Create Route Table.

On the Create Route Table dialog box, provide the route table name and select the VPC and hit Yes, Create.

Here is a closer look.

On the Route Tables page, select the newly created Route Table and click on Set As Main Table.

On the Set Main Route Table dialog box, click Yes, Set.

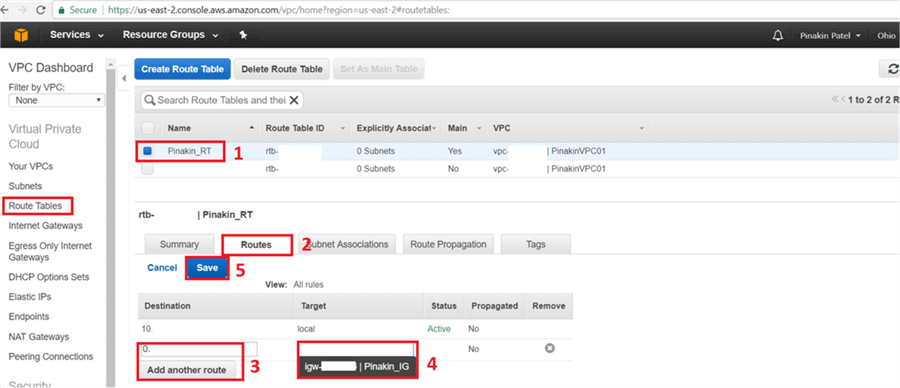
On the Route Tables page, after setting up the newly created Route Table as the main table, go to the Routes tab and click Edit.

On the Route Tables page, on the Routes tab click on Add another route and add the Destination IPs and select the target as the Internet Gateway and then click Save.
On the Route Tables page, the changes will appear as shown below.

Step # 5 - Create Network ACLs
A network access control (ACL) is an optional layer of security for your VPC and acts as an additional firewall on the security group for controlling the traffic for the subnets. You might set up network ACL rules similar to your security groups in order to add an additional layer of security to your VPC. By default, the VPC comes with a default network ACL, and by default it allows all inbound and outbound IPv4 traffic. You can create a custom network ACL and associate it with a subnet. By default, each custom network ACL denies all inbound and outbound traffic until you add rules.
On Network ACLs page, click on Create Network ACL.
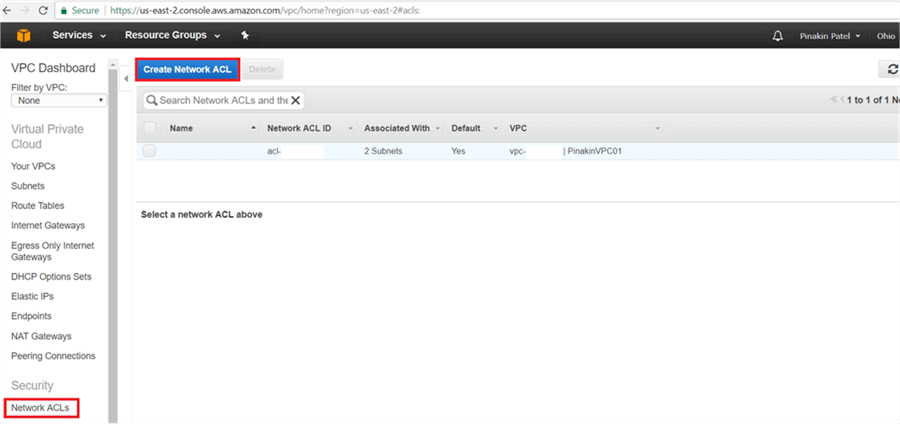
On Create Network ACL page, enter the Name tag and select the VPC and hit Yes, Create.

On Network ACLs page, select the newly created network ACL and go to the Inbound Rules tab and click on Edit.
On the Inbound Rules tab click on Add another rule and enter a Rule # and Type (select the port number to open the appropriate port), give source IPs and then click Save.

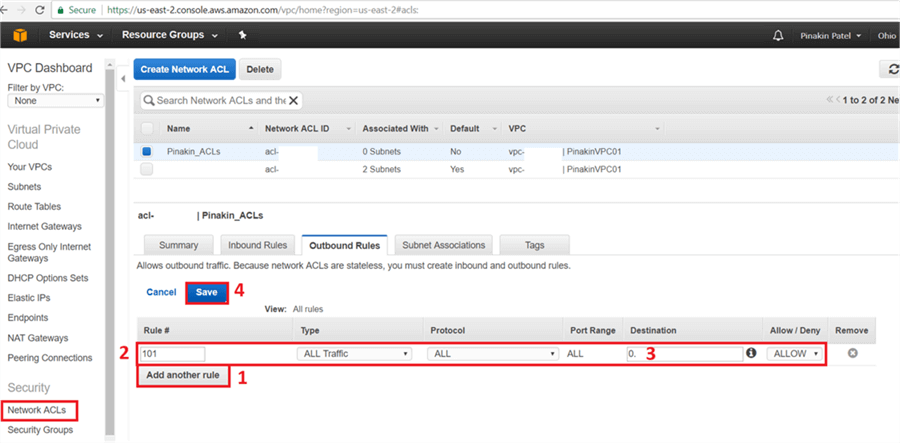
On Network ACLs page, select the newly created network ACL and go to the Outbound Rules tab and click on Edit.

On the Outbound Rules tab click on Add another rule and enter a Rule # and Type (select the port number to open the appropriate port), give source IPs and then click Save.
Step # 6 - Change Network ACLs in Subnets
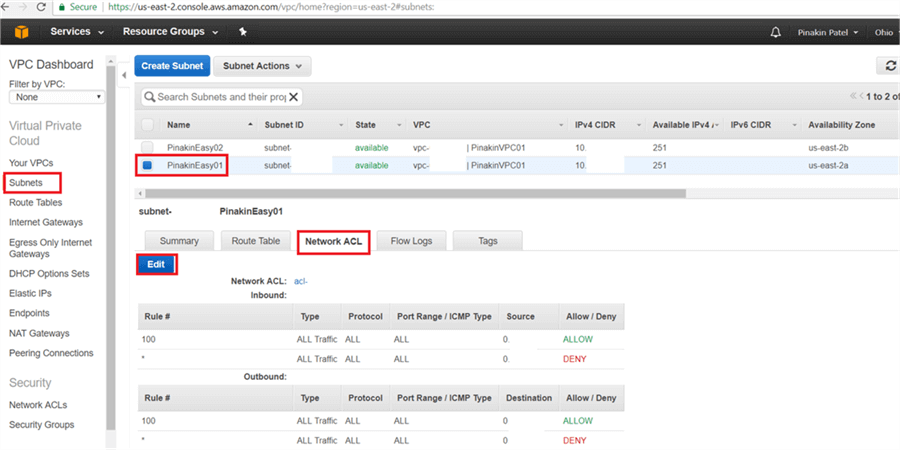
After creating a custom network ACL, if you want to change the subnet to use custom network ACL do the following.
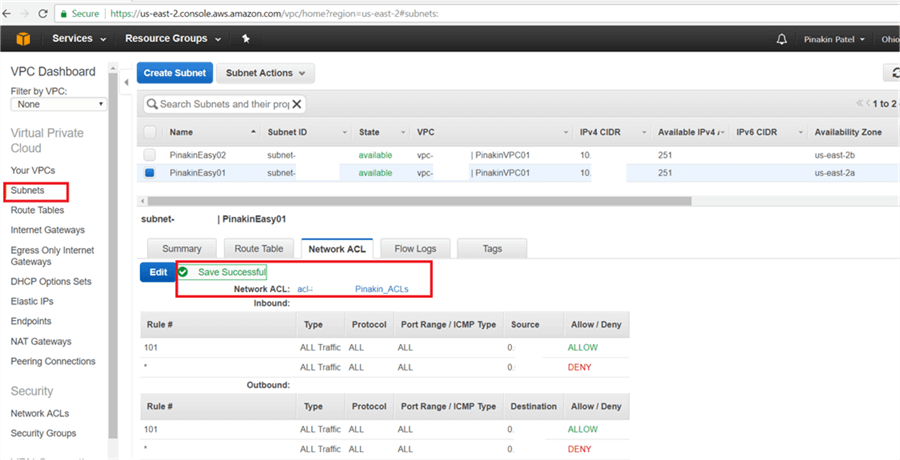
On the Subnets page, select the subnet and go to the Network ACL tab and click on Edit.
On the Network ACL tab, change the current network ACL to the newly created Network ACLs and click Save.
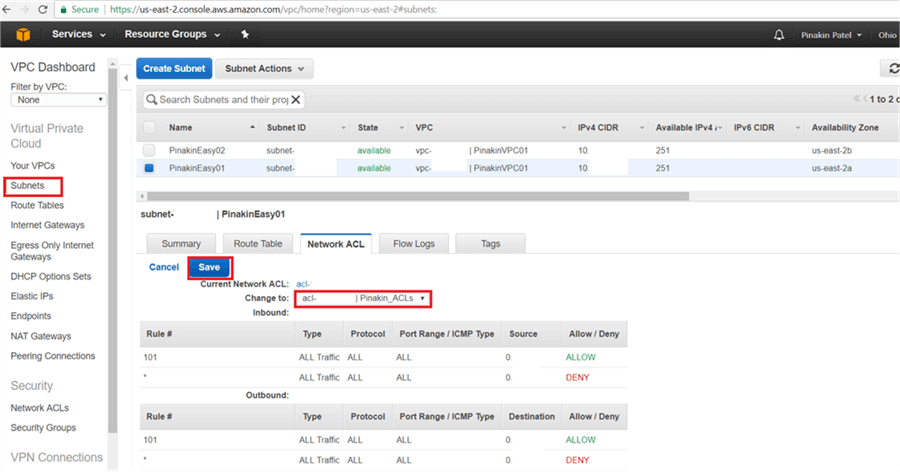
After successfully changing the network ACLs it will appear as shown below.
Step # 7 - Create Security Group
A security group acts as a virtual firewall to control all traffic for one or more EC2 instance servers to secure the environment. When you launch new instance server you need to specify the security group and within the assigned security groups the server instances will communicate each other. You can modify the rules for the security group and the new rules automatically applied to all instance servers that are associated with the security group.
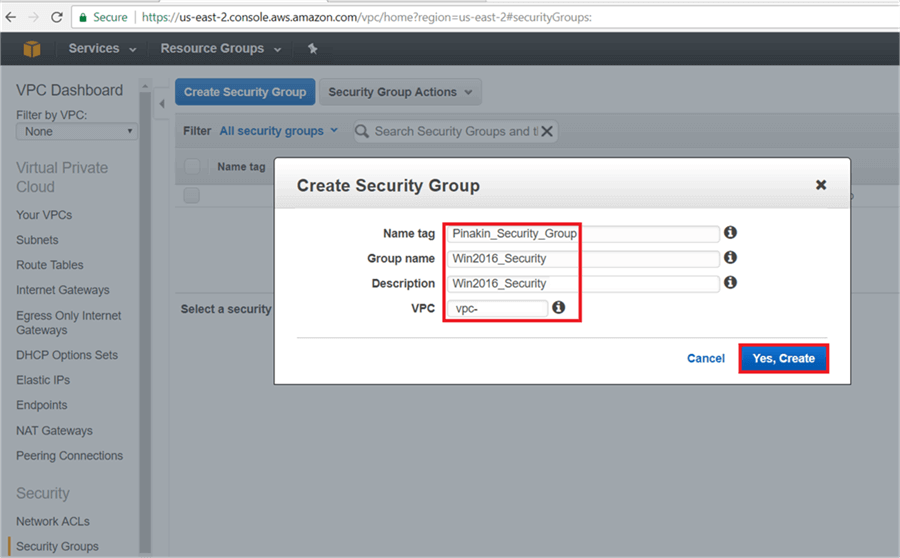
On the Security Group page, click on Create Security Group.

On the Create Security Group dialog box, enter a Name Tag and select the VPC and hit Yes, Create.
On the EC2 Dashboard page, go to the Security Groups and select the newly created security group. Then go to the Inbound tab and click on Edit.
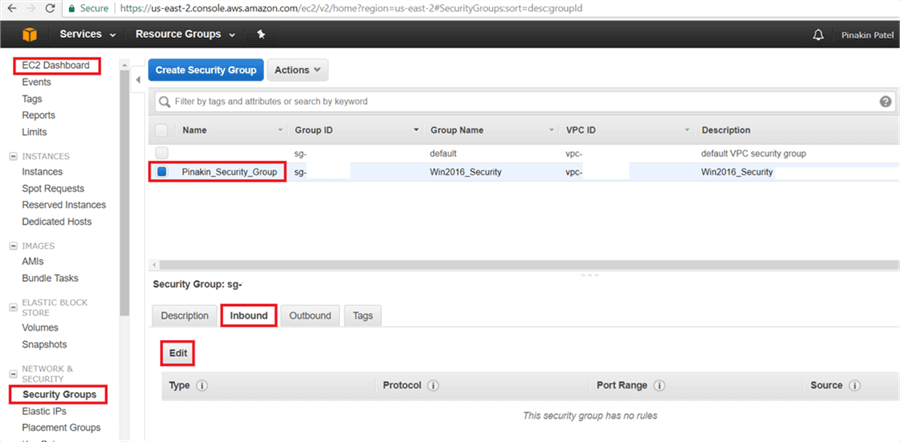
On the Edit Inbound Rules dialog box, select the type (open appropriate port) and enter the security group id (this will allow your EC2 instances to communicate with each other within the security group assigned. Click on Add Rule to add an extra row type (open appropriate) select RDP and in Source select My IP (to open secure RDP connection for your EC2 instance server) then click Save.

After successfully changing the Inbound Rules it will appear as shown below.

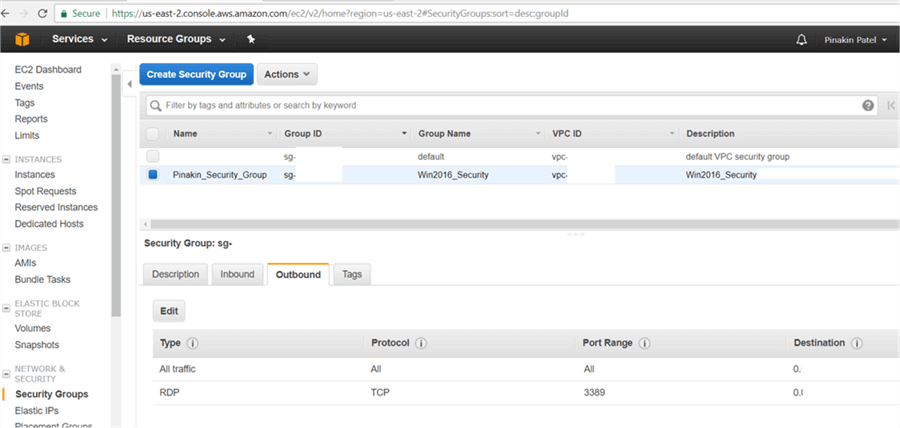
After successfully changing the Outbound Rules it will appear as shown below.
We have created all of the prerequisites, now we can create EC2 instances.
Step # 8 - Create EC2 Instance in AWS Management Console
Amazon Elastic Compute Cloud (EC2) also called EC2 instance is a cloud based server. In a cloud based server you can install your own Windows server/ SQL Server with MSDN license or you can use a license offered by Amazon Web Service (AWS). In EC2 you can create Windows Server Data Center edition (free tier) or you can pay as you go on an hourly basis. To calculate your hourly charges click here.
You can build up your server with few clicks as per your requirement. Amazon offers a wide selection for instance types to best fit your needs. You can compare various types of instance combinations of memory, storage, networking and CPU capacity. For more info you can visit the Amazon AWS site click here.
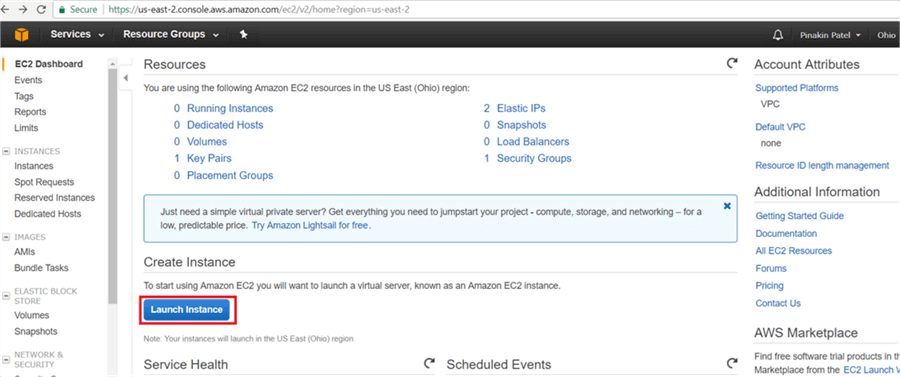
To create an EC2 Instance click on Services (top left side) and under the Compute select EC2.

On the Resource Group dialog box, click on Launch Instance.
Select the appropriate Amazon Machine Image (AMI) as shown below.

On the Choose an Instance Type page, select the instance type and hit Next: Configure Instance Details. (For more information click here.)

On the Configure Instance Details page, enter the number of instances needed to be created then select the network VPCs, Subnet, and click on Next: Add Storage.

On the Configure Instance Details page, Tenancy selection is very important. When you select Run a shared hardware instance and if you are planning to use your own SQL Server license then you need to a mobility agreement from Microsoft, so there won’t be a licensing conflict. When you select Run a Dedicated instance then you do not need a licenses agreement, but the EC2 instance price will be a little more.

On the Add Storage page, click on Add New Volume (In free tier there will be 30 GBs storage available) and select the Volume Type and click Next: Add Tags.


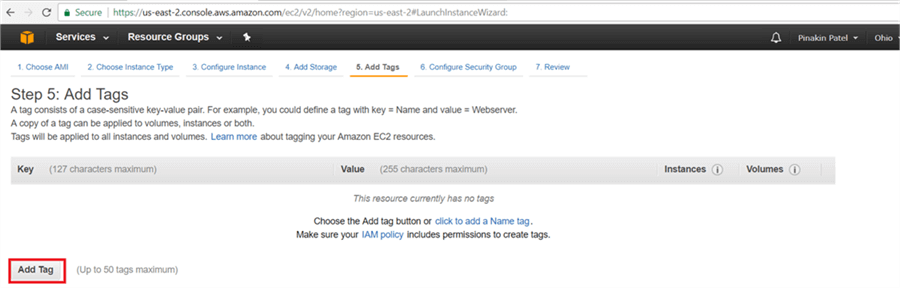
On the Add Tags page, click on Add Tag.
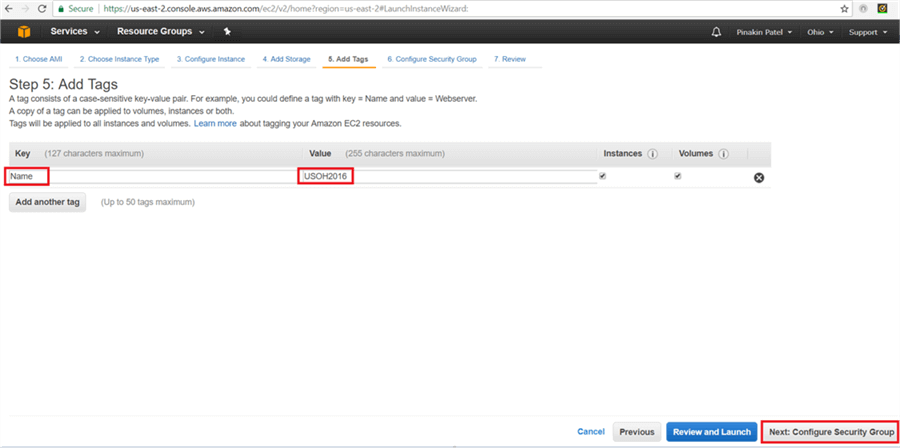
On the Add Tags dialog box, give Key name and Value as the Server Name and then click on Next: Configure Security Group.
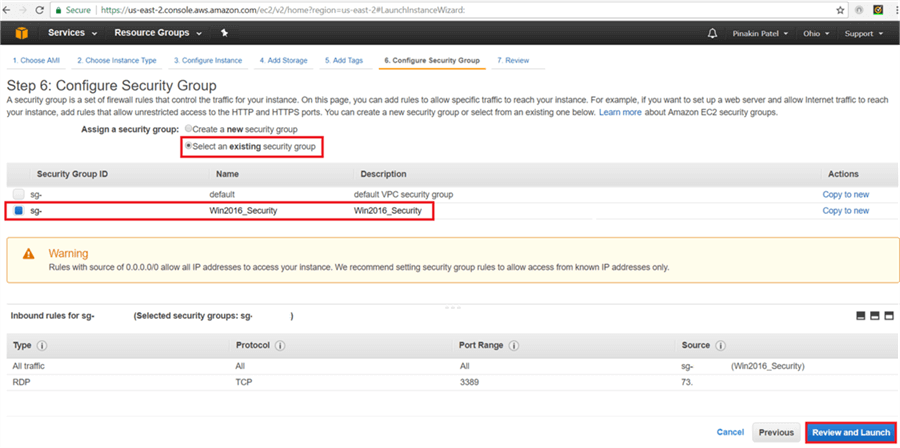
On the Configure Security Group page, select an existing security group and then click on Review and Launch.
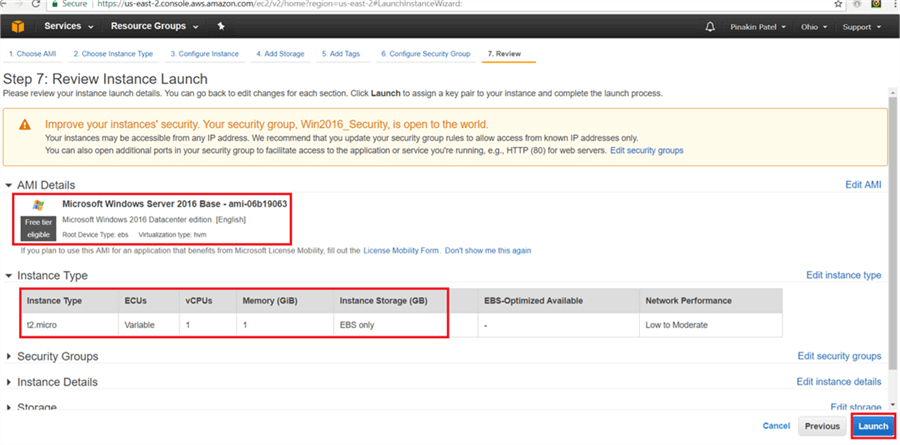
On the Review Instance Launch page, review all of the configuration settings and hit Launch.
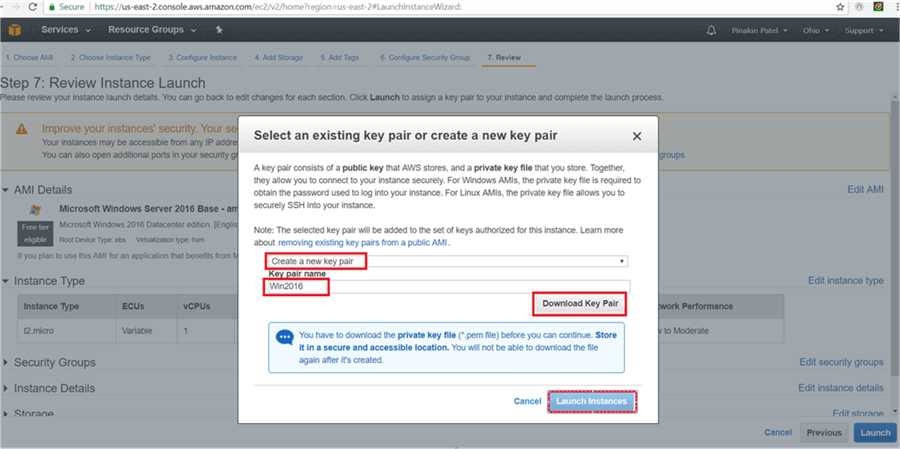
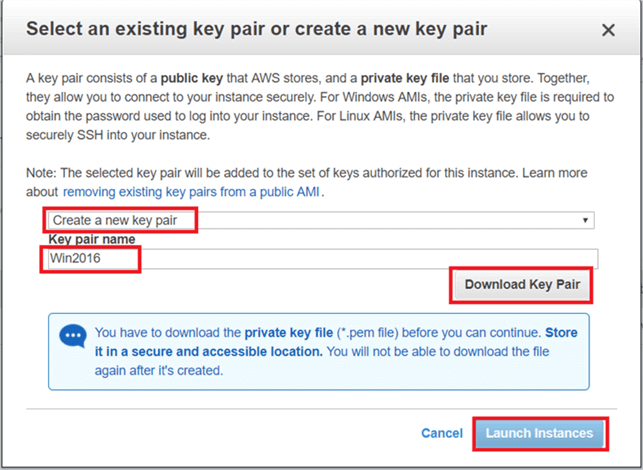
On the Select an existing key pair or create a new key pair dialog box click on Create a new key pair (or select an existing key pair) and enter a Key pair name and click on Download Key Pair. (Save the key pair in a secure location). Then click Launch Instances.
On the Launch Status page, an instance launching message will appear as shown below.

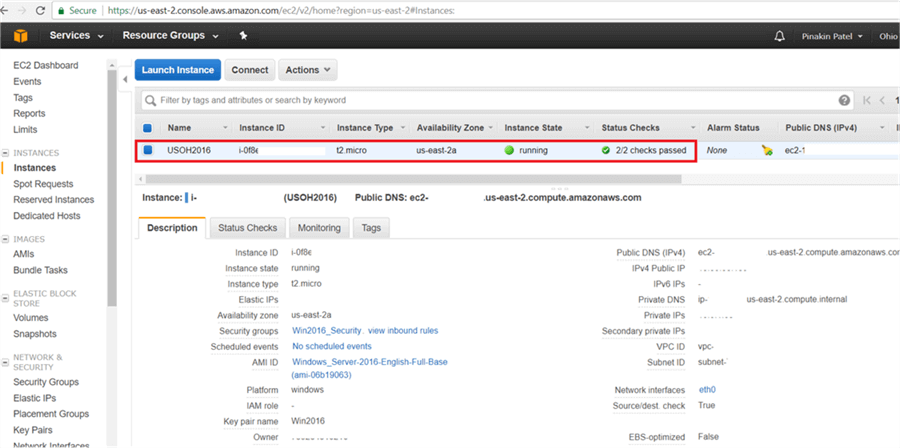
On the Instances page, we will see the Instance State as running and Status Checks as initializing.

After complete, on the Instances page the instance Status Checks will show as passed and the AWS instance is up and running.
On the Instances page, click on Connect.
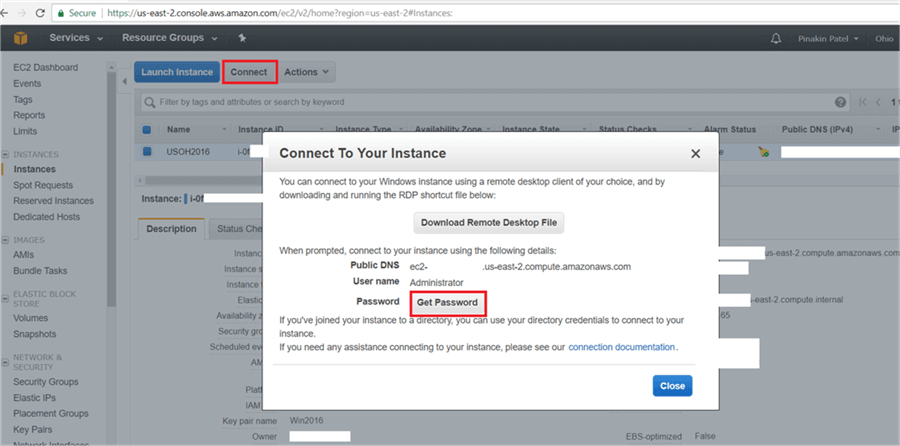
On the Connect To Your Instance dialog box, click on Get Password.

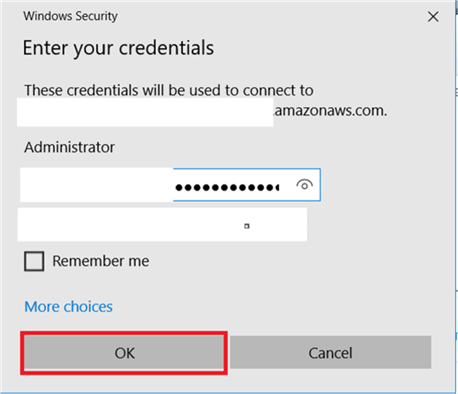
On the Connect To Your Instance > Get Password dialog box, choose the key pair file (we earlier downloaded the key pair and saved it in a secure location) and Hit Decrypt Password to get the password.

Double click on downloaded Remote Desktop File and add the credentials and hit Connect.

Finally the Amazon Web Services Server Instance connects using RDP.
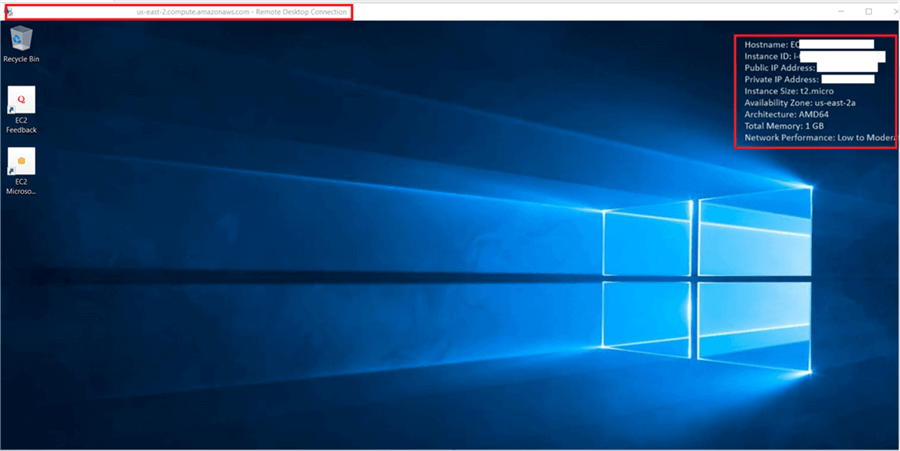
Here is a closer look.

Next Steps
- Check out these other could related tips

Pinakin Patel is a SQL Server Admin / AWS Solutions Architect with experience in SQL Server 2000 to 2016. His expertise is implementing SQL Server high availability and disaster recovery solutions including backup and recovery plans, database mirroring, log shipping, replication, clustering and SQL Server Always On Availability Groups across multiple availability zones. Over his career he has been involved with installing, upgrading and configuring SQL Server, designing security plans, performance tuning and monitoring and SQL Server maintenance. As an AWS Solutions Architect he has configured an AWS cloud environment, launched EC2 instances in AWS and SQL Server in AWS. Further he has worked with SQL Server Azure Virtual Machines. Pinakin can be reached at pinakinaws108@gmail.com.