Problem
Your organization has both an overseas and a local development team, and you want everyone to be able to work remotely. You want to roll out a Windows remote desktop fleet that people can access via a web browser or by a desktop client.
This desktop fleet will have identical apps, like SQL Server Management Studio, among others. You want the solution to be cost effective and low maintenance.
Solution
One of the AWS managed services is Amazon WorkSpaces, a Windows desktop-as-a-service solution. AWS WorkSpaces are fully managed by AWS (including OS level patches and backups). Each desktop in WorkSpaces is associated with a single Active Directory (AD) user. It can automatically start when accessed remotely and automatically shut down after a defined cooling-off period. We can leverage the Amazon WorkSpaces service to achieve this, and we can also use AWS Managed Windows AD for user authentication.
Solution Architecture
The image below shows the high-level architecture of the solution. Here, we have a dedicated Virtual Private Cloud (VPC) for the Amazon WorkSpaces workstations and the managed Windows Active Directory. Users connect to their WorkSpaces remote desktops over the public Internet using a secured method. The WorkSpaces desktops can connect to other AWS resources either in the same VPC or in different VPCs of the same AWS account. The desktops also have a connection out to the Internet using the WorkSpaces VPC’s Internet Gateway.
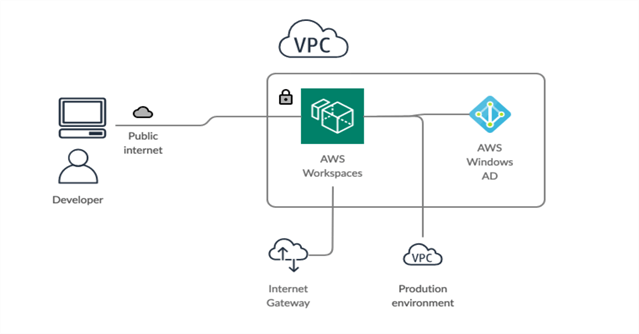
Figure: Simplified Architecture of the WorkSpaces Solution
Some Assumptions
- Most organizations have on-premises AD, Azure AD or AWS-hosted AD for user authentication service. We will assume that the Windows AD we will create here will be synchronizing with the company’s main Active Directory
- This article assumes basic AWS knowledge (including how to set up VPCs and basic networking)
- We are not considering any network protections like proxies, firewalls, IP whitelisting, VPNs or certificates.
Creating the Basic Network (VPC)
For this tutorial, we are creating a new VPC with 4 subnets:
- Two Public Subnets: These will host Amazon WorkSpaces, one per availability zone (AZ). The two subnets will allow all inbound and outbound traffic from the internet.
- Two Private Subnets: These will host the Windows AD; one per availability zone (AZ). These subnets will be only accessible from the public subnets.
The subnets will be in different availability zones, increasing the fault-tolerance in case of an outage affecting a single AZ.
From the ‘VPC’ menu in the AWS console, create the new VPC, and subnets. Create an Internet Gateway and assign it to the public subnet routing table.

Figure: The VPC and its Subnets
We should now have the required network.
Creating the AWS-Managed Windows AD
Each AWS WorkSpace needs a single AD user assigned with it; the directory needs to be one of the AWS-managed directory services. For the purpose of this article, we’ll create a Windows AD as it offers the possibility of sync users with another Windows AD you already maintain.
To create the Active Directory, open the ‘Amazon WorkSpaces’ service in the AWS Console. As soon as you open the quick guide, it will ask you which type of directory you want to create. Choose ‘Advanced Setup’, and then ‘AWS Managed Microsoft AD’. Choose the ‘Standard’ or ‘Enterprise’ edition depending on your business requirements.

Figure: Choosing the Edition for Windows AD
Enter the new admin password for the AD, and choose the two private subnets for the AD service.
After reviewing, wait for the service to be created (it can take up to 40 minutes).

Figure: A New AWS-Managed Active Directory being Created
When the status changes to ‘Active’, register the directory to be used with Amazon WorkSpaces by choosing the menu ‘Actions > Register‘.
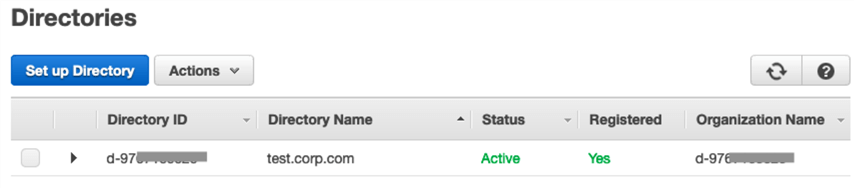
Figure: A New AWS-Managed Active Directory Registered with WorkSpaces
Now the Windows AD is ready to be used by the WorkSpaces.
Creating the WorkSpace
While still inside the Amazon WorkSpaces console, choose the menu WorkSpaces > Launch WorkSpaces, and select the AD service created in the previous step.
The next screen may seem confusing, but it’s very useful. This is where we select which users, we’d like to create WorkSpaces for. We can add users to AD (and they get automatically selected) or select previously created users. We can select up to 20 users at a time. The trick is to look at the very bottom, and check which users are selected.
Ensure to add a valid email, as instructions and the link to set passwords will be sent to the user via email.

Figure: Selected Users for a WorkSpace
The next screen allows you to select a WorkSpace ‘Bundle’. A Bundle is a mix of hardware configuration and software installed: there are many options of remote desktops with different combinations of CPU and memory, different software packages like MS Office suite installed and licensed and so on. Each bundle is priced differently. While this can be changed later, it will cause WorkSpace downtime for a change.
The last screen is probably the most important from a cost perspective. Here, we have the option to either keep the WorkSpaces running continuously (except for some brief scheduled outages for patches and reboots), or let them automatically stop after a certain period of inactivity. This will obviously affect the running cost of WorkSpaces, so you need to carefully consider which option provides better advantage for your organization.
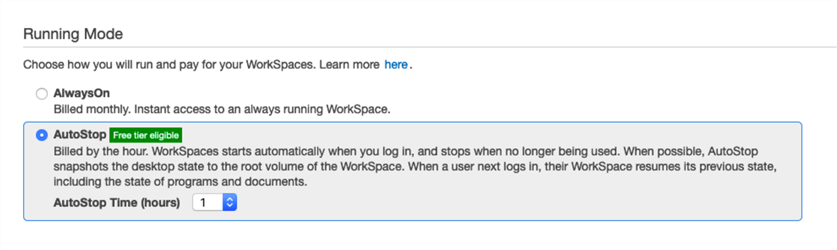
Figure: AutoStop or AlwaysOn Configuration for WorkSpaces
After reviewing, and clicking the “Launch WorkSpaces” button, it will take a few minutes for the workspace to become ‘available’.
From the ‘Actions’ menu, we will now be able to select ‘Invite User’. It will send an automated email to the user with detailed instructions on how to connect to their WorkSpace. The email will contain information such as:
- A unique link to setup the password
- The registration code for the WorkSpace
- The registered username
- Instructions to download the WorkSpaces client from https://clients.amazonworkspaces.com/
Connecting to the WorkSpace
Following the instructions received via email, the user will be able to download the AWSWorkSpaces client.
Once started, the WorkSpaces client will prompt for the registration code, username and the password.
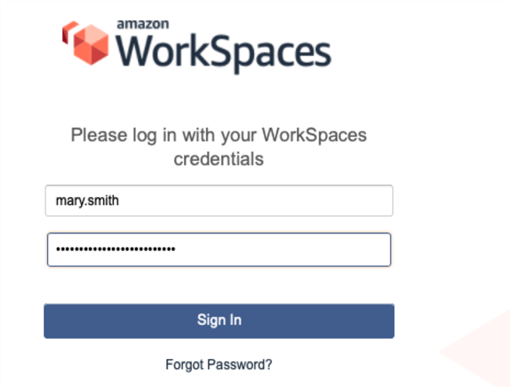
Figure: Logging into an AWS WorkSpace from a client
The AWS WorkSpace clients support full screen mode and multiple monitors.
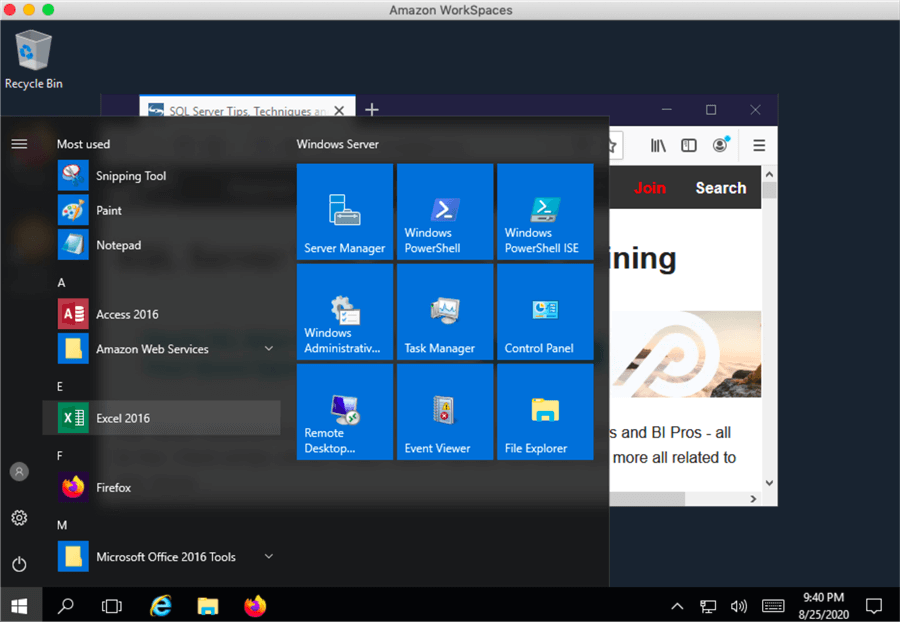
Figure: A Remote Desktop Created in AWS WorkSpace
At this point in time, we have a fully operational machine where you can install any desired software.
Installing New Software in WorkSpaces
There are two different ways to install software in an existing WorkSpace.
The first one is to create a WorkSpace from an image.
To create a custom WorkSpace image, install and configure the necessary applications. Then shutdown the WorkSpace and select ‘Actions > Create Image’ from the WorkSpaces console menu. The process will take a snapshot from the WorkSpace’s root volume, and the new image can then be used to create a new custom bundle. New WorkSpaces can be started from this new custom bundle, and it will have all software that was installed before.
The second method is to use Amazon WorkSpaces Application Manager (Amazon WAM). With WAM, we can automatically install, or pre-approve installation for, some selected applications. The permission model and the installation process are fairly granular: we can select which software and which versions are allowed to be installed.
In order to use Amazon WAM, we need to enable it in the WorkSpaces console. We can then create a ‘Catalog’, which is a collection of selected applications that need to be installed. WAM marketplace has a few useful pre-packaged software ready to be installed, but you can also package your own software and publish in WAM.
With the WAM approach, required software will be installed automatically in WorkSpaces; optional software can be installed by users with the WAM software available on the WorkSpace. A shortcut to the Amazon WAM will be available on the user’s desktop.

Figure: A Particular Software from the WAM Installed in a WorkSpace
To use Amazon WAM, the WorkSpace needs to have direct access to the Internet.
Maintenance Operations
After creating the WorkSpace for a user, most of the maintenance is done by AWS, including backups and OS patches.
But sometimes we may need to reboot a desktop or force stop/start. WorkSpaces administrators can use the ‘Actions’ menu to perform these actions.
Administrators also have the option to recreate a WorkSpace (keeping the user volume data) or migrate it to another ‘Bundle’ (for example, with higher hardware specifications).
The image below shows the options available once a WorkSpace is created:
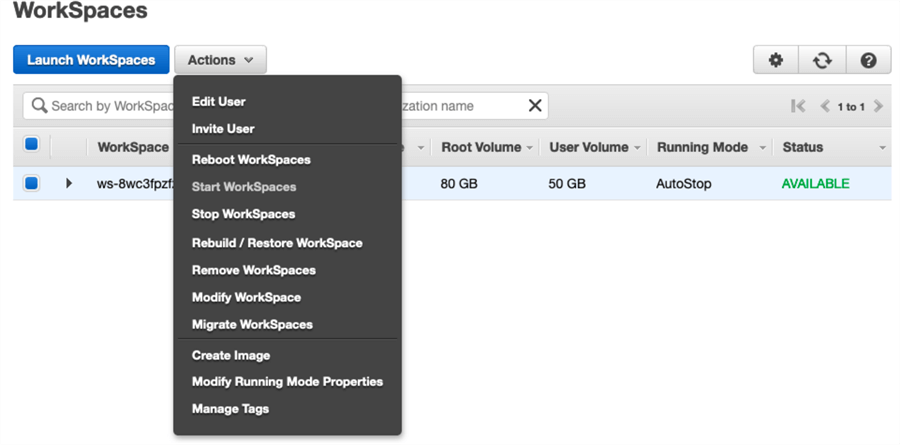
Figure: List of Maintenance Tasks Available for a WorkSpace.
Conclusion
Now we have seen how to use Amazon WorkSpaces, AWS Windows AD and Amazon WAM to build a fleet of cost-effective desktops. As we have seen, the initial installation and configuration is very simple. With the addition of network-level and endpoint security, this managed virtual desktop model can both save cost and make operational processes simpler for companies heavily reliant on remote workforces.
Next Steps
- Check which applications are available in Amazon WAM marketplace
- Learn how to connect AWS Windows AD to your existing AD
- Learn about how to secure your Amazon WorkSpace environments
- Check how to automate repetitive tasks using AWS WorkSpaces CLI or CloudFormation for WorkSpaces

Cintia Del Rio is Lead Site Reliability Engineer at Rezdy. She has been working with infrastructure and DevOps for more than 8 years, and before that she was a developer.
She has been the lead infrastructure for the OpenMRS open source community for the past 6 years.
Her blog is https://cintia.me